


In this tutorial, you will learn how to work with the different variables available with the Unity 2017 platform. We will show you how to use these variables through use cases in order to script powerful Unity games.
This article is an excerpt from the book, Learning C# by Developing Games with Unity 2017 written by Micael DaGraca, Greg Lukosek.
Writing C# statements properly
When you do normal writing, it’s in the form of a sentence, with a period used to end the sentence. When you write a line of code, it’s called a statement, with a semicolon used to end the statement. This is necessary because the console reads the code one line at a time and it’s necessary to use a semicolon to tell the console that the line of code is over and that the console can jump to the next line. (This is happening so fast that it looks like the computer is reading all of them at the same time, but it isn’t.) When we start learning how to code, forgetting about this detail is very common, so don’t forget to check for this error if the code isn’t working:

The code for a C# statement does not have to be on a single line as shown in the following example:
public
int
number1
=
2;
The statement can be on several lines. Whitespace and carriage returns are ignored, so, if you really want to, you can write it as follows:
public int number1 = 2;
However, I do not recommend writing your code like this because it’s terrible to read code that is formatted like the preceding code. Nevertheless, there will be times when you’ll have to write long statements that are longer than one line. Unity won’t care. It just needs to see the semicolon at the end.
Understanding component properties in Unity’s Inspector
GameObjects have some components that make them behave in a certain way. For instance, select Main Camera and look at the Inspector panel. One of the components is the camera. Without that component, it will cease being a camera. It would still be a GameObject in your scene, just no longer a functioning camera.
Variables become component properties
When we refer to components, we are basically referring to the available functions of a GameObject, for example, the human body has many functions, such as talking, moving, and observing. Now let’s say that we want the human body to move faster. What is the function linked to that action? Movement. So in order to make our body move faster, we would need to create a script that had access to the movement component and then we would use that to make the body move faster. Just like in real life, different GameObjects can also have different components, for example, the camera component can only be accessed from a camera. There are plenty of components that already exist that were created by Unity’s programmers, but we can also write our own components. This means that all the properties that we see in Inspector are just variables of some type. They simply store data that will be used by some method.
Unity changes script and variable names slightly
When we create a script, one of the first things that we need to do is give a name to the script and it’s always good practice to use a name that identifies the content of the script. For example, if we are creating a script that is used to control the player movement, ideally that would be the name of the script. The best practice is to write playerMovement, where the first word is uncapitalized and the second one is capitalized. This is the standard way Unity developers name scripts and variables. Now let’s say that we created a script named playerMovement. After assigning that script to a GameObject, we’ll see that in the Inspector panel we would see that Unity adds a space to separate the words of the name, Player Movement. Unity does this modification to variable names too where, for example, a variable named number1 is shown as Number 1 and number2 as Number 2. Unity capitalizes the first letter as well. These changes improve readability in Inspector.
Changing a property’s value in the Inspector panel
There are two situations where you can modify a property value:
- During the Play mode
- During the development stage (not in the Play mode)
When you are in the Play mode, you will see that your changes take effect immediately in real time. This is great when you’re experimenting and want to see the results.
Write down any changes that you want to keep because when you stop the Play mode, any changes you made will be lost.
When you are in the Development mode, changes that you make to the property values will be saved by Unity. This means that if you quit Unity and start it again, the changes will be retained. Of course, you won’t see the effect of your changes until you click Play.
The changes that you make to the property values in the Inspector panel do not modify your script. The only way your script can be changed is by you editing it in the script editor (MonoDevelop). The values shown in the Inspector panel override any values you might have assigned in your script.
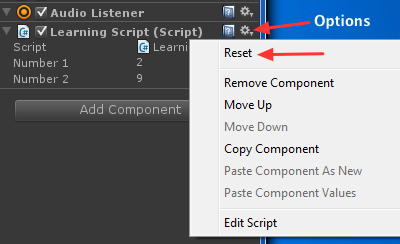
If you want to undo the changes you’ve made in the Inspector panel, you can reset the values to the default values assigned in your script. Click on the cog icon (the gear) on the far right of the component script, and then select Reset, as shown in the following screenshot:
Displaying public variables in the Inspector panel
You might still be wondering what the word public at the beginning of a variable statement means:
public int number1 = 2;
We mentioned it before. It means that the variable will be visible and accessible. It will be visible as a property in the Inspector panel so that you can manipulate the value stored in the variable. The word also means that it can be accessed from other scripts using the dot syntax.
Private variables
Not all variables need to be public. If there’s no need for a variable to be changed in the Inspector panel or be accessed from other scripts, it doesn’t make sense to clutter the Inspector panel with needless properties. In the LearningScript, perform the following steps:
- Change line 6 to this:
private int number1 = 2;
- Then change line 7 to the following:
int number2 = 9;
- Save the file
- In Unity, select Main Camera
You will notice in the Inspector panel that both properties, Number 1 and
Number 2, are gone:
Line 6: private int number1 = 2;
The preceding line explicitly states that the number1 variable has to be private. Therefore, the variable is no longer a property in the Inspector panel. It is now a private variable for storing data:
Line 7: int number2 = 9;
The number2 variable is no longer visible as a property either, but you didn’t specify it as private. If you don’t explicitly state whether a variable will be public or private, by default, the variable will implicitly be private in C#.
It is good coding practice to explicitly state whether a variable will be public or private.
So now, when you click Play, the script works exactly as it did before. You just can’t manipulate the values manually in the Inspector panel anymore.
Naming Unity variables properly
As we explored previously, naming a script or variable is a very important step. It won’t change the way that the code runs, but it will help us to stay organized and, by using best practices, we are avoiding errors and saving time trying to find the piece of code that isn’t working. Always use meaningful names to store your variables. If you don’t do that, six months down the line, you will be lost. I’m going to exaggerate here a bit to make a point. Let’s say you will name a variable as shown in this code:
public bool areRoadConditionsPerfect = true;
That’s a descriptive name. In other words, you know what it means by just reading the variable. So 10 years from now, when you look at that name, you’ll know exactly what I meant in the previous comment. Now suppose that instead of areRoadConditionsPerfect, you had named this variable as shown in the following code:
public bool perfect = true;
Sure, you know what perfect is, but would you know that it refers to perfect road conditions? I know that right now you’ll understand it because you just wrote it, but six months down the line, after writing hundreds of other scripts for all sorts of different projects, you’ll look at this word and wonder what you meant. You’ll have to read several lines of code you wrote to try to figure it out.
You may look at the code and wonder who in their right mind would write such terrible code. So, take your time to write descriptive code that even a stranger can look at and know what you mean. Believe me, in six months or probably less time, you will be that stranger.
Beginning variable names with lowercase
You should begin a variable name with a lowercase letter because it helps distinguish between a class name and a variable name in your code. There are some other guides in the C# documentation as well, but we don’t need to worry about them at this stage. Component names (class names) begin with an uppercase letter. For example, it’s easy to know that Transform is a class and transform is a variable.
There are, of course, exceptions to this general rule, and every programmer has a preferred way of using lowercase, uppercase, and perhaps an underscore to begin a variable name. In the end, you will have to decide upon a naming convention that you like. If you read the Unity forums, you will notice that there are some heated debates on naming variables. In this book, I will show you my preferred way, but you can use whatever is more comfortable for you.
Using multiword variable names
Let’s use the same example again, as follows:
public bool areRoadConditionsPerfect = true;
You can see that the variable name is actually four words squeezed together. Since variable names can be only one word, begin the first word with a lowercase and then just capitalize the first letter of every additional word. This greatly helps create descriptive names that the viewer is still able to read. There’s a term for this, it’s called camel casing.
I have already mentioned that for public variables, Unity’s Inspector will separate each word and capitalize the first word. Go ahead! Add the previous statement to the LearningScript and see what Unity does with it in the Inspector panel.
Declaring a variable and its type
Every variable that we want to use in a script must be declared in a statement. What does that mean? Well, before Unity can use a variable, we have to tell Unity about it first. Okay then, what are we supposed to tell Unity about the variable?
There are only three absolute requirements to declare a variable and they are
as follows:
- We have to specify the type of data that a variable can store
- We have to provide a name for the variable
- We have to end the declaration statement with a semicolon
The following is the syntax we use to declare a variable:
typeOfData nameOfTheVariable;
Let’s use one of the LearningScript variables as an example; the following is how we declare a variable with the bare minimum requirements:
int number1;
This is what we have:
- Requirement #1 is the type of data that number1 can store, which in this case is an int, meaning an integer
- Requirement #2 is a name, which is number1
- Requirement #3 is the semicolon at the end
The second requirement of naming a variable has already been discussed. The third requirement of ending a statement with a semicolon has also been discussed. The first requirement of specifying the type of data will be covered next.
The following is what we know about this bare minimum declaration as far as Unity is concerned:
- There’s no public modifier, which means it’s private by default
- It won’t appear in the Inspector panel or be accessible from other scripts
- The value stored in number1 defaults to zero
We discussed working with the Unity 2017 variables and how you can start working with them to create fun-filled games effectively.
If you liked this article, be sure to go through the book Learning C# by Developing games with Unity 2017 to create exciting games with C# and Unity 2017.
Read More
Unity 2D & 3D game kits simplify Unity game development for beginners
Build a Virtual Reality Solar System in Unity for Google Cardboard
Unity Machine Learning Agents: Transforming Games with Artificial Intelligence


")