


In this article by Volodymyr Gerasimov, the author of the book, Building Levels in Unity, you will see two types of lighting that you need to take into account if you want to create well lit levels—direct and indirect.
Direct light is the one that is coming directly from the source. Indirect light is created by light bouncing off the affected area at a certain angle with variable intensity. In the real world, the number of bounces is infinite and that is the reason why we can see dark areas that don’t have light shining directly at them. In computer software, we don’t yet have the infinite computing power at our disposal to be able to use different tricks to simulate the realistic lighting at runtime. The process that simulates indirect lighting, light bouncing, reflections, and color bleeding is known as Global Illumination (GI).
Unity 5 is powered by one of the industry’s leading technologies for handling indirect lighting (radiosity) in the gaming industry, called Enlighten by Geomerics. Games such as Battlefield 3-4, Medal of Honor: Warfighter, Need for Speed the Run and Dragon Age: Inquisition are excellent examples of what this technology is capable of, and now all of that power is at your fingertips completely for free! Now, it’s only appropriate to learn how to tame this new beast.
(For more resources related to this topic, see here.)
Preparing the environment
Realtime realistic lighting is just not feasible at our level of computing power, which forces us into inventing tricks to simulate it as close as possible, but just like with any trick, there are certain conditions that need to be met in order for it to work properly and keep viewer’s eyes from exposing our clever deception. To demonstrate how to work with these limitations, we are going to construct a simple light set up for the small interior scene and talk about solutions to the problems as we go.
For example, we will use the LightmappingInterior scene that can be found in the Chapter 7 folder in the Project window. It’s a very simple interior and should take us no time to set up.
The first step is to place the lights. We will be required to create two lights: a Directional to imitate the moonlight coming from the crack in the dome and a Point light for the fire burning in the goblet, on the ceiling.

Tune the light’s Intensity, Range (in Point light’s case), and Color to your liking.
So far so good! We can see the direct lighting coming from the moonlight, but there is no trace of indirect lighting. Why is this happening? Should GI be enabled somehow for it to work? As a matter of fact, it does and here comes the first limitation of Global Illumination—it only works on GameObjects that are marked as Static.
Static versus dynamic objects
Unity objects can be of one of the two categories: static or dynamic. Differentiation is very simple: static objects don’t move, they stay still where they are at all times, they neither play any animations nor engage in any kind of interactions. The rest of the objects are dynamic.
By default, all objects in Unity are dynamic and can only be converted into static by checking the Static checkbox in the Inspector window.

See it for yourself. Try to mark an object as static in Unity and attempt to move it around in the Play mode. Does it work?
Global Illumination will only work with static objects; this means, before we go into the Play mode right above it, we need to be 100 percent sure that the objects that will cast and receive indirect lights will not stop doing that from their designated positions. However, why is that you may ask, isn’t the whole purpose of Realtime GI to calculate indirect lighting in runtime? The answer to that would be yes, but only to an extent. The technology behind this is called Precomputed Realtime GI, according to Unity developers it precomputes all possible bounces that the light can make and encodes them to be used in realtime; so it essentially tells us that it’s going to take a static object, a light and answer a question: “If this light is going to travel around, how is it going to bounce from the affected surface of the static object from every possible angle?”

During runtime, lights are using this encoded data as instructions on how the light should bounce instead of calculating it every frame.
Having static objects can be beneficial in many other ways, such as pathfinding, but that’s a story for another time.
To test this theory, let’s mark objects in the scene as Static, meaning they will not move (and can’t be forced to move) by physics, code or even transformation tools (the latter is only true during the Play mode). To do that, simply select Pillar, Dome, WaterProNighttime, and Goblet GameObjects in the Hierarchy window and check the Static checkbox at the top-right corner of the Inspector window.
Doing that will cause Unity to recalculate the light and encode bouncing information. Once the process has finished (it should take no time at all), you can hit the Play button and move the light around. Notice that bounce lighting is changing as well without any performance overhead.
Fixing the light coming from the crack
The moonlight inside the dome should be coming from the crack on its surface, however, if you rotate the directional light around, you’ll notice that it simply ignores concrete walls and freely shines through. Naturally, that is incorrect behavior and we can’t have that stay.
We can clearly see through the dome ourselves from the outside as a result of one-sided normals. Earlier, the solution was to duplicate the faces and invert the normals; however, in this case, we actually don’t mind seeing through the walls and only want to fix the lighting issue. To fix this, we need to go to the Mesh Render component of the Dome GameObject and select the Two Sided option from the drop-down menu of the Cast Shadows parameter.

This will ignore backface culling and allow us to cast shadows from both sides of the mesh, thus fixing the problem. In order to cast shadows, make sure that your directional light has Shadow Type parameter set to either Hard Shadows or Soft Shadows.

Emission materials
Another way to light up the level is to utilize materials with Emission maps. Pillar_EmissionMaterial applied to the Pillar GameObject already has an Emission map assigned to it, all that is left is to crank up the parameter next to it, to a number which will give it a noticeable effect (let’s say 3).

Unfortunately, emissive materials are not lights, and precomputed GI will not be able to update indirect light bounce created by the emissive material. As a result, changing material in the Play mode will not cause the update.
Changes done to materials in the Play mode will be preserved in the Editor.
Shadows
An important byproduct of lighting is shadows cast by affected objects. No surprises here! Unity allows us to cast shadows by both dynamic and static objects and have different results based on render settings.
By default, all lights in Unity have shadows disabled. In order to enable shadows for a particular light, we need to modify the Shadow Type parameter to be either Hard Shadows or Soft Shadows in the Inspector window.

Enabling shadows will grant you access to three parameters:
- Strength: This is the darkness of shadows, from 0 to 1.
- Resolution: This controls the resolution of the shadows. This parameter can utilize the value set in the Use Quality Settings or be selected individually from the drop down menu.
- Bias and Normal Bias – this is the shadow offset. These parameters are used to prevent an artifact known as Shadow Acne (pixelated shadows in lit areas); however, setting them too high can cause another artifact known as Peter Panning (disconnected shadow). Default values usually help us to avoid both issues.
Unity is using a technique known as Shadow Mapping, which determines the objects that will be lit by assuming the light’s perspective—every object that light sees directly, is lit; every object that isn’t seen should be in the shadow. After rendering the light’s perspective, Unity stores the depth of each surface into a shadow map. In the cases where the shadow map resolution is low, this can cause some pixels to appear shaded when they shouldn’t be (Shadow Acne) or not have a shadow where it’s supposed to be (Peter Panning), if the offset is too high.

Unity allows you to control the objects that should receive or cast shadows by changing the parameters Cast Shadows and Receive Shadows in the Rendering Mesh component of a GameObject.

Lightmapping
Every year, more and more games are being released with real-time rendering solutions that allow for more realistic-looking environments at the price of ever-growing computing power of modern PCs and consoles. However, due to the limiting hardware capabilities of mobile platforms, it is still a long time before we are ready to part ways with cheap and affordable techniques such as lightmapping.
Lightmapping is a technology for precomputing brightness of surfaces, also known as baking, and storing it in a separate texture—a lightmap. In order to see lighting in the area, we need to be able to calculate it at least 30 times per second (or more, based on fps requirements). This is not very cheap; however, with lightmapping we can calculate lighting once and then apply it as a texture. This technology is suitable for static objects that artists know will never be moved; in a nutshell, this process involves creating a scene, setting up the lighting rig and clicking Bake to get great lighting with minimum performance issues during runtime.
To demonstrate the lightmapping process, we will take the scene and try to bake it using lightmapping.
Static versus dynamic lights
We’ve just talked about a way to guarantee that the GameObjects will not move. But what about lights? Hitting the Static checkbox for lights will not achieve much (unless you simply want to completely avoid the possibility of accidentally moving them). The problem at hand is that light, being a component of an object, has a separate set of controls allowing them to be manipulated even if the holder is set to static. For that purpose, each light has a parameter that allows us to specify the role of individual light and its contribution to the baking process, this parameter is called Baking.

There are three options available for it:
- Realtime: This option will exclude this particular light from the baking process. It is totally fine to use real-time lighting, precomputed GI will make sure that modern computers and consoles are able to handle them quite smoothly. However, they might cause an issue if you are developing for the mobile platforms which will require every bit of optimization to be able to run with a stable frame rate. There are ways to fake real-time lighting with much cheaper options,. The only thing you should consider is that the number of realtime lights should be kept at a minimum if you are going for maximum optimization. Realtime will allow lights to affect static and dynamic objects.
- Baked: This option will include this light into the baking process. However, there is a catch: only static objects will receive light from it. This is self-explanatory—if we want dynamic objects to receive lighting, we need to calculate it every time the position of an object changes, which is what Realtime lighting does. Baked lights are cheap, calculated once we have stored all lighting information on a hard drive and using it from there, no further recalculation is required during runtime. It is mostly used on small situational lights that won’t have a significant effect on dynamic objects.
- Mixed: This one is a combination of the previous two options. It bakes the lights into the static objects and affects the dynamic objects as they pass by. Think of the street lights: you want the passing cars to be affected; however, you have no need to calculate the lighting for the static environment in realtime. Naturally, we can’t have dynamic objects move around the level unlit, no matter how much we’d like to save on computing power. Mixed will allow us to have the benefit of the baked lighting on the static objects as well as affect the dynamic objects at runtime.
The first step that we are going to take is changing the Baking parameter of our lights from Realtime to Baked and enabling Soft Shadows:

You shouldn’t notice any significant difference, except for the extra shadows appearing.

The final result isn’t too different from the real-time lighting. Its performance is much better, but lacks the support of dynamic objects.
Dynamic shadows versus static shadows
One of the things that get people confused when starting to work with shadows in Unity is how they are being cast by static and dynamic objects with different Baking settings on the light source. This is one of those things that you simply need to memorize and keep in mind when planning the lighting in the scene. We are going to explore how different Baking options affect the shadow casting between different combinations of static and dynamic objects:

As you can see, real-time lighting handles everything pretty well; all the objects are casting shadows onto each other and everything works as intended. There is even color bleeding happening between two static objects on the right.

With Baked lighting the result isn’t that inspiring. Let’s break it down.
Dynamic objects are not lit. If the object is subject to change at runtime, we can’t preemptively bake it into the lightmap; therefore, lights that are set to Baked will simply ignore them.
Shadows are only cast by static objects onto static objects. This correlates to the previous statement that if we aren’t sure that the object is going to change we can’t safely bake its shadows into the shadow map.

With Mixed we get a similar result as with real-time lighting, except for one instance: dynamic objects are not casting shadows onto static objects, but the reverse does work: static objects are casting shadows onto the dynamic objects just fine, so what’s the catch? Each object gets individual treatment from the Mixed light: those that are static are treated as if they are lit by the Baked light and dynamic are lit in realtime. In other words, when we are casting a shadow onto a dynamic object, it is calculated in realtime, while when we are casting shadow onto the static object, it is baked and we can’t bake a shadow that is cast by the object that is subject to change. This was never the case with real-time lighting, since we were calculating the shadows at realtime, regardless of what they were cast by or cast onto. And again, this is just one scenario that you need to memorize.
Lighting options
The Lighting window has three tabs: Object, Scene, and Lightmap. For now we will focus on the first one.
The main content of an Object tab is information on objects that are currently selected. This allows us to get quick access to a list of controls, to better tweak selected objects for lightmapping and GI.
You can switch between object types with the help of Scene Filter at the top; this is a shortcut to filtering objects in the Hierarchy window (this will not filter the selected GameObjects, but everything in the Hierarchy window).
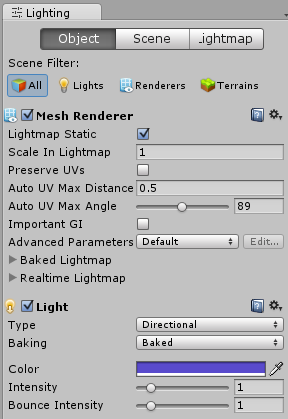
All GameObjects need to be set to Static in order to be affected by the lightmapping process; this is why the Lightmap Static checkbox is the first in the list for Mesh Renderers. If you haven’t set the object to static in the Inspector window, checking the Lightmap Static box will do just that.
The Scale in Lightmap parameter controls the lightmap resolution. The greater the value, the bigger the resolution given to the object’s lightmap, resulting in better lighting effects and shadows. Setting the parameter to 0 will result in an object not being affected by lightmapping. Unless you are trying to fix lighting artifacts on the object, or going for the maximum optimization, you shouldn’t touch this parameter; there is a better way to adjust the lightmap resolution for all objects in the scene; Scale in Lightmap scales in relation to global value.

The rest of the parameters are very situational and quite advanced, they deal with UVs, extend the effect of GI on the GameObject, and give detailed information on the lightmap.
For lights, we have a baking parameter with three options: Realtime, Baked, or Mixed. Naturally, if you want this light for lightmapping, Realtime is not an option, so you should pick Baked or Mixed.
Color and Intensity are referenced from the Inspector window and can be adjusted in either place.
Baked Shadows allows us to choose the shadow type that will be baked (Hard, Soft, Off).
Summary
Lighting is a difficult process that is deceptively easy to learn, but hard to master. In Unity, lighting isn’t without its issues. Attempting to apply real-world logic to 3D rendering will result in a direct confrontation with limitations posed by imperfect simulation. In order to solve issues that may arise, one must first understand what might be causing them, in order to isolate the problem and attempt to find a solution.
Alas, there are still a lot of topics left uncovered that are outside of the realm of an introduction. If you wish to learn more about lighting, I would point you again to the official documentation and developer blogs, where you’ll find a lot of useful information, tons of theory, practical recommendations, as well as in-depth look into all light elements discussed.
Resources for Article:
Further resources on this subject:
- Learning NGUI for Unity [article]
- Saying Hello to Unity and Android [article]
- Components in Unity [article]


")