


In this tutorial, we’ll look at how to create a home screen App Widget using which users can add your app on their Home screen. We’ll also explore adding a Search option to the Action Bar using the Android SearchManager API.
This tutorial is an excerpt taken from the book ‘Android 9 Development Cookbook – Third Edition’, written by Rick Boyer. The book explores techniques and knowledge of graphics, animations, media, etc, to help you develop applications using the latest Android framework.
Creating a Home screen widget
Before we dig into the code for creating an App Widget, let’s cover the basics. There are three required and one optional component:
- The AppWidgetProviderInfo file: It’s an XML resource.
- The AppWidgetProvider class: This is a Java class.
- The View layout file: It’s a standard layout XML file, with some restrictions.
- The App Widget configuration Activity (optional): This is an Activity the OS will launch when placing the widget to provide configuration options.
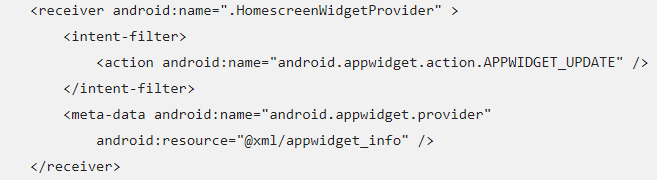
The AppWidgetProvider must also be declared in the AndroidManifest file. Since AppWidgetProvider is a helper class based on the Broadcast Receiver, it is declared in the manifest with the <receiver> element. Here is an example manifest entry:

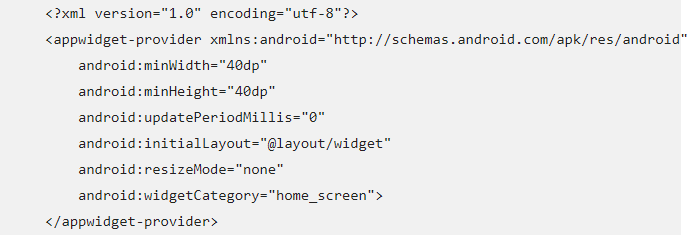
The metadata points to the AppWidgetProviderInfo file, which is placed in the res/xml directory. Here is a sample AppWidgetProviderInfo.xml file:
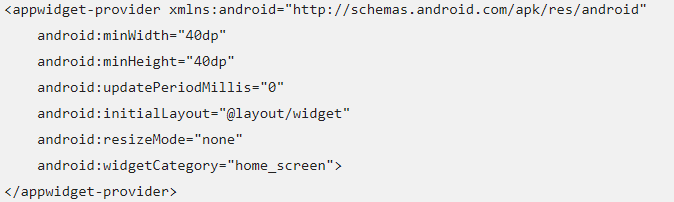
The following is a brief overview of the available attributes:
- minWidth: The default width when placed on the Home screen
- minHeight: The default height when placed on the Home screen
- updatePeriodMillis: It’s part of the onUpdate() polling interval (in milliseconds)
- initialLayout: The AppWidget layout
- previewImage (optional): The image shown when browsing App Widgets
- configure (optional): The activity to launch for configuration settings
- resizeMode (optional): The flags indicate resizing options: horizontal, vertical, none
- minResizeWidth (optional): The minimum width allowed when resizing
- minResizeHeight (optional): The minimum height allowed when resizing
- widgetCategory (optional): Android 5+ only supports Home screen widgets
The AppWidgetProvider extends the BroadcastReceiver class, which is why the <receiver> element is used when declaring the AppWidget in the Manifest. As it’s BroadcastReceiver, the class still receives OS broadcast events, but the helper class filters those events down to those applicable for an App Widget. The AppWidgetProvider class exposes the following methods:
- onUpdate(): It’s called when initially created and at the interval specified.
- onAppWidgetOptionsChanged(): It’s called when initially created and any time the size changes.
- onDeleted(): It’s called any time a widget is removed.
- onEnabled(): It’s called the first time a widget is placed (it isn’t called when adding second and subsequent widgets).
- onDisabled(): It’s called when the last widget is removed.
- onReceive(): It’s called on every event received, including the preceding event. Usually not overridden as the default implementation only sends applicable events.
The last required component is the layout. An App Widget uses a Remote View, which only supports a subset of the available layouts:
- AdapterViewFlipper
- FrameLayout
- GridLayout
- GridView
- LinearLayout
- ListView
- RelativeLayout
- StackView
- ViewFlipper
And it supports the following widgets:
- AnalogClock
- Button
- Chronometer
- ImageButton
- ImageView
- ProgressBar
- TextClock
- TextView
With App Widget basics covered, it’s now time to start coding. Our example will cover the basics so you can expand the functionality as needed. This recipe uses a View with a clock, which, when pressed, opens our activity.
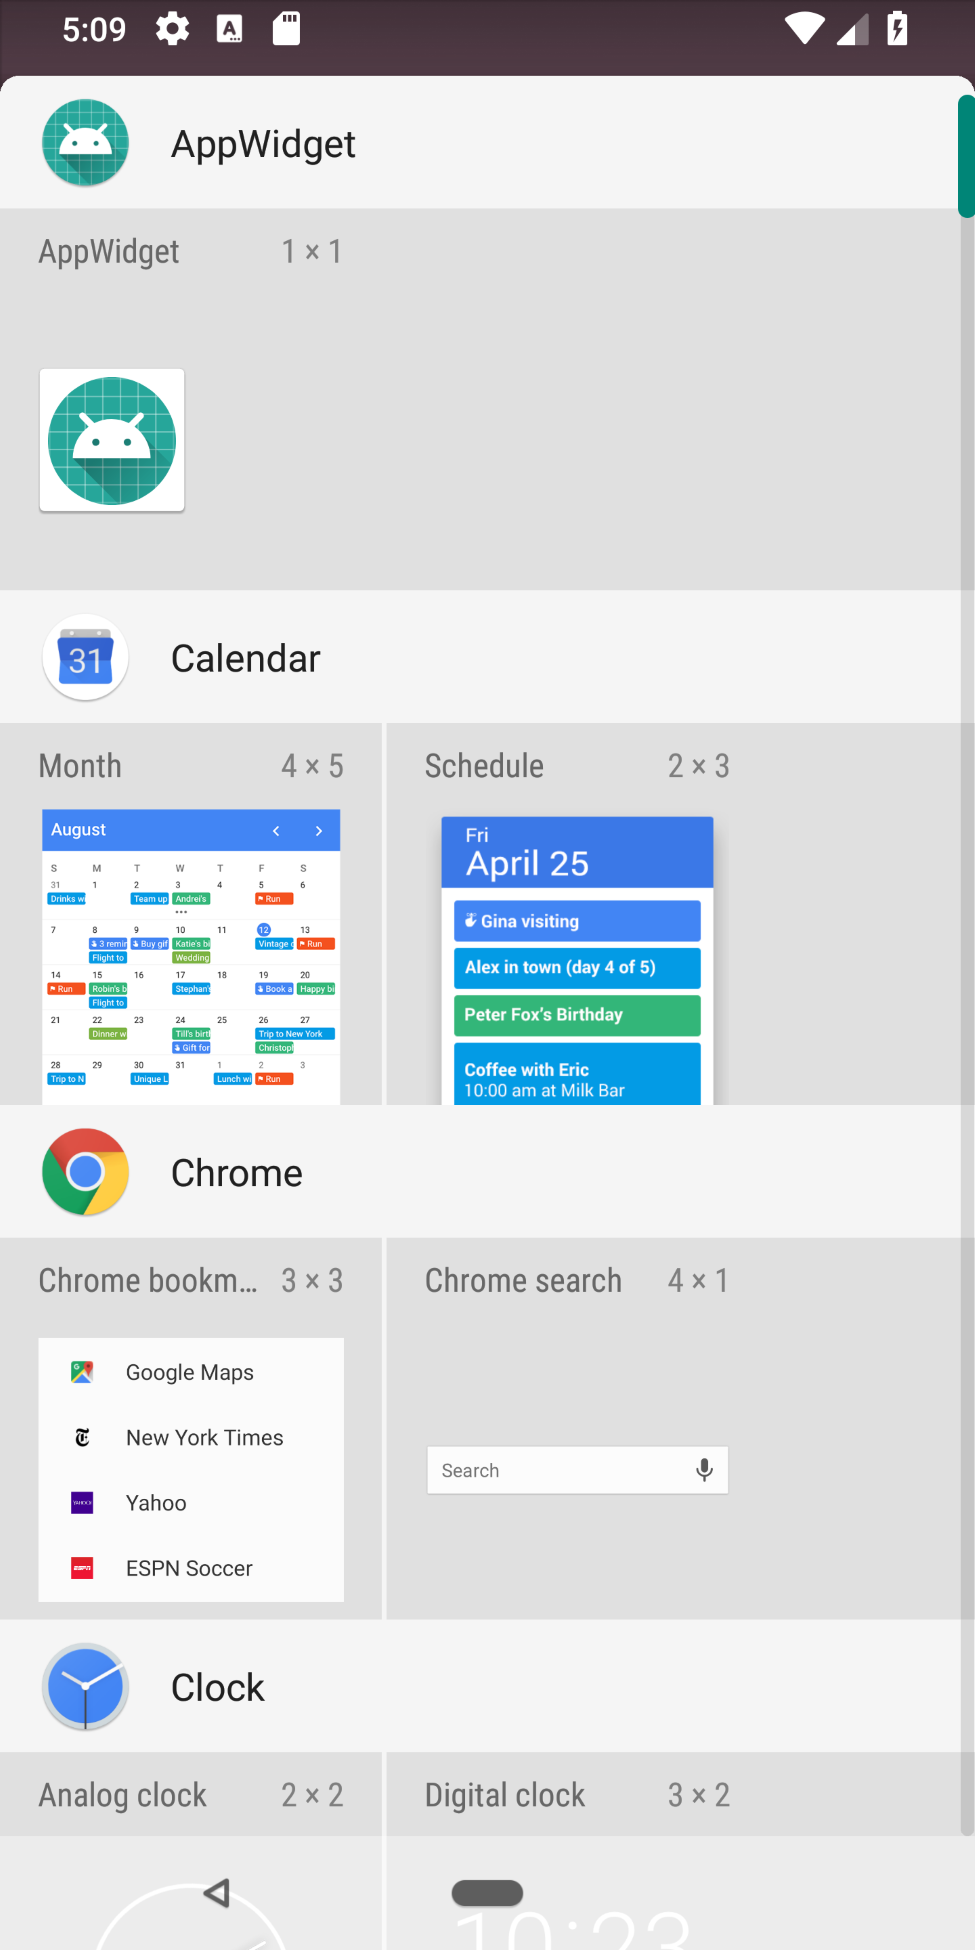
The following screenshot shows the widget in the widget list when adding it to the Home screen:
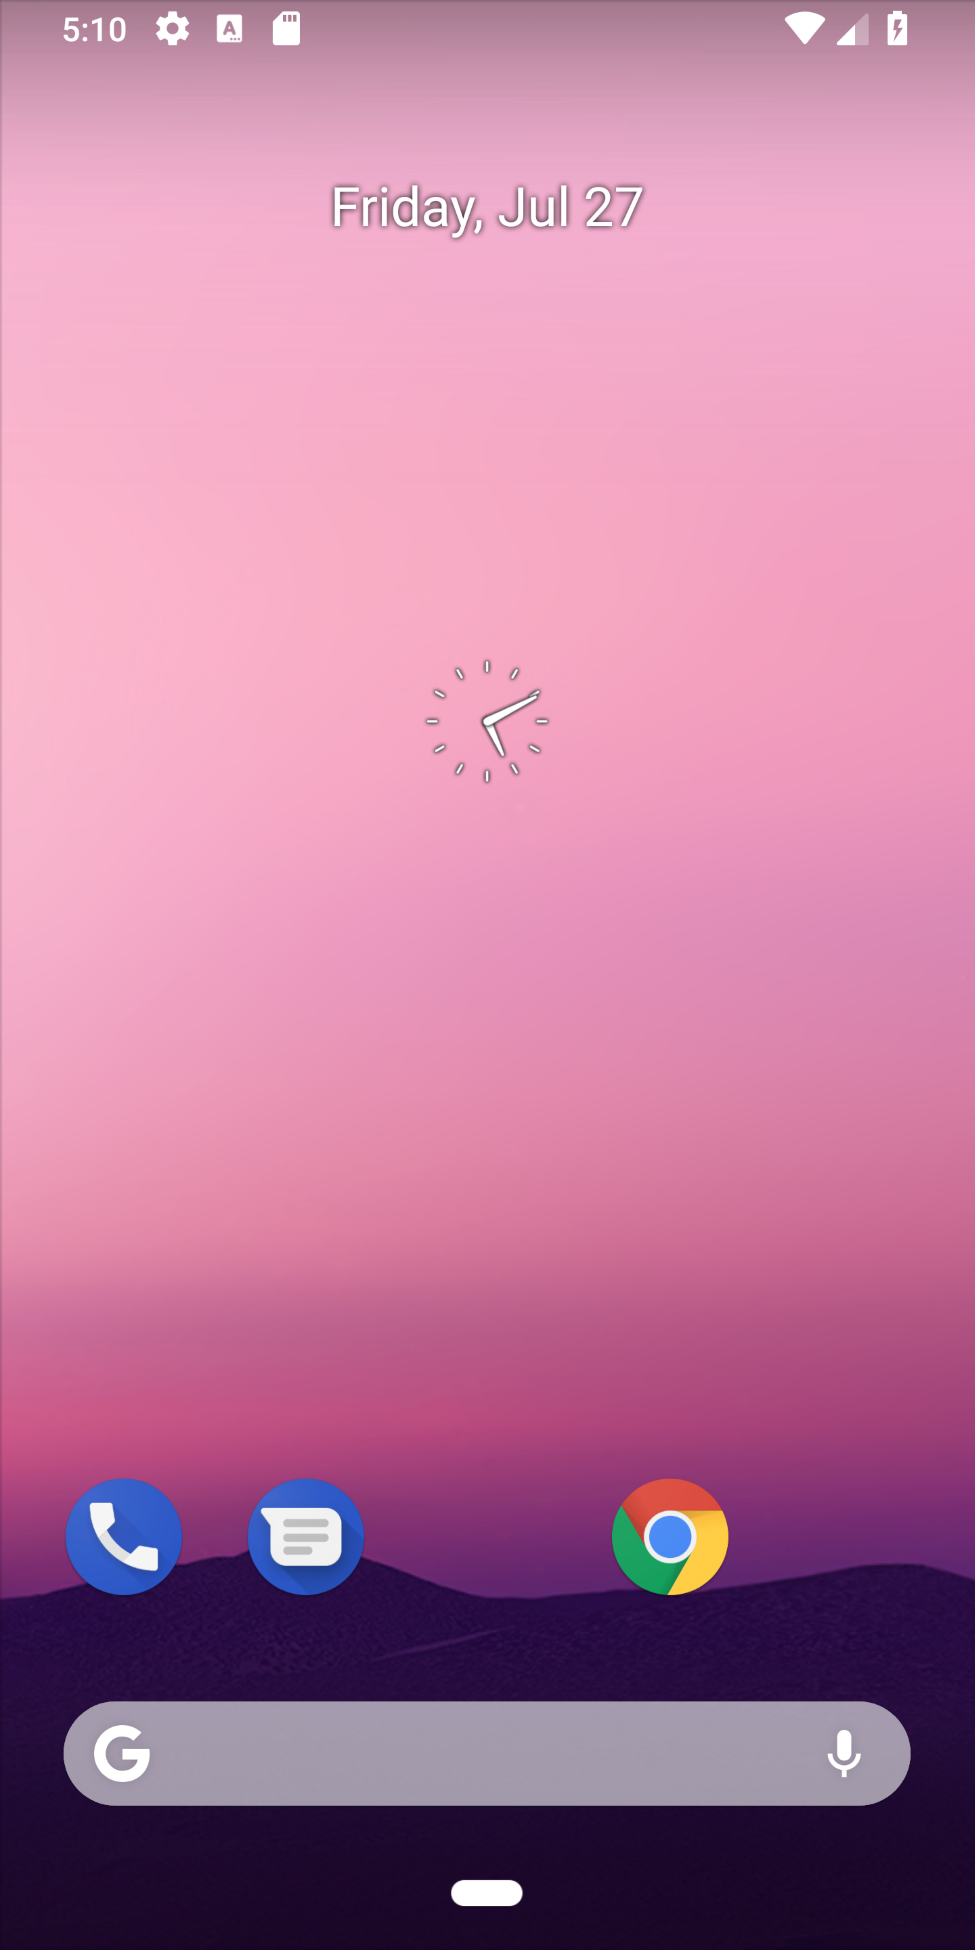
Here’s a screenshot showing the widget after it is added to the Home screen:
Getting ready
Create a new project in Android Studio and call it AppWidget. Use the default Phone & Tablet options and select the Empty Activity option when prompted for the Activity Type.
How to do it…
We’ll start by creating the widget layout, which resides in the standard layout resource directory. Then, we’ll create the XML resource directory to store the AppWidgetProviderInfo file. We’ll add a new Java class and extend AppWidgetProvider, which handles the onUpdate() call for the widget. With the receiver created, we can then add it to the Android Manifest.
Here are the detailed steps:
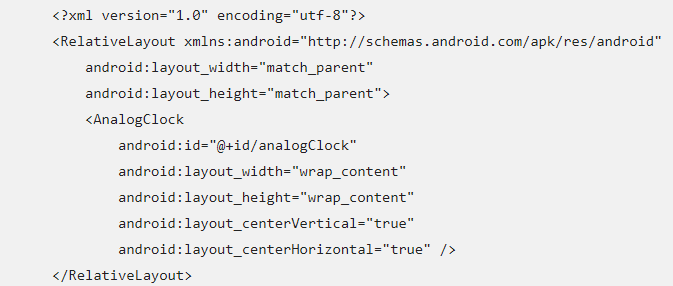
- Create a new file in res/layout called widget.xml using the following XML:
- Create a new directory called XML in the resource directory. The final result will be res/xml.
- Create a new file in res/xml called appwidget_info.xml using the following XML:
- Create a new Java class called HomescreenWidgetProvider, extending from AppWidgetProvider.
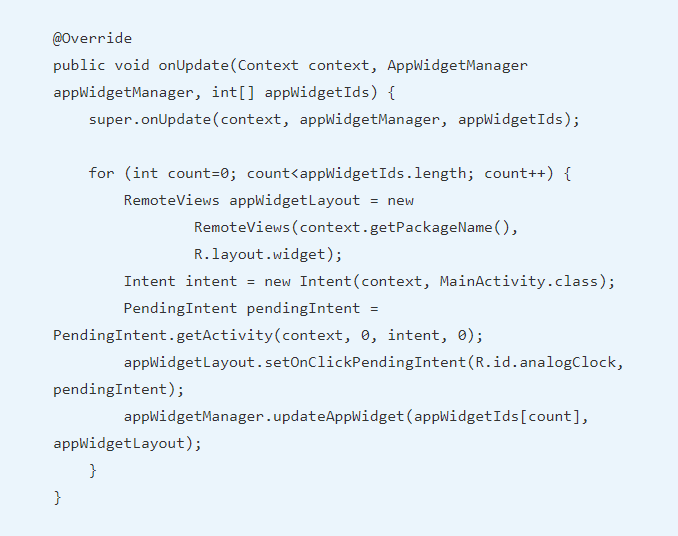
- Add the following onUpdate() method to the HomescreenWidgetProvider class:
- Add the HomescreenWidgetProvider to the AndroidManifest using the following XML declaration within the <application> element:
- Run the program on a device or emulator. After first running the application, the widget will then be available to add to the Home screen.
How it works…
Our first step is to create the layout file for the widget. This is a standard layout resource with the restrictions based on the App Widget being a Remote View, as discussed in the recipe introduction. Although our example uses an Analog Clock widget, this is where you’d want to expand the functionality based on your application needs.
The XML resource directory serves to store the AppWidgetProviderInfo, which defines the default widget settings. The configuration settings determine how the widget is displayed when initially browsing the available widgets. We use very basic settings for this recipe, but they can easily be expanded to include additional features, such as a preview image to show
a functioning widget and sizing options. The updatePeriodMillis attribute sets the update frequency. Since the update will wake up the device, it’s a trade-off between having up-to-date data and battery life. (This is where the optional Settings Activity is useful by letting the user decide.)
The AppWidgetProvider class is where we handle the onUpdate() event triggered by the updatePeriodMillis polling. Our example doesn’t need any updating so we set the polling to zero. The update is still called when initially placing the widget. onUpdate() is where we set the pending intent to open our app when the clock is pressed.
Since the onUpdate() method is probably the most complicated aspect of AppWidgets, we’ll explain this in some detail. First, it’s worth noting that onUpdate() will occur only once each polling interval for all the widgets is created by this provider. (All additional widgets created will use the same cycle as the first widget created.) This explains the for loop, as we need it to iterate through all the existing widgets. This is where we create a pending intent, which calls our app when the clock widget is pressed. As discussed earlier, an AppWidget is a Remote View. Therefore, to get the layout, we call RemoteViews() with our fully qualified package name and the layout ID. Once we have the layout, we can attach the pending intent to the clock view using setOnClickPendingIntent(). We call the AppWidgetManager named updateAppWidget() to initiate the changes we made.
The last step to make all this work is to declare the widget in the Android Manifest. We identify the action we want to handle with the <intent-filter>. Most App Widgets will likely want to handle the Update event, as ours does. The other item to note in the declaration is the following line:

This tells the system where to find our configuration file.
Adding Search to the Action Bar
Along with the Action Bar, Android 3.0 introduced the SearchView widget, which can be included as a menu item when creating a menu. This is now the recommended UI pattern to provide a consistent user experience.
The following screenshot shows the initial appearance of the Search icon in the Action Bar:

The following screenshot shows how the Search option expands when pressed:

If you want to add Search functionality to your application, this recipe will walk you through the steps to set up your User Interface and properly configure the Search Manager API.
Getting ready
Create a new project in Android Studio and call it SearchView. Use the default Phone & Tablet options and select Empty Activity when prompted for the Activity Type.
How to do it…
To set up the Search UI pattern, we need to create the Search menu item and a resource called searchable. We’ll create a second activity to receive the search query. Then, we’ll hook it all up in the AndroidManifest file. To get started, open the strings.xml file in res/values and follow these steps:
- Add the following string resources:

- Create the menu directory: res/menu.
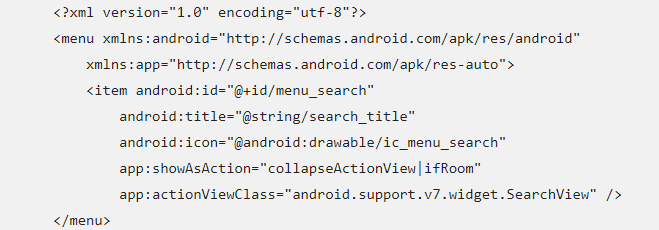
- Create a new menu resource called menu_search.xml in res/menu using the following XML:
- Open ActivityMain and add the following onCreateOptionsMenu() to inflate the menu and set up the Search Manager:
@Override
public boolean onCreateOptionsMenu(Menu menu) {
    MenuInflater inflater = getMenuInflater();
    inflater.inflate(R.menu.menu_search, menu);
    SearchManager searchManager = (SearchManager) getSystemService(Context.SEARCH_SERVICE);
    MenuItem searchItem = menu.findItem(R.id.menu_search);
    SearchView searchView = (SearchView) searchItem.getActionView();
    searchView.setSearchableInfo(searchManager.getSearchableInfo(getComponentName()));
    return true;
}
- Create a new XML resource directory: res/xml.
- Create a new file in res/xml called searchable.xml using the following XML:

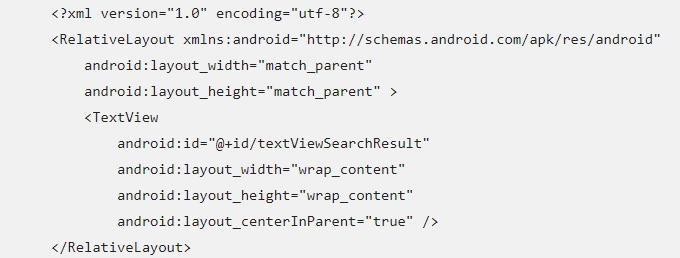
- Create a new layout called activity_search_result.xml using this XML:
- Add a new Empty Activity to the project called SearchResultActivity.
- Add the following variable to the class:
TextView mTextViewSearchResult;
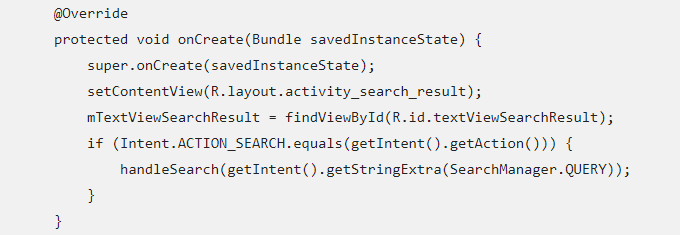
- Change onCreate() to load our layout, set the TextView, and check for the QUERY action:
- Add the following method to handle the search:

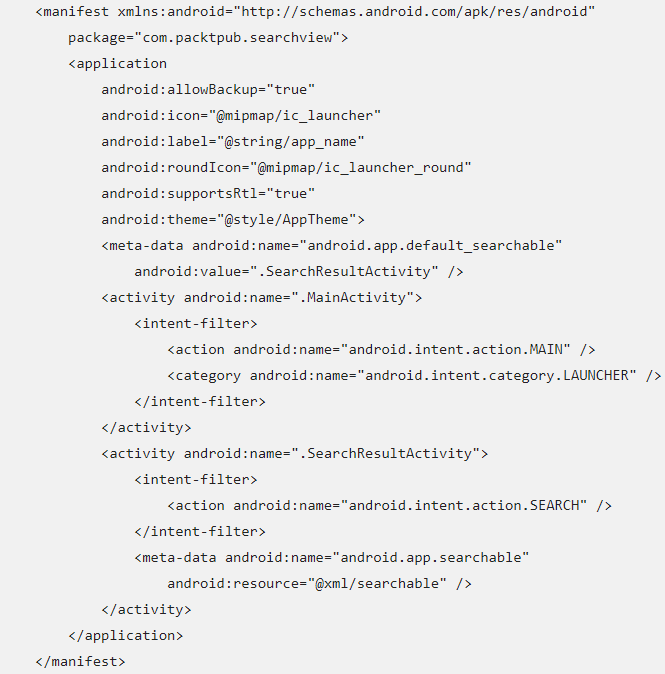
- With the User Interface and code now complete, we just need to hook everything up correctly in the AndroidManifest. Here is the complete manifest, including both activities:
- Run the application on a device or emulator. Type in a search query and hit the Search button (or press Enter). The SearchResultActivity will be displayed, showing the search query entered.
How it works…
Since the New Project Wizard uses the AppCompat library, our example uses the support library API. Using the support library provides the greatest device compatibility as it allows the use of modern features (such as the Action Bar) on older versions of the Android OS. We start by creating string resources for the Search View.
In step 3, we create the menu resource, as we’ve done many times. One difference is that we use the app namespace for the showAsAction and actionViewClass attributes. The earlier versions of the Android OS don’t include these attributes in the Android namespace, which is why we create an app namespace. This serves as a way to bring new functionality to older versions of the Android OS.
In step 4, we set up the SearchManager, using the support library APIs.
Step 6 is where we define the searchable XML resource, which is used by the SearchManager. The only required attribute is the label, but a hint is recommended so the user will have an idea of what they should type in the field.
Steps 7-11 are for the SearchResultActivity. Calling the second activity is not a requirement of the SearchManager, but is commonly done to provide a single activity for all searches initiated in your application.
If you run the application at this point, you would see the search icon, but nothing would work. Step 12 is where we put it all together in the AndroidManifest file. The first item to note is the following:
![]()
Notice this is in the <application> element and not in either of the <activity> elements. By defining it at the <application> level, it will automatically apply to all <activities>. If we moved it to the MainActivity element, it would behave exactly the same in our example.
We specify the searchable resource in the SearchResultActivity <meta-data> element:

We also need to set the intent filter for SearchResultActivity as we do here:

The SearchManager broadcasts the SEARCH intent when the user initiates the search. This declaration directs the intent to the SearchResultActivity activity. Once the search is triggered, the query text is sent to the SearchResultActivity using the SEARCH intent. We check for the SEARCH intent in the onCreate() and extract the query string using the following code:

You now have the Search UI pattern fully implemented. With the UI pattern complete, what you do with the search results is specific to your application needs. Depending on your application, you might search a local database or maybe a web service.
So, we discussed creating a shortcut on the Home screen, creating a Home screen widget and adding Search to the Action Bar. Be sure to check out the book ‘Android 9 Development Cookbook – Third Edition’, if you’re interested in learning how to show your app in full-screen and enable lock screen shortcuts.
Read Next
Build your first Android app with Kotlin
How to Secure and Deploy an Android App
Android User Interface Development: Animating Widgets and Layouts


