


In this article, we will be covering two extremely important Android-related topics:
- Android application security
- Android application deployment
We will kick off the post by discussing Android application security.
Securing an Android application
It should come as no surprise that security is an important consideration when building software. Besides the security measures put in place in the Android operating system, it is important that developers pay extra attention to ensure that their applications meet the set security standards.
In this section, a number of important security considerations and best practices will be broken down for your understanding. Following these best practices will make your applications less vulnerable to malicious programs that may be installed on a client device.
Data storage
All things being equal, the privacy of data saved by an application to a device is the most common security concern in developing an Android application. Some simple rules can be followed to make your application data more secure.
Securing your data when using internal storage
As we saw in the previous chapter, internal storage is a good way to save private data on a device. Every Android application has a corresponding internal storage directory in which private files can be created and written to. These files are private to the creating application, and as such cannot be accessed by other applications on the client device. As a rule of thumb, if data should only be accessible by your application and it is possible to store it in internal storage, do so. Feel free to refer to the previous chapter for a refresher on how to use internal storage.
Securing your data when using external storage
External storage files are not private to applications, and, as such, can be easily accessed by other applications on the same client device. As a result of this, you should consider encrypting application data before storing it in external storage. There are a number of libraries and packages that can be used to encrypt data prior to its saving to external storage. Facebook’s Conceal (http://facebook.github.io/conceal/) library is a good option for external-storage data encryption.
In addition to this, as another rule of thumb, do not store sensitive data in external storage. This is because external storage files can be manipulated freely. Validation should also be performed on input retrieved from external storage. This validation should be done as a result of the untrustworthy nature of data stored in external storage.
Securing your data when using internal storage.
Content providers can either prevent or enable external access to your application data. Use the android:exported attribute when registering your content provider in the manifest file to specify whether external access to the content provider should be permitted. Set android:exported to true if you wish the content provider to be exported, otherwise set the attribute to false.
In addition to this, content provider query methods—for example, query(), update(), and delete()—should be used to prevent SQL injection (a code injection technique that involves the execution of malicious SQL statements in an entry field by an attacker).
Networking security Best practices for your Android App development
There are a number of best practices that should be followed when performing network transactions via an Android application. These best practices can be split into different categories. We shall speak about Internet Protocol (IP) networking and telephony networking best practices in this section.
IP networking
When communicating with a remote computer via IP, it is important to ensure that your application makes use of HTTPs wherever possible (thus wherever it is supported in the server). One major reason for doing this is because devices often connect to insecure networks, such as public wireless connections. HTTPs ensure encrypted communication between clients and servers, regardless of the network they are connected to. In Java, an HttpsURLConnection can be used for secure data transfer over a network. It is important to note that data received via an insecure network connection should not be trusted.
Telephony networking
In instances where data needs to be transferred freely across a server and client applications, Firebase Cloud Messaging (FCM)—along with IP networking—should be utilized instead of other means, such as the Short Messaging Service (SMS) protocol. FCM is a multi-platform messaging solution that facilitates the seamless and reliable transfer of messages between applications.
SMS is not a good candidate for transferring data messages, because:
- It is not encrypted
- It is not strongly authenticated
- Messages sent via SMS are subject to spoofing
- SMS messages are subject to interception
Input validation
The validation of user input is extremely important in order to avoid security risks that may arise. One such risk, as explained in the Using content providers section, is SQL injection. The malicious injection of SQL script can be prevented by the use of parameterized queries and the extensive sanitation of inputs used in raw SQL queries.
In addition to this, inputs retrieved from external storage must be appropriately validated because external storage is not a trusted data source.
Working with user credentials
The risk of phishing can be alleviated by reducing the requirement of user credential input in an application. Instead of constantly requesting user credentials, consider using an authorization token. Eliminate the need for storing usernames and passwords on the device. Instead, make use of a refreshable authorization token.
Code obfuscation
Before publishing an Android application, it is imperative to utilize a code obfuscation tool, such as ProGuard, to prevent individuals from getting unhindered access to your source code by utilizing various means, such as decompilation. ProGuard is prepackaged included within the Android SDK, and, as such, no dependency inclusion is required. It is automatically included in the build process if you specify your build type to be a release. You can find out more about ProGuard here: https://www.guardsquare.com/en/proguard .
Securing broadcast receivers
By default, a broadcast receiver component is exported and as a result can be invoked by other applications on the same device. You can control access of applications to your apps’s broadcast receiver by applying security permissions to it. Permissions can be set for broadcast receivers in an application’s manifest file with the <receiver> element.
Securing your Dynamically loading code
In scenarios in which the dynamic loading of code by your application is necessary, you must ensure that the code being loaded comes from a trusted source. In addition to this, you must make sure to reduce the risk of tampering code at all costs. Loading and executing code that has been tampered with is a huge security threat. When code is being loaded from a remote server, ensure it is transferred over a secure, encrypted network. Keep in mind that code that is dynamically loaded runs with the same security permissions as your application (the permissions you defined in your application’s manifest file).
Securing services
Unlike broadcast receivers, services are not exported by the Android system by default. The default exportation of a service only happens when an intent filter is added to the declaration of a service in the manifest file. The android:exported attribute should be used to ensure services are exported only when you want them to be. Set android:exported to true when you want a service to be exported and false otherwise.
Deploying your Android Application
So far, we have taken an in-depth look at the Android system, application development in Android, and some other important topics, such as Android application security. It is time for us to cover our final topic for this article pertaining to the Android ecosystem—launching and publishing an Android application.
You may be wondering at this juncture what the words launch and publish mean. A launch is an activity that involves the introduction of a new product to the public (end users). Publishing an Android application is simply the act of making an Android application available to users. Various activities and processes must be carried out to ensure the successful launch of an Android application. There are 15 of these activities in all. They are:
- Understanding the Android developer program policies
- Preparing your Android developer account
- Localization planning
- Planning for simultaneous release
- Testing against the quality guideline
- Building a release-ready APK
- Planning your application’s Play Store listing
- Uploading your application package to the alpha or beta channel
- Device compatibility definition
- Pre-launch report assessment
- Pricing and application distribution setup
- Distribution option selection
- In-app products and subscriptions setup
- Determining your application’s content rating
- Publishing your application
Wow! That’s a long list. Don’t fret if you don’t understand everything on the list. Let’s look at each item in more detail.
Understanding the Android developer program policies
There is a set of developer program policies that were created for the sole purpose of making sure that the Play Store remains a trusted source of software for its users. Consequences exist for the violation of these defined policies. As a result, it is important that you peruse and fully understand these developer policies—their purposes and consequences—before continuing with the process of launching your application.
Preparing your Android developer account
You will need an Android developer account to launch your application on the Play Store. Ensure that you set one up by signing up for a developer account and confirming the accuracy of your account details. If you ever need to sell products on an Android application of yours, you will need to set up a merchant account.
Localization planning
Sometimes, for the purpose of localization, you may have more than one copy of your application, with each localized to a different language. When this is the case, you will need to plan for localization early on and follow the recommended localization checklist for Android developers. You can view this checklist here: https://developer.android.com/distribute/best-practices/launch/localization-checklist.html.
Planning for simultaneous release
You may want to launch a product on multiple platforms. This has a number of advantages, such as increasing the potential market size of your product, reducing the barrier of access to your product, and maximizing the number of potential installations of your application. Releasing on numerous platforms simultaneously is generally a good idea. If you wish to do this with any product of yours, ensure you plan for this well in advance.
In cases where it is not possible to launch an application on multiple platforms at once, ensure you provide a means by which interested potential users can submit their contact details so as to ensure that you can get in touch with them once your product is available on their platform of choice.
Testing against the quality guidelines
Quality guidelines provide testing templates that you can use to confirm that your application meets the fundamental functional and non-functional requirements that are expected by Android users. Ensure that you run your applications through these quality guides before launch. You can access these application quality guides here: https://developer.android.com/develop/quality-guidelines/index.html.
Building a release-ready application package (APK)
A release-ready APK is an Android application that has been packaged with optimizations and then built and signed with a release key. Building a release-ready APK is an important step in the launch of an Android application. Pay extra attention to this step.
Planning your application’s Play Store listing
This step involves the collation of all resources necessary for your product’s Play Store listing. These resources include, but are not limited to, your application’s log, screenshots, descriptions, promotional graphics, and videos, if any. Ensure you include a link to your application’s privacy policy along with your application’s Play Store listing. It is also important to localize your application’s product listing to all languages that your application supports.
Uploading your application package to the alpha or beta channel
As testing is an efficient and battle-tested way of detecting defects in software and improving software quality, it is a good idea to upload your application package to alpha and beta channels to facilitate carrying out alpha and beta software testing on your product. Alpha testing and beta testing are both types of acceptance testing.
Device compatibility definition
This step involves the declaration of Android versions and screen sizes that your application was developed to work on. It is important to be as accurate as possible in this step as defining inaccurate Android versions and screen sizes will invariably lead to users experiencing problems with your application.
Pre-launch report assessment
Pre-launch reports are used to identify issues found after the automatic testing of your application on various Android devices. Pre-launch reports will be delivered to you, if you opt in to them, when you upload an application package to an alpha or beta channel.
Pricing and application distribution setup
First, determine the means by which you want to monetize you application. After determining this, set up your application as either a free install or a paid download. After you have set up the desired pricing of your application, select the countries you wish to distribute you applications to.
Distribution option selection
This step involves the selection of devices and platforms—for example, Android TV and Android Wear—that you wish to distribute your app on. After doing this, the Google Play team will be able to review your application. If your application is approved after its review, Google Play will make it more discoverable.
In-app products and subscriptions setup
If you wish to sell products within your application, you will need to set up your in-app products and subscriptions. Here, you will specify the countries that you can sell into and take care of various monetary-related issues, such as tax considerations. In this step, you will also set up your merchant account.
Determining your application’s content rating
It is necessary that you provide an accurate rating for the application you are publishing to the Play Store. This step is mandated by the Android Developer Program Policies for good reason. It aids the appropriate age group you are targeting to discover your application.
Publishing your application
Once you have catered for the necessary steps prior to this, you are ready to publish your application to the production channel of the Play Store. Firstly, you will need to roll out a release. A release allows you to upload the APK files of your application and roll out your application to a specific track. At the end of the release procedure, you can publish your application by clicking Confirm rollout.
So, that was all we need to know to publish a new application on the Play Store. In most cases, you will not need to follow all these steps in a linear manner, you will just need to follow a subset of the steps—more specifically, those pertaining to the type of application you wish to publish.
Releasing your Android app
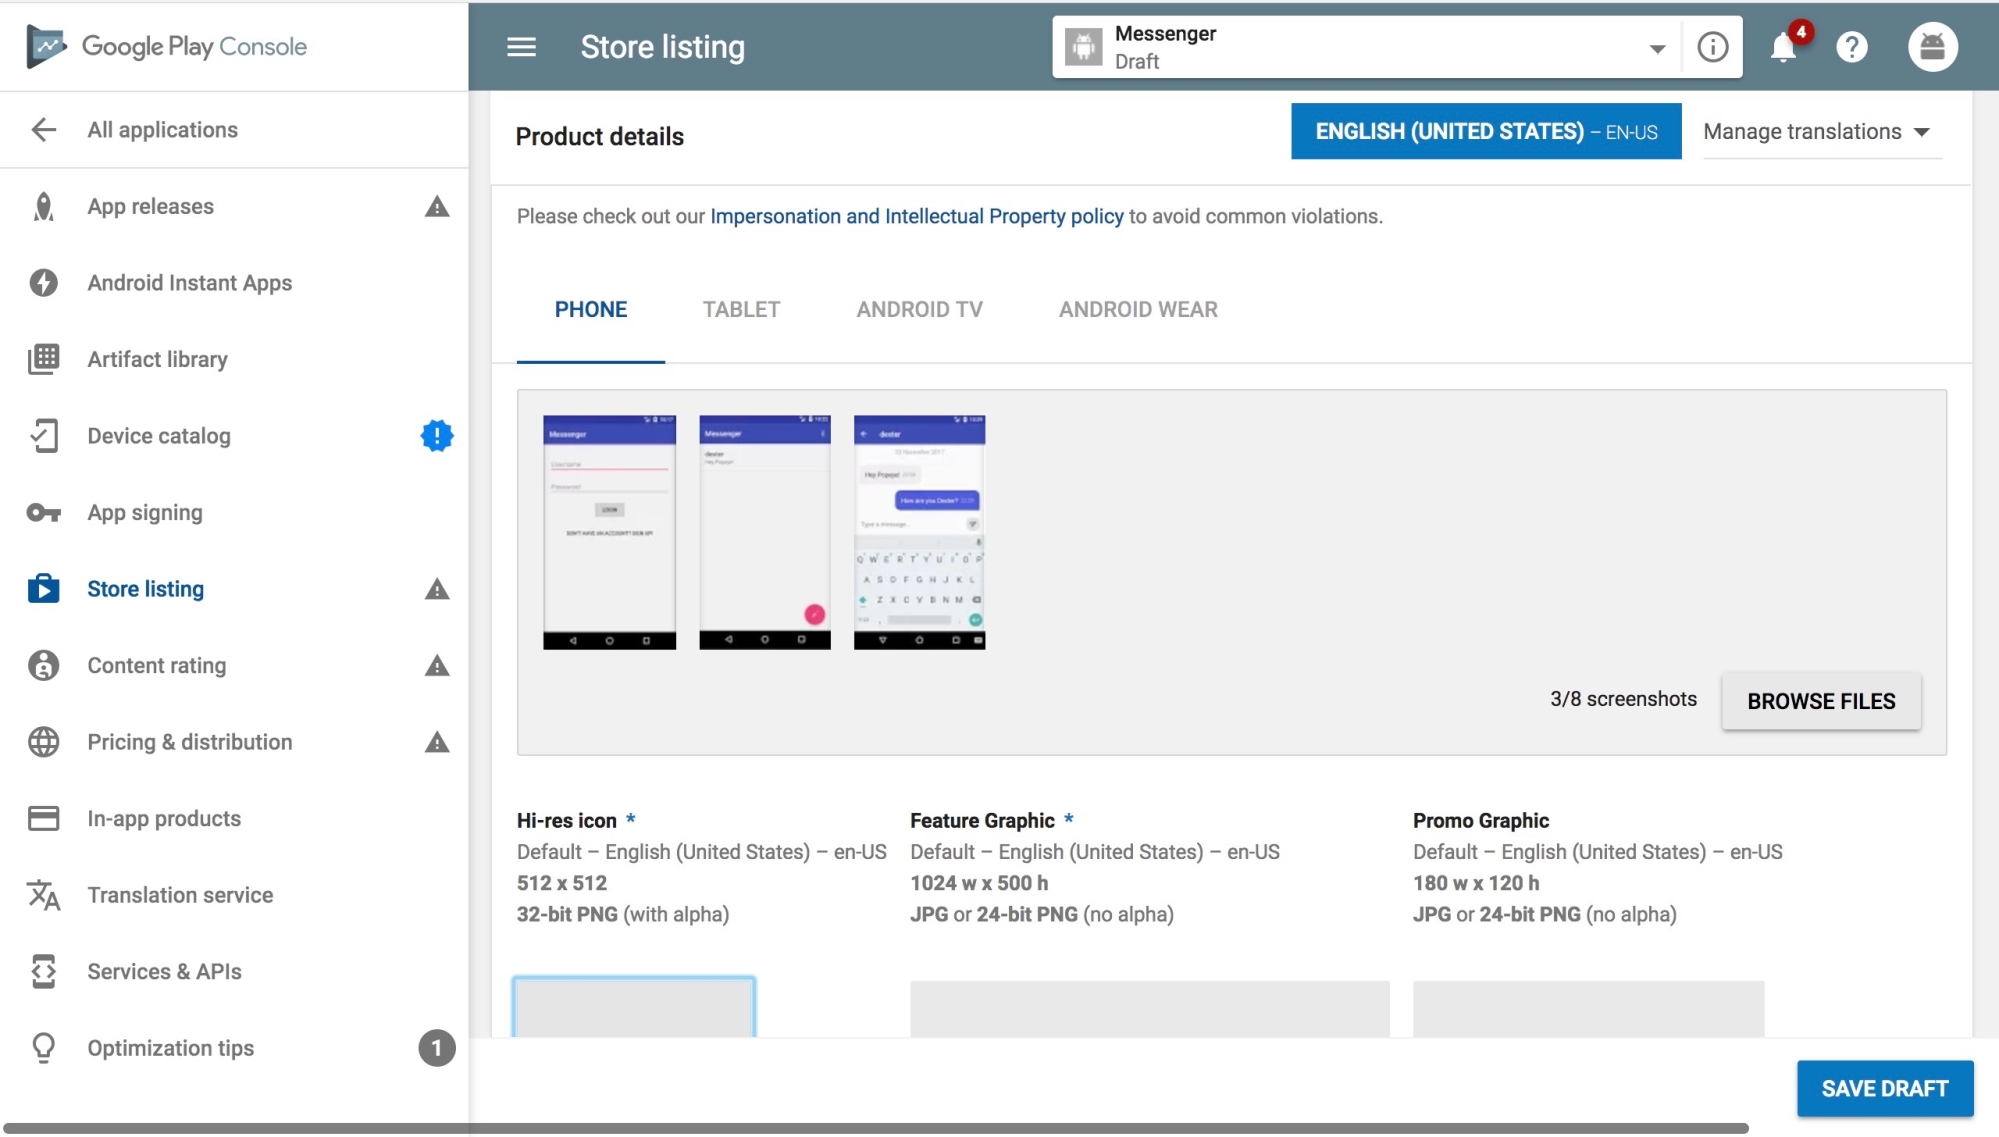
Having signed your application, you can proceed with completing the required application details toward the goal of releasing your app. Firstly, you need to create a suitable store listing for the application. Open the application in the Google Play Console and navigate to the store-listing page (this can be done by selecting Store Listing on the side navigation bar).
You will need to fill out all the required information in the store listing page before we proceed further. This information includes product details, such as a title, short description, full description, as well as graphic assets and categorization information—including the application type, category and content rating, contact details, and privacy policy. The Google Play Console store listing page is shown in the following screenshot:
Once the store listing information has been filled in, the next thing to fill in is the pricing and distribution information. Select Pricing & distribution on the left navigation bar to open up its preference selection page. For the sake of this demonstration, we set the pricing of this app to FREE. We also selected five random countries to distribute this application to. These countries are Nigeria, India, the United States of America, the United Kingdom, and Australia:

Besides selecting the type of pricing and the available countries for product distribution, you will need to provide additional preference information. The necessary information to be provided includes device category information, user program information, and consent information.
It is now time to add our signed APK to our Google Play Console app. Navigate to App releases | MANAGE BETA | EDIT RELEASE. In the page that is presented to you, you may be asked whether you want to opt into Google play app signing:

For the sake of this example, select OPT-OUT. Once OPT-OUT is selected, you will be able to choose your APK file for upload from your computer’s file system. Select your APK for upload by clicking BROWSE FILES, as shown in the following screenshot:
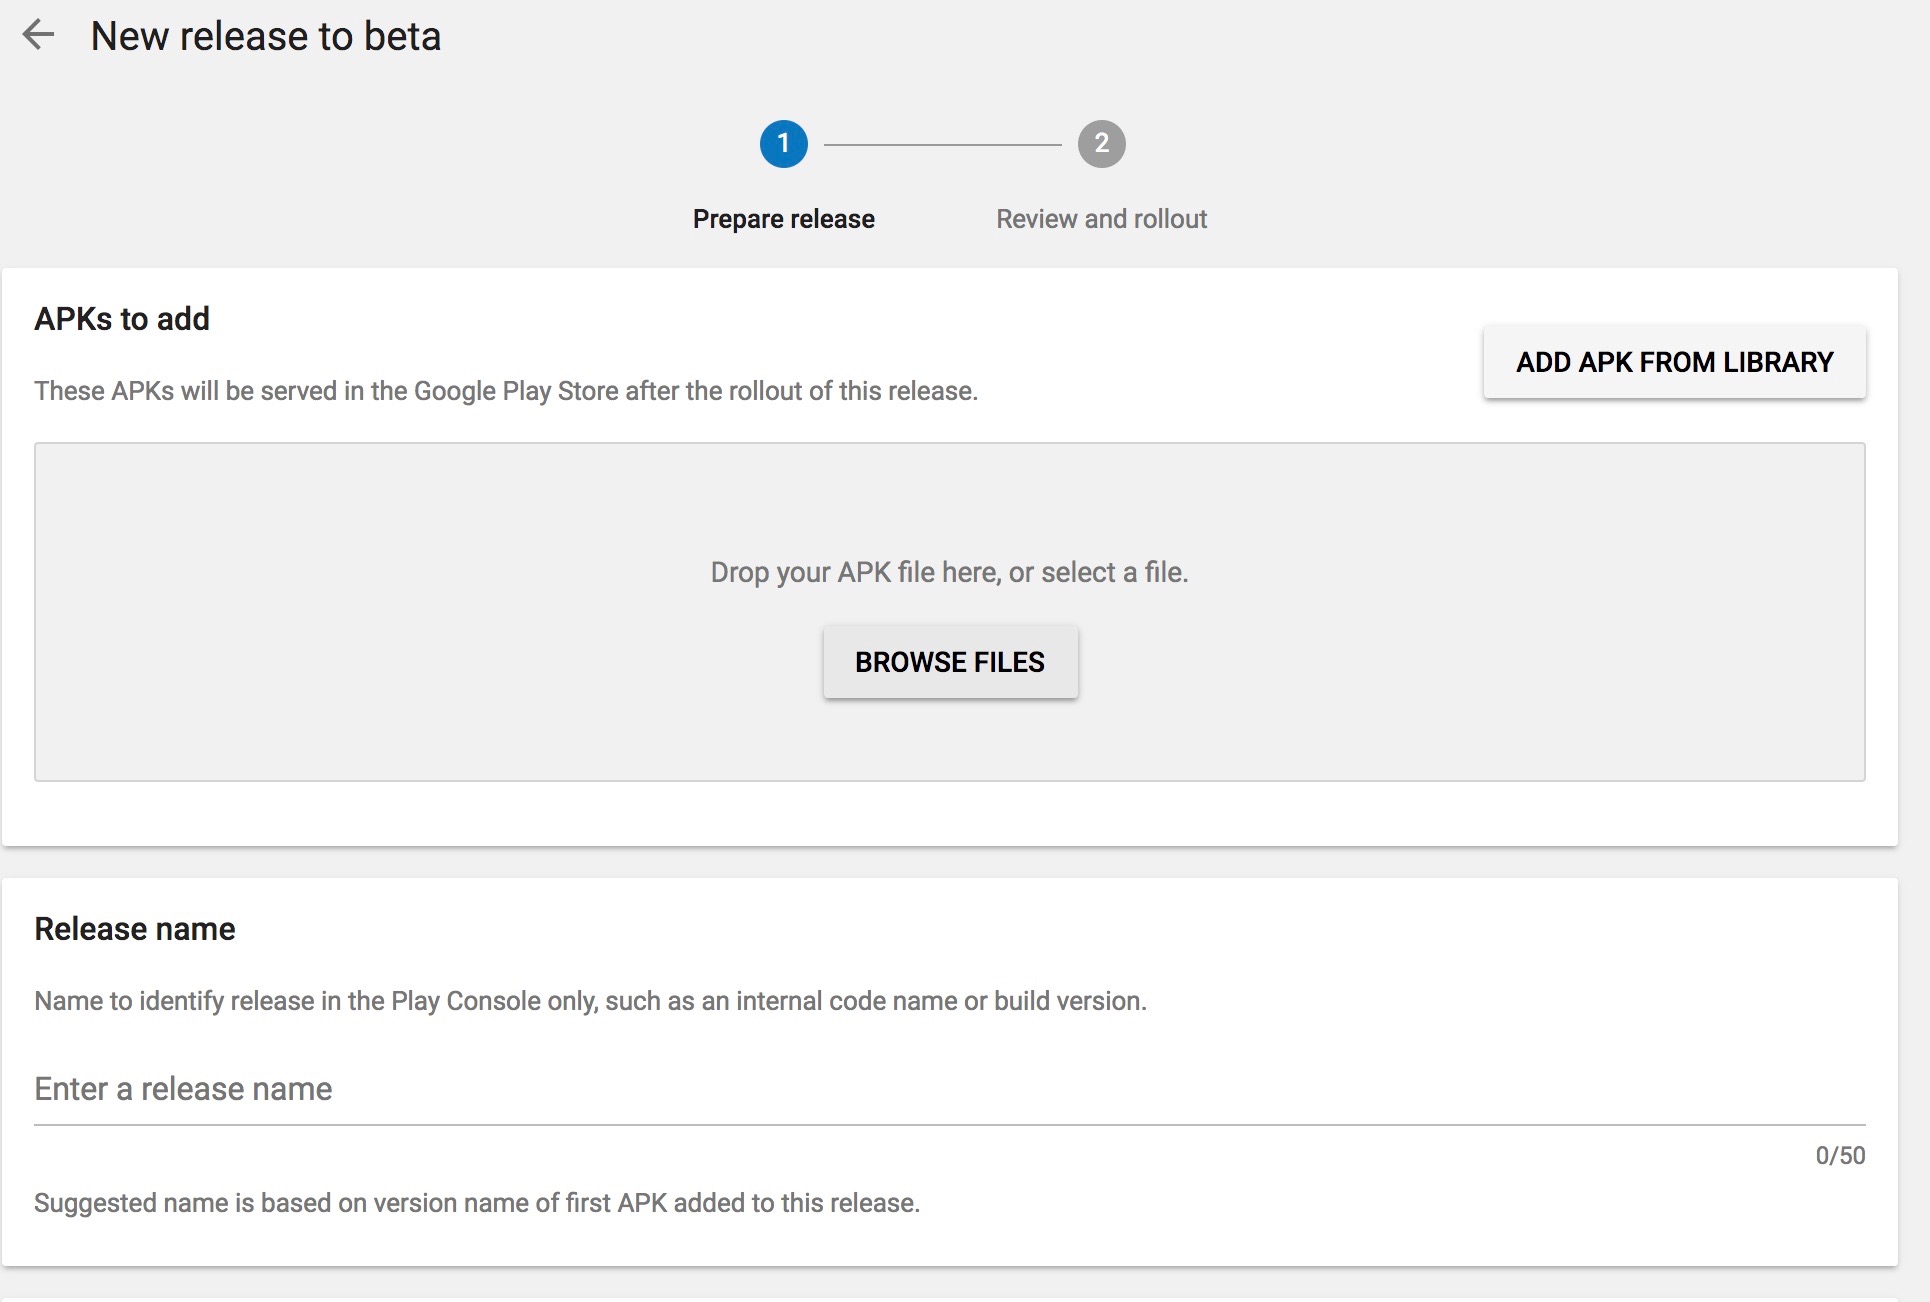
After selecting an appropriate APK, it will be uploaded to the Google Play Console. Once the upload is done, the play console will automatically add a suggested release name for your beta release. This release name is based on the version name of the uploaded APK. Modify the release name if you are not comfortable with the suggestion. Next, add a suitable release note in the text field provided. Once you are satisfied with the data you have input, save and continue by clicking the Review button at the bottom of the web page. After reviewing the beta release, you can roll it out if you have added beta testers to your app. Rolling out a beta release is not our focus, so let’s divert back to our main goal: publishing the Messenger app.
Having uploaded an APK for your application, you can now complete the mandatory content rating questionnaire. Click the Content rating navigation item on the sidebar and follow the instructions to do this. Once the questionnaire is complete, appropriate ratings for your application will be generated:

With the completion of the content rating questionnaire, the application is ready to be published to production. Applications that are published to production are made available to all users on the Google Play Store. On the play console, navigate to App releases | Manage Production | Create releases. When prompted to upload an APK, click the ADD APK FROM LIBRARY button to the right of the screen and select the APK we previously uploaded (the APK with a version name of 1.0) and complete the necessary release details similar to how we did when creating a beta release. Click the review button at the bottom of the page once you are ready to proceed. You will be given a brief release summary in the page that follows:

Go through the information presented in the summary carefully. Start the roll out to production once you have asserted that you are satisfied with the information presented to you in the summary. Once you start the roll out to production, you will be prompted to confirm your understanding that your app will become available to users of the Play Store:

Click Confirm once you are ready for the app to go live on the Play Store. Congratulations! You have now published your first application to the Google Play Store!
In this article, we learned how to secure and publish Android applications to the Google Play Store. We identified security threats to Android applications and fully explained ways to alleviate them, we also noted best practices to follow when developing applications for the Android ecosystem.
Finally, we took a deep dive into the process of application publication to the Play Store covering all the necessary steps for the successful publication of an Android application.
You enjoyed an excerpt from the book, Kotlin Programming By Example, written by Iyanu Adelekan. This book will take on Android development with Kotlin, from building a classic game Tetris to a messenger app, a level up in terms of complexity.
Read Next
Build your first Android app with Kotlin
Creating a custom layout implementation for your Android app