


The famous Java programmer, Bruce Eckel, came up with a slogan which highlights the importance of testing software:
Though a confident programmer may challenge this, it beautifully highlights the ability to determine that code works as expected over and over again, without any exception. How do we know that the code we are shipping to the end user or customer is of good quality and all the user requirements would work? By testing? Yes, by testing, we can be confident that the software works as per customer requirements and specifications.
If there are any discrepancies between expected and actual behavior, it is referred to as a bug/defect in the software. The earlier the discrepancies are caught, the more easily they can be fixed before the software is shipped, and the results are good quality. No wonder software testers are also referred to as quality control analysts in various software firms. The mantra for a good software tester is:
In this article, we will understand the testing deployment model of .NET Core applications, the Live Unit Testing feature of Visual Studio 2017.
We will look at types of testing methods briefly and write our unit tests, which a software developer must write after writing any program. Software testing is conducted at various levels:
- Unit testing: While coding, the developer conducts tests on a unit of a program to validate that the code they have written is error-free. We will write a few unit tests shortly.
- Integration testing: In a team where a number of developers are working, there may be different components that the developers are working on. Even if all developers perform unit testing and ensure that their units are working fine, there is still a need to ensure that, upon integration of these components, they work without any error. This is achieved through integration testing.
- System testing: The entire software product is tested as a whole. This is accomplished using one or more of the following:
- Functionality testing: Test all the functionality of the software against the business requirement document.
- Performance testing: To test how performant the software is. It tests the average time, resource utilization, and so on, taken by the software to complete a desired business use case. This is done by means of load testing and stress testing, where the software is put under high user and data load.
- Security testing: Tests how secure the software is against common and well-known security threats.
- Accessibility testing: Tests if the user interface is accessible and user-friendly to specially-abled people or not.
- User acceptance testing: When the software is ready to be handed over to the customer, it goes through a round of testing by the customer for user interaction and response.
- Regression testing: Whenever a piece of code is added/updated in the software to add a new functionality or fix an existing functionality, it is tested to detect if there are any side-effects from the newly added/updated code.
Of all these different types of testing, we will focus on unit testing, as it is done by the developer while coding the functionality.
Unit testing
.NET Core has been designed with testability in mind. .NET Core 2.0 has unit test project templates for VB, F#, and C#. We can also pick the testing framework of our choice amongst xUnit, NUnit, and MSTest.
Unit tests that test single programming parts are the most minimal-level tests. Unit tests should just test code inside the developer’s control, and ought to not test infrastructure concerns, for example, databases, filesystems, or network resources. Unit tests might be composed utilizing test-driven development (TDD) or they can be added to existing code to affirm its accuracy.
The naming convention of Test class names should end with Test and reside in the same namespace as the class being tested. For instance, the unit tests for the Microsoft.Example.AspNetCore class would be in the Microsoft.Example.AspNetCoreTest class in the test assembly. Also, unit test method names must be descriptive about what is being tested, under what conditions, and what the expectations are. A good unit test has three main parts to it in the following specified order:
- Arrange
- Act
- Assert
We first arrange the code and then act on it and then do a series of asserts to check if the actual output matches the expected output. Let’s have a look at them in detail:
- Arrange: All the parameter building, and method invocations needed for making a call in the act section must be declared in the arrange section.
- Act: The act stage should be one statement and as simple as possible. This one statement should be a call to the method that we are trying to test.
- Assert: The only reason method invocation may fail is if the method itself throws an exception, else, there should always be some state change or output from any meaningful method invocation. When we write the act statement, we anticipate an output and then do assertions if the actual output is the same as expected. If the method under test should throw an exception under normal circumstances, we can do assertions on the type of exception and the error message that should be thrown.
Testing using xUnit
In this section, we will learn to write unit and integration tests for our controllers. There are a number of options available to us for choosing the test framework. We will use xUnit for all our unit tests and Moq for mocking objects. Let’s create an xUnit test project by doing the following:
- Open the Let’s Chat project in Visual Studio 2017
- Create a new folder named Test
- Right-click the Test folder and click Add | New Project
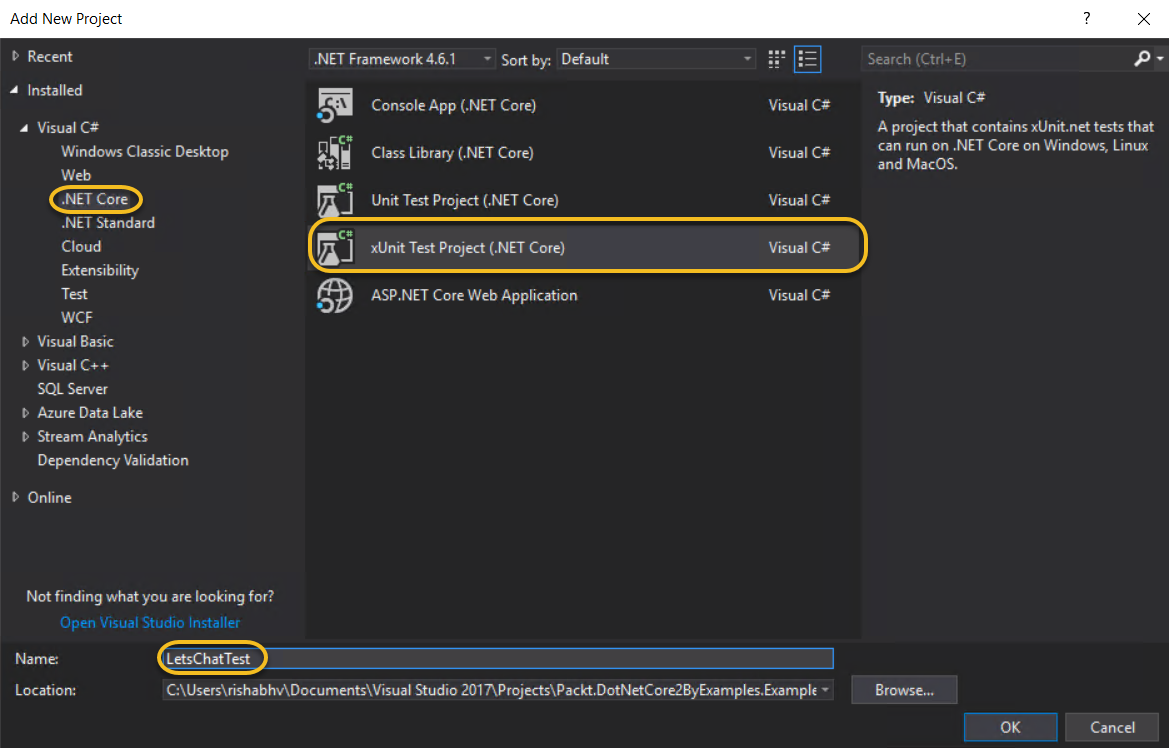
- Select xUnit Test Project (.NET Core) under Visual C# project templates, as shown here:
- Delete the default test class that gets created with the template
- Create a test class inside this project AuthenticationControllerUnitTests for the unit test
We need to add some NuGet packages. Right-click the project in VS 2017 to edit the project file and add the references manually, or use the NuGet Package Manager to add these packages:
// This package contains dependencies to ASP.NET Core
<PackageReference Include="Microsoft.AspNetCore.All" Version="2.0.0" />
// This package is useful for the integration testing, to build a test host for the project to test.
<PackageReference Include="Microsoft.AspNetCore.TestHost" Version="2.0.0" />
// Moq is used to create fake objects
<PackageReference Include="Moq" Version="4.7.63" />
With this, we are now ready to write our unit tests. Let’s start doing this, but before we do that, here’s some quick theory about xUnit and Moq.
The documentation from the xUnit website and Wikipedia tells us that xUnit.net is a free, open source, community-focused unit testing tool for the .NET Framework. It is the latest technology for unit testing C#, F#, Visual Basic .NET, and other .NET languages. All xUnit frameworks share the following basic component architecture:
- Test runner: It is an executable program that runs tests implemented using an xUnit framework and reports the test results.
- Test case: It is the most elementary class. All unit tests are inherited from here.
- Test fixtures: Test fixures (also known as a test context) are the set of preconditions or state needed to run a test. The developer should set up a known good state before the tests, and return to the original state after the tests.
- Test suites: It is a set of tests that all share the same fixture. The order of the tests shouldn’t matter.
xUnit.net includes support for two different major types of unit test:
- Facts: Tests which are always true. They test invariant conditions, that is, data-independent tests.
- Theories: Tests which are only true for a particular set of data.
Moq is a mocking framework for C#/.NET. It is used in unit testing to isolate the class under test from its dependencies and ensure that the proper methods on the dependent objects are being called.
Recall that in unit tests, we only test a unit or a layer/part of the software in isolation and hence do not bother about external dependencies, so we assume they work fine and just mock them using the mocking framework of our choice.
Let’s put this theory into action by writing a unit test for the following action in AuthenticationController:
    public class AuthenticationController : Controller
    {
        private readonly ILogger<AuthenticationController> logger;
public
AuthenticationController(ILogger<AuthenticationController>
logger)
{
this.logger = logger;
}

[Route("signin")]
public IActionResult SignIn()
{
logger.LogInformation($"Calling {nameof(this.SignIn)}");
return Challenge(new AuthenticationProperties { RedirectUri
= "/" });
}
}
The unit test code depends on how the method to be tested is written. To understand this, let’s write a unit test for a SignIn action. To test the SignIn method, we need to invoke the SignIn action in AuthenticationController. To do so, we need an instance of the AuthenticationController class, on which the SignIn action can be invoked. To create the instance of AuthenticationController, we need a logger object, as the AuthenticationController constructor expects it as a parameter. Since we are only testing the SignIn action, we do not bother about the logger and so we can mock it. Let’s do it:
    /// <summary>
    /// Authentication Controller Unit Test - Notice the naming
        convention {ControllerName}Test
    /// </summary>
    public class AuthenticationControllerTest
    {
        /// <summary>
        /// Mock the dependency needed to initialize the controller.
        /// </summary>
        private Mock<ILogger<AuthenticationController>> mockedLogger =
        new Mock<ILogger<AuthenticationController>>();
/// <summary>
/// Tests the SignIn action.
/// </summary>
[Fact]
public void SignIn_Pass_Test()
{
// Arrange - Initialize the controller. Notice the mocked
logger object passed as the parameter.
var controller = new
AuthenticationController(mockedLogger.Object);

// Act - Invoke the method to be tested.
var actionResult = controller.SignIn();

// Assert - Make assertions if actual output is same as
expected output.
Assert.NotNull(actionResult);
Assert.IsType<ChallengeResult>(actionResult);
Assert.Equal(((ChallengeResult)actionResult).
Properties.Items.Count, 1);
}
}
Reading the comments would explain the unit test code.
The previous example shows how easy it is to write a unit test. Agreed, depending on the method to be tested, things can get complicated. But it is likely to be around mocking the objects and, with some experience on the mocking framework and binging around, mocking should not be a difficult task. The unit test for the SignOut action would be a bit complicated in terms of mocking as it uses HttpContext. The unit test for the SignOut action is left to the reader as an exercise.
Let’s explore a new feature introduced in Visual Studio 2017 called Live Unit Testing.
Live Unit Testing
It may disappoint you but Live Unit Testing (LUT) is available only in the Visual Studio 2017 Enterprise edition and not in the Community edition.
What is Live Unit Testing? It’s a new productivity feature, introduced in the Visual Studio 2017 Enterprise edition, that provides real-time feedback directly in the Visual Studio editor on how code changes are impacting unit tests and code coverage. All this happens live, while you write the code and hence it is called Live Unit Testing. This will help in maintaining the quality by keeping tests passing as changes are made. It will also remind us when we need to write additional unit tests, as we are making bug fixes or adding features.
To start Live Unit Testing:
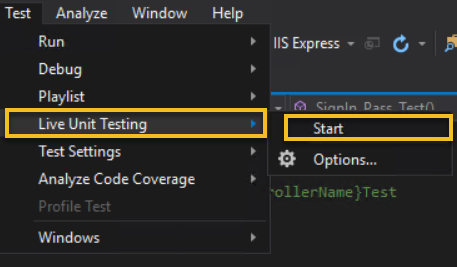
- Go to the Test menu item
- Click Live Unit Testing
- Click Start, as shown here:
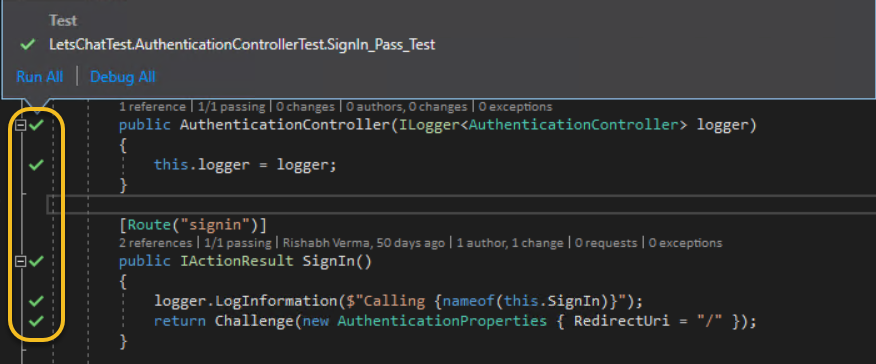
On clicking this, your CPU usage may go higher as Visual Studio spawns the MSBuild and tests runner processes in the background. In a short while, the editor will display the code coverage of the individual lines of code that are covered by the unit test. The following image displays the lines of code in AuthenticationController that are covered by the unit test. On clicking the right icon, it displays the tests covering this line of code and also provides the option to run and debug the test:
Similarly, if we open the test file, it will show the indicator there as well. Super cool, right!
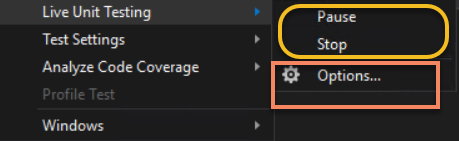
If we navigate to Test|Live Unit Testing now, we would see the options to Stop and Pause. So, in case we wish to save our resources after getting the data once, we can pause or stop Live Unit Testing:
There are numerous icons which indicates the code coverage status of individual lines of code. These are:
- Red cross: Indicates that the line is covered by at least one failing test

- Green check mark: Indicates that the line is covered by only passing tests

- Blue dash: Indicates that the line is not covered by any test

If you see a clock-like icon just below any of these icons, it indicates that the data is not up to date. With this productivity-enhancing feature, we conclude our discussion on basic unit testing. Next, we will learn about containers and how we can do the deployment and testing of our .NET Core 2.0 applications in containers.
To summarize, we learned the importance of testing and how we can write unit tests using Moq and xUnit. We saw a new productivity-enhancing feature introduced in Visual Studio 2017 Enterprise edition called Live Unit Testing and how it helps us write better-quality code.
You read an excerpt from a book written by Rishabh Verma and Neha Shrivastava, titled .NET Core 2.0 By Example. This book will help you build cross-platform solutions with .NET Core 2.0 through real-life scenarios.
More on Testing:
Unit Testing and End-To-End Testing


