


In this article written by Burkhard A. Meierwe, the author of the book Python GUI Programming Cookbook – Second Edition, we will lay out our GUI using Python 3.6 and above:
- Arranging several labels within a label frame widget
- Using padding to add space around widgets
- How widgets dynamically expand the GUI
- Aligning the GUI widgets by embedding frames within frames
(For more resources related to this topic, see here.)
In this article, we will explore how to arrange widgets within widgets to create our Python GUI. Learning the fundamentals of GUI layout design will enable us to create great looking GUIs. There are certain techniques that will help us to achieve this layout design.
The grid layout manager is one of the most important layout tools built into tkinter that we will be using.
We can very easily create menu bars, tabbed controls (aka Notebooks) and many more widgets using tkinter .
Arranging several labels within a label frame widget
The LabelFrame widget allows us to design our GUI in an organized fashion. We are still using the grid layout manager as our main layout design tool, yet by using LabelFrame widgets we get much more control over our GUI design.
Getting ready
We are starting to add more and more widgets to our GUI, and we will make the GUI fully functional in the coming recipes. Here we are starting to use the LabelFrame widget.
Add the following code just above the main event loop towards the bottom of the Python module.

Running the code will result in the GUI looking like this:

Uncomment line 111 and notice the different alignment of the LabelFrame.
We can easily align the labels vertically by changing our code, as shown next. Note that the only change we had to make was in the column and row numbering.

Now the GUI LabelFrame looks as such:

How it works…
In line 109 we create our first ttk LabelFrame widget and assign the resulting instance to the variable buttons_frame. The parent container is win, our main window.
In lines 114 -116, we create labels and place them in the LabelFrame. buttons_frame is the parent of the labels. We are using the important grid layout tool to arrange the labels within the LabelFrame. The column and row properties of this layout manager give us the power to control our GUI layout.
The parent of our labels is the buttons_frame instance variable of the LabelFrame, not the win instance variable of the main window. We can see the beginning of a layout hierarchy here.
We can see how easy it is to change our layout via the column and row properties. Note how we change the column to 0, and how we layer our labels vertically by numbering the row values sequentially.
The name ttk stands for themed tk. The tk-themed widget set was introduced in Tk 8.5.
There’s more…
In a recipe later in this article we will embed LabelFrame widgets within LabelFrame widgets, nesting them to control our GUI layout.
Using padding to add space around widgets
Our GUI is being created nicely. Next, we will improve the visual aspects of our widgets by adding a little space around them, so they can breathe.
Getting ready
While tkinter might have had a reputation for creating ugly GUIs, this has dramatically changed since version 8.5. You just have to know how to use the tools and techniques that are available. That’s what we will do next.
tkinter version 8.6 ships with Python 3.6.
How to do it…
The procedural way of adding spacing around widgets is shown first, and then we will use a loop to achieve the same thing in a much better way.
Our LabelFrame looks a bit tight as it blends into the main window towards the bottom. Let’s fix this now.
Modify line 110 by adding padx and pady:
![]()
And now our LabelFrame got some breathing space:

How it works…
In tkinter, adding space horizontally and vertically is done by using the built-in properties named padx and pady. These can be used to add space around many widgets, improving horizontal and vertical alignments, respectively. We hard-coded 20 pixels of space to the left and right of the LabelFrame, and we added 40 pixels to the top and bottom of the frame. Now our LabelFrame stands out more than it did before.
The screenshot above only shows the relevant change.
We can use a loop to add space around the labels contained within the LabelFrame:

Now the labels within the LabelFrame widget have some space around them too:

The grid_configure() function enables us to modify the UI elements before the main loop displays them. So, instead of hard-coding values when we first create a widget, we can work on our layout and then arrange spacing towards the end of our file, just before the GUI is being created. This is a neat technique to know.
The winfo_children() function returns a list of all the children belonging to the buttons_frame variable. This enables us to loop through them and assign the padding to each label.
One thing to notice is that the spacing to the right of the labels is not really visible. This is because the title of the LabelFrame is longer than the names of the labels. We can experiment with this by making the names of the labels longer.

Now our GUI looks like this. Note how there is now some space added to the right of the long label next to the dots. The last dot does not touch the LabelFrame which it otherwise would without the added space.

We can also remove the name of the LabelFrame to see the effect padx has on positioning our labels.
![]()
By setting the text property to an empty string, we remove the name that was previously displayed for the LabelFrame.

How widgets dynamically expand the GUI
You probably noticed in previous screenshots and by running the code that widgets have a capability to extend themselves to the space they need to visually display their text.
Java introduced the concept of dynamic GUI layout management. In comparison, visual development IDEs like VS.NET lay out the GUI in a visual manner, and are basically hard-coding the x and y coordinates of UI elements.
Using tkinter, this dynamic capability creates both an advantage and a little bit of a challenge, because sometimes our GUI dynamically expands when we would prefer it rather not to be so dynamic! Well, we are dynamic Python programmers so we can figure out how to make the best use of this fantastic behavior!
Getting ready
At the beginning of the previous recipe we added a LabelFrame widget. This moved some of our controls to the center of column 0. We might not wish this modification to our GUI layout. Next we will explore some ways to solve this.
How to do it…
Let us first become aware of the subtle details that are going on in our GUI layout in order to understand it better.
We are using the grid layout manager widget and it lays out our widgets in a zero-based grid. This is very similar to an Excel spreadsheet or a database table.
Grid Layout Manager Example with 2 Rows and 3 Columns:
| Row 0; Col 0 | Row 0; Col 1 | Row 0; Col 2 |
| Row 1; Col 0 | Row 1; Col 1 | Row 1; Col 2 |
Using the grid layout manager, what is happening is that the width of any given column is determined by the longest name or widget in that column. This affects all rows.
By adding our LabelFrame widget and giving it a title that is longer than some hard-coded size widget like the top-left label and the text entry below it, we dynamically move those widgets to the center of column 0, adding space to the left and right sides of those widgets.
Incidentally, because we used the sticky property for the Checkbutton and ScrolledText widgets, those remain attached to the left side of the frame.
Let’s look in more detail at the screenshot from the first recipe of this article.
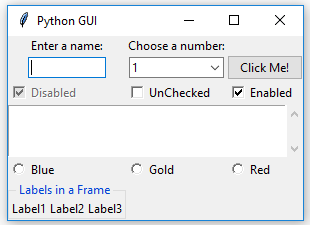
We added the following code to create the LabelFrame and then placed labels into this frame.
![]()
Since the text property of the LabelFrame, which is displayed as the title of the LabelFrame, is longer than both our Enter a name: label and the text box entry below it, those two widgets are dynamically centered within the new width of column 0.
The Checkbutton and Radiobutton widgets in column 0 did not get centered because we used the sticky=tk.W property when we created those widgets.
For the ScrolledText widget we used sticky=tk.WE, which binds the widget to both the west (aka left) and east (aka right) side of the frame.
Let’s remove the sticky property from the ScrolledText widget and observe the effect this change has.

Now our GUI has new space around the ScrolledText widget both on the left and right sides. Because we used the columnspan=3 property, our ScrolledText widget still spans all three columns.

If we remove columnspan=3 we get the following GUI which is not what we want. Now our ScrolledText only occupies column 0 and, because of its size, it stretches the layout.

One way to get our layout back to where we were before adding the LabelFrame is to adjust the grid column position. Change the column value from 0 to 1.
![]()
Now our GUI looks like this:

How it works…
Because we are still using individual widgets, our layout can get messed up. By moving the column value of the LabelFrame from 0 to 1, we were able to get the controls back to where they used to be and where we prefer them to be. At least the left-most label, text, Checkbutton, ScrolledText, and Radiobutton widgets are now located where we intended them to be. The second label and text Entry located in column 1 aligned themselves to the center of the length of the Labels in a Frame widget so we basically moved our alignment challenge one column to the right. It is not so visible because the size of the Choose a number: label is almost the same as the size of the Labels in a Frame title, and so the column width was already close to the new width generated by the LabelFrame.
There’s more…
In the next recipe we will embed frames within frames to avoid the accidental misalignment of widgets we just experienced in this recipe.
Aligning the GUI widgets by embedding frames within frames
We have much better control of our GUI layout if we embed frames within frames. This is what we will do in this recipe.
Getting ready
The dynamic behavior of Python and its GUI modules can create a little bit of a challenge to really get our GUI looking the way we want. Here we will embed frames within frames to get more control of our layout. This will establish a stronger hierarchy among the different UI elements, making the visual appearance easier to achieve.
We will continue to use the GUI we created in the previous recipe.
How to do it…
Here, we will create a top-level frame that will contain other frames and widgets. This will help us to get our GUI layout just the way we want.
In order to do so, we will have to embed our current controls within a central ttk.LabelFrame. This ttk.LabelFrame is a child of the main parent window and all controls will be children of this ttk.LabelFrame.
Up to this point in our recipes we have assigned all widgets to our main GUI frame directly. Now we will only assign our LabelFrame to our main window and after that we will make this LabelFrame the parent container for all the widgets.
This creates the following hierarchy in our GUI layout:

In this diagram, win is the variable that holds a reference to our main GUI tkinter window frame; mighty is the variable that holds a reference to our LabelFrame and is a child of the main window frame (win); and Label and all other widgets are now placed into the LabelFrame container (mighty).
Add the following code towards the top of our Python module:

Next we will modify all the following controls to use mighty as the parent, replacing win. Here is an example of how to do this:
![]()

Note how all the widgets are now contained in the Mighty Python LabelFrame which surrounds all of them with a barely visible thin line. Next, we can reset the Labels in a Frame widget to the left without messing up our GUI layout:

Oops – maybe not. While our frame within another frame aligned nicely to the left, it again pushed our top widgets into the center (a default).
In order to align them to the left, we have to force our GUI layout by using the sticky property. By assigning it 'W' (West) we can control the widget to be left-aligned.


How it works…
Note how we aligned the label, but not the text box below it. We have to use the sticky property for all the controls we want to left-align. We can do that in a loop, using the winfo_children() and grid_configure(sticky='W') properties, as we did before in the second recipe of this article.
The winfo_children() function returns a list of all the children belonging to the parent. This enables us to loop through all of the widgets and change their properties.
Using tkinter to force left, right, top, bottom the naming is very similar to Java: west, east, north and south, abbreviated to: 'W' and so on. We can also use the following syntax: tk.W instead of 'W'. This requires having imported the tkinter module aliased as tk.
In a previous recipe we combined both 'W' and 'E' to make our ScrolledText widget attach itself both to the left and right sides of its container using 'WE'. We can add more combinations: 'NSE' will stretch our widget to the top, bottom and right side. If we have only one widget in our form, for example a button, we can make it fill in the entire frame by using all options: 'NSWE'. We can also use tuple syntax: sticky=(tk.N, tk.S, tk.W, tk.E).
Let’s align the entry in column 0 to the left.

Now both the label and the Entry are aligned towards the West (left).

In order to separate the influence that the length of our Labels in a Frame LabelFrame has on the rest of our GUI layout we must not place this LabelFrame into the same LabelFrame as the other widgets but assign it directly to the main GUI form (win).
Summary
We have learned the layout management for Python GUI using the following reciepes:
- Arranging several labels within a label frame widget
- Using padding to add space around widgets
- How widgets dynamically expand the GUI
- Aligning the GUI widgets by embedding frames within frames
Resources for Article:
Further resources on this subject:
- Python Scripting Essentials [article]
- An Introduction to Python Lists and Dictionaries [article]
- Test all the things with Python [article]


