Until recently, most business and financial systems had product-focused designs while records and fields maintained basic customer information, processes, and reporting typically revolved around product-related transactions. In the past, businesses were centered on specific products, but now the focus has shifted to center the business on the customer. The Customer Relationship Management (CRM) system provides the tools and reporting necessary to manage customer information and interactions.
In this article, we will take a look at what it takes to implement a CRM system in Odoo 11 as part of an overall business strategy. We will also install the CRM application and setup salespersons that can be assigned to our customers.
This article is an excerpt from the book, Working with Odoo 11 – Third Edition by Greg Moss. In this book, you will learn to configure, manage, and customize your Odoo system.
Using CRM as a business strategy
It is critical that the sales people share account knowledge and completely understand the features and capabilities of the system. They often have existing tools that they have relied on for many years. Without clear objectives and goals for the entire sales team, it is likely that they will not use the tool. A plan must be implemented to spend time training and encouraging the sharing of knowledge to successfully implement a CRM system.
Installing the CRM application
If you have not installed the CRM module, log in as the administrator and then click on the Apps menu. In a few seconds, the list of available apps will appear. The CRM will likely be in the top-left corner:

Click on Install to set up the CRM application.
Look at the CRM Dashboard
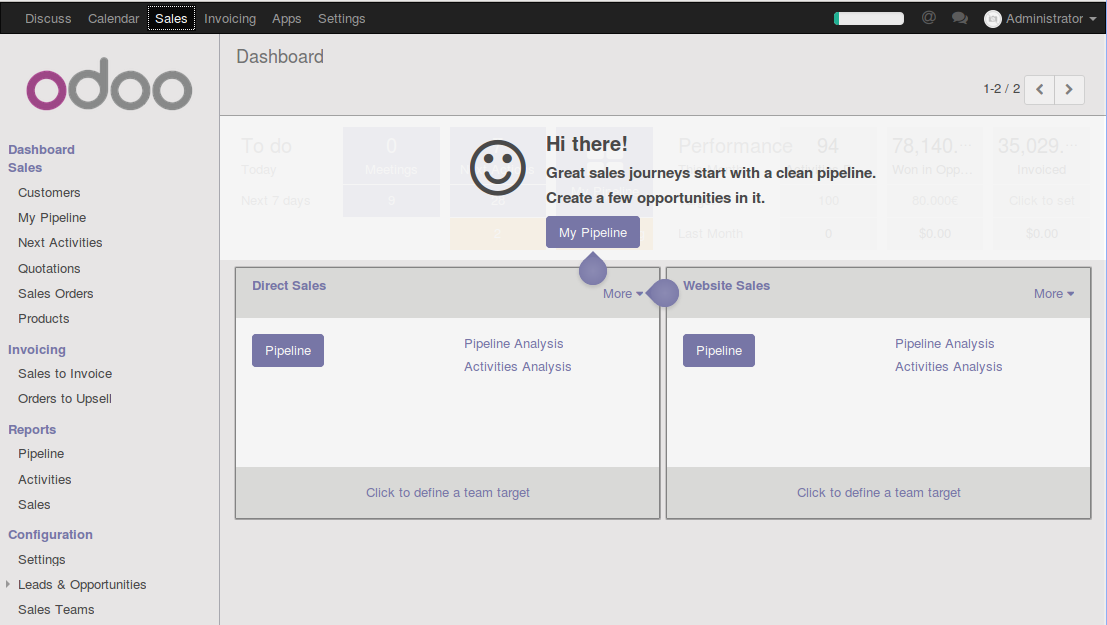
Like with the installation of the Sales application, Odoo takes you to the Discuss menu. Click on Sales to see the new changes after installing the CRM application. New to Odoo 10 is an improved CRM Dashboard that provides you a friendly welcome message when you first install the application. You can use the dashboard to get an overview of your sales pipelines and get easy access to the most common actions within CRM.
Assigning the sales representative or account manager
In Odoo 10, like in most CRM systems, the sales representative or account manager plays an important role. Typically, this is the person that will ultimately be responsible for the customer account and a satisfactory customer experience.
We will begin by creating a salesperson that will handle standard customer accounts. Note that a sales representative is also a user in the Odoo system.
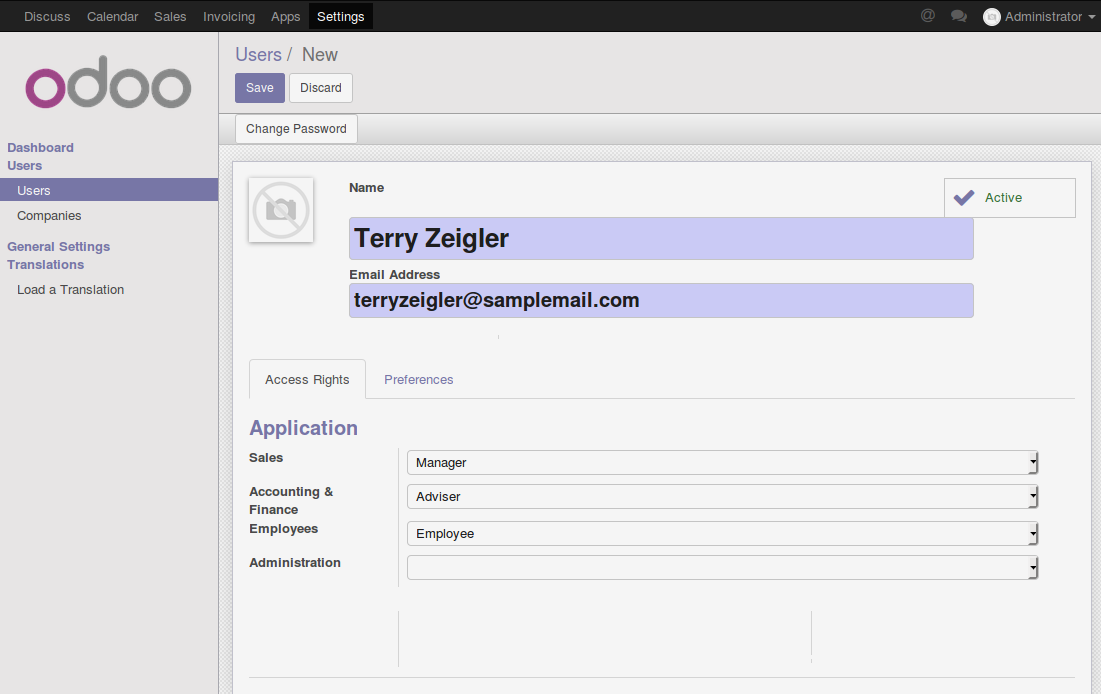
Create a new salesperson by going to the Settings menu, selecting Users, and then clicking the Create button. The new user form will appear. We have filled in the form with values for a fictional salesperson, Terry Zeigler.
The following is a screenshot of the user’s Access Rights tab:
Specifying the name of the user
You specify the username. Unlike some systems that provide separate first name and last name fields, with Odoo you specify the full name within a single field.
Email address
Beginning in Odoo 9, the user and login form prompts for email as opposed to username. This practice has continued in Odoo version 10 as well. It is still possible to use a user name instead of email address, but given the strong encouragement to use email address in Odoo 9 and Odoo 10, it is possible that in future versions of Odoo the requirement to provide an email address may be more strictly enforced.
Access Rights
The Access Rights tab lets you control which applications the user will be able to access. By default, Odoo will specify Mr.Ziegler as an employee so we will accept that default.
Sales application settings
When setting up your sales people in Odoo 10, you have three different options on how much access an individual user has to the sales system:

User: Own Documents Only
This is the most restrictive access to the sales application. A user with this access level is only allowed to see the documents they have entered themselves or which have been assigned to them. They will not be able to see Leads assigned to other salespeople in the sales application.
User: All Documents
With this setting, the user will have access to all documents within the sales application.
Manager
The Manager setting is the highest access level in the Odoo sales system. With this access level, the user can see all Leads as well as access the configuration options of the sales application. The Manager setting also allows the user to access statistical reports.
We will leave the Access Rights options unchecked. These are used when working with multiple companies or with multiple currencies.

The Preferences tab consists of the following options:
Language and Timezone
Odoo allows you to select the language for each user. Currently, Odoo supports more than 20 language translations. Specifying the Timezone field allows Odoo to coordinate the display of date and time on messages.
Email Messages and Notifications
In Odoo 7, messaging became a central component of the Odoo system. In version 10, support has been improved and it is now even easier to communicate important sales information between colleagues. Therefore, determining the appropriate handling of email, and circumstances in which a user will receive email, is very important. The Email Messages and Notifications option lets you determine when you will receive email messages from notifications that come to your Odoo inbox.
For our example, we have chosen All Messages. This is now the new default setting in Odoo 10. However, since we have not yet configured an email server, or if you have not configured an email server yourself, no emails will be sent or received at this stage.
Let’s review the user options that will be available in communicating by email.
Never: Selecting Never suppresses all email messaging for the user. Naturally, this is the setting you will wish to use if you do not have an email server configured. This is also a useful option for users that simply want to use the built-in inbox inside Odoo to retrieve their messages.
All Messages (discussions, emails, followed system notifications): This option sends an email notification for any action that would create an entry in your Odoo inbox. Unlike the other options, this action can include system notifications or other automated communications.
Signature
The Signature section allows you to customize the signature that will automatically be appended to Odoo-generated messages and emails.
Manually setting the user password
You may have noticed that there is no visible password field in the user record. That is because the default method is to email the user an account verification they can use to set their password. However, if you do not have an email server configured, there is an alternative method for setting the user password.
After saving the user record, use the Change Password button at the top of the form.

A form will then appear allowing you to set the password for the user.
Now in Odoo 10, there is a far more visible button available at the top left of the form. Just click the Change Password button.
Assigning a salesperson to a customer
Now that we have set up our salesperson, it is time to assign the salesperson their first customer. Previously, no salesperson had been assigned to our one and only customer, Mike Smith. So let’s go to the Sales menu and then click on Mike Smith to pull up his customer record and assign him Terry Ziegler as his salesperson. The following screenshot is of the customer screen opened to assign a salesperson:

Here, we have set the sales person to Terry Zeigler. By assigning your customers a salesperson, you can then better organize your customers for reports and additional statistical analysis.
Understanding Your Pipeline
Prior to Odoo 10, the CRM application primarily was a simple collection of Leads and opportunities. While Odoo still uses both Leads and opportunities as part of the CRM application, the concept of a Pipeline now takes center stage. You use the Pipeline to organize your opportunities by what stage they are within your sales process. Click on Your Pipeline in the Sales menu to see the overall layout of the Pipeline screen:
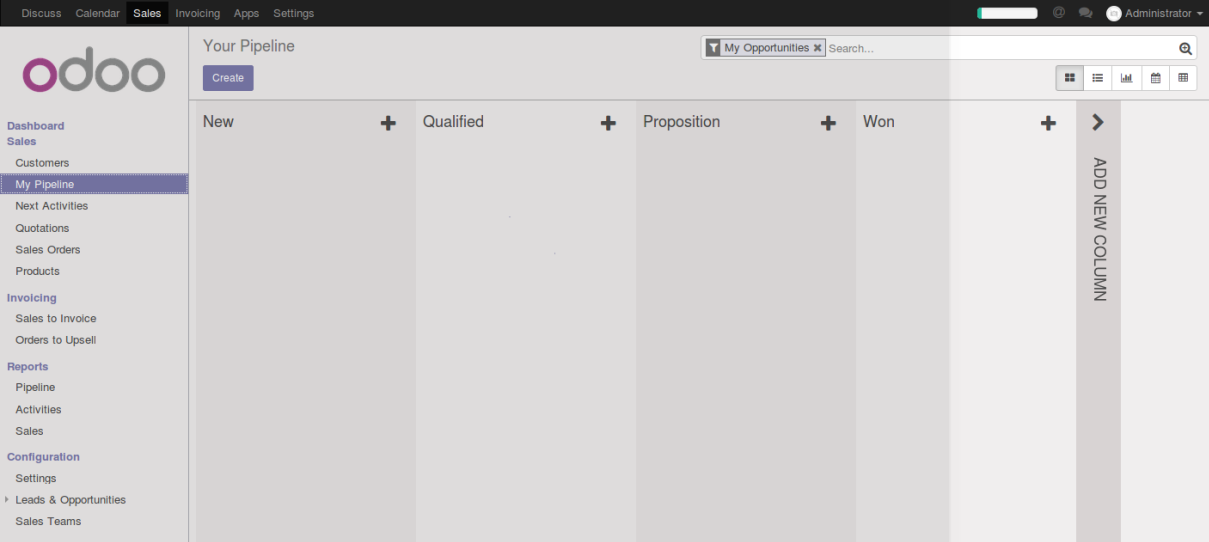
In the preceding Pipeline forms, one of the first things to notice is that there are default filters applied to the view. Up in the search box, you will see that there is a filter to limit the records in this view to the Direct Sales team as well as a My Opportunities filter. This effectively limits the records so you only see your opportunities from your primary sales team. Removing the My Opportunities filter will allow you to see opportunities from other salespeople in your organization.
Creating new opportunity
In Odoo 10, a potential sale is defined by creating a new opportunity. An opportunity allows you to begin collecting information about the scope and potential outcomes for a sale. These opportunities can be created from new Leads, or an opportunity can originate from an existing customer.
For our real-world example, let’s assume that Mike Smith has called and was so happy with his first order that he now wants to discuss using Silkworm for his local sports team. After a short conversation we decide to create an opportunity by clicking the Create button.
In Odoo 10, the CRM application greatly simplified the form for entering a new opportunity. Instead of bringing up the entire opportunity form with all the fields you get a simple form that collects only the most important information. The following screenshot is of a new opportunity form:

Opportunity Title
The title of your opportunity can be anything you wish. It is naturally important to choose a subject that makes it easy to identify the opportunity in a list. This is the only field required to create an opportunity in Odoo 10.
Customer
This field is automatically populated if you create an opportunity from the customer form. You can, however, assign a different customer if you like. This is not a required field, so if you have an opportunity that you do not wish to associate with a customer, that is perfectly fine. For example, you may leave this field blank if you are attending a trade show and expect to have revenue, but do not yet have any specific customers to attribute to the opportunity.
Expected revenue
Here, you specify the amount of revenue you can expect from the opportunity if you are successful. Inside the full opportunity form there is a field in which you can specify the percentage likelihood that an opportunity will result in a sale. These values are useful in many statistical reports, although they are not required to create an opportunity.
Rating
Some opportunities are more important than others. You can choose none, one, two, or three stars to designate the relative importance of this opportunity.
Introduction to sales stages
At the top of the Kanban view, you can see the default stages that are provided by an Odoo CRM installation. In this case, we see New, Qualified, Proposition, and Won.
As an opportunity moves between stages, the Kanban view will update to show you where each opportunity currently stands. Here, we can see because this Sports Team Project has just been entered in the New column.
Viewing the details of an opportunity
If you click the three lines at the top right of the Sports Team Project opportunity in the Kanban view, which appears when you hover the mouse over it, you will see a pop-up menu with your available options. The following screenshot shows the available actions on an opportunity:

Actions you can take on an opportunity
Selecting the Edit option takes you to the opportunity record and into edit mode for you to change any of the information. In addition, you can delete the record or archive the record so it will no longer appear in your pipeline by default.
The color palette at the bottom lets you color code your opportunities in the Kanban view. The small stars on the opportunity card allow you to highlight opportunities for special consideration. You can also easily drag and drop the opportunity into other columns as you work through the various stages of the sale.
Using Odoo’s OpenChatter feature
One of the biggest enhancements brought about in Odoo 7 and expanded on in later versions of Odoo was the new OpenChatter feature that provides social networking style communication to business documents and transactions.
As we work our brand new opportunity, we will utilize the OpenChatter feature to demonstrate how to communicate details between team members and generate log entries to document our progress.
The best thing about the OpenChatter feature is that it is available for nearly all business documents in Odoo. It also allows you to see a running set of logs of the transactions or operations that have affected the document. This means everything that applies here to the CRM application can also be used to communicate in sales and purchasing, or in communicating about a specific customer or vendor.
Changing the status of an opportunity
For our example, let’s assume that we have prepared our proposal and made the presentation. Bring up the opportunity by using the right-click Menu in the Kanban view or going into the list view and clicking the opportunity in the list.
It is time to update the status of our opportunity by clicking the Proposition arrow at the top of the form:

Notice that you do not have to edit the record to change the status of the opportunity. At the bottom of the opportunity, you will now see a logged note generated by Odoo that documents the changing of the opportunity from a new opportunity to a proposition. The following screenshot is of OpenChatter displaying a changed stage for the opportunity:
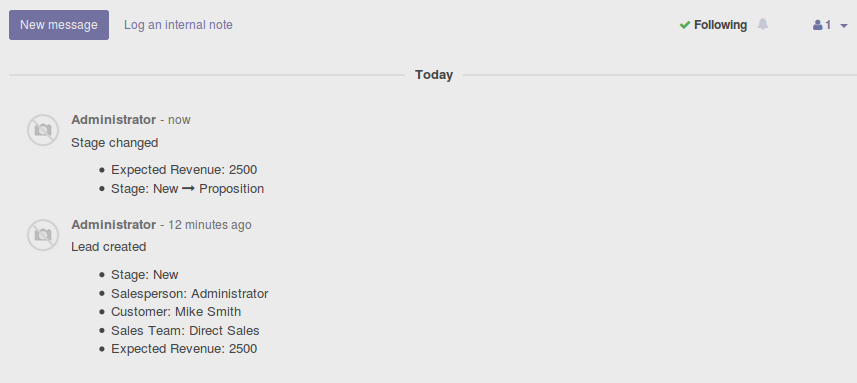
Notice how Odoo is logging the events automatically as they take place.
Managing the opportunity
With the proposal presented, let’s take down some details from what we have learned that may help us later when we come back to this opportunity. One method of collecting this information could be to add the details to the Internal Notes field in the opportunity form. There is value, however, in using the OpenChatter feature in Odoo to document our new details.
Most importantly, using OpenChatter to log notes gives you a running transcript with date and time stamps automatically generated. With the Generic Notes field, it can be very difficult to manage multiple entries. Another major advantage is that the OpenChatter feature can automatically send messages to team members’ inboxes updating them on progress. let’s see it in action!
Click the Log an Internal note link to attach a note to our opportunity. The following screenshot is for creating a note:

The activity option is unique to the CRM application and will not appear in most documents. You can use the small icons at the bottom to add a smiley, attach a document, or open up a full featured editor if you are creating a long note.
When you create a note, it is attached to the business document, but no message will be sent to followers. You can even attach a document to the note by using the Attach a File feature. After clicking the Log button, the note is saved and becomes part of the OpenChatter log for that document.
Following a business document
Odoo brings social networking concepts into your business communication. Fundamental to this implementation is that you can get automatic updates on a business document by following the document. Then, whenever there is a note, action, or a message created that is related to a document you follow, you will receive a message in your Odoo inbox. In the bottom right-hand corner of the form, you are presented with the options for when you are notified and for adding or removing followers from the document. The following screenshot is of the OpenChatter follow options:

In this case, we can see that both Terry Zeigler and Administrator are set as followers for this opportunity. The Following checkbox at the top indicates that I am following this document. Using the Add Followers link you can add additional users to follow the document.
The items followers are notified are viewed by clicking the arrow to the right of the following button. This brings up a list of the actions that will generate notifications to followers:

The checkbox next to Discussions indicates that I should be notified of any discussions related to this document. However, I would not be notified, for example, if the stage changed.
Modifying the stages of the sale
We have seen that Odoo provides a default set of sales stages. Many times, however, you will want to customize the stages to best deliver an outstanding customer experience. Moving an opportunity through stages should trigger actions that create a relationship with the customer and demonstrate your understanding of their needs. A customer in the qualification stage of a sale will have much different needs and much different expectations than a customer that is in the negotiation phase.
For our case study, there are sometimes printing jobs that are technically complex to accomplish. With different jerseys for a variety of teams, the final details need to go through a final technical review and approval process before the order can be entered and verified.
From a business perspective, the goal is not just to document the stage of the sales cycle; the primary goal is to use this information to drive customer interactions and improve the overall customer experience.
To add a stage to the sales process, bring up Your Pipeline and then click on the ADD NEW COLUMN area in the right of the form to bring up a little popup to enter the name for the new stage: 
After you have added the column to the sales process, you can use your mouse to drag and drop the columns into the order that you wish them to appear. We are now ready to begin the technical approval stage for this opportunity.
Drag and drop the Sports Team Project opportunity over to the Technical Approval column in the Kanban view. The following screenshot is of the opportunities Kanban view after adding the technical approval stage:

We now see the Technical Approval column in our Kanban view and have moved over the opportunity. You will also notice that any time you change the stage of an opportunity that there will be an entry that will be created in the OpenChatter section at the bottom of the form. In addition to the ability to drag and drop an opportunity into a new stage, you can also change the stage of an opportunity by going into the form view.
Closing the sale
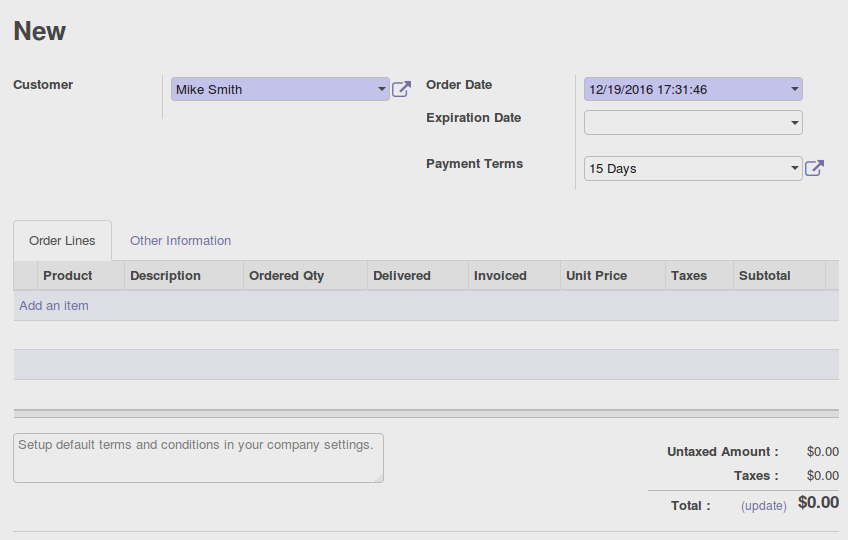
After a lot of hard work, we have finally won the opportunity, and it is time to turn this opportunity into a quotation. At this point, Odoo makes it easy to take that opportunity and turn it into an actual quotation.
Open up the opportunity and click the New Quotation tab at the top of the opportunity form: 
Unlike Odoo 8, which prompts for more information, in Odoo 10 you get taken to a new quote with the customer information already filled in:
We installed the CRM module, created salespeople, and proceeded to develop a system to manage the sales process.
To modify stages in the sales cycle and turn the opportunity into a quotation using Odoo 11, grab the latest edition Working with Odoo 11 – Third Edition.


![How to create sales analysis app in Qlik Sense using DAR method [Tutorial] Financial and Technical Data Analysis Graph Showing Search Findings](https://hub.packtpub.com/wp-content/uploads/2018/08/iStock-877278574-218x150.jpg)


