


In this article by Saurabh Grover, author of the book Designing Hyper-V Solutions, we will be discussing the last of the basics to get you equipped to create and manage a simple Hyper-V structure. No server environment, physical or virtual, is complete without a clear consideration and consensus over the underlying storage. In this article, you will learn about the details of virtual storage, how to differentiate one from the other, and how to convert one to the other and vice versa.
We will also see how Windows Server 2012 R2 removes dependencies on raw device mappings by way of pass-through or iSCSI LUN, which were required for guest clustering. VHDX can now be shared and delivers better results than pass-through disks. There are more merits to VHDX than the former, as it allows you to extend the size even if the virtual machine is alive.
Previously, Windows Server 2012 added a very interesting facet for storage virtualization in Hyper-V when it introduced virtual SAN, which adds a virtual host bus adapter (HBA) capability to a virtual machine. This allows a VM to directly view the fibre channel SAN. This in turn allows FC LUN accessibility to VMs and provides you with one more alternative for shared storage for guest clustering.
Windows Server 2012 also introduced the ability to utilize the SMI-S capability, which was initially tested on System Center VMM 2012. Windows 2012 R2 carries the torch forward, with the addition of new capabilities. We will discuss this feature briefly in this article.
In this article, you will cover the following:
- Two types of virtual disks, namely VHD and VHDX
- Merits of using VHDX from Windows 2012 R2 onwards
- Virtual SAN storage
- Implementing guest clustering using shared VHDX
Getting an insight into SMI-S
(For more resources related to this topic, see here.)
Virtual storage
A virtual machine is a replica of a physical machine in all rights and with respect to the building components, regardless of the fact that it is emulated, resembles, and delivers the same performance as a physical machine. Every computer ought to have storage for the OS or application loading. This condition applies to virtual machines as well. If VMs are serving as independent servers for roles such as domain controller or file server, where the server needs to maintain additional storage apart from the OS, the extended storage can be extended for domain user access without any performance degradation.
Virtual machines can benefit from multiple forms of storage, namely VHD/VHDX, which are file-based storage; iSCSI LUNs; pass-through LUNs, which are raw device mappings; and of late, virtual-fibre-channel-assigned LUNs. There have been enhancements to each of these, and all of these options have a straightforward implementation procedure. However, before you make a selection, you should identify the use case according to your design strategy and planned expenditure. In the following section, we will look at the storage choices more closely.
VHD and VHDX
VHD is the old flag bearer for Microsoft virtualization ever since the days of virtual PC and virtual server. The same was enhanced and employed in early Hyper-V releases. However, as a file-based storage that gets mounted as a normal storage for a virtual machine, VHD had its limitations. VHDX, a new feature addition to Windows Server 2012, was built further upon the limitations of its predecessor and provides greater storage capacity, support for large sector disks, and better protection against corruption. In the current release of Windows Server 2012 R2, VHDX has been bundled with more ammo.
VHDX packed a volley of feature enhancements when it was initially launched, and with Windows Server 2012 R2, Microsoft only made it better. If we compare the older, friendlier version of VHD with VHDX, we can draw the following inferences:
- Size factor: VHD had an upper size limit of 2 TB, while VHDX gives you a humungous maximum capacity of 64 TB.
- Large disk support: With the storage industry progressing towards 4 KB sector disks from the 512 bytes sector, for applications that still may depend on the older sector format, there are two offerings from the disk alignment perspective: native 4 KB disk and 512e (or 512 byte emulation disks). The operating system, depending on whether it supports native 4 KB disk or not, will either write 4 KB chunks of data or inject 512 bytes of data into a 4 KB sector. The process of injecting 512 bytes into a 4 KB sector is called RMW, or Read-Write-Modify.
VHDs are generically supported on 512e disks. Windows Server 2012 and R2 both support native 4 KB disks. However, the VHD driver has a limitation; it cannot open VHD files on physical 4 KB disks. This limitation is checked by enabling VHD to be aligned to 4 KB and RMW ready, but if you are migrating from the older Hyper-V platform, you will need to convert it accordingly.
VHDX, on the other hand, is the “superkid”. It can be used on all disk forms, namely 512, 512e, and the native 4 KB disk as well, without any RMW dependency.
- Data corruption safety: In the event of power outages or failures, the possibility of data corruption is reduced with VHDX. Metadata inside the VHDX is updated via a logging process that ensures that the allocations inside VHDX are committed successfully.
- Offloaded data transfers (ODX): With Windows Server 2012 Hyper-V supporting this feature, data transfer and moving and sizing of virtual disks can be achieved at the drop of a hat, without host server intervention. The basic prerequisite for utilizing this feature is to host the virtual machines on ODX-capable hardware. Thereafter, Windows Server 2012 self-detects and enables the feature. Another important clause is that virtual disks (VHDX) should be attached to the SCSI, not IDE.
- TRIM/UNMAP: Termed by Microsoft in its documentation as efficiency in representing data, this feature works in tandem with thin provisioning. It adds the ability to allow the underlying storage to reclaim space and maintain it optimally small.
- Shared VHDX: This is the most interesting feature in the collection released with Windows Server 2012 R2. It made guest clustering (failover clustering in virtual machines) in Hyper-V a lot simpler. With Windows Server 2012, you could set up a guest cluster using virtual fibre channel or iSCSI LUN. However, the downside was that the LUN was exposed to the user of the virtual machine.
Shared VHDX proves to be the ideal shared storage. It gives you the benefit of storage abstraction, flexibility, and faster deployment of guest clusters, and it can be stored on an SMB share or a cluster-shared volume (CSV).
Now that we know the merits of using VHDX over VHD, it is important to realize that either of the formats can be converted into the other and can be used under various types of virtual disks, allowing users to decide a trade-off between performance and space utilization.
Virtual disk types
Beyond the two formats of virtual hard disks, let’s talk about the different types of virtual hard disks and their utility as per the virtualization design. There are three types of virtual hard disks, namely dynamically expanding, fixed-size, and differencing virtual hard disks:
- Dynamically expanding: Also called a dynamic virtual hard disk, this is the default type. It gets created when you create a new VM or a new VHD/VHDX. This is Hyper-V’s take on thin provisioning. The VHD/VHDX file will start off from a small size and gradually grow up to the maximum defined size for the file as and when chunks of data get appended or created inside the OSE (short for operating system environment) hosted by the virtual disk.
This disk type is quite beneficial, as it prevents storage overhead and utilizes as much as required, rather than committing the entire block. However, due to the nature of the virtual storage, as it spawns in size, the actual file gets written in fragments across the Hyper-V CSV or LUN (physical storage). Hence, it affects the performance of the disk I/O operations of the VM.
- Fixed size: As the name indicates, the virtual disk type commits the same block size on the physical storage as its defined size. In other words, if you have specified a fixed size 1 TB, it will create a 1 TB VHDX file in the storage. The creation of a fixed size takes a considerable amount of time, commits space on the underlying storage, and does allow SAN thin provisioning to reclaim it, somewhat like whitespaces in a database. The advantage of using this type is that it delivers amazing read performance and heavy workloads from SQL, and exchange can benefit from it.
- Differencing: This is the last of the lot, but quite handy as an option when it comes to quick deployment of virtual machines. This is by far an unsuitable option, unless employed for VMs with a short lifespan, namely pooled VDI (short for virtual desktop infrastructure) or lab testing.
The idea behind the design is to have a generic virtual operating system environment (VOSE) in a shut down state at a shared location. The VHDX of the VOSE is used as a parent or root, and thereafter, multiple VMs can be spawned with differencing or child virtual disks that use the generalized OS from the parent and append changes or modifications to the child disk. So, the parent stays unaltered and serves as a generic image. It does not grow in size; on the contrary, the child disk keeps on growing as and when data is added to the particular VM.
Unless used for short-lived VMs, the long-running VMs could enter an outage state or may be performance-stricken soon due to the unpredictable growth pattern of a differencing disk. Hence, these should be avoided for server virtual machines without even a second thought.
Virtual disk operations
Now we will apply all of the knowledge gained about virtual hard disks, and check out what actions and customizations we can perform on them.
Creating virtual hard disks
This goal can be achieved in different ways:
- You can create a new VHD when you are creating a new VM, using the New Virtual Machine Wizard. It picks up the VHDX as the default option.
- You can also launch the New Virtual Hard Disk Wizard from a virtual machine’s settings.
- This can be achieved by PowerShell cmdlets as well:
New-VHD
You may employ the Disk Management snap-in to create a new VHD as well. The steps to create a VHD here are pretty simple:
- In the Disk Management snap-in, select the Action menu and select Create VHD, like this:

Figure 5-1: Disk Management – Create VHD
- This opens the Create and Attach Virtual Hard Disk applet. Specify the location to save the VHD at, and fill in Virtual hard disk format and Virtual hard disk type as depicted here in figure 5-2:

Figure 5-2: Disk Management – Create and Attach Virtual Hard Disk
The most obvious way to create a new VHD/VHDX for a VM is by launching New Virtual Hard Disk Wizard from the Actions pane in the Hyper-V Manager console. Click on New and then select the Hard Disk option. It will take you to the following set of screens:
-
On the Before You Begin screen, click on Next, as shown in this screenshot:

Figure 5-3: New Virtual Hard Disk Wizard – Create VHD
- The next screen is Choose Disk Format, as shown in figure 5-4. Select the relevant virtual hard disk format, namely VHD or VHDX, and click on Next.

Figure 5-4: New Virtual Hard Disk Wizard – Virtual Hard Disk Format
- In the screen for Choose Disk Type, select the relevant virtual hard disk type and click on Next, as shown in the following screenshot:

Figure 5-5: New Virtual Hard Disk Wizard– Virtual Hard Disk Type
- The next screen, as shown in figure 5-6, is Specify Name and Location. Update the Name and Location fields to store the virtual hard disk and click on Next.

Figure 5-6: New Virtual Hard Disk Wizard – File Location
- The Configure Disk screen, shown in figure 5-7, is an interesting one. If needs be, you can convert or copy the content of a physical storage (local, LUN, or something else) to the new virtual hard disk. Similarly, you can copy the content from an older VHD file to the Windows Server 2012 or R2 VHDX format. Then click on Next.

Figure 5-7: New Virtual Hard Disk Wizard – Configure Disk
- On the Summary screen, as shown in the following screenshot, click on Finish to create the virtual hard disk:

Figure 5-8: New Virtual Hard Disk Wizard – Summary
Editing virtual hard disks
There may be one or more reasons for you to feel the need to modify a previously created virtual hard disk to suit a purpose. There are many available options that you may put to use, given a particular virtual disk type. Before you edit a VHDX, it’s a good practice to inspect the VHDX or VHD.
The Inspect Disk option can be invoked from two locations: from the VM settings under the IDE or SCSI controller, or from the Actions pane of the Hyper-V Manager console. Also, don’t forget how to do this via PowerShell:
Get-VHD -Path "E:Hyper-VVirtual hard disks1.vhdx"
You may now proceed with editing a virtual disk. Again, the Edit Disk option can be invoked in exactly the same fashion as Inspect Disk. When you edit a VHDX, you are presented with four options, as shown in figure 5-9. It may sound obvious, but not all the options are for all the disk types:
- Compact: This operation is used to reduce or compact the size of a virtual hard disk, though the preset capacity remains the same. A dynamic disk, or differencing disk, grows as data elements are added, though deletion of the content does not automatically reclaim the storage capacity. Hence, a manual compact operation becomes imperative reduce the file size. PowerShell cmdlet can also do this trick, as follows:
Optimize-VHD
- Convert: This is an interesting one, and it almost makes you change your faith. As the name indicates, this operation allows you to convert one virtual disk type to another and vice versa. You can also create a new virtual disk of the desired format and type at your preferred location. The PowerShell construct used to help you achieve the same goal is as follows:
Convert-VHD
- Expand: This operation comes in handy, similar to Extend a LUN. You end up increasing the size of a virtual hard disk, which happens visibly fast for a dynamic disk and a bit slower for its fixed-size cousins. After this action, you have to perform the follow-up action inside the virtual machine to increase the volume size from disk management. Now, for the PowerShell code:
Resize-VHD
- Merge: This operation is disk-type-specific—differencing virtual disks. It allows two different actions. You can either merge the differencing disk with the original parent, or create a new merged VHD out of all the contributing VHDs, namely the parent and the child or the differencing disk. The latter is the preferred way of doing it, as in utmost probability, there would be more than differencing to a parent. In PowerShell, the alternative the cmdlet is this:
Merge-VHD

- Figure 5-9: Edit Virtual Hard Disk Wizard – Choose Action
Pass-through disks
As the name indicates, these are physical LUNs or hard drives passed on from the Hyper-V hosts, and can be assigned to a virtual machine as a standard disk. A once popular method on older Hyper-V platforms, this allowed the VM to harness the full potential of the raw device bypassing the Hyper-V host filesystem and also not getting restricted by the 2 TB limit of VHDs. A lot has changed over the years, as Hyper-V has matured into a superior virtualization platform and introduced VHDX, which went past the size limitation. with Windows Server 2012 R2 can be used as a shared storage for Hyper-V guest clusters.
There are, however, demerits to this virtual storage. When you employ a pass-through disk, the virtual machine configuration file is stored separately. Hence, the snapshotting becomes unknown to this setup. You would not be able to utilize the dynamic disk’s or differential disk’s abilities here too. Another challenge of using this form of virtual storage is that when using a VSS-based backup, the VSS writer ignores the pass-through and iSCSI LUN. Hence, a complex backup plan has to be implemented by involving a running backup within VM and on the virtualization host separately.
The following are steps, along with a few snapshots, that show you how to set up a pass-through disk:
-
Present a LUN to the Hyper-V host.
- Confirm the LUN in Disk Management and ensure that it stays in the Offline State and as Not Initialized.

Figure 5-10: Hyper-V Host Disk Management
- In Hyper-V Manager, right-click on the VM you wish to assign the pass-through to and select Settings.

Figure 5-11: VM Settings – Pass-through disk placement
- Select SCSI Controller (or IDE in the case of Gen-1 VM) and then select the Physical hard disk option, as shown in the preceding screenshot. In the drop-down menu, you will see the raw device or LUN you wish to assign. Select the appropriate option and click on OK.
- Check Disk Management within the virtual machine to confirm that the disk has visibility.
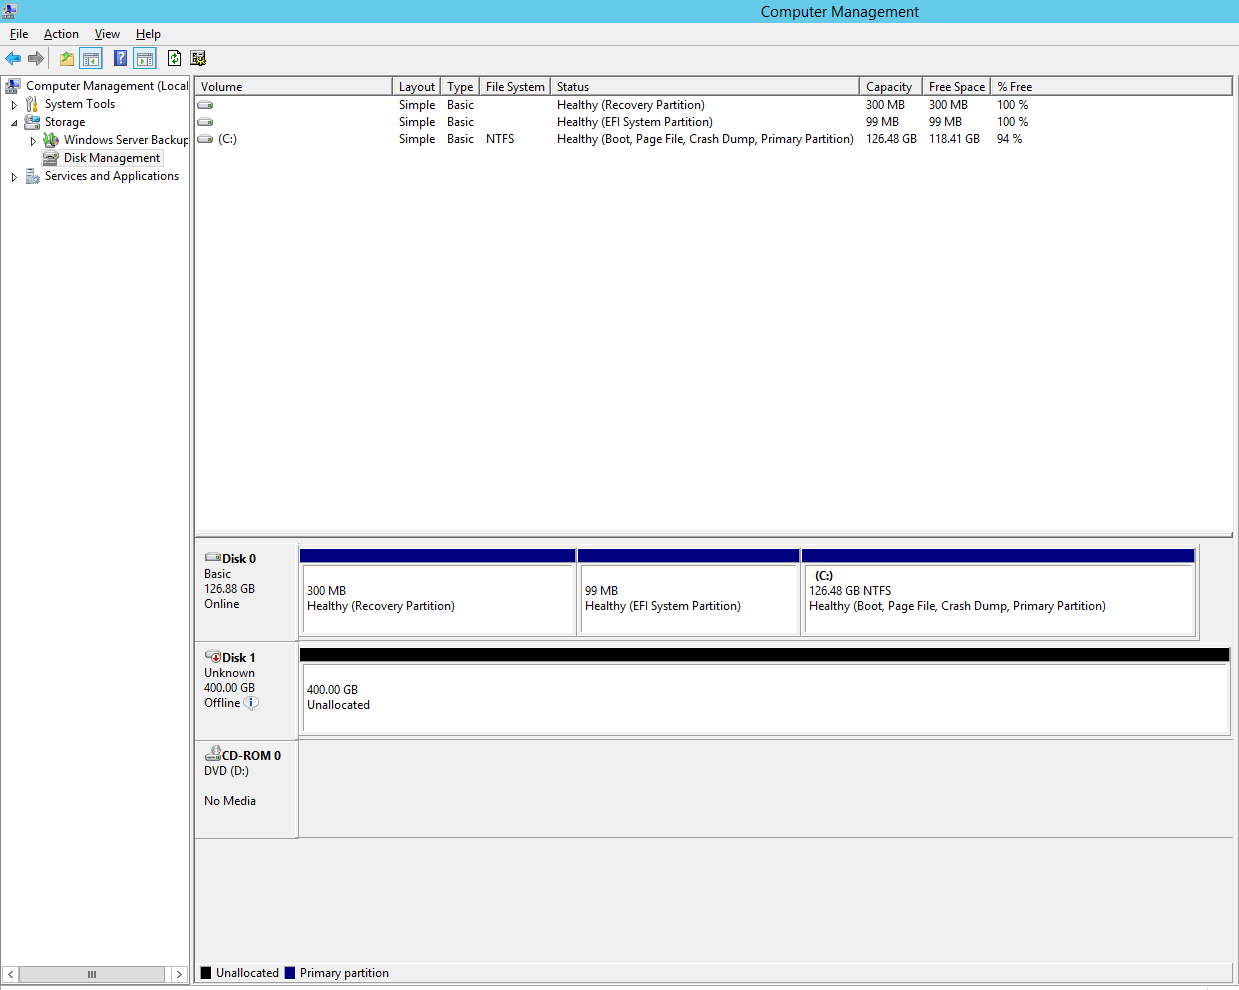
Figure 5-12: VM Disk Management – Pass-through Assignment
- Bring it online and initialize.

Figure 5-13: VM Disk Management – Pass-through Initialization
As always the preceding path can be chalked out with the help of a PowerShell cmdlet:
Add-VMHardDiskDrive -VMName VM5 –ControllerType SCSI – ControllerNumber 0 –ControllerLocation 2 –DiskNumber 3
Virtual fibre channel
Let’s move on to the next big offering in Windows Server 2012 and R2 Hyper-V Server. There was pretty much a clamor for direct FC connectivity to virtual machines, as pass-through disks were supported only via iSCSI LUNs (with some major drawbacks not with FC). Also, needless to say, FC is faster. Enterprises with high-performance workloads relying on the FC SAN refrained from virtualizing or migrating to the cloud.
Windows Server 2012 introduced the virtual fibre channel SAN ability in Hyper-V, which extended the HBA (short for host bus adapter) abilities to a virtual machine, granting them a WWN (short for world wide node name) and allowing access to a fibre channel SAN over a virtual SAN. The fundamental principle behind the virtual SAN is the same as the Hyper-V virtual switch, wherein you create a virtual SAN that hooks up to the SAN fabric over the physical HBA of the Hyper-V host. The virtual machine has new synthetic hardware for the last piece. It is called a virtual host bus adapter or vHBA, which gets its own set of WWNs, namely WWNN (node name) and WWPN (port name). The WWN is to the FC protocol as MAC is to the Ethernet. Once the WWNs are identified at the fabric and the virtual SAN, the storage admins can set up zoning and present the LUN to the specific virtual machine.
The concept is straightforward, but there are prerequisites that you will need to ensure are in place before you can get down to the nitty-gritty of the setup:
- One or more Windows Server 2012 or R2 Hyper-V hosts.
- Hosts should have one or more FC HBAs with the latest drivers, and should support the virtual fibre channel and NPIV. NPIV may be disabled at the HBA level (refer to the vendor documentation prior to deployment). The same can be enabled using command-line utilities or GUI-based such as OneCommand manager, SANSurfer, and so on.
- NPIV should be enabled on the SAN fabric or actual ports.
- Storage arrays are transparent to NPIV, but they should support devices that present LUNs.
- Supported guest operating systems for virtual SAN are Windows 2008, Windows 2008 R2, Windows 2012, and Windows 2012 R2.
- The virtual fibre channel does not allow boot from SAN, unlike pass-through disks.
We are now done with the prerequisites! Now, let’s look at two important aspects of SAN infrastructure, namely NPIV and MPIO.
N_Port ID virtualization (NPIV)
An ANSI T11 standard extension, this feature allows virtualization of the N_Port (WWPN) of an HBA, allowing multiple FC initiators to share a single HBA port. The concept is popular and is widely accepted and promoted by different vendors. Windows Server 2012 and R2 Hyper-V utilizes this feature to the best, wherein each virtual machine partaking in the virtual SAN gets assigned a unique WWPN and access to the SAN over a physical HBA spawning its own N_Port. Zoning follows next, wherein the fabric can have the zone directed to the VM WWPN. This attribute leads to a very small footprint, and thereby, easier management and operational and capital expenditure.
Summary
It is going to be quite a realization that we have covered almost all the basic attributes and aspects required for a simple Windows Server 2012 R2 Hyper-V infrastructure setup. If we revise the contents, we will notice this: we started off in this article by understanding and defining the purpose of virtual storage, and what the available options are for storage to be used with a virtual machine.
We reviewed various virtual hard disk types, formats, and associated operations that may be required to customize a particular type or modify it accordingly. We recounted how the VHDX format is superior to its predecessor VHD and which features were added with the latest Window Server releases, namely 2012 and 2012 R2. We discussed shared VHDX and how it can be used as an alternative to the old-school iSCSI or FC LUN as a shared storage for Windows guest clustering.
Pass-through disks are on their way out, and we all know the reason why. The advent of the virtual fibre channel with Windows Server 2012 has opened the doors for virtualization of high-performance workloads relying heavily on FC connectivity, which until now was a single reason and enough of a reason to decline consolidation of these workloads.
Resources for Article:
Further resources on this subject:
- Hyper-V Basics [article]
- Getting Started with Hyper-V Architecture and Components [article]
- Hyper-V building blocks for creating your Microsoft virtualization platform [article]