


In this article by Charbel Nemnom, the author of the book Getting Started with Windows Nano Server, we will cover the following topics:
- Remote server graphical tools
- Server manager
- Hyper-V manager
- Microsoft management console
- Managing Nano Server with PowerShell
(For more resources related to this topic, see here.)
Remote server graphical tools
Without the Graphical User Interface (GUI), it’s not easy to carry out the daily management and maintenance of Windows Server. For this reason, Microsoft integrated Nano Server with all the existing graphical tools that you are familiar with such as Hyper-V manager, failover cluster manager, server manager, registry editor, File explorer, disk and device manager, server configuration, computer management, users and groups console, and so on. All those tools and consoles are compatible to manage Nano Server remotely. The GUI is always the easiest way to use.
In this section, we will discuss how to access and set the most common configurations in Nano Server with remote graphical tools.
Server manager
Before we start managing Nano Server, we need to obtain the IP address or the computer name of the Nano Server to connect to and remotely manage a Nano instance either physical or virtual machine.
Login to your management machine and make sure you have installed the latest Remote Server Administration Tools (RSAT) for Windows Server 2016 or Windows 10.
You can download the latest RSAT tools from the following link:
https://www.microsoft.com/en-us/download/details.aspx?id=45520
Launch server manager as shown in Figure 1, and add your Nano Server(s) that you would like to manage:
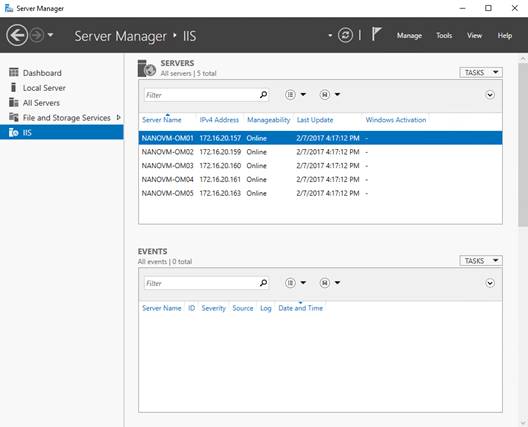 Figure 1: Managing Nano Server using server manager
You can refresh the view and browse all events and services as you expect to see.
I want to point out that Best Practices Analyzer (BPA) is not supported in Nano Server. BPA is completely cmdlets-based and written in C# back during the days of PowerShell 2.0. It is also statically using some .NET XML library code that was not part of .NET framework at that time. So, do not expect to see Best Practices Analyzer in server manager.
Hyper-V manager
The next console that you probably want to access is Hyper-V Manager, right click on Nano Server name in server manager and select Hyper-V Manager console as shown in Figure 2:
 Figure 2: Managing Nano Server using Hyper-V manager
Hyper-V Manager will launch with full support as you expect when managing full Windows Server 2016 Hyper-V, free Hyper-V server, server core and Nano Server with Hyper-V role.
Microsoft management console
You can use the Microsoft Management Console (MMC) to manage Nano Server as well.
From the command line type mmc.exe.
From the File menu, Click Add/Remove Snap-in…and then select Computer Management and click Add.
Choose Another computer and add the IP address or the computer name of your Nano Server machine. Click Ok.
As shown in Figure 3, you can expand System Tools and check the tools that you are familiar with like (Event Viewer, Local Users and Groups, Shares,and Services). Please note that some of these MMC tools such as Task Scheduler and Disk Management cannot be used against Nano Server. Also, for certain tools you need to open some ports in Windows firewall:
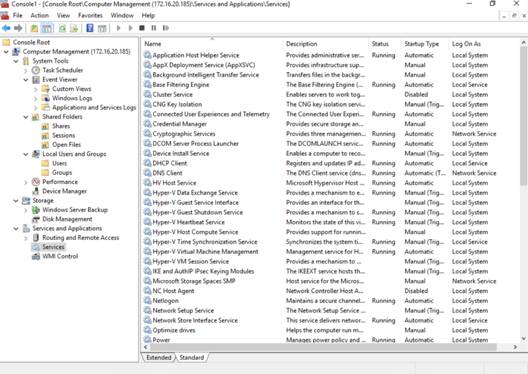 Figure 3: Managing Nano Server using Microsoft Management Console
Managing Nano Server with PowerShell
For most IT administrators, the graphical user interface is the easiest way to use. But on the other hand, PowerShell can bring a fast and an automated process.
That’s why in Windows Server 2016, the Nano Server deployment option of Windows Server comes with full PowerShell remoting support. The purpose of the core PowerShell engine, is to manage Nano Server instances at scale. PowerShell remoting including DSC, Windows Server cmdlets (network, storage, Hyper-V, and so on), Remote file transfer, Remote script authoring and debugging, and PowerShell Web access.
Some of the new features in Windows PowerShell version 5.1 on Nano Server supports the following:
- Copying files via PowerShell sessions
- Remote file editing in PowerShell ISE
- Interactive script debugging over PowerShell session
- Remote script debugging within PowerShell ISE
- Remote host process connects and debug
PowerShell version 5.1 is available in different editions which denote varying feature sets and platform compatibility. Desktop Edition targeting Full Server, Server Core and Windows Desktop, Core Edition targeting Nano Server and Windows IoT.
You can find a list of Windows PowerShell features not available yet in Nano Server here.
As Nano Server is still evolving, we will see what the next cadence update will bring for unavailable PowerShell features.
If you want to manage your Nano Server, you can use PowerShell Remoting or if your Nano Server instance is running in a virtual machine you can also use PowerShell Direct, more on that at the end of this section.
In order to manage a Nano server installation using PowerShell remoting carry out the following steps:
You may need to start the WinRM service on your management machine to enable remote connections. From the PowerShell console type the following command:
net start WinRMIf you want to manage Nano Server in a workgroup environment, open PowerShell console, and type the following command, substituting server name or IP with the right value using your machine-name is the easiest to use, but if your device is not uniquely named on your network, you can use the IP address instead:
Set-Item WSMan:localhostClientTrustedHosts -Value "servername or IP"If you want to connect multiple devices, you can use comma and quotation marks to separate each device.
Set-Item WSMan:localhostClientTrustedHosts -Value "servername or IP, servername or IP"You can also set it to allow to connect to a specific network subnet using the following command:
Set-Item WSMan:localhostClientTrustedHosts -Value 10.10.100.*To test Windows PowerShell remoting against Nano Server and check if it’s working, you can use the following command:
Test-WSMan -ComputerName"servername or IP" -Credential servernameAdministrator -Authentication NegotiateYou can now start an interactive session with Nano Server. Open an elevated PowerShell console and type the following command:
Enter-PSSession -ComputerName "servername or IP" -Credential servernameAdministratorIn the following example, we will create two virtual machines on Nano Server Hyper-V host using PowerShell remoting. From your management machine, open an elevated PowerShell console or PowerShell scripting environment ,and run the following script (make sure to update the variables to match your environment):
#region Variables

$NanoSRV='NANOSRV-HV01'
$Cred=Get-Credential"DemoSuperNano"
$Session=New-PSSession-ComputerName$NanoSRV-Credential$Cred
$CimSesion=New-CimSession-ComputerName$NanoSRV-Credential$Cred
$VMTemplatePath='C:Temp'
$vSwitch='Ext_vSwitch'
$VMName='DemoVM-0'

#endregion

# Copying VM Template from the management machine to Nano Server
Get-ChildItem-Path$VMTemplatePath-filter*.VHDX-recurse|Copy-Item-ToSession$Session-DestinationD:

1..2|ForEach-Object {

New-VM-CimSession$CimSesion-Name$VMName$_-VHDPath"D:$VMName$_.vhdx"-MemoryStartupBytes1024GB`
-SwitchName$vSwitch-Generation2

Start-VM-CimSession$CimSesion-VMName$VMName$_-Passthru

}
In this script, we are creating a PowerShell session and CIM session to Nano Server. A CIM session is a client-side object representing a connection to a local computer or a remote computer.
Then we are copying VM Templates from the management machine to Nano Server over PowerShell remoting, when the copy is completed, we are creating two virtual machines as Generation 2 and finally starting them.
After a couple of seconds, you can launch Hyper-V Manager console and see the new VMs running on Nano Server host as shown in Figure 4:
 Figure 4: Creating virtual machines on Nano Server host using PowerShell remoting
If you have installed Nano Server in a virtual machine running on a Hyper-V host, you can use PowerShell direct to connect directly from your Hyper-V host to your Nano Server VM without any network connection by using the following command:
Enter-PSSession -VMName <VMName> -Credential.Administrator So instead of specifying the computer name, we specified the VM Name, PowerShell Direct is so powerful, it’s one of my favorite feature, you can configure a bunch of VMs from scratch in just couple of seconds without any network connection.
Moreover, if you have Nano Server running as a Hyper-V host as shown in the example earlier, you could use PowerShell remoting first to connect to Nano Server from your management machine, and then leverage PowerShell Direct to manage your virtual machines running on top of Nano Server. In this example, we used two PowerShell technologies (PS remoting and PS Direct).This is so powerful and open many possibilities to effectively manage Nano Server.
To do that, you can use the following command:
#region Variables

$NanoSRV='NANOSRV-HV01'#Nano Server name or IP address
$DomainCred=Get-Credential"DemoSuperNano"
$VMLocalCred=Get-Credential"~Administrator"
$Session=New-PSSession-ComputerName$NanoSRV-Credential$DomainCred

#endregion

Invoke-Command-Session$Session-ScriptBlock {

Get-VM
Invoke-Command-VMName (Get-VM).Name-Credential$Using;VMLocalCred-ScriptBlock {
hostname
Tzutil/g
                }
}
In this script, we have created a PowerShell session into Nano Server physical host, and then we used PowerShell Direct to list all VMs, including their hostnames and time zone.
The result is shown in Figure 5:
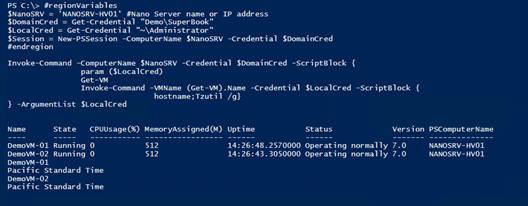 Figure 5. Nested PowerShell remoting
Summary
In this article, we discussed how to manage a Nano Server installation using remote server graphic tools, and Windows PowerShell remoting.
Resources for Article:
Further resources on this subject:
- Exploring Windows PowerShell 5.0 [article]
- Exchange Server 2010 Windows PowerShell: Mailboxes and Reports [article]
- Exchange Server 2010 Windows PowerShell: Managing Mailboxes [article]


