


In this article by Sangram Rath, the author of the book Hybrid Cloud Management with Red Hat CloudForms, this article takes you through the steps required to install, configure, and use Red Hat CloudForms on Red Hat Enterprise Linux OpenStack. However, you should be able to install it on OpenStack running on any other Linux distribution.
The following topics are covered in this article:
- System requirements
- Deploying the Red Hat CloudForms Management Engine appliance
- Configuring the appliance
- Accessing and navigating the CloudForms web console
(For more resources related to this topic, see here.)
System requirements
Installing the Red Hat CloudForms Management Engine Appliance requires an existing virtual or cloud infrastructure. The following are the latest supported platforms:
- OpenStack
- Red Hat Enterprise Virtualization
- VMware vSphere
The system requirements for installing CloudForms are different for different platforms. Since this book talks about installing it on OpenStack, we will see the system requirements for OpenStack.
You need a minimum of:
- Four VCPUs
- 6 GB RAM
- 45 GB disk space
The flavor we select to launch the CloudForms instance must meet or exceed the preceding requirements.
For a list of system requirements for other platforms, refer to the following links:
System requirements for Red Hat Enterprise Virtualization: https://access.redhat.com/documentation/en-US/Red_Hat_CloudForms/3.1/html/Installing_CloudForms_on_Red_Hat_Enterprise_Virtualization/index.html
System requirements for installing CloudForms on VMware vSphere: https://access.redhat.com/documentation/en-US/Red_Hat_CloudForms/3.1/html/Installing_CloudForms_on_VMware_vSphere/index.html
Additional OpenStack requirements
Before we can launch a CloudForms instance, we need to ensure that some additional requirements are met:
- Security group: Ensure that a rule is created to allow traffic on port 443 in the security group that will be used to launch the appliance.
- Flavor: Based on the system requirements for running the CloudForms appliance, we can either use an existing flavor, such as m1.large, or create a new flavor for the CloudForms Management Engine Appliance. To create a new flavor, click on the Create Flavor button under the Flavor option in Admin and fill in the required parameters, especially these three:
- At least four VCPUs
- At least 6144 MB of RAM
- At least 45 GB of disk space
- Key pair: Although, at the VNC console, you can just use the default username and password to log in to the appliance, it is good to have access to a key pair as well, if required, for remote SSH.
Deploying the Red Hat CloudForms Management Engine appliance
Now that we are aware of the resource and security requirements for Red Hat CloudForms, let’s look at how to obtain a copy of the appliance and run it.
Obtaining the appliance
The CloudForms Management appliance for OpenStack can be downloaded from your Red Hat customer portal under the Red Hat CloudForms product page. You need access to a Red Hat CloudForms subscription to be able to do so. At the time of writing this book, the direct download link for this is https://rhn.redhat.com/rhn/software/channel/downloads/Download.do?cid=20037.
For more information on obtaining the subscription and appliance, or to request a trial, visit http://www.redhat.com/en/technologies/cloud-computing/cloudforms.
Note
If you are unable to get access to Red Hat CloudForms, ManageIQ (the open source version) can also be used for hands-on experience.
Creating the appliance image in OpenStack
Before launching the appliance, we need to create an image in OpenStack for the appliance, since OpenStack requires instances to be launched from an image.
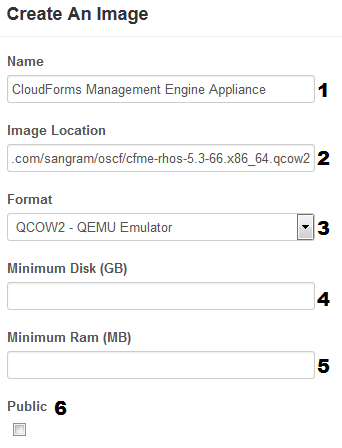
You can create a new Image under Project with the following parameters (see the screenshot given for assistance):
- Enter a name for the image.
- Enter the image location in Image Source (HTTP URL).
- Set the Format as QCOW2.
- Optionally, set the Minimum Disk size.
- Optionally, set Minimum Ram.
- Make it Public if required and Create An Image.
Note that if you have a newer release of OpenStack, there may be some additional options, but the preceding are what need to be filled in—most importantly the download URL of the Red Hat CloudForms appliance.
Wait for the Status field to reflect as Active before launching the instance, as shown in this screenshot:

Launching the appliance instance
In OpenStack, under Project, select Instances and then click on Launch Instance. In the Launch Instance wizard enter the following instance information in the Details tab:
- Select an Availabilty Zone.
- Enter an Instance Name.
- Select Flavor.
- Set Instance Count.
- Set Instance Boot Source as Boot from image.
- Select CloudForms Management Engine Appliance under Image Name. The final result should appear similar to the following figure:

- Under the Access & Security tab, ensure that the correct Key Pair and Security Group tab are selected, like this:

- For Networking, select the proper networks that will provide the required IP addresses and routing, as shown here:

- Other options, such as Post-Creation and Advanced Options, are optional and can be left blank.
- Click on Launch when ready to start creating the instance. Wait for the instance state to change to Running before proceeding to the next step.
Note
If you are accessing the CloudForms Management Engine from the Internet, a Floating IP address needs to be associated with the instance. This can be done from Project, under Access & Security and then the Floating IPs tab.
The Red Hat CloudForms web console
The web console provides a graphical user interface for working with the CloudForms Management Engine Appliance. The web console can be accessed from a browser on any machine that has network access to the CloudForms Management Engine server.
System requirements
The system requirements for accessing the Red Hat CloudForms web console are:
- A Windows, Linux, or Mac computer
- A modern browser, such as Mozilla Firefox, Google Chrome, and Internet Explorer 8 or above
- Adobe Flash Player 9 or above
- The CloudForms Management Engine Appliance must already be installed and activated in your enterprise environment
Accessing the Red Hat CloudForms Management Engine web console
Type the hostname or floating IP assigned to the instance prefixed by https in a supported browser to access the appliance. Enter default username as admin and the password as smartvm to log in to the appliance, as shown in this screenshot:

You should log in to only one tab in each browser, as the console settings are saved for the active tab only. The CloudForms Management Engine also does not guarantee that the browser’s Back button will produce the desired results. Use the breadcrumbs provided in the console.
Navigating the web console
The web console has a primary top-level menu that provides access to feature sets such as Insight, Control, and Automate, along with menus used to add infrastructure and cloud providers, create service catalogs and view or raise requests.
The secondary menu appears below the top primary menu, and its options change based on the primary menu option selected. In certain cases, a third-sublevel menu may also appear for additional options based on the selection in the secondary menu.

The feature sets available in Red Hat CloudForms are categorized under eight menu items:
- Cloud Intelligence: This provides a dashboard view of your hybrid cloud infrastructure for the selected parameters. Whatever is displayed here can be configured as a widget. It also provides additional insights into the hybrid cloud in the form of reports, chargeback configuration and information, timeline views, and an RSS feeds section.
- Services: This provides options for creating templates and service catalogs that help in provisioning multitier workloads across providers. It also lets you create and approve requests for these service catalogs.
- Clouds: This option in the top menu lets you add cloud providers; define availability zones; and create tenants, flavors, security groups, and instances.
- Infrastructure: This option, in a way similar to clouds, lets you add infrastructure providers; define clusters; view, discover, and add hosts; provision VMs; work with data stores and repositories; view requests; and configure the PXE.
- Control: This section lets you define compliance and control policies for the infrastructure providers using events, conditions, and actions based on the conditions. You can further combine these policies into policy profiles. Another important feature is alerting the administrators, which is configured from here. You can also simulate these policies, import and export them, and view logs.
- Automate: This menu option lets you manage life cycle tasks such as provisioning and retirement, and automation of resources. You can create provisioning dialogs to provision hosts and virtual machines and service dialogs to provision service catalogs. Dialog import/export, logs, and requests for automation are all managed from this menu option.
- Optimize: This menu option provides utilization, planning, and bottleneck summaries for the hybrid cloud environment. You can also generate reports for these individual metrics.
- Configure: Here, you can customize the look of the dashboard; view queued, running tasks and check errors and warnings for VMs and the UI. It let’s you configure the CloudForms Management Engine appliance settings such as database, additional worker appliances, SmartProxy, and white labelling. One can also perform tasks maintenance tasks such as updates and manual modification of the CFME server configuration files.
Summary
In this article, we deployed the Red Hat CloudForms Management Engine Appliance in an OpenStack environment, and you learned where to configure the hostname, network settings, and time zone. We then used the floating IP of the instance to access the appliance from a web browser, and you learned where the different feature sets are and how to navigate around.
Resources for Article:
Further resources on this subject:
- Introduction to Microsoft Azure Cloud Services[article]
- Apache CloudStack Architecture[article]
- Using OpenStack Swift [article]