


In this article by Michael Seidl, author of the book Microsoft System Center 2016 Orchestrator Cookbook – Second Edition, will show you how to setup Orchestrator Environment and how to deploy and configure Orchestrator Integration Packs.
(For more resources related to this topic, see here.)
Deploying an additional Runbook designer
Runbook designer is the key feature to build your Runbooks. After the initial installation, Runbook designer is installed on the server. For your daily work with orchestrator and Runbooks, you would like to install the Runbook designer on your client or on admin server. We will go through these steps in this recipe.
Getting ready
You must review the planning the Orchestrator deployment recipe before performing the steps in this recipe. There are a number of dependencies in the planning recipe you must perform in order to successfully complete the tasks in this recipe.
You must install a management server before you can install the additional Runbook Designers. The user account performing the installation has administrative privileges on the server nominated for the SCO deployment and must also be a member of OrchestratorUsersGroup or equivalent rights.
The example deployment in this recipe is based on the following configuration details:
- Management server called TLSCO01 with a remote database is already installed
- System Center 2016 Orchestrator
How to do it…
The Runbook designer is used to build Runbooks using standard activities and or integration pack activities. The designer can be installed on either a server class operating system or a client class operating system.
Follow these steps to deploy an additional Runbook Designer using the deployment manager:
- Install a supported operating system and join the active directory domain in scope of the SCO deployment. In this recipe the operating system is Windows 10.
- Ensure you configure the allowed ports and services if the local firewall is enabled for the domain profile. See the following link for details: https://technet.microsoft.com/en-us/library/hh420382(v=sc.12).aspx.
- Log in to the SCO Management server with a user account with SCO administrative rights.
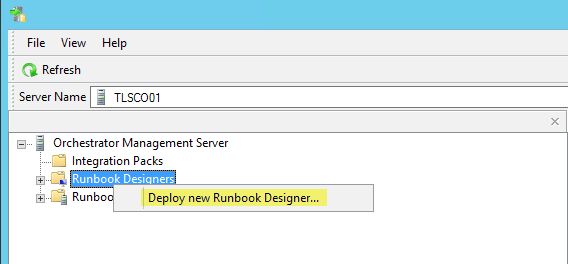
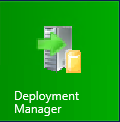
- Launch System Center 2016 Orchestrator Deployment Manager:

- Right-click on Runbook designers, and select Deploy new Runbook Designer:
- Click on Next on the welcome page. Type the computer name in the Computer field and click on Add. Click on Next.
- On the Deploy Integration Packs or Hotfixes page check all the integration packs required by the user of the Runbook designer (for this example we will select the AD IP).
- Click on Next. Click on Finish to begin the installation using the Deployment Manager.
How it works…
The Deployment Manager is a great option for scaling out your Runbook Servers and also for distributing the Runbook Designer without the need for the installation media. In both cases the Deployment Manager connects to the Management Server and the database server to configure the necessary settings. On the target system the deployment manager installs the required binaries and optionally deploys the integration packs selected.
Using the Deployment Manager provides a consistent and coordinated approach to scaling out the components of a SCO deployment.
See also
The following official web link is a great source of the most up to date information on SCO: https://docs.microsoft.com/en-us/system-center/orchestrator/
Registering an SCO Integration Pack
Microsoft System Center 2016 Orchestrator (SCO) automation is driven by process automation components.
These process automation components are similar in concept to a physical toolbox. In a toolbox you typically have different types of tools which enable you to build what you desire. In the context of SCO these tools are known as Activities.
Activities fall into two main categories:
- Built-in Standard Activities: These are the default activity categories available to you in the Runbook Designer. The standard activities on their own provide you with a set of components to create very powerful Runbooks.
- Integration Pack Activities: Integration Pack Activities are provided either by Microsoft, the community, solution integration organizations, or are custom created by using the Orchestrator Integration Pack Toolkit. These activities provide you with the Runbook components to interface with the target environment of the IP. For example, the Active Directory IP has the activities you can perform in the target Active Directory environment.
This recipe provides the steps to find and register the second type of activities into your default implementation of SCO.
Getting ready
You must download the Integration Pack(s) you plan to deploy from the provider of the IP. In this example we will be deploying the Active Directory IP, which can be found at the following link: https://www.microsoft.com/en-us/download/details.aspx?id=54098.
You must have deployed a System Center 2016 Orchestrator environment and have full administrative rights in the environment.
How to do it…
The following diagram provides a visual summary and order of the tasks you need to perform to complete this recipe:

We will deploy the Microsoft Active Directory (AD) integration pack (IP).
Integration pack organization
A good practice is to create a folder structure for your integration packs. The folders should reflect versions of the IPs for logical grouping and management. The version of the IP will be visible in the console and as such you must perform this step after you have performed the step to load the IP(s). This approach will aid in change management when updating IPs in multiple environments.
Follow these steps to deploy the Active Directory integration pack.
- Identify the source location for the Integration Pack in scope (for example, the AD IP for SCO2016). Download the IP to a local directory on the Management Server or UNC share.
- Log in to the SCO Management server. Launch the Deployment Manager:
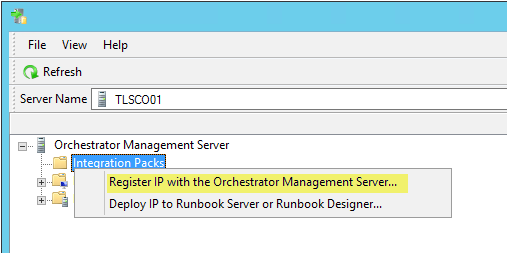
- Under Orchestrator Management Server, right-click on Integration Packs. Select Register IP with the Orchestrator Management Server:
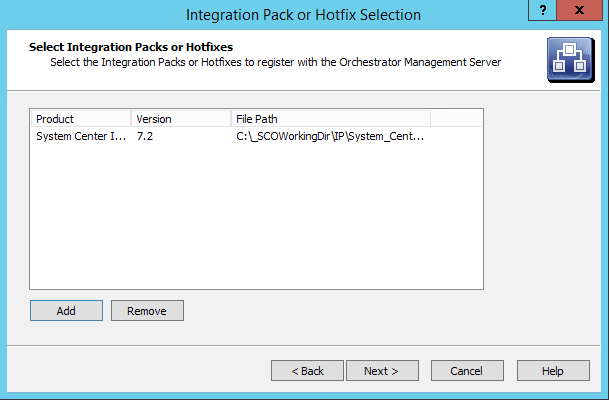
- Click on Next on the welcome page. Click on Add on the Select Integration Packs or Hotfixes page. Navigate to the directory where the target IP is located, click on Open, and then click on Next.
- Click on Finish . Click on Accept on End-User License Agreement to complete the registration. Click on Refresh to validate if the IP has successfully been registered.
How it works…
The process of loading an integration pack is simple. The prerequisite for successfully registering the IP (loading) is ensuring you have downloaded a supported IP to a location accessible to the SCO management server. Additionally the person performing the registration must be a SCO administrator.
At this point we have registered the Integration Pack to our Deployment Wizard, 2 Steps are still necessary before we can use the Integration Pack, see our following Recipe for this.
There’s more…
Registering the IP is the first part of the process of making the IP activities available to Runbook designers and Runbook Servers. The next Step has to be the Deployment of Integration Packs to Runbook Designer. See the next Recipe for that.
Orchestrator Integration Packs are provided not only by Microsoft, also third party Companies like Cisco or NetAPP are providing OIP’s for their Products. Additionally there is a huge Community which are providing Orchestrator Integration Packs.
There are several Sources of downloading Integration Packs, here are two useful links:
- http://www.techguy.at/liste-mit-integration-packs-fuer-system-center-orchestrator/
- http://scorch.codeplex.com/
- https://www.microsoft.com/en-us/download/details.aspx?id=54098
Deploying the IP to designers and Runbook servers
Registering the Orchestrator Integration Pack is only the first step, you also need to deploy the OIP to your Designer or Runbook Server.
Getting Ready
You have to follow the steps described in Recipe Registering an SCO Integration Pack before you can start with the next steps to deploy an OIP.
How to do it
In our example we will deploy the Active Direcgtory Integration Pack to our Runbooks Desginer.
Follow these steps to deploy the Active Directory integration pack.
Once the IP in scope (AD IP in our example) has successfully been registered, follow these steps to deploy it to the Runbook Designers and Runbook Servers.
- Log in to the SCO Management server and launch Deployment Manager:

- Under Orchestrator Management Server, right-click on the Integration Pack in scope and select Deploy IP to Runbook Server or Runbook Designer:
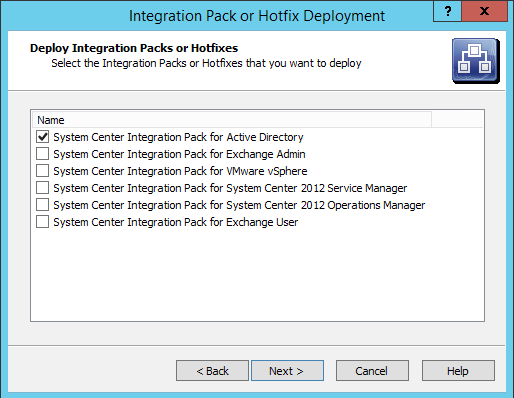
- Click on Next on the welcome page, select the IP you would like to deploy (in our example, System Center Integration Pack for Active Directory , and then click on Next.
- On the computer Selection page. Type the name of the Runbook Server or designer in scope and click on Add (repeat for all servers in the scope). On the Installation Options page you have the following three options:
- Schedule the Installation: select this option if you want to schedule the deployment for a specific time. You still have to select one of the next two options.
- Stop all running Runbooks before installing the Integration Packs or Hotfixes: This option will as described stop all current Runbooks in the environment.
- Install the Integration Packs or Hotfixes without stopping the running Runbooks: This is the preferred option if you want to have a controlled deployment without impacting current jobs:
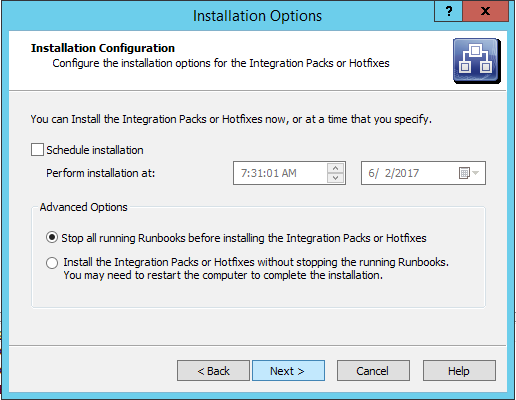
- Click on Next after making your installation option selection. Click on Finish
- The integration pack will be deployed to all selected designers and Runbook servers. You must close all Runbook designer consoles and re-launch to see the newly deployed Integration Pack.
How it works…
The process of deploying an integration pack is simple. The pre-requisite for successfully deploying the IP (loading) is ensuring you have registered a supported IP in the SCO management server.
Now we have successfully deployed an Orchestrator Integration Pack. If you have deployed it to a Runbook designer, make sure you close and reopen the designer to be able to use the activities in this Integration Pack. Now your are able to use these activities to build your Runbooks, the only thing you have to do, is to follow our next recipe and configure this Integration Pack.
This steps can be used for each single Integration Pack, also deploy multiple OIP with one deployment.
There’s more…
You have to deploy an OIP to every single Designer and Runbook Server, where you want to work with the Activities. Doesn’t matter if you want to edit a Runbook with the Designer or want to run a Runbook on a special Runbook Server, the OIP has to be deployed to both.
With Orchestrator Deployment Manager, this is a easy task to do.
Initial Integration Pack configuration
This recipe provides the steps required to configure an integration pack for use once it has been successfully deployed to a Runbook designer.
Getting ready
You must deploy an Orchestrator environment and also deploy the IP you plan to configure to a Runbook designer before following the steps in this recipe.
The authors assume the user account performing the installation has administrative privileges on the server nominated for the SCO Runbook designer.
How to do it…
Each integration pack serves as an interface to the actions SCO can perform in the target environment. In our example we will be focusing on the Active Directory connector. We will have two accounts under two categories of AD tasks in our scenario:
|
IP name |
Category of actions |
Account name |
|
Active Directory |
Domain Account Management |
SCOAD_ACCMGT |
|
Active Directory |
Domain Administrator Management |
SCOAD_DOMADMIN |
The following diagram provides a visual summary and order of the tasks you need to perform to complete this recipe:

Follow these steps to complete the configuration of the Active Directory IP options in the Runbook Designer:
- Create or identify an existing account for the IP tasks. In our example we are using two accounts to represent two personas of a typical active directory delegation model. SCOAD_ACCMGT is an account with the rights to perform account management tasks only and SCOAD_DOMADMIN is a domain admin account for elevated tasks in Active Directory.
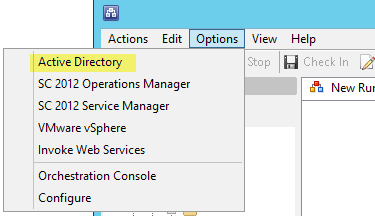
- Launch the Runbook Designer as a SCO administrator, select Options from the menu bar, and select the IP to configure (in our example, Active Directory).
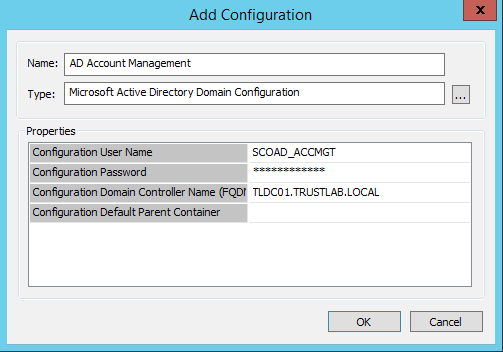
- Click on Add, type AD Account Management in the Name: field, select Microsoft Active Directory Domain Configuration in the Type field by clicking on the.
- In the Properties section type the following:
- Configuration User Name: SCOAD_ACCMGT
- Configuration Password: Enter the password for SCOAD_ACCMGT
- Configuration Domain Controller Name (FQDN): The FQDN of an accessible domain controller in the target AD (In this example, TLDC01.TRUSTLAB.LOCAL).
- Configuration Default Parent Container: This is an optional field. Leave it blank:
- Click on OK. Repeat steps 3 and 4 for the Domain Admin account and click on Finish to complete the configuration.
How it works…
The IP configuration is unique for each system environment SCO interfaces with for the tasks in scope of automation. The active directory IP configuration grants SCO the rights to perform the actions specified in the Runbook using the activities of the IP.
Typical Active Directory activities include, but are not limited to creating user and computer accounts, moving user and computer accounts into organizational units, or deleting user and computer accounts.
In our example we created two connection account configurations for the following reasons:
- Follow the guidance of scoping automation to the rights of the manual processes. If we use the example of a Runbook for creating user accounts we do not need domain admin access. A service desk user performing the same action manually would typically be granted only account management rights in AD.
- We have more flexibility with delegating management and access to Runbooks. Runbooks with elevated rights through the connection configuration can be separated from Runbooks with lower rights using folder security.
The configuration requires planning and understanding of its implication before implementing.
Each IP has its own unique options which you must specify before you create Runbooks using the specified IP. The default IPs that you can download from Microsoft include the documentation on the properties you must set.
There’s more…
As you have seen in this recipe, we need to configure each additional Integration Pack with a Connections String, User and Password. The built in Activities from SCO, are using the Service Account rights to perform this Actions, or you can configure a different User for most of the built in Activities.
See also
-
The official online documentation for Microsoft Integration Packs is updated regularly and should be a point for reference at https://www.microsoft.com/en-us/download/details.aspx?id=54098
-
The creating and maintaining a security model for Orchestrator in this article expands further on the delegation model in SCO.
Summary
In this article, we have covered the following:
- Deploying an Additional Runbook Designer
- Registering an SCO Integration Pack
- Deploying an SCO Integration Pack to Runbook Designer and Server
- Initial Integration Pack Configuration
Resources for Article:
Further resources on this subject:
- Deploying the Orchestrator Appliance [article]
- Unpacking System Center 2012 Orchestrator [article]
- Planning a Compliance Program in Microsoft System Center 2012 [article]