


Relay is used with both web and mobile React applications. It relies on a language called GraphQL which is used to fetch resources and to mutate those resources. The premise of Relay is that it can be scaled in ways that Redux and other approaches to handling state are limiting. It does this by eliminating them and keeping the focus on the data requirements of the component.
In this article, we will build a Todo React Native application using Relay. By the end of this article, you should feel comfortable about how data moves around in a GraphQL centric architecture.
At a high level, you can think of Relay as an implementation of Flux architecture patterns, and you can think of GraphQL as the interface that describes how the Flux stores within Relay work. At a more practical level, the value of Relay is ease of implementation. For example, with Redux, you have a lot of implementation work to do, just to populate the stores with data. This gets verbose over time. It’s this verbosity that makes Redux difficult to scale beyond a certain point.
[box type=”shadow” align=”” class=”” width=””]This article is taken from the book React and React Native – Second Edition by Adam Boduch. This book guides you through building applications for web and native mobile platforms with React, JSX, Redux, and GraphQL. To follow along with the examples implemented in this article, you can find the code in the GitHub repository of the book.
[/box]
TodoMVC and Relay
TodoMVC example for Relay will be a robust yet concise example. We will walk through an example React Native implementation of a Todo app. The key is that it’ll use the same GraphQL backend as the web UI.
I’ve included the web version of the TodoMVC app in the code that ships with this book, but I won’t dwell on the details of how it works. If you’ve worked on web development in the past 5 years, you’ve probably come across a sample Todo app. Here’s what the web version looks like:
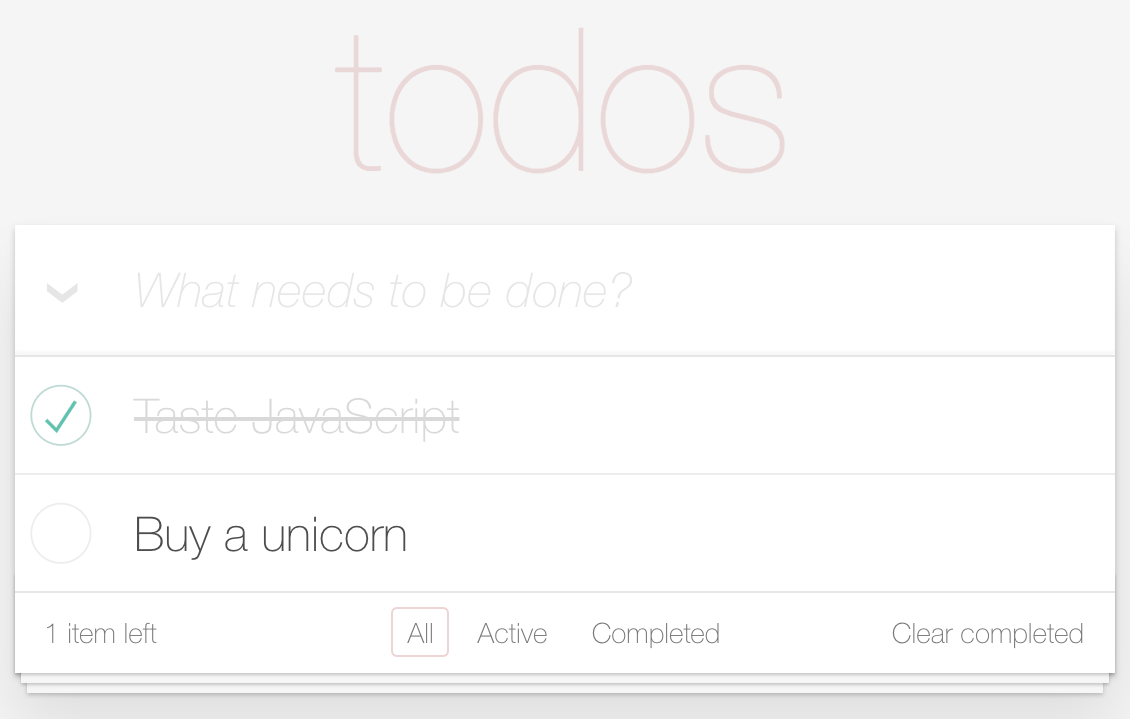
Even if you haven’t used any of the TodoMVC apps before, I would recommend playing with this one before trying to implement the native version, which is what you’ll be doing for the remainder of the article.
The goal of the native version that you’re about to implement isn’t functional parity. In fact, you’re shooting for a very minimal subset of todo functionality. The aim is to show you that Relay works mostly the same on native platforms as it does on web platforms and that the GraphQL backend can be shared between web and native apps.
The GraphQL schema
The schema is the vocabulary used by GraphQL backend server and the Relay components in the frontend. The GraphQL type system enables the schema to describe the data that’s available, and how to put it all together when a query request comes in. This is what makes the whole approach so scalable, the fact that the GraphQL runtime figures out how to put data together. All you need to supply are functions that tell GraphQL where the data is; for example, in a database or in some remote service endpoint.
Let’s take a look at the types used in the GraphQL schema for the TodoMVC app:
You can find the code in this section on GitHub.
import {
  GraphQLBoolean,
  GraphQLID,
  GraphQLInt,
  GraphQLList,
  GraphQLNonNull,
  GraphQLObjectType,
  GraphQLSchema,
  GraphQLString
} from 'graphql';
import {
  connectionArgs,
  connectionDefinitions,
  connectionFromArray,
  cursorForObjectInConnection,
  fromGlobalId,
  globalIdField,
  mutationWithClientMutationId,
  nodeDefinitions,
  toGlobalId
} from 'graphql-relay';

import {
  Todo,
  User,
  addTodo,
  changeTodoStatus,
  getTodo,
  getTodos,
  getUser,
  getViewer,
  markAllTodos,
  removeCompletedTodos,
  removeTodo,
  renameTodo
} from './database';

const { nodeInterface, nodeField } = nodeDefinitions(
  globalId => {
    const { type, id } = fromGlobalId(globalId);
    if (type === 'Todo') {
      return getTodo(id);
    }
    if (type === 'User') {
      return getUser(id);
    }
    return null;
  },
  obj => {
    if (obj instanceof Todo) {
      return GraphQLTodo;
    }
    if (obj instanceof User) {
      return GraphQLUser;
    }
    return null;
  }
);

const GraphQLTodo = new GraphQLObjectType({
  name: 'Todo',
  fields: {
    id: globalIdField(),
    complete: { type: GraphQLBoolean },
    text: { type: GraphQLString }
  },
  interfaces: [nodeInterface]
});

const {
  connectionType: TodosConnection,
  edgeType: GraphQLTodoEdge
} = connectionDefinitions({ nodeType: GraphQLTodo });

const GraphQLUser = new GraphQLObjectType({
  name: 'User',
  fields: {
    id: globalIdField(),
    todos: {
      type: TodosConnection,
      args: {
        status: {
          type: GraphQLString,
          defaultValue: 'any'
        },
        ...connectionArgs
      },
      resolve: (obj, { status, ...args }) =>
        connectionFromArray(getTodos(status), args)
    },
    numTodos: {
      type: GraphQLInt,
      resolve: () => getTodos().length
    },
    numCompletedTodos: {
      type: GraphQLInt,
      resolve: () => getTodos('completed').length
    }
  },
  interfaces: [nodeInterface]
});

const GraphQLRoot = new GraphQLObjectType({
  name: 'Root',
  fields: {
    viewer: {
      type: GraphQLUser,
      resolve: getViewer
    },
    node: nodeField
  }
});

const GraphQLAddTodoMutation = mutationWithClientMutationId({
  name: 'AddTodo',
  inputFields: {
    text: { type: new GraphQLNonNull(GraphQLString) }
  },
  outputFields: {
    viewer: {
      type: GraphQLUser,
      resolve: getViewer
    },
    todoEdge: {
      type: GraphQLTodoEdge,
      resolve: ({ todoId }) => {
        const todo = getTodo(todoId);
        return {
          cursor: cursorForObjectInConnection(getTodos(), todo),
          node: todo
        };
      }
    }
  },
  mutateAndGetPayload: ({ text }) => {
    const todoId = addTodo(text);
    return { todoId };
  }
});

const GraphQLChangeTodoStatusMutation = mutationWithClientMutationId({
  name: 'ChangeTodoStatus',
  inputFields: {
    id: { type: new GraphQLNonNull(GraphQLID) },
    complete: { type: new GraphQLNonNull(GraphQLBoolean) }
  },
  outputFields: {
    viewer: {
      type: GraphQLUser,
      resolve: getViewer
    },
    todo: {
      type: GraphQLTodo,
      resolve: ({ todoId }) => getTodo(todoId)
    }
  },
  mutateAndGetPayload: ({ id, complete }) => {
    const { id: todoId } = fromGlobalId(id);
    changeTodoStatus(todoId, complete);
    return { todoId };
  }
});

const GraphQLMarkAllTodosMutation = mutationWithClientMutationId({
  name: 'MarkAllTodos',
  inputFields: {
    complete: { type: new GraphQLNonNull(GraphQLBoolean) }
  },
  outputFields: {
    viewer: {
      type: GraphQLUser,
      resolve: getViewer
    },
    changedTodos: {
      type: new GraphQLList(GraphQLTodo),
      resolve: ({ changedTodoIds }) => changedTodoIds.map(getTodo)
    }
  },
  mutateAndGetPayload: ({ complete }) => {
    const changedTodoIds = markAllTodos(complete);
    return { changedTodoIds };
  }
});

const GraphQLRemoveCompletedTodosMutation = mutationWithClientMutationId(
  {
    name: 'RemoveCompletedTodos',
    outputFields: {
      viewer: {
        type: GraphQLUser,
        resolve: getViewer
      },
      deletedIds: {
        type: new GraphQLList(GraphQLString),
        resolve: ({ deletedIds }) => deletedIds
      }
    },
    mutateAndGetPayload: () => {
      const deletedTodoIds = removeCompletedTodos();
      const deletedIds = deletedTodoIds.map(
        toGlobalId.bind(null, 'Todo')
      );
      return { deletedIds };
    }
  }
);

const GraphQLRemoveTodoMutation = mutationWithClientMutationId({
  name: 'RemoveTodo',
  inputFields: {
    id: { type: new GraphQLNonNull(GraphQLID) }
  },
  outputFields: {
    viewer: {
      type: GraphQLUser,
      resolve: getViewer
    },
    deletedId: {
      type: GraphQLID,
      resolve: ({ id }) => id
    }
  },
  mutateAndGetPayload: ({ id }) => {
    const { id: todoId } = fromGlobalId(id);
    removeTodo(todoId);
    return { id };
  }
});

const GraphQLRenameTodoMutation = mutationWithClientMutationId({
  name: 'RenameTodo',
  inputFields: {
    id: { type: new GraphQLNonNull(GraphQLID) },
    text: { type: new GraphQLNonNull(GraphQLString) }
  },
  outputFields: {
    todo: {
      type: GraphQLTodo,
      resolve: ({ todoId }) => getTodo(todoId)
    }
  },
  mutateAndGetPayload: ({ id, text }) => {
    const { id: todoId } = fromGlobalId(id);
    renameTodo(todoId, text);
    return { todoId };
  }
});

const GraphQLMutation = new GraphQLObjectType({
  name: 'Mutation',
  fields: {
    addTodo: GraphQLAddTodoMutation,
    changeTodoStatus: GraphQLChangeTodoStatusMutation,
    markAllTodos: GraphQLMarkAllTodosMutation,
    removeCompletedTodos: GraphQLRemoveCompletedTodosMutation,
    removeTodo: GraphQLRemoveTodoMutation,
    renameTodo: GraphQLRenameTodoMutation
  }
});

export default new GraphQLSchema({
  query: GraphQLRoot,
  mutation: GraphQLMutation
});
There are a lot of things being imported here, so I’ll start with the imports. I wanted to include all of these imports because I think they’re contextually relevant for this discussion. First, there’s the primitive GraphQL types from the graphql library. Next, you have helpers from the graphql-relay library that simplify defining a GraphQL schema. Lastly, there’s imports from your own database module. This isn’t necessarily a database, in fact, in this case, it’s just mock data. You could replace database with api for instance, if you needed to talk to remote API endpoints, or we could combine the two; it’s all GraphQL as far as your React components are concerned.
Then, you define some of your own GraphQL types. For example, the GraphQLTodo type has two fields—text and complete. One is a Boolean and one is a string. The important thing to note about GraphQL fields is the resolve() function. This is how you tell the GraphQL runtime how to populate these fields when they’re required. These two fields simply return property values.
Then, there’s the GraphQLUser type. This field represents the user’s entire universe within the UI, hence the name. The todos field, for example, is how you query for todo items from Relay components. It’s resolved using the connectionFromArray() function, which is a shortcut that removes the need for more verbose field definitions. Then, there’s the GraphQLRoot type. This has a single viewer field that’s used as the root of all queries.
Now let’s take a closer look at the add todo mutation, as follows. I’m not going to go over every mutation that’s used by the web version of this app, in the interests of space:
const GraphQLAddTodoMutation = mutationWithClientMutationId({
  name: 'AddTodo',
  inputFields: {
    text: { type: new GraphQLNonNull(GraphQLString) }
  },
  outputFields: {
    viewer: {
      type: GraphQLUser,
      resolve: getViewer
    },
    todoEdge: {
      type: GraphQLTodoEdge,
      resolve: ({ todoId }) => {
        const todo = getTodo(todoId);
        return {
          cursor: cursorForObjectInConnection(getTodos(), todo),
          node: todo
        };
      }
    }
  },
  mutateAndGetPayload: ({ text }) => {
    const todoId = addTodo(text);
    return { todoId };
  }
});
All mutations have a mutateAndGetPayload() method, which is how the mutation actually makes a call to some external service to change the data. The returned payload can be the changed entity, but it can also include data that’s changed as a side-effect. This is where the outputFields come into play. This is the information that’s handed back to Relay in the browser so that it has enough information to properly update components based on the side effects of the mutation. Don’t worry, you’ll see what this looks like from Relay’s perspective shortly.
The mutation type that you’ve created here is used to hold all application mutations. Lastly, here’s how the entire schema is put together and exported from the module:
export default new GraphQLSchema({
  query: GraphQLRoot,
  mutation: GraphQLMutation
});
Don’t worry about how this schema is fed into the GraphQL server for now.
Bootstrapping Relay
At this point, you have the GraphQL backend up and running. Now, you can focus on your React components in the frontend. In particular, you’re going to look at Relay in a React Native context, which really only has minor differences. For example, in web apps, it’s usually react-router that bootstraps Relay. In React Native, it’s a little different. Let’s look at the App.js file that serves as the entry point for your native app:
You can find the code in this section on GitHub.
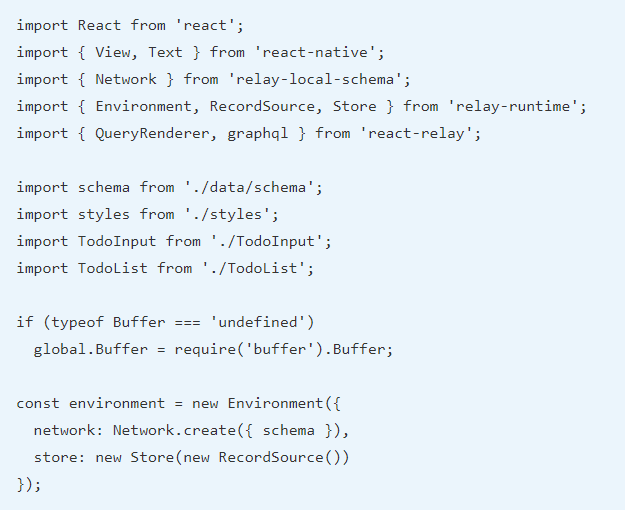
Let’s break down what’s happening here, starting with the environment constant:
const environment = new Environment({
  network: Network.create({ schema }),
  store: new Store(new RecordSource())
});
This is how you communicate with the GraphQL backend, by configuring a network. In this example, you’re importing Network from relay-local-schema, which means that no network requests are being made. This is really handy for when you’re getting started—especially building a React Native app.
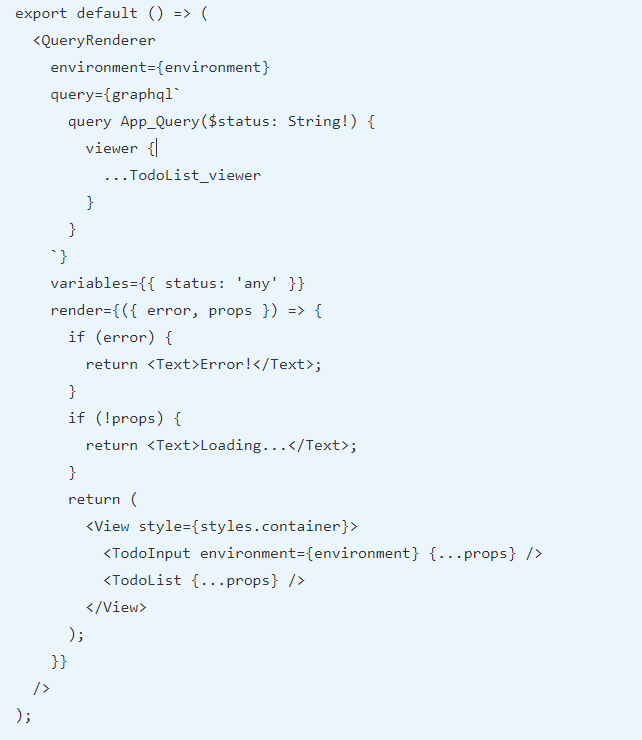
Next, there’s the QueryRenderer component. This Relay component is used to render other components that depend on GraphQL queries. It expects a query property:
query={graphql`
  query App_Query($status: String!) {
    viewer {
      ...TodoList_viewer
    }
  }
`}
Note that queries are prefixed by the module that they’re in. In this case, App. This query uses a GraphQL fragment from another module, TodoList, and is named TodoList_viewer. You can pass variables to the query:
variables={{ status: 'any' }}
Then, the render property is a function that renders your components when the GraphQL data is ready:
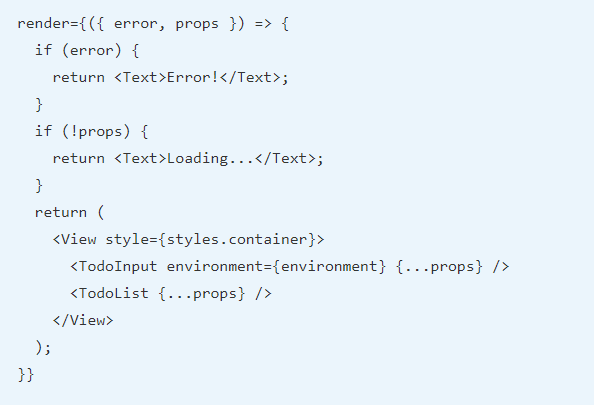
If something went wrong, error will contain information about the error. If there’s no error and no props, it’s safe to assume that the GraphQL data is still loading.
Adding todo items
In the TodoInput component, there’s a text input that allows the user to enter new todo items. When they’re done entering the todo, Relay will need to send a mutation to the backend GraphQL server. Here’s what the component code looks like:
You can find the code in this section on GitHub.
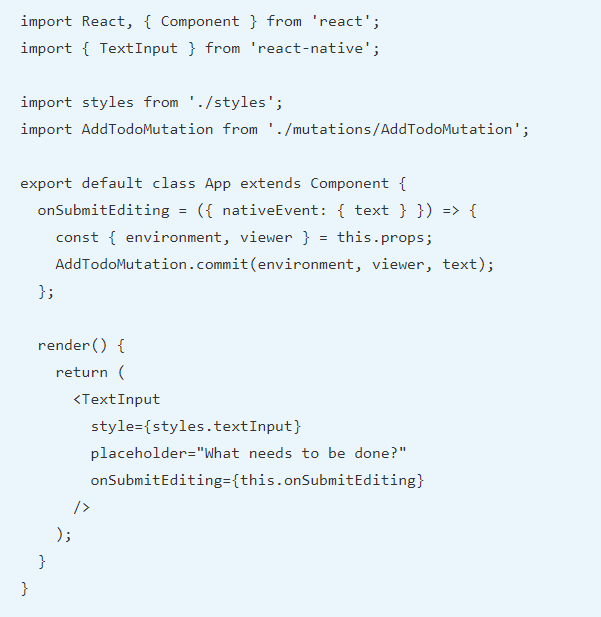
It doesn’t look that different from your typical React Native component. The piece that stands out is the mutation—AddTodoMutation. This is how you tell the GraphQL backend that you want a new todo node created.
Let’s see what the application looks like so far:
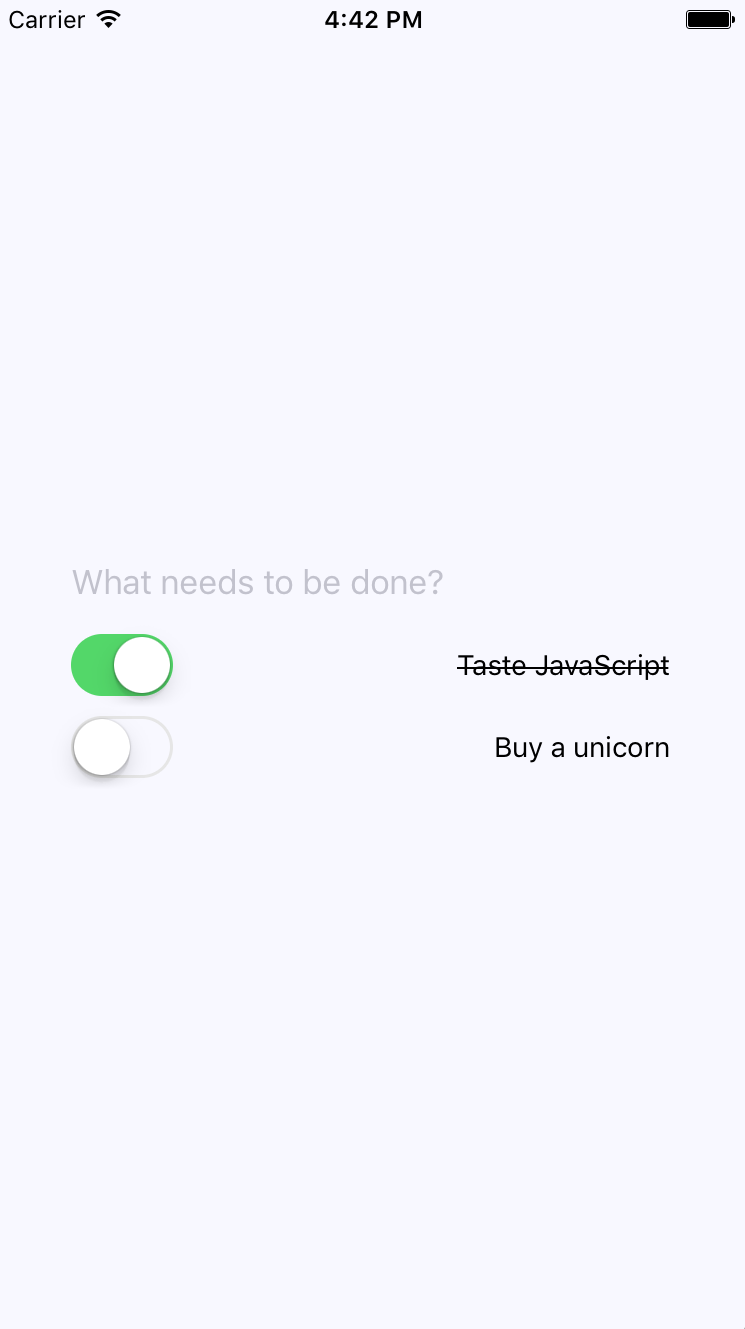
The textbox for adding new todo items is just above the list of todo items. Now, let’s look at the TodoList component, which is responsible for rendering the todo item list.
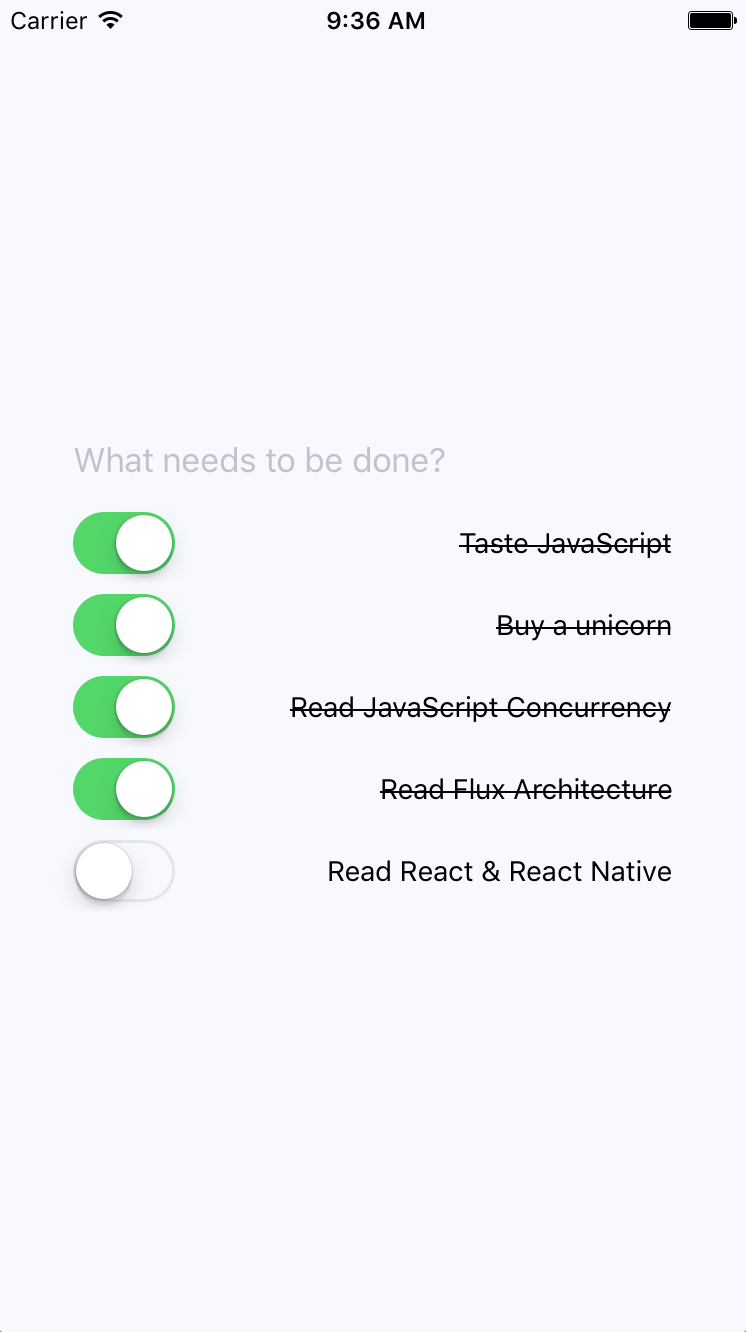
Rendering todo items
It’s the job of the TodoList component to render the todo list items. When AddTodoMutation takes place, the TodoList component needs to be able to render this new item. Relay takes care of updating the internal data stores where all of our GraphQL data lives. Here’s a look at the item list again, with several more todos added:
Here’s the TodoList component itself:
You can find the code in this section on GitHub.
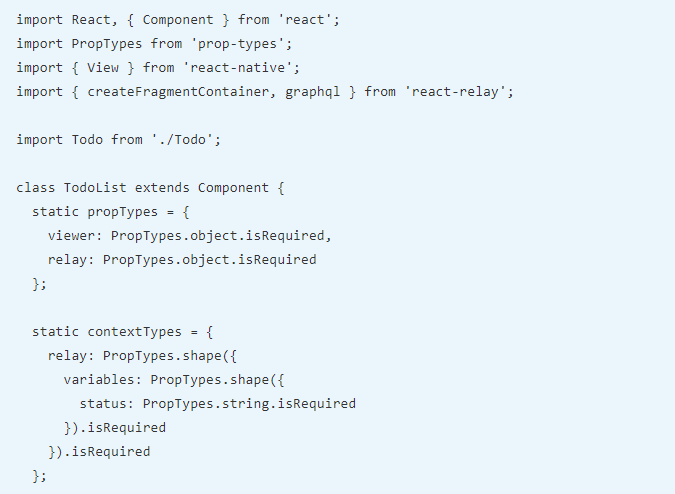
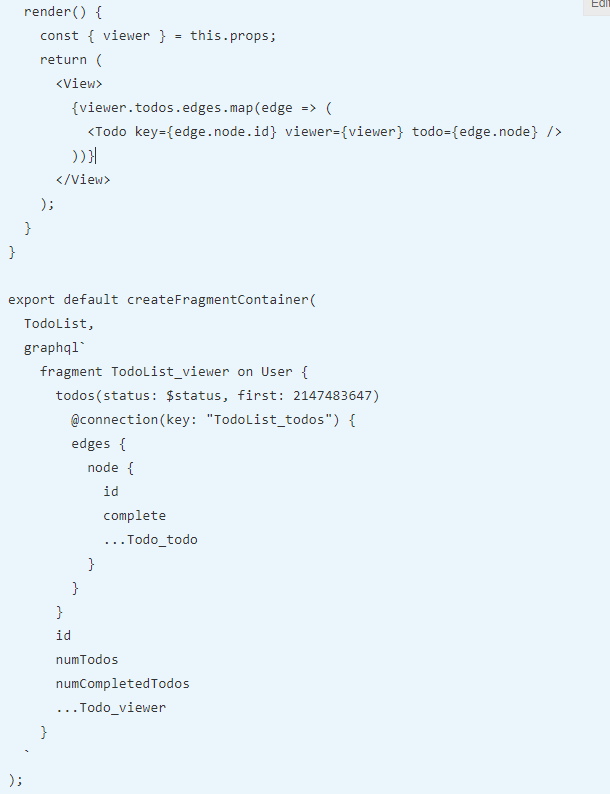

The relevant GraphQL to get the data you need is passed as a second argument to createFragmentContainer(). This is the declarative data dependency for the component. When you render the <Todo> component, you’re passing it the edge.todo data. Now, let’s see what the Todo component itself looks like.
Completing todo items
The last piece of this application is rendering each todo item and providing the ability to change the status of the todo. Let’s take a look at this code:
You can find the code in this section on GitHub.
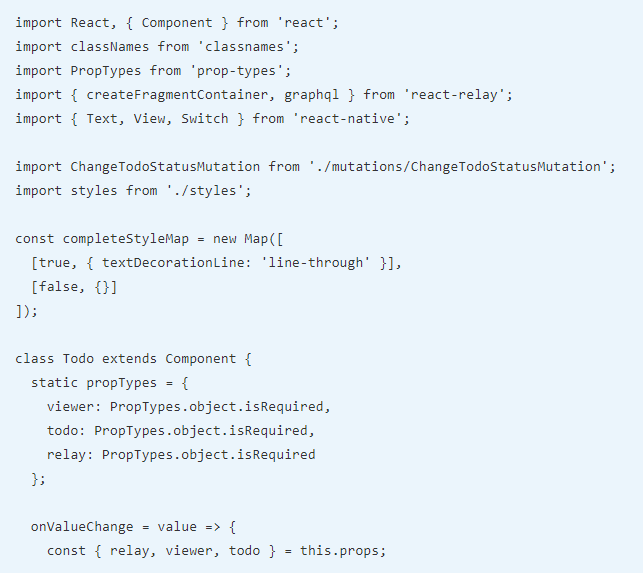
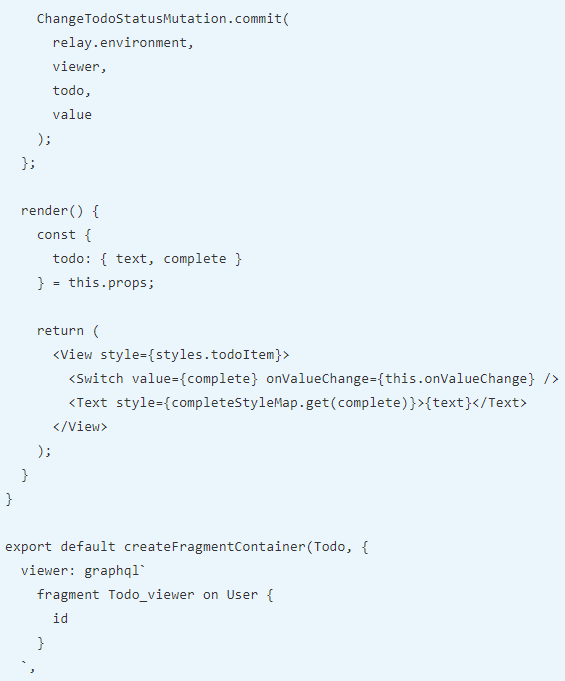

The actual component that’s rendered is a switch control and the item text. When the user marks the todo as complete, the item text is styled as crossed off. The user can also uncheck items. The ChangeTodoStatusMutation mutation sends the request to the GraphQL backend to change the todo state. The GraphQL backend then talks to any microservices that are needed to make this happen. Then, it responds with the fields that this component depends on.
The important part of this code that I want to point out is the fragments used in the Relay container. This container doesn’t actually use them directly. Instead, they’re used by the todos query in the TodoList component (Todo.getFrament()). This is useful because it means that you can use the Todo component in another context, with another query, and its data dependencies will always be satisfied.
In this article, we implemented some specific Relay and GraphQL ideas. Starting with the GraphQL schema, we learned how to declare the data that’s used by the application and how these data types resolve to specific data sources, such as microservice endpoints. Then, we learned about bootstrapping GraphQL queries from Relay in your React Native app. Next, we walked through the specifics of adding, changing and listing todo items. The application itself uses the same schema as the web version of the Todo application, which makes things much easier when you’re developing web and native React applications.
If you found this post useful, do check out the book, React and React Native – Second Edition. This book guides you through building applications for web and native mobile platforms with React, JSX, Redux, and GraphQL.
Read Next
JavaScript mobile frameworks comparison: React Native vs Ionic vs NativeScript
React introduces Hooks, a JavaScript function to allow using React without classes
npm JavaScript predictions for 2019: React, GraphQL, and TypeScript are three technologies to learn


