In this article by the author, Thilina Gunarathne, of the book, Hadoop MapReduce v2 Cookbook - Second Edition, we will learn about Hadoop and MadReduce. We are living in the era of big data, where exponential growth of phenomena such as web, social networking, smartphones, and so on are producing petabytes of data on a daily basis. Gaining insights from analyzing these very large amounts of data has become a must-have competitive advantage for many industries. However, the size and the possibly unstructured nature of these data sources make it impossible to use traditional solutions such as relational databases to store and analyze these datasets.
(For more resources related to this topic, see here.)
Storage, processing, and analyzing petabytes of data in a meaningful and timely manner require many compute nodes with thousands of disks and thousands of processors together with the ability to efficiently communicate massive amounts of data among them. Such a scale makes failures such as disk failures, compute node failures, network failures, and so on a common occurrence making fault tolerance a very important aspect of such systems. Other common challenges that arise include the significant cost of resources, handling communication latencies, handling heterogeneous compute resources, synchronization across nodes, and load balancing. As you can infer, developing and maintaining distributed parallel applications to process massive amounts of data while handling all these issues is not an easy task. This is where Apache Hadoop comes to our rescue.
Google is one of the first organizations to face the problem of processing massive amounts of data. Google built a framework for large-scale data processing borrowing the map and reduce paradigms from the functional programming world and named it as MapReduce. At the foundation of Google, MapReduce was the Google File System, which is a high throughput parallel filesystem that enables the reliable storage of massive amounts of data using commodity computers. Seminal research publications that introduced Google MapReduce and Google File System concepts can be found at http://research.google.com/archive/mapreduce.html and http://research.google.com/archive/gfs.html. Apache Hadoop MapReduce is the most widely known and widely used open source implementation of the Google MapReduce paradigm. Apache Hadoop Distributed File System (HDFS) provides an open source implementation of the Google File Systems concept.
Apache Hadoop MapReduce, HDFS, and YARN provide a scalable, fault-tolerant, distributed platform for storage and processing of very large datasets across clusters of commodity computers. Unlike in traditional High Performance Computing (HPC) clusters, Hadoop uses the same set of compute nodes for data storage as well as to perform the computations, allowing Hadoop to improve the performance of large scale computations by collocating computations with the storage. Also, the hardware cost of a Hadoop cluster is orders of magnitude cheaper than HPC clusters and database appliances due to the usage of commodity hardware and commodity interconnects. Together Hadoop-based frameworks have become the de-facto standard for storing and processing big data.
Hadoop Distributed File System – HDFS
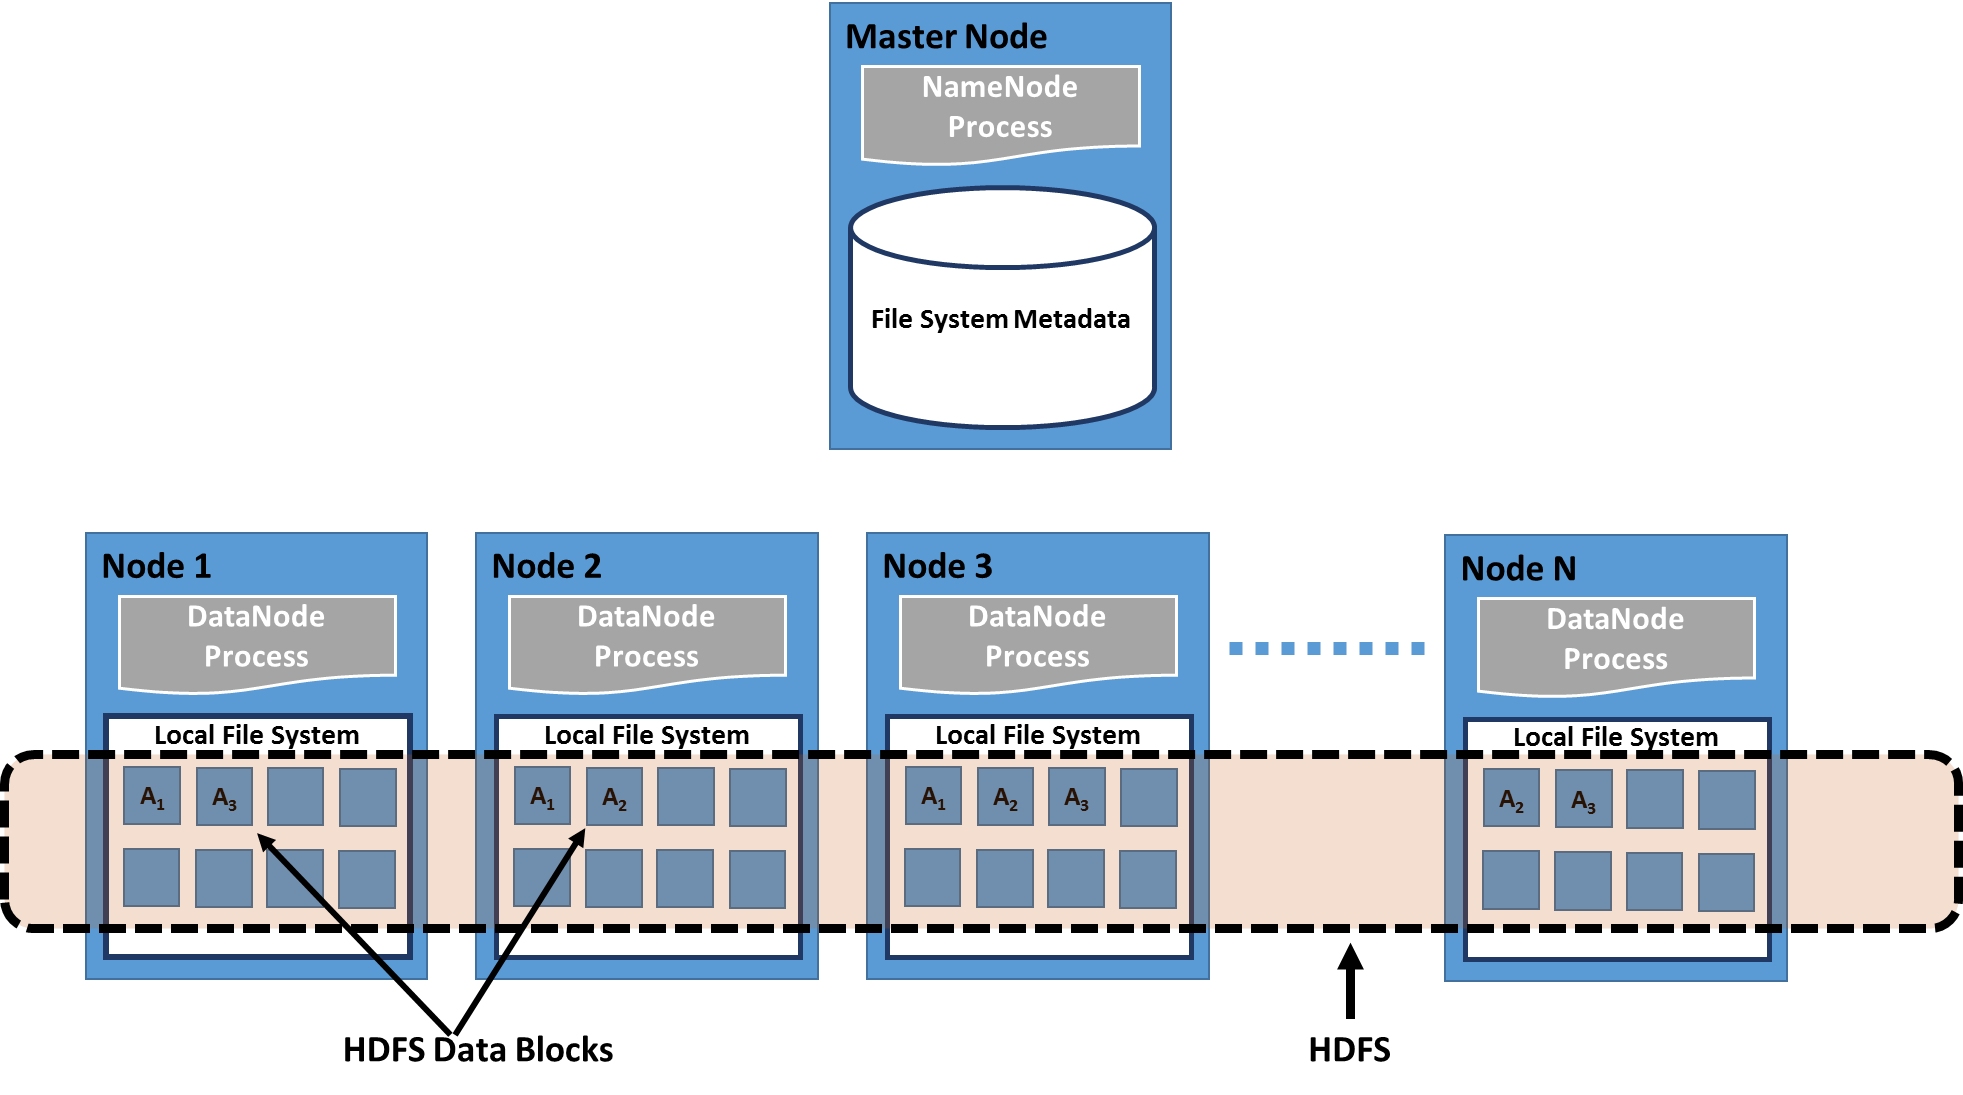
HDFS is a block structured distributed filesystem that is designed to store petabytes of data reliably on compute clusters made out of commodity hardware. HDFS overlays on top of the existing filesystem of the compute nodes and stores files by breaking them into coarser grained blocks (for example, 128 MB). HDFS performs better with large files. HDFS distributes the data blocks of large files across to all the nodes of the cluster to facilitate the very high parallel aggregate read bandwidth when processing the data. HDFS also stores redundant copies of these data blocks in multiple nodes to ensure reliability and fault tolerance. Data processing frameworks such as MapReduce exploit these distributed sets of data blocks and the redundancy to maximize the data local processing of large datasets, where most of the data blocks would get processed locally in the same physical node as they are stored.
HDFS consists of NameNode and DataNode services providing the basis for the distributed filesystem. NameNode stores, manages, and serves the metadata of the filesystem. NameNode does not store any real data blocks. DataNode is a per node service that manages the actual data block storage in the DataNodes. When retrieving data, client applications first contact the NameNode to get the list of locations the requested data resides in and then contact the DataNodes directly to retrieve the actual data. The following diagram depicts a high-level overview of the structure of HDFS:
Hadoop v2 brings in several performance, scalability, and reliability improvements to HDFS. One of the most important among those is the High Availability (HA) support for the HDFS NameNode, which provides manual and automatic failover capabilities for the HDFS NameNode service. This solves the widely known NameNode single point of failure weakness of HDFS. Automatic NameNode high availability of Hadoop v2 uses Apache ZooKeeper for failure detection and for active NameNode election. Another important new feature is the support for HDFS federation. HDFS federation enables the usage of multiple independent HDFS namespaces in a single HDFS cluster. These namespaces would be managed by independent NameNodes, but share the DataNodes of the cluster to store the data. The HDFS federation feature improves the horizontal scalability of HDFS by allowing us to distribute the workload of NameNodes. Other important improvements of HDFS in Hadoop v2 include the support for HDFS snapshots, heterogeneous storage hierarchy support (Hadoop 2.3 or higher), in-memory data caching support (Hadoop 2.3 or higher), and many performance improvements.
Almost all the Hadoop ecosystem data processing technologies utilize HDFS as the primary data storage. HDFS can be considered as the most important component of the Hadoop ecosystem due to its central nature in the Hadoop architecture.
Hadoop YARN
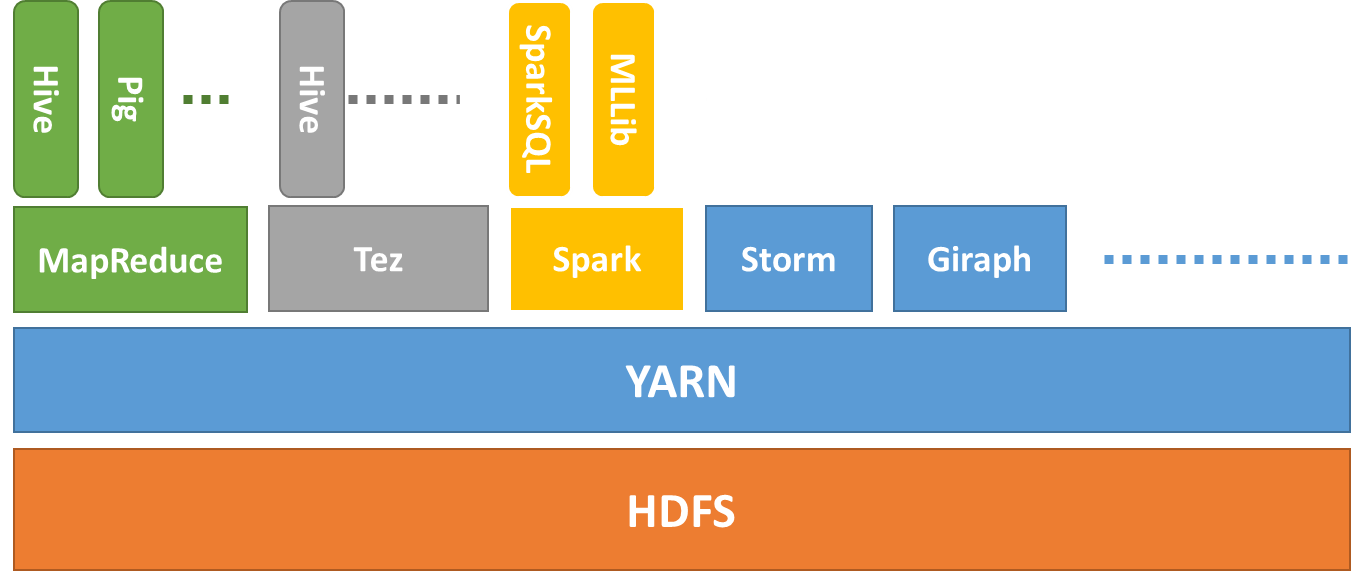
YARN (Yet Another Resource Negotiator) is the major new improvement introduced in Hadoop v2. YARN is a resource management system that allows multiple distributed processing frameworks to effectively share the compute resources of a Hadoop cluster and to utilize the data stored in HDFS. YARN is a central component in the Hadoop v2 ecosystem and provides a common platform for many different types of distributed applications.
The batch processing based MapReduce framework was the only natively supported data processing framework in Hadoop v1. While MapReduce works well for analyzing large amounts of data, MapReduce by itself is not sufficient enough to support the growing number of other distributed processing use cases such as real-time data computations, graph computations, iterative computations, and real-time data queries. The goal of YARN is to allow users to utilize multiple distributed application frameworks that provide such capabilities side by side sharing a single cluster and the HDFS filesystem. Some examples of the current YARN applications include the MapReduce framework, Tez high performance processing framework, Spark processing engine, and the Storm real-time stream processing framework. The following diagram depicts the high-level architecture of the YARN ecosystem:
The YARN ResourceManager process is the central resource scheduler that manages and allocates resources to the different applications (also known as jobs) submitted to the cluster. YARN NodeManager is a per node process that manages the resources of a single compute node. Scheduler component of the ResourceManager allocates resources in response to the resource requests made by the applications, taking into consideration the cluster capacity and the other scheduling policies that can be specified through the YARN policy plugin framework.
YARN has a concept called containers, which is the unit of resource allocation. Each allocated container has the rights to a certain amount of CPU and memory in a particular compute node. Applications can request resources from YARN by specifying the required number of containers and the CPU and memory required by each container.
ApplicationMaster is a per-application process that coordinates the computations for a single application. The first step of executing a YARN application is to deploy the ApplicationMaster. After an application is submitted by a YARN client, the ResourceManager allocates a container and deploys the ApplicationMaster for that application. Once deployed, the ApplicationMaster is responsible for requesting and negotiating the necessary resource containers from the ResourceManager. Once the resources are allocated by the ResourceManager, ApplicationMaster coordinates with the NodeManagers to launch and monitor the application containers in the allocated resources. The shifting of application coordination responsibilities to the ApplicationMaster reduces the burden on the ResourceManager and allows it to focus solely on managing the cluster resources. Also having separate ApplicationMasters for each submitted application improves the scalability of the cluster as opposed to having a single process bottleneck to coordinate all the application instances. The following diagram depicts the interactions between various YARN components, when a MapReduce application is submitted to the cluster:
While YARN supports many different distributed application execution frameworks, our focus in this article is mostly on traditional MapReduce and related technologies.
Hadoop MapReduce
Hadoop MapReduce is a data processing framework that can be utilized to process massive amounts of data stored in HDFS. As we mentioned earlier, distributed processing of a massive amount of data in a reliable and efficient manner is not an easy task. Hadoop MapReduce aims to make it easy for users by providing a clean abstraction for programmers by providing automatic parallelization of the programs and by providing framework managed fault tolerance support.
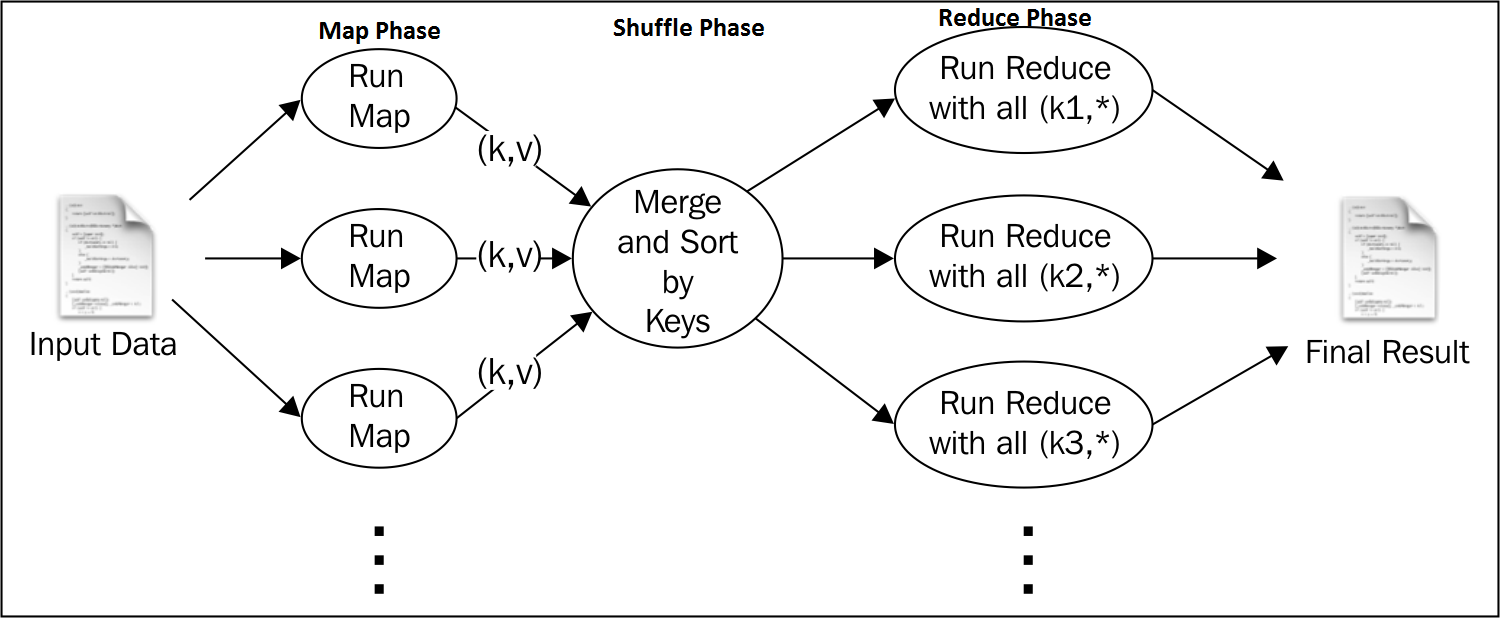
MapReduce programming model consists of Map and Reduce functions. The Map function receives each record of the input data (lines of a file, rows of a database, and so on) as key-value pairs and outputs key-value pairs as the result. By design, each Map function invocation is independent of each other allowing the framework to use divide and conquer to execute the computation in parallel. This also allows duplicate executions or re-executions of the Map tasks in case of failures or load imbalances without affecting the results of the computation. Typically, Hadoop creates a single Map task instance for each HDFS data block of the input data. The number of Map function invocations inside a Map task instance is equal to the number of data records in the input data block of the particular Map task instance.
Hadoop MapReduce groups the output key-value records of all the Map tasks of a computation by the key and distributes them to the Reduce tasks. This distribution and transmission of data to the Reduce tasks is called the Shuffle phase of the MapReduce computation. Input data to each Reduce task would also be sorted and grouped by the key. The Reduce function gets invoked for each key and the group of values of that key (reduce <key, list_of_values>) in the sorted order of the keys. In a typical MapReduce program, users only have to implement the Map and Reduce functions and Hadoop takes care of scheduling and executing them in parallel. Hadoop will rerun any failed tasks and also provide measures to mitigate any unbalanced computations. Have a look at the following diagram for a better understanding of the MapReduce data and computational flows:
In Hadoop 1.x, the MapReduce (MR1) components consisted of the JobTracker process, which ran on a master node managing the cluster and coordinating the jobs, and TaskTrackers, which ran on each compute node launching and coordinating the tasks executing in that node. Neither of these processes exist in Hadoop 2.x MapReduce (MR2). In MR2, the job coordinating responsibility of JobTracker is handled by an ApplicationMaster that will get deployed on-demand through YARN. The cluster management and job scheduling responsibilities of JobTracker are handled in MR2 by the YARN ResourceManager. JobHistoryServer has taken over the responsibility of providing information about the completed MR2 jobs. YARN NodeManagers provide the functionality that is somewhat similar to MR1 TaskTrackers by managing resources and launching containers (which in the case of MapReduce 2 houses Map or Reduce tasks) in the compute nodes.
Hadoop installation modes
Hadoop v2 provides three installation choices:
Local mode: The local mode allows us to run MapReduce computation using just the unzipped Hadoop distribution. This nondistributed mode executes all parts of Hadoop MapReduce within a single Java process and uses the local filesystem as the storage. The local mode is very useful for testing/debugging the MapReduce applications locally.
Pseudo distributed mode: Using this mode, we can run Hadoop on a single machine emulating a distributed cluster. This mode runs the different services of Hadoop as different Java processes, but within a single machine. This mode is good to let you play and experiment with Hadoop.
Distributed mode: This is the real distributed mode that supports clusters that span from a few nodes to thousands of nodes. For production clusters, we recommend using one of the many packaged Hadoop distributions as opposed to installing Hadoop from scratch using the Hadoop release binaries, unless you have a specific use case that requires a vanilla Hadoop installation. Refer to the Setting up Hadoop ecosystem in a distributed cluster environment using a Hadoop distribution recipe for more information on Hadoop distributions.
Setting up Hadoop ecosystem in a distributed cluster environment using a Hadoop distribution
The Hadoop YARN ecosystem now contains many useful components providing a wide range of data processing, storing, and querying functionalities for the data stored in HDFS. However, manually installing and configuring all of these components to work together correctly using individual release artifacts is quite a challenging task. Other challenges of such an approach include the monitoring and maintenance of the cluster and the multiple Hadoop components.
Luckily, there exist several commercial software vendors that provide well integrated packaged Hadoop distributions to make it much easier to provision and maintain a Hadoop YARN ecosystem in our clusters. These distributions often come with easy GUI-based installers that guide you through the whole installation process and allow you to select and install the components that you require in your Hadoop cluster. They also provide tools to easily monitor the cluster and to perform maintenance operations. For regular production clusters, we recommend using a packaged Hadoop distribution from one of the well-known vendors to make your Hadoop journey much easier. Some of these commercial Hadoop distributions (or editions of the distribution) have licenses that allow us to use them free of charge with optional paid support agreements.
Hortonworks Data Platform (HDP) is one such well-known Hadoop YARN distribution that is available free of charge. All the components of HDP are available as free and open source software. You can download HDP from http://hortonworks.com/hdp/downloads/. Refer to the installation guides available in the download page for instructions on the installation.
Cloudera CDH is another well-known Hadoop YARN distribution. The Express edition of CDH is available free of charge. Some components of the Cloudera distribution are proprietary and available only for paying clients. You can download Cloudera Express from http://www.cloudera.com/content/cloudera/en/products-and-services/cloudera-express.html. Refer to the installation guides available on the download page for instructions on the installation.
Hortonworks HDP, Cloudera CDH, and some of the other vendors provide fully configured quick start virtual machine images that you can download and run on your local machine using a virtualization software product. These virtual machines are an excellent resource to learn and try the different Hadoop components as well as for evaluation purposes before deciding on a Hadoop distribution for your cluster.
Apache Bigtop is an open source project that aims to provide packaging and integration/interoperability testing for the various Hadoop ecosystem components. Bigtop also provides a vendor neutral packaged Hadoop distribution. While it is not as sophisticated as the commercial distributions, Bigtop is easier to install and maintain than using release binaries of each of the Hadoop components. In this recipe, we provide steps to use Apache Bigtop to install Hadoop ecosystem in your local machine.
Benchmarking Hadoop MapReduce using TeraSort
Hadoop TeraSort is a well-known benchmark that aims to sort 1 TB of data as fast as possible using Hadoop MapReduce. TeraSort benchmark stresses almost every part of the Hadoop MapReduce framework as well as the HDFS filesystem making it an ideal choice to fine-tune the configuration of a Hadoop cluster.
The original TeraSort benchmark sorts 10 million 100 byte records making the total data size 1 TB. However, we can specify the number of records, making it possible to configure the total size of data.
Getting ready
You must set up and deploy HDFS and Hadoop v2 YARN MapReduce prior to running these benchmarks, and locate the hadoop-mapreduce-examples-*.jar file in your Hadoop installation.
How to do it...
The following steps will show you how to run the TeraSort benchmark on the Hadoop cluster:
The first step of the TeraSort benchmark is the data generation. You can use the teragen command to generate the input data for the TeraSort benchmark. The first parameter of teragen is the number of records and the second parameter is the HDFS directory to generate the data. The following command generates 1 GB of data consisting of 10 million records to the tera-in directory in HDFS. Change the location of the hadoop-mapreduce-examples-*.jar file in the following commands according to your Hadoop installation:
$ hadoop jar $HADOOP_HOME/share/Hadoop/mapreduce/hadoop-mapreduce-examples-*.jar teragen 10000000 tera-in
It's a good idea to specify the number of Map tasks to the teragen computation to speed up the data generation. This can be done by specifying the –Dmapred.map.tasks parameter.
Also, you can increase the HDFS block size for the generated data so that the Map tasks of the TeraSort computation would be coarser grained (the number of Map tasks for a Hadoop computation typically equals the number of input data blocks). This can be done by specifying the –Ddfs.block.size parameter.
$ hadoop jar $HADOOP_HOME/share/hadoop/mapreduce/hadoop-mapreduce-examples-*.jar teragen –Ddfs.block.size=536870912
–Dmapred.map.tasks=256 10000000 tera-in
The second step of the TeraSort benchmark is the execution of the TeraSort MapReduce computation on the data generated in step 1 using the following command. The first parameter of the terasort command is the input of HDFS data directory, and the second part of the terasort command is the output of the HDFS data directory.
$ hadoop jar $HADOOP_HOME/share/hadoop/mapreduce/hadoop-mapreduce-examples-*.jar terasort tera-in tera-out
It's a good idea to specify the number of Reduce tasks to the TeraSort computation to speed up the Reducer part of the computation. This can be done by specifying the –Dmapred.reduce.tasks parameter as follows:
$ hadoop jar $HADOOP_HOME/share/hadoop/mapreduce/hadoop-mapreduce-examples-*.jar terasort –Dmapred.reduce.tasks=32 tera-in tera-out
The last step of the TeraSort benchmark is the validation of the results. This can be done using the teravalidate application as follows. The first parameter is the directory with the sorted data and the second parameter is the directory to store the report containing the results.
$ hadoop jar
$HADOOP_HOME/share/hadoop/mapreduce/hadoopmapreduce-
examples-*.jar
teravalidate tera-out tera-validate
How it works...
TeraSort uses the sorting capability of the MapReduce framework together with a custom range Partitioner to divide the Map output among the Reduce tasks ensuring the global sorted order.
Optimizing Hadoop YARN and MapReduce configurations for cluster deployments
In this recipe, we explore some of the important configuration options of Hadoop YARN and Hadoop MapReduce. Commercial Hadoop distributions typically provide a GUI-based approach to specify Hadoop configurations.
YARN allocates resource containers to the applications based on the resource requests made by the applications and the available resource capacity of the cluster. A resource request by an application would consist of the number of containers required and the resource requirement of each container. Currently, most container resource requirements are specified using the amount of memory. Hence, our focus in this recipe will be mainly on configuring the memory allocation of a YARN cluster.
Getting ready
Set up a Hadoop cluster by following the earlier recipes.
How to do it...
The following instructions will show you how to configure the memory allocation in a YARN cluster. The number of tasks per node is derived using this configuration:
The following property specifies the amount of memory (RAM) that can be used by YARN containers in a worker node. It's advisable to set this slightly less than the amount of physical RAM present in the node, leaving some memory for the OS and other non-Hadoop processes. Add or modify the following lines in the yarn-site.xml file:
The following property specifies the minimum amount of memory (RAM) that can be allocated to a YARN container in a worker node. Add or modify the following lines in the yarn-site.xml file to configure this property. If we assume that all the YARN resource-requests request containers with only the minimum amount of memory, the maximum number of concurrent resource containers that can be executed in a node equals (YARN memory per node specified in step 1)/(YARN minimum allocation configured below). Based on this relationship, we can use the value of the following property to achieve the desired number of resource containers per node. The number of resource containers per node is recommended to be less than or equal to the minimum of (2*number CPU cores) or (2* number of disks).
Restart the YARN ResourceManager and NodeManager services by running sbin/stop-yarn.sh and sbin/start-yarn.sh from the HADOOP_HOME directory.
The following instructions will show you how to configure the memory requirements of the MapReduce applications.
The following properties define the maximum amount of memory (RAM) that will be available to each Map and Reduce task. These memory values will be used when MapReduce applications request resources from YARN for Map and Reduce task containers. Add the following lines to the mapred-site.xml file:
The following properties define the JVM heap size of the Map and Reduce tasks respectively. Set these values to be slightly less than the corresponding values in step 4, so that they won't exceed the resource limits of the YARN containers. Add the following lines to the mapred-site.xml file:
We can control Hadoop configurations through the following four configuration files. Hadoop reloads the configurations from these configuration files after a cluster restart:
core-site.xml: Contains the configurations common to the whole Hadoop distribution
hdfs-site.xml: Contains configurations for HDFS
mapred-site.xml: Contains configurations for MapReduce
yarn-site.xml: Contains configurations for the YARN ResourceManager and NodeManager processes
Each configuration file has name-value pairs expressed in XML format, defining the configurations of different aspects of Hadoop. The following is an example of a property in a configuration file. The <configuration> tag is the top-level parent XML container and <property> tags, which define individual properties, are specified as child tags inside the <configuration> tag:
Some configurations can be configured on a per-job basis using the job.getConfiguration().set(name, value) method from the Hadoop MapReduce job driver code.
There's more...
There are many similar important configuration properties defined in Hadoop. The following are some of them:
conf/core-site.xml
Name
Default value
Description
fs.inmemory.size.mb
200
Amount of memory allocated to the in-memory filesystem that is used to merge map outputs at reducers in MBs
io.file.buffer.size
131072
Size of the read/write buffer used by sequence files
conf/mapred-site.xml
Name
Default value
Description
mapreduce.reduce.shuffle.parallelcopies
20
Maximum number of parallel copies the reduce step will execute to fetch output from many parallel jobs
mapreduce.task.io.sort.factor
50
Maximum number of streams merged while sorting files
mapreduce.task.io.sort.mb
200
Memory limit while sorting data in MBs
conf/hdfs-site.xml
Name
Default value
Description
Unlock access to the largest independent learning library in Tech for FREE!
Get unlimited access to 7500+ expert-authored eBooks and video courses covering every tech area you can think of.
Renews at $19.99/month. Cancel anytime
dfs.blocksize
134217728
HDFS block size
dfs.namenode.handler.count
200
Number of server threads to handle RPC calls in NameNodes
Unit testing Hadoop MapReduce applications using MRUnit
MRUnit is a JUnit-based Java library that allows us to unit test Hadoop MapReduce programs. This makes it easy to develop as well as to maintain Hadoop MapReduce code bases. MRUnit supports testing Mappers and Reducers separately as well as testing MapReduce computations as a whole. In this recipe, we'll be exploring all three testing scenarios.
Getting ready
We use Gradle as the build tool for our sample code base.
How to do it...
The following steps show you how to perform unit testing of a Mapper using MRUnit:
In the setUp method of the test class, initialize an MRUnit MapDriver instance with the Mapper class you want to test. In this example, we are going to test the Mapper of the WordCount MapReduce application we discussed in earlier recipes:
public class WordCountWithToolsTest {
MapDriver<Object, Text, Text, IntWritable> mapDriver;
@Before
public void setUp() {
WordCountWithTools.TokenizerMapper mapper = new WordCountWithTools.TokenizerMapper();
mapDriver = MapDriver.newMapDriver(mapper);
}
……
}
Write a test function to test the Mapper logic. Provide the test input to the Mapper using the MapDriver.withInput method. Then, provide the expected result of the Mapper execution using the MapDriver.withOutput method. Now, invoke the test using the MapDriver.runTest method. The MapDriver.withAll and MapDriver.withAllOutput methods allow us to provide a list of test inputs and a list of expected outputs, rather than adding them individually.
@Test
public void testWordCountMapper() throws IOException {
IntWritable inKey = new IntWritable(0);
mapDriver.withInput(inKey, new Text("Test Quick"));
….
mapDriver.withOutput(new Text("Test"),new IntWritable(1));
mapDriver.withOutput(new Text("Quick"),new IntWritable(1));
…
mapDriver.runTest();
}
The following step shows you how to perform unit testing of a Reducer using MRUnit.
Similar to step 1 and 2, initialize a ReduceDriver by providing the Reducer class under test and then configure the ReduceDriver with the test input and the expected output. The input to the reduce function should conform to a key with a list of values. Also, in this test, we use the ReduceDriver.withAllOutput method to provide a list of expected outputs.
public class WordCountWithToolsTest {
ReduceDriver<Text,IntWritable,Text,IntWritable> reduceDriver;
@Before
public void setUp() {
WordCountWithTools.IntSumReducer reducer = new WordCountWithTools.IntSumReducer();
reduceDriver = ReduceDriver.newReduceDriver(reducer);
}
@Test
public void testWordCountReduce() throws IOException {
ArrayList<IntWritable> reduceInList = new ArrayList<IntWritable>();
reduceInList.add(new IntWritable(1));
reduceInList.add(new IntWritable(2));
reduceDriver.withInput(new Text("Quick"), reduceInList);
...
ArrayList<Pair<Text, IntWritable>> reduceOutList = new ArrayList<Pair<Text,IntWritable>>();
reduceOutList.add(new Pair<Text, IntWritable> (new Text("Quick"),new IntWritable(3)));
...
reduceDriver.withAllOutput(reduceOutList);
reduceDriver.runTest();
}
}
The following steps show you how to perform unit testing on a whole MapReduce computation using MRUnit.
In this step, initialize a MapReduceDriver by providing the Mapper class and Reducer class of the MapReduce program that you want to test. Then, configure the MapReduceDriver with the test input data and the expected output data. When executed, this test will execute the MapReduce execution flow starting from the Map input stage to the Reduce output stage. It's possible to provide a combiner implementation to this test as well.
public class WordCountWithToolsTest {
……
MapReduceDriver<Object, Text, Text,
IntWritable, Text,IntWritable> mapReduceDriver;
@Before
public void setUp() {
....
mapReduceDriver = MapReduceDriver.
newMapReduceDriver(mapper, reducer);
}
@Test
public void testWordCountMapReduce() throws IOException {
IntWritable inKey = new IntWritable(0);
mapReduceDriver.withInput(inKey, new Text
("Test Quick"));
……
ArrayList<Pair<Text, IntWritable>> reduceOutList
= new ArrayList<Pair<Text,IntWritable>>();
reduceOutList.add(new Pair<Text, IntWritable>
(new Text("Quick"),new IntWritable(2)));
……
mapReduceDriver.withAllOutput(reduceOutList);
mapReduceDriver.runTest();
}
}
The Gradle build script (or any other Java build mechanism) can be configured to execute these unit tests with every build. We can add the MRUnit dependency to the Gradle build file as follows:
Use the following Gradle command to execute only the WordCountWithToolsTest unit test. This command executes any test class that matches the pattern **/WordCountWith*.class:
You can also execute MRUnit-based unit tests in your IDE. You can use the gradle eclipse or gradle idea commands to generate the project files for the Eclipse and IDEA IDE respectively.
Generating an inverted index using Hadoop MapReduce
Simple text searching systems rely on inverted index to look up the set of documents that contain a given word or a term. In this recipe, we implement a simple inverted index building application that computes a list of terms in the documents, the set of documents that contains each term, and the term frequency in each of the documents. Retrieval of results from an inverted index can be as simple as returning the set of documents that contains the given terms or can involve much more complex operations such as returning the set of documents ordered based on a particular ranking.
Getting ready
You must have Apache Hadoop v2 configured and installed to follow this recipe. Gradle is needed for the compiling and building of the source code.
How to do it...
In the following steps, we use a MapReduce program to build an inverted index for a text dataset:
Create a directory in HDFS and upload a text dataset. This dataset should consist of one or more text files.
You can download the text versions of the Project Gutenberg books by following the instructions given at http://www.gutenberg.org/wiki/Gutenberg:Information_About_Robot_Access_to_our_Pages. Make sure to provide the filetypes query parameter of the download request as txt. Unzip the downloaded files. You can use the unzipped text files as the text dataset for this recipe.
Compile the source by running the gradle build command from the chapter 8 folder of the source repository.
Run the inverted indexing MapReduce job using the following command.Provide the HDFS directory where you uploaded the input data in step 2 as the first argument and provide an HDFS path to store the output as the second argument:
$ hadoop jar hcb-c8-samples.jar
chapter8.invertindex.TextOutInvertedIndexMapReduce
input_dir output_dir
Check the output directory for the results by running the following command. The output of this program will consist of the term followed by a comma-separated list of filename and frequency:
$ hdfs dfs -cat output_dir/*
ARE three.txt:1,one.txt:1,four.txt:1,two.txt:1,
AS three.txt:2,one.txt:2,four.txt:2,two.txt:2,
AUGUSTA three.txt:1,
About three.txt:1,two.txt:1,
Abroad three.txt:2,
We used the text outputting inverted indexing MapReduce program in step 3 for the clarity of understanding the algorithm. Run the program by substituting the command in step 3 with the following command:
$ hadoop jar hcb-c8-samples.jar
chapter8.invertindex.InvertedIndexMapReduce
input_dir seq_output_dir
How it works...
The Map Function receives a chunk of an input document as the input and outputs the term and <docid, 1> pair for each word. In the Map function, we first replace all the non-alphanumeric characters from the input text value before tokenizing it as follows:
public void map(Object key, Text value, ……… {
String valString = value.toString().replaceAll("[^a-zA-Z0-9]+"," ");
StringTokenizer itr = new StringTokenizer(valString);
StringTokenizer(value.toString());
FileSplit fileSplit = (FileSplit) context.getInputSplit();
String fileName = fileSplit.getPath().getName();
while (itr.hasMoreTokens()) {
term.set(itr.nextToken());
docFrequency.set(fileName, 1);
context.write(term, docFrequency);
}
}
We use the getInputSplit() method of MapContext to obtain a reference to InputSplit assigned to the current Map task. The InputSplits class for this computation are instances of FileSplit due to the usage of a FileInputFormat based InputFormat. Then we use the getPath() method of FileSplit to obtain the path of the file containing the current split and extract the filename from it. We use this extracted filename as the document ID when constructing the inverted index.
The Reduce function receives IDs and frequencies of all the documents that contain the term (Key) as the input. The Reduce function then outputs the term and a list of document IDs and the number of occurrences of the term in each document as the output:
public void reduce(Text key, Iterable
values,Context context) …………{
HashMap<Text, IntWritable> map = new HashMap<Text, IntWritable>();
for (TermFrequencyWritable val : values) {
Text docID = new Text(val.getDocumentID());
int freq = val.getFreq().get();
if (map.get(docID) != null) {
map.put(docID, new IntWritable(map.get(docID).get() + freq));
} else {
map.put(docID, new IntWritable(freq));
}
}
MapWritable outputMap = new MapWritable();
outputMap.putAll(map);
context.write(key, outputMap);
}
In the preceding model, we output a record for each word, generating a large amount of intermediate data between Map tasks and Reduce tasks. We use the following combiner to aggregate the terms emitted by the Map tasks, reducing the amount of Intermediate data that needs to be transferred between Map and Reduce tasks:
public void reduce(Text key, Iterable values ……
{
int count = 0;
String id = "";
for (TermFrequencyWritable val : values) {
count++;
if (count == 1) {
id = val.getDocumentID().toString();
}
}
TermFrequencyWritable writable = new TermFrequencyWritable();
writable.set(id, count);
context.write(key, writable);
}
In the driver program, we set the Mapper, Reducer, and the Combiner classes. Also, we specify both Output Value and the MapOutput Value properties as we use different value types for the Map tasks and the reduce tasks.
We can improve this indexing program by performing optimizations such as filtering stop words, substituting words with word stems, storing more information about the context of the word, and so on, making indexing a much more complex problem. Luckily, there exist several open source indexing frameworks that we can use for indexing purposes. The later recipes of this article will explore indexing using Apache Solr and Elasticsearch, which are based on the Apache Lucene indexing engine.
The upcoming section introduces the usage of MapFileOutputFormat to store InvertedIndex in an indexed random accessible manner.
Outputting a random accessible indexed InvertedIndex
Apache Hadoop supports a file format called MapFile that can be used to store an index into the data stored in SequenceFiles. MapFile is very useful when we need to random access records stored in a large SequenceFile. You can use the MapFileOutputFormat format to output MapFiles, which would consist of a SequenceFile containing the actual data and another file containing the index into the SequenceFile.
The chapter8/invertindex/MapFileOutInvertedIndexMR.java MapReduce program in the source folder of chapter8 utilizes MapFiles to store a secondary index into our inverted index. You can execute that program by using the following command. The third parameter (sample_lookup_term) should be a word that is present in your input dataset:
$ hadoop jar hcb-c8-samples.jar chapter8.invertindex.MapFileOutInvertedIndexMR input_dir indexed_output_dir sample_lookup_term
If you check indexed_output_dir, you will be able to see folders named as part-r-xxxxx with each containing a data and an index file. We can load these indexes to MapFileOutputFormat and perform random lookups for the data. An example of a simple lookup using this method is given in the MapFileOutInvertedIndexMR.java program as follows:
MapFile.Reader[] indexReaders = MapFileOutputFormat.getReaders(new Path(args[1]), getConf()); MapWritable value = new MapWritable(); Text lookupKey = new Text(args[2]); // Performing the lookup for the values if the lookupKey Writable map = MapFileOutputFormat.getEntry(indexReaders, new HashPartitioner<Text, MapWritable>(), lookupKey, value);
In order to use this feature, you need to make sure to disable Hadoop from writing a _SUCCESS file in the output folder by setting the following property. The presence of the _SUCCESS file might cause an error when using MapFileOutputFormat to lookup the values in the index:
Data preprocessing using Hadoop streaming and Python
Data preprocessing is an important and often required component in data analytics. Data preprocessing becomes even more important when consuming unstructured text data generated from multiple different sources. Data preprocessing steps include operations such as cleaning the data, extracting important features from data, removing duplicate items from the datasets, converting data formats, and many more.
Hadoop MapReduce provides an ideal environment to perform these tasks in parallel when processing massive datasets. Apart from using Java MapReduce programs or Pig scripts or Hive scripts to preprocess the data, Hadoop also contains several other tools and features that are useful in performing these data preprocessing operations. One such feature is the InputFormats, which provides us with the ability to support custom data formats by implementing custom InputFormats. Another feature is the Hadoop Streaming support, which allows us to use our favorite scripting languages to perform the actual data cleansing and extraction, while Hadoop will parallelize the computation to hundreds of compute and storage resources.
In this recipe, we are going to use Hadoop Streaming with a Python script-based Mapper to perform data extraction and format conversion.
Getting ready
Check whether Python is already installed on the Hadoop worker nodes. If not, install Python on all the Hadoop worker nodes.
How to do it...
The following steps show how to clean and extract data from the 20news dataset and store the data as a tab-separated file:
Extract the resource package and locate the MailPreProcessor.py Python script.
Locate the hadoop-streaming.jar JAR file of the Hadoop installation in your machine. Run the following Hadoop Streaming command using that JAR. /usr/lib/hadoop-mapreduce/ is the hadoop-streaming JAR file's location for the BigTop-based Hadoop installations:
Hadoop uses the default TextInputFormat as the input specification for the previous computation. Usage of the TextInputFormat generates a Map task for each file in the input dataset and generates a Map input record for each line. Hadoop streaming provides the input to the Map application through the standard input:
line = sys.stdin.readline();
while line:
….
if (doneHeaders):
list.append( line )
elif line.find( "Message-ID:" ) != -1:
messageID = line[ len("Message-ID:"):]
….
elif line == "":
doneHeaders = True
line = sys.stdin.readline();
The preceding Python code reads the input lines from the standard input until it reaches the end of the file. We parse the headers of the newsgroup file till we encounter the empty line that demarcates the headers from the message contents. The message content will be read in to a list line by line:
value = ' '.join( list )
value = fromAddress + "t" ……"t" + value
print '%st%s' % (messageID, value)
The preceding code segment merges the message content to a single string and constructs the output value of the streaming application as a tab-delimited set of selected headers, followed by the message content. The output key value is the Message-ID header extracted from the input file. The output is written to the standard output by using a tab to delimit the key and the value.
There's more...
We can generate the output of the preceding computation in the Hadoop SequenceFile format by specifying SequenceFileOutputFormat as the OutputFormat of the streaming computations:
It is a good practice to store the data as SequenceFiles (or other Hadoop binary file formats such as Avro) after the first pass of the input data because SequenceFiles takes up less space and supports compression. You can use hdfs dfs -text <path_to_sequencefile> to output the contents of a SequenceFile to text:
$ hdfs dfs –text 20news-seq/part-* | more
However, for the preceding command to work, any Writable classes that are used in the SequenceFile should be available in the Hadoop classpath.
Loading large datasets to an Apache HBase data store – importtsv and bulkload
The Apache HBase data store is very useful when storing large-scale data in a semi-structured manner, so that it can be used for further processing using Hadoop MapReduce programs or to provide a random access data storage for client applications. In this recipe, we are going to import a large text dataset to HBase using the importtsv and bulkload tools.
Getting ready
Install and deploy Apache HBase in your Hadoop cluster.
Make sure Python is installed in your Hadoop compute nodes.
How to do it…
The following steps show you how to load the TSV (tab-separated value) converted 20news dataset in to an HBase table:
Follow the Data preprocessing using Hadoop streaming and Python recipe to perform the preprocessing of data for this recipe. We assume that the output of the following step 4 of that recipe is stored in an HDFS folder named "20news-cleaned":
Create a table named 20news-data by executing the following command in the HBase shell. Older versions of the importtsv (used in the next step) command can handle only a single column family. Hence, we are using only a single column family when creating the HBase table:
hbase(main):001:0> create '20news-data','h'
Execute the following command to import the preprocessed data to the HBase table created earlier:
The MailPreProcessor.py Python script extracts a selected set of data fields from the newsboard message and outputs them as a tab-separated dataset:
value = fromAddress + "t" + newsgroup
+"t" + subject +"t" + value
print '%st%s' % (messageID, value)
We import the tab-separated dataset generated by the Streaming MapReduce computations to HBase using the importtsv tool. The importtsv tool requires the data to have no other tab characters except for the tab characters that separate the data fields. Hence, we remove any tab characters that may be present in the input data by using the following snippet of the Python script:
line = line.strip()
line = re.sub('t',' ',line)
The importtsv tool supports the loading of data into HBase directly using the Put operations as well as by generating the HBase internal HFiles as well. The following command loads the data to HBase directly using the Put operations. Our generated dataset contains a Key and four fields in the values. We specify the data fields to the table column name mapping for the dataset using the -Dimporttsv.columns parameter. This mapping consists of listing the respective table column names in the order of the tab-separated data fields in the input dataset:
$ hbase org.apache.hadoop.hbase.mapreduce.ImportTsv -Dimporttsv.columns=<data field to table column mappings> <HBase tablename> <HDFS input directory>
We can use the following command to generate HBase HFiles for the dataset. These HFiles can be directly loaded to HBase without going through the HBase APIs, thereby reducing the amount of CPU and network resources needed:
$ hbase org.apache.hadoop.hbase.mapreduce.ImportTsv -Dimporttsv.columns=<filed to column mappings> -Dimporttsv.bulk.output=<path for hfile output> <HBase tablename> <HDFS input directory>
These generated HFiles can be loaded into HBase tables by simply moving the files to the right location. This moving can be performed by using the completebulkload command:
$ hbase org.apache.hadoop.hbase.mapreduce.LoadIncrementalHFiles <HDFS path for hfiles> <table name>
There's more...
You can use the importtsv tool that has datasets with other data-filed separator characters as well by specifying the '-Dimporttsv.separator' parameter. The following is an example of using a comma as the separator character to import a comma-separated dataset in to an HBase table:
$ hbase org.apache.hadoop.hbase.mapreduce.ImportTsv '-Dimporttsv.separator=,' -Dimporttsv.columns=<data field to table column mappings> <HBase tablename> <HDFS input directory>
Look out for Bad Lines in the MapReduce job console output or in the Hadoop monitoring console. One reason for Bad Lines is to have unwanted delimiter characters. The Python script we used in the data-cleaning step removes any extra tabs in the message:
14/03/27 00:38:10 INFO mapred.JobClient: ImportTsv14/03/27 00:38:10 INFO mapred.JobClient: Bad Lines=2
Data de-duplication using HBase
HBase supports the storing of multiple versions of column values for each record. When querying, HBase returns the latest version of values, unless we specifically mention a time period. This feature of HBase can be used to perform automatic de-duplication by making sure we use the same RowKey for duplicate values. In our 20news example, we use MessageID as the RowKey for the records, ensuring duplicate messages will appear as different versions of the same data record.
HBase allows us to configure the maximum or minimum number of versions per column family. Setting the maximum number of versions to a low value will reduce the data usage by discarding the old versions. Refer to http://hbase.apache.org/book/schema.versions.html for more information on setting the maximum or minimum number of versions.
Summary
In this article, we have learned about getting started with Hadoop, Benchmarking Hadoop MapReduce, optimizing Hadoop YARN, unit testing, generating an inverted index, data processing, and loading large datasets to an Apache HBase data store.

 United States
 Great Britain
 India
India
 Germany
 France
 Canada
 Russia
 Spain
Spain
 Brazil
 Australia
 Singapore
 Canary Islands
 Hungary
 Ukraine
 Luxembourg
 Estonia
 Lithuania
 South Korea
 Turkey
 Switzerland
 Colombia
 Taiwan
 Chile
Chile
 Norway
 Ecuador
 Indonesia
 New Zealand
 Cyprus
 Denmark
 Finland
 Poland
 Malta
Malta
 Czechia
 Austria
 Sweden
 Italy
Italy
 Egypt
Egypt
 Belgium
 Portugal
 Slovenia
 Ireland
 Romania
 Greece
 Argentina
 Netherlands
 Bulgaria
 Latvia
 South Africa
 Malaysia
 Japan
Japan
 Slovakia
 Philippines
 Mexico
 Thailand