(For more resources related to this topic, see here.)
Pentaho Data Integration and Pentaho BI Suite
Before introducing PDI, let’s talk about Pentaho BI Suite. The Pentaho Business Intelligence Suite is a collection of software applications intended to create and deliver solutions for decision making. The main functional areas covered by the suite are:
- Analysis: The analysis engine serves multidimensional analysis. It’s provided by the Mondrian OLAP server.
- Reporting: The reporting engine allows designing, creating, and distributing reports in various known formats (HTML, PDF, and so on), from different kinds of sources.
- Data Mining: Data mining is used for running data through algorithms in order to understand the business and do predictive analysis. Data mining is possible thanks to the Weka Project.
- Dashboards: Dashboards are used to monitor and analyze Key Performance Indicators (KPIs). The Community Dashboard Framework (CDF), a plugin developed by the community and integrated in the Pentaho BI Suite, allows the creation of interesting dashboards including charts, reports, analysis views, and other Pentaho content, without much effort.
- Data Integration: Data integration is used to integrate scattered information from different sources (applications, databases, files, and so on), and make the integrated information available to the final user.
All of this functionality can be used standalone but also integrated. In order to run analysis, reports, and so on, integrated as a suite, you have to use the Pentaho BI Platform. The platform has a solution engine, and offers critical services, for example, authentication, scheduling, security, and web services.
This set of software and services form a complete BI Platform, which makes Pentaho Suite the world’s leading open source Business Intelligence Suite.
Exploring the Pentaho Demo
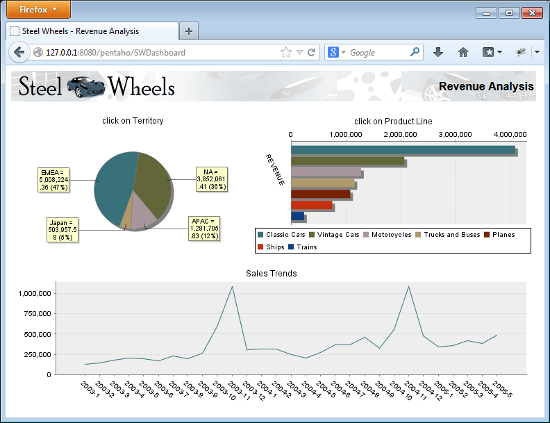
The Pentaho BI Platform Demo is a pre-configured installation that allows you to explore several capabilities of the Pentaho platform. It includes sample reports, cubes, and dashboards for Steel Wheels. Steel Wheels is a fictional store that sells all kind of scale replicas of vehicles. The following screenshot is a sample dashboard available in the demo:
The Pentaho BI Platform Demo is free and can be downloaded from http://sourceforge.net/projects/pentaho/files/. Under the Business Intelligence Server folder, look for the latest stable version.
You can find out more about Pentaho BI Suite Community Edition at http://community.pentaho.com/projects/bi_platform. There is also an Enterprise Edition of the platform with additional features and support. You can find more on this at www.pentaho.org.
Pentaho Data Integration
Most of the Pentaho engines, including the engines mentioned earlier, were created as community projects and later adopted by Pentaho. The PDI engine is not an exception—Pentaho Data Integration is the new denomination for the business intelligence tool born as Kettle.
The name Kettle didn’t come from the recursive acronym Kettle Extraction, Transportation, Transformation, and Loading Environment it has now. It came from KDE Extraction, Transportation, Transformation, and Loading Environment, since the tool was planned to be written on top of KDE, a Linux desktop environment, as mentioned in the introduction of the article.
In April 2006, the Kettle project was acquired by the Pentaho Corporation and Matt Casters, the Kettle founder, also joined the Pentaho team as a Data Integration Architect.
When Pentaho announced the acquisition, James Dixon, Chief Technology Officer said:
We reviewed many alternatives for open source data integration, and Kettle clearly had the best architecture, richest functionality, and most mature user interface. The open architecture and superior technology of the Pentaho BI Platform and Kettle allowed us to deliver integration in only a few days, and make that integration available to the community.
By joining forces with Pentaho, Kettle benefited from a huge developer community, as well as from a company that would support the future of the project.
From that moment, the tool has grown with no pause. Every few months a new release is available, bringing to the users improvements in performance, existing functionality, new functionality, ease of use, and great changes in look and feel. The following is a timeline of the major events related to PDI since its acquisition by Pentaho:
- June 2006: PDI 2.3 is released. Numerous developers had joined the project and there were bug fixes provided by people in various regions of the world. The version included among other changes, enhancements for large-scale environments and multilingual capabilities.
- February 2007: Almost seven months after the last major revision, PDI 2.4 is released including remote execution and clustering support, enhanced database support, and a single designer for jobs and transformations, the two main kind of elements you design in Kettle.
- May 2007: PDI 2.5 is released including many new features; the most relevant being the advanced error handling.
- November 2007: PDI 3.0 emerges totally redesigned. Its major library changed to gain massive performance. The look and feel had also changed completely.
- October 2008: PDI 3.1 arrives, bringing a tool which was easier to use, and with a lot of new functionality as well.
- April 2009: PDI 3.2 is released with a really large amount of changes for a minor version: new functionality, visualization and performance improvements, and a huge amount of bug fixes. The main change in this version was the incorporation of dynamic clustering.
- June 2010: PDI 4.0 was released, delivering mostly improvements with regard to enterprise features, for example, version control. In the community version, the focus was on several visual improvements such as the mouseover assistance that you will experiment with soon.
- November 2010: PDI 4.1 is released with many bug fixes.
- August 2011: PDI 4.2 comes to light not only with a large amount of bug fixes, but also with a lot of improvements and new features. In particular, several of them were related to the work with repositories.
- April 2012: PDI 4.3 is released also with a lot of fixes, and a bunch of improvements and new features.
- November 2012: PDI 4.4 is released. This version incorporates a lot of enhancements and new features. In this version there is a special emphasis on Big Data—the ability of reading, searching, and in general transforming large and complex collections of datasets.
- 2013: PDI 5.0 will be released, delivering interesting low-level features such as step load balancing, job transactions, and restartability.
Using PDI in real-world scenarios
Paying attention to its name, Pentaho Data Integration, you could think of PDI as a tool to integrate data.
In fact, PDI not only serves as a data integrator or an ETL tool. PDI is such a powerful tool, that it is common to see it used for these and for many other purposes. Here you have some examples.
Loading data warehouses or datamarts
The loading of a data warehouse or a datamart involves many steps, and there are many variants depending on business area, or business rules.
But in every case, no exception, the process involves the following steps:
- Extracting information from one or different databases, text files, XML files and other sources. The extract process may include the task of validating and discarding data that doesn’t match expected patterns or rules.
- Transforming the obtained data to meet the business and technical needs required on the target. Transformation implies tasks as converting data types, doing some calculations, filtering irrelevant data, and summarizing.
- Loading the transformed data into the target database. Depending on the requirements, the loading may overwrite the existing information, or may add new information each time it is executed.
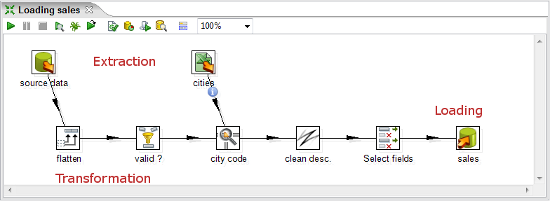
Kettle comes ready to do every stage of this loading process. The following screenshot shows a simple ETL designed with Kettle:
Integrating data
Imagine two similar companies that need to merge their databases in order to have a unified view of the data, or a single company that has to combine information from a main ERP (Enterprise Resource Planning) application and a CRM (Customer Relationship Management) application, though they’re not connected. These are just two of hundreds of examples where data integration is needed. The integration is not just a matter of gathering and mixing data. Some conversions, validation, and transport of data have to be done. Kettle is meant to do all of those tasks.
Data cleansing
It’s important and even critical that data be correct and accurate for the efficiency of business, to generate trust conclusions in data mining or statistical studies, to succeed when integrating data. Data cleansing is about ensuring that the data is correct and precise. This can be achieved by verifying if the data meets certain rules, discarding or correcting those which don’t follow the expected pattern, setting default values for missing data, eliminating information that is duplicated, normalizing data to conform minimum and maximum values, and so on. These are tasks that Kettle makes possible thanks to its vast set of transformation and validation capabilities.
Migrating information
Think of a company, any size, which uses a commercial ERP application. One day the owners realize that the licenses are consuming an important share of its budget. So they decide to migrate to an open source ERP. The company will no longer have to pay licenses, but if they want to change, they will have to migrate the information. Obviously, it is not an option to start from scratch, nor type the information by hand. Kettle makes the migration possible thanks to its ability to interact with most kind of sources and destinations such as plain files, commercial and free databases, and spreadsheets, among others.
Exporting data
Data may need to be exported for numerous reasons:
- To create detailed business reports
- To allow communication between different departments within the same company
- To deliver data from your legacy systems to obey government regulations, and so on
Kettle has the power to take raw data from the source and generate these kind of ad-hoc reports.
Integrating PDI along with other Pentaho tools
The previous examples show typical uses of PDI as a standalone application. However, Kettle may be used embedded as part of a process or a dataflow. Some examples are pre-processing data for an online report, sending mails in a scheduled fashion, generating spreadsheet reports, feeding a dashboard with data coming from web services, and so on.
The use of PDI integrated with other tools is beyond the scope of this article. If you are interested, you can find more information on this subject in the Pentaho Data Integration 4 Cookbook by Packt Publishing at http://www.packtpub.com/pentaho-data-integration-4-cookbook/book.
Installing PDI
In order to work with PDI, you need to install the software. It’s a simple task, so let’s do it now.
Time for action – installing PDI
These are the instructions to install PDI, for whatever operating system you may be using.
Unlock access to the largest independent learning library in Tech for FREE!
Get unlimited access to 7500+ expert-authored eBooks and video courses covering every tech area you can think of.
Renews at $19.99/month. Cancel anytime
The only prerequisite to install the tool is to have JRE 6.0 installed. If you don’t have it, please download it from www.javasoft.com and install it before proceeding. Once you have checked the prerequisite, follow these steps:
- Go to the download page at http://sourceforge.net/projects/pentaho/files/Data Integration.
- Choose the newest stable release. At this time, it is 4.4.0, as shown in the following screenshot:
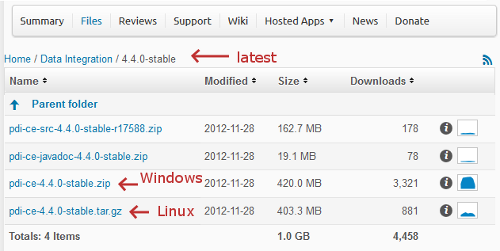
- Download the file that matches your platform. The preceding screenshot should help you.
- Unzip the downloaded file in a folder of your choice, that is,
c:/util/kettle or /home/pdi_user/kettle.
- If your system is Windows, you are done. Under Unix-like environments, you have to make the scripts executable. Assuming that you chose
/home/pdi_user/kettle as the installation folder, execute:
- In Mac OS you have to give execute permissions to the
JavaApplicationStub file. Look for this file; it is located in Data Integration 32-bit.appContentsMacOS, or Data Integration 64-bit.appContentsMacOS depending on your system.
What just happened?
You have installed the tool in just a few minutes. Now, you have all you need to start working.
Launching the PDI graphical designer – Spoon
Now that you’ve installed PDI, you must be eager to do some stuff with data. That will be possible only inside a graphical environment. PDI has a desktop designer tool named Spoon. Let’s launch Spoon and see what it looks like.
Time for action – starting and customizing Spoon
In this section, you are going to launch the PDI graphical designer, and get familiarized with its main features.
- Start Spoon.
- If your system is Windows, run
Spoon.bat
You can just double-click on the Spoon.bat icon, or Spoon if your Windows system doesn’t show extensions for known file types. Alternatively, open a command window—by selecting Run in the Windows start menu, and executing cmd, and run Spoon.bat in the terminal.
- In other platforms such as Unix, Linux, and so on, open a terminal window and type
spoon.sh
- If you didn’t make
spoon.sh executable, you may type sh spoon.sh
- Alternatively, if you work on Mac OS, you can execute the
JavaApplicationStub file, or click on the Data Integration 32-bit.app, or Data Integration 64-bit.app icon
- As soon as Spoon starts, a dialog window appears asking for the repository connection data. Click on the Cancel button.
- A small window labeled Spoon tips... appears. You may want to navigate through various tips before starting. Eventually, close the window and proceed.
- Finally, the main window shows up. A Welcome! window appears with some useful links for you to see. Close the window. You can open it later from the main menu.
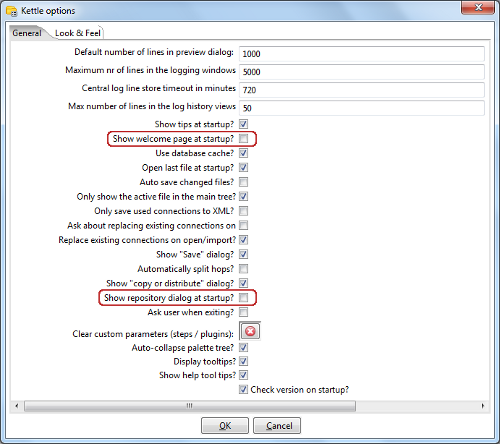
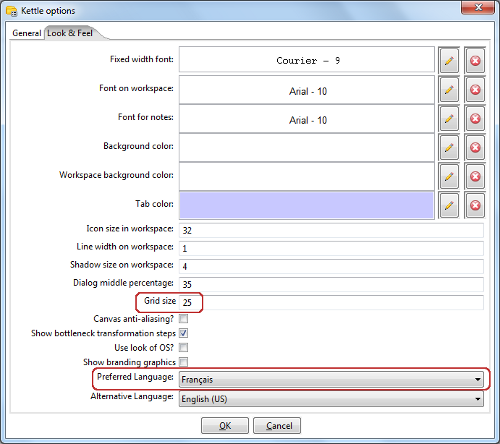
- Click on Options... from the menu Tools. A window appears where you can change various general and visual characteristics. Uncheck the highlighted checkboxes, as shown in the following screenshot:
- Select the tab window Look & Feel.
- Change the Grid size and Preferred Language settings as shown in the following screenshot:
- Click on the OK button.
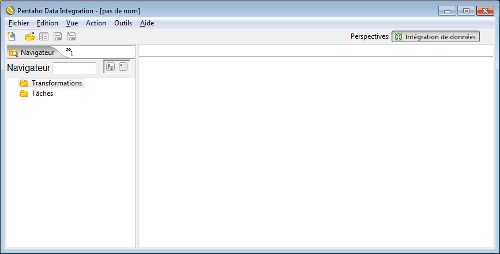
- Restart Spoon in order to apply the changes. You should not see the repository dialog, or the Welcome! window. You should see the following screenshot full of French words instead:
What just happened?
You ran for the first time Spoon, the graphical designer of PDI. Then you applied some custom configuration.
In the Option… tab, you chose not to show the repository dialog or the Welcome! window at startup. From the Look & Feel configuration window, you changed the size of the dotted grid that appears in the canvas area while you are working. You also changed the preferred language. These changes were applied as you restarted the tool, not before.
The second time you launched the tool, the repository dialog didn’t show up. When the main window appeared, all of the visible texts were shown in French which was the selected language, and instead of the Welcome! window, there was a blank screen.
You didn’t see the effect of the change in the Grid option. You will see it only after creating or opening a transformation or job, which will occur very soon!
Spoon
Spoon, the tool you’re exploring in this section, is the PDI’s desktop design tool. With Spoon, you design, preview, and test all your work, that is, Transformations and Jobs. When you see PDI screenshots, what you are really seeing are Spoon screenshots.
Setting preferences in the Options window
In the earlier section, you changed some preferences in the Options window. There are several look and feel characteristics you can modify beyond those you changed. Feel free to experiment with these settings.
Remember to restart Spoon in order to see the changes applied.
In particular, please take note of the following suggestion about the configuration of the preferred language.
If you choose a preferred language other than English, you should select a different language as an alternative. If you do so, every name or description not translated to your preferred language, will be shown in the alternative language.
One of the settings that you changed was the appearance of the Welcome! window at startup. The Welcome! window has many useful links, which are all related with the tool: wiki pages, news, forum access, and more. It’s worth exploring them.
You don’t have to change the settings again to see the Welcome! window. You can open it by navigating to Help | Welcome Screen.
Storing transformations and jobs in a repository
The first time you launched Spoon, you chose not to work with repositories. After that, you configured Spoon to stop asking you for the Repository option. You must be curious about what the repository is and why we decided not to use it. Let’s explain it.
As we said, the results of working with PDI are transformations and jobs. In order to save the transformations and jobs, PDI offers two main methods:
- Database repository: When you use the database repository method, you save jobs and transformations in a relational database specially designed for this purpose.
- Files: The files method consists of saving jobs and transformations as regular XML files in the filesystem, with extension KJB and KTR respectively.
It’s not allowed to mix the two methods in the same project. That is, it makes no sense to mix jobs and transformations in a database repository with jobs and transformations stored in files. Therefore, you must choose the method when you start the tool.
By clicking on Cancel in the repository window, you are implicitly saying that you will work with the files method.
Why did we choose not to work with repositories? Or, in other words, to work with the files method? Mainly for two reasons:
- Working with files is more natural and practical for most users.
- Working with a database repository requires minimal database knowledge, and that you have access to a database engine from your computer. Although it would be an advantage for you to have both preconditions, maybe you haven’t got both of them.
There is a third method called File repository, that is a mix of the two above—it’s a repository of jobs and transformations stored in the filesystem. Between the File repository and the files method, the latest is the most broadly used. Therefore, throughout this article we will use the files method.
Creating your first transformation
Until now, you’ve seen the very basic elements of Spoon. You must be waiting to do some interesting task beyond looking around. It’s time to create your first transformation.
 United States
 Great Britain
 India
India
 Germany
 France
 Canada
 Russia
 Spain
Spain
 Brazil
 Australia
 Singapore
 Canary Islands
 Hungary
 Ukraine
 Luxembourg
 Estonia
 Lithuania
 South Korea
 Turkey
 Switzerland
 Colombia
 Taiwan
 Chile
Chile
 Norway
 Ecuador
 Indonesia
 New Zealand
 Cyprus
 Denmark
 Finland
 Poland
 Malta
Malta
 Czechia
 Austria
 Sweden
 Italy
Italy
 Egypt
Egypt
 Belgium
 Portugal
 Slovenia
 Ireland
 Romania
 Greece
 Argentina
 Netherlands
 Bulgaria
 Latvia
 South Africa
 Malaysia
 Japan
Japan
 Slovakia
 Philippines
 Mexico
 Thailand


