Using explicit credentials with PowerShell cmdlets
(For more resources related to this topic, see here.)
Microsoft introduced some radical architectural changes in Exchange 2007, including a brand-new set of management tools. PowerShell, along with an additional set of Exchange Server specific cmdlets, finally gave administrators an interface that could be used to manage the entire product from a command line shell. This was an interesting move, and at that time the entire graphical management console was built on top of this technology.
The same architecture still existed with Exchange 2010, and PowerShell was even more tightly integrated with this product. Exchange 2010 used PowerShell v2, which relied heavily on its new remoting infrastructure. This provides seamless administrative capabilities from a single seat with the Exchange Management Tools, whether your servers are on-premises or in the cloud.
Initially when Exchange 2013 was released, it was using version 4 of PowerShell, and during the life cycle it could be updated to version 5 of PowerShell with a lot of new cmdlets, core functionality changes, and even more integrations with the cloud services.
Now with Exchange 2016, we have even more cmdlets and even more integrations with cloud-related integration and services. During the initial work on this book, we had 839 cmdlets with Cumulative Update 4 which was released in December 2016. This can be compared with the previous book, where at that stage we had 806 cmdlets based on Service Pack 1 and Cumulative Update 7.
It gives us an impression that Microsoft is working heavily on the integrations and that the development of the on-premises product is still ongoing. This demonstrates that more features and functionality have been added over time. It will most likely continue like this in the future as well.
In this article, we'll cover some of the most common topics, as well as common tasks, that will allow you to effectively write scripts with this latest release. We'll also take a look at some general tasks such as scheduling scripts, sending emails, generating reports, and more.
Performing some basic steps
To work with the code samples in this article, follow these steps to launch the Exchange Management Shell:
Log onto a workstation or server with the Exchange Management Tools installed.
You can connect using remote PowerShell if, for some reason, you don't have Exchange Management Tools installed. Use the following command:
Just like Exchange 2013, Exchange 2016 is very reliable on remote PowerShell for both on-premises and cloud services. When you double-click the Exchange Management Shell shortcut on a server or workstation with the Exchange Management Tools installed, you are connected to an Exchange server using a remote PowerShell session.
PowerShell remoting also allows you to remotely manage your Exchange servers from a workstation or a server even when the Exchange Management Tools are not installed. In this recipe, we'll create a manual remote shell connection to an Exchange server using a standard PowerShell console.
Getting ready
To complete the steps in this recipe, you'll need to log on to a workstation or a server and launch Windows PowerShell.
How to do it...
First, create a credential object using the Get-Credential cmdlet. When running this command, you'll be prompted with a Windows authentication dialog box. Enter a username and password for an account that has administrative access to your Exchange organization. Make sure you enter your user name in DOMAINUSERNAME or UPN format:
$credential = Get-Credential
Next, create a new session object and store it in a variable. In this example, the Exchange server we are connecting to is specified using the -ConnectionUri parameter. Replace the server FQDN in the following example with one of your own Exchange servers:
After you execute the preceding command, the Exchange Management Shell cmdlets will be imported into your current Windows PowerShell session, as shown in the following screenshot:
How it works...
Each server runs IIS and supports remote PowerShell sessions through HTTP. Exchange servers host a PowerShell virtual directory in IIS. This contains several modules that perform authentication checks and determine which cmdlets and parameters are assigned to the user making the connection. This happens both when running the Exchange Management Shell with the tools installed, and when creating a manual remote connection. The IIS virtual directory that is being used for connecting is shown in the following screenshot:
The IIS virtual directories can also be retrieved by using PowerShell with the cmdlet Get-WebVirtualDirectory. For getting the information about the web applications, use the cmdlet Get-WebApplication.
Remote PowerShell connections to Exchange 2016 servers connect almost the same way as Exchange 2013 did. This is called implicit remoting that allows us to import remote commands into the local shell session. With this feature, we can use the Exchange PowerShell cmdlets installed on the Exchange server and load the cmdlets into our local PowerShell session without installing any management tools.
However, the detailed behavior for establishing a remote PowerShell session was changed in Exchange 2013 CU11. What happens right now when a user or admin is trying to establish the PowerShell session is that it first tries to connect to the user’s or admin’s mailbox (anchor mailbox), if there are any. If the user doesn’t have an existing mailbox, the PowerShell request will be redirected to the organization arbitration mailbox named SystemMailbox{bb558c35-97f1-4cb9-8ff7-d53741dc928c[AP4] }.
You may be curious as to why Exchange uses remote PowerShell even when the tools are installed and when running the shell from the server. There are a couple of reasons for this, but some of the main factors are permissions. The Exchange 2010, 2013, and 2016 permissions model has been completely transformed in these latest versions and uses a feature called Role Based Access Control (RBAC), which defines what administrators can and cannot do. When you make a remote PowerShell connection to an Exchange 2016 server, the RBAC authorization module in IIS determines which cmdlets and parameters you have access to. Once this information is obtained, only the cmdlets and parameters that have been assigned to your account through an RBAC role are loaded into your PowerShell session using implicit remoting.
There's more...
In the previous example, we explicitly set the credentials used to create the remote shell connection. This is optional and not required if the account you are currently logged on with has the appropriate Exchange permissions assigned. To create a remote shell session using your currently logged on credentials, use the following syntax to create the session object:
When the tasks have been completed, remove the session:
Remove-PSSession $session
You can see here that the commands are almost identical to the previous example, except this time we've removed the -Credential parameter and used the assigned credential object. After this is done, you can simply import the session and the commands will be imported into your current session using implicit remoting.
Unlock access to the largest independent learning library in Tech for FREE!
Get unlimited access to 7500+ expert-authored eBooks and video courses covering every tech area you can think of.
Renews at $19.99/month. Cancel anytime
In addition to implicit remoting, Exchange 2016 servers running PowerShell v5 or above can also be managed using fan-out remoting. This is accomplished using the Invoke-Command cmdlet and it allows you to execute a script block on multiple computers in parallel. For more details, run Get-Help Invoke-Command and Get-Help about_remoting.
Since Exchange Online is commonly used by Microsoft customers nowadays, let’s take a look at an example on how to connect as well. It’s very similar to connecting to remote PowerShell on-premises. The following prerequisites are required: .NET Framework 4.5 or 4.5.1 and then either Windows Management Framework 3.0 or 4.0.
Exchange Online mailboxes are shown in the following screenshot:
When the tasks have been completed, remove the session:
Remove-PSSession $session
Using explicit credentials with PowerShell cmdlets
There are several PowerShell and Exchange Management Shell cmdlets that provide a credential parameter that allows you to use an alternate set of credentials when running a command. You may need to use alternate credentials when making manual remote shell connections, sending email messages, working in cross-forest scenarios, and more. In this recipe, we'll take a look at how you can create a credential object that can be used with commands that support the -Credential parameter.
How to do it...
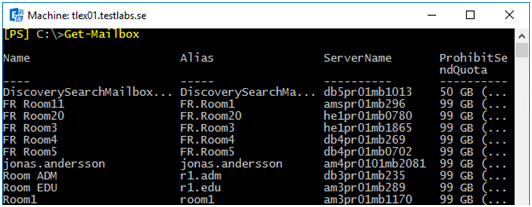
To create a credential object, we can use the Get-Credential cmdlet. In this example, we store the credential object in a variable that can be used by the Get-Mailbox cmdlet:
When you run the Get-Credential cmdlet,, you are presented with a Windows authentication dialog box requesting your username and password. In the previous example, we assigned the Get-Credential cmdlet to the $credential variable. After typing your username and password into the authentication dialog box, the credentials are saved as an object that can then be assigned to the -Credential parameter of a cmdlet. The cmdlet that utilizes the credential object will then run using the credentials of the specified user.
Supplying credentials to a command doesn't have to be an interactive process. You can programmatically create a credential object within your script without using the Get-Credential cmdlet:
You can see here that we've created a credential object from scratch without using the Get-Credential cmdlet. In order to create a credential object, we need to supply the password as a secure string type. The ConvertTo-SecureString cmdlet can be used to create a secure string object. We then use the New-Object cmdlet to create a credential object specifying the desired username and password as arguments.
If you need to prompt a user for their credentials but you do not want to invoke the Windows authentication dialog box, you can use this alternative syntax to prompt the user in the shell for their credentials:
$user = Read-Host "Please enter your username"
$pass = Read-Host "Please enter your password" -AsSecureString
$credential = New-Object ` System.Management.Automation.PSCredential-ArgumentList ` $user,$pass
This syntax uses the Read-Host cmdlet to prompt the user for both their username and password. Notice that when creating the $pass object, we use Read-Host with the -AsSecureString parameter to ensure that the object is stored as a secure string.
There's more...
After you've created a credential object, you may need to access the properties of that object to retrieve the username and password. We can access the username and password properties of the $credential object created previously using the following commands:
You can see here that we can simply grab the username stored in the object by accessing the UserName property of the credential object. Since the Password property is stored as a secure string, we need to use the GetNetworkCredential method to convert the credential to a NetworkCredential object that exposes the Password property as a simple string.
Another powerful method for managing passwords for scripts is to encrypt them and store them into a text file. This can be easily done using the following example.
The password is stored into a variable:
$secureString = Read-Host -AsSecureString "Enter a secret password"
The variable gets converted from SecureString and saved to a text file:

 United States
 Great Britain
 India
India
 Germany
 France
 Canada
 Russia
 Spain
Spain
 Brazil
 Australia
 Singapore
 Canary Islands
 Hungary
 Ukraine
 Luxembourg
 Estonia
 Lithuania
 South Korea
 Turkey
 Switzerland
 Colombia
 Taiwan
 Chile
Chile
 Norway
 Ecuador
 Indonesia
 New Zealand
 Cyprus
 Denmark
 Finland
 Poland
 Malta
Malta
 Czechia
 Austria
 Sweden
 Italy
Italy
 Egypt
Egypt
 Belgium
 Portugal
 Slovenia
 Ireland
 Romania
 Greece
 Argentina
 Netherlands
 Bulgaria
 Latvia
 South Africa
 Malaysia
 Japan
Japan
 Slovakia
 Philippines
 Mexico
 Thailand