
Extract, Transform, and Load data to build a dynamic, operational data warehouse with Oracle Warehouse Builder 11g R2 with this book and eBook
The Product dimension
In the Product dimension, we will create the attributes that describe the products sold by ACME Toys and Gizmos. The principles of the Time dimension apply to this dimension as well. The same four characteristics need to be defined—Levels, Dimension Attributes, Level Attributes, and Hierarchies. The only difference will be that they are product-oriented instead of time/date-oriented.
Let's begin by looking at the attributes of our products, and then we'll group by levels and a hierarchy. The first thing we should consider is how each toy or gizmo sold by ACME is represented. As with any retail operation, a Stock Keeping Unit (SKU) is maintained that uniquely identifies each individual type of item sold. This is an individual number assigned by the main office that uniquely identifies each type of product sold by ACME, and there could be tens of thousands of different items. There could be more than one product with the same name, but they won't have the same SKU. So the SKU, together with the NAME, forms the business identifier we can use for the products. A business identifier contains one or more attributes that have been selected by us to uniquely represent a record to differentiate it from another. These attributes are what we think of when we think about what differentiates an individual product from another. An SKU number all by itself is not very helpful. Therefore, in our Product dimension, we will want to make available more descriptive information about each product such as the description.
Every SKU can be grouped together by brand name—the toy manufacturer who makes the product—and then by the category of product, such as game, doll, action figure, sporting goods, and so on. Each category could be grouped by department in the store. Already, a list of attributes is starting to take shape and a product hierarchy is forming in our minds. For each of those levels in the hierarchy, that is the department, category, and brand, we need to have a business identifier. For that the NAME will be sufficient as there are no departments, categories, or brands that have the same name.
Product attributes (attribute type)
- ID (Dimension/Level)
- SKU (Level)
- Name (Dimension/Level)
- Description (Dimension/Level)
- List Price (Level)
Product levels
- Department located in
- Category of item
- Brand
- Item
Product hierarchy (highest to lowest)
- Department
- Category
- Brand
- Item
Looking at the product attributes, we see that they have been listed above with the type and that ID, Name, and Description are labeled as dimension attributes. This means they can appear on more than one level. Each level has a name (Item, Brand, Category, and Department) that identifies the level, but what about the names of the individual brands, or the different categories or departments? There has to be a place to store those names and descriptions, and that is the purpose of these dimension attributes. By labeling them as dimension attributes, they appear once for each level in the dimension. They are used to store the individual names and descriptions of the brands, categories, and departments. Likewise, each level will have a unique ID that will act as the surrogate key for that level, as well as one or more attributes defined as the business identifier. In our previous discussion about the Time dimension, we saw how a surrogate key was used as an identifier and how business identifiers were used; that same principle applies here, including the use of a surrogate key which wasn't used for a time dimension.
As we want the computer to do most of the work for us, let's use the OWB Dimension Wizard to create our Product dimension now that we've determined what will be in it.
Creating the Product dimension with the new Dimension Wizard
OWB provides a wizard that we can use to create a dimension. It is similar to the Time Dimension Wizard, but is more generic for applying to other dimensions. As a result, there will be more steps involved in the wizard, just because it has to ask us more because it will not be able to make as many assumptions as it did with the Time dimension. This wizard can be used with any dimension, and therefore things such as attributes, levels, and hierarchies are going to need to be defined explicitly. Right-click on the Dimensions node under our ACME_DWH Oracle module, which is under Databases in the Design Center Project Navigator. Choose New Dimension to launch the Create Dimension Wizard. The very first screen we'll see is the Welcome screen that will describe for us the steps that we will be going through. We can see that it requires more steps than the Time Dimension Wizard:

We will have to provide a name for our dimension, and tell it what type of storage to use—relational or multidimensional—just as we did for the Time Dimension Wizard. It will then ask us to define our dimension attributes. We didn't have to do that for the Time dimension. That wizard had a preset number of attributes it defined for us automatically because it knew it was creating a Time dimension. We then had to define the levels where we simply chose from a preset list of levels for the Time dimension. Here we have to explicitly name the levels. This is where we'll have to pay close attention to aggregations. We will then choose our level attributes from the dimension attributes.
Then we see in the previous figure that we will have to choose the slowly changing dimension type, which is how we want to handle changes to values in our dimension attributes over time. This is a new concept we haven't dealt with yet that pertains to dimensional modeling, and we'll soon briefly discuss just what that involves when we see the choices we'll be able to make for it. We'll then get a last chance to review the settings, and then it will create the dimension for us showing us the progress, which is similar to the last two steps of the Time Dimension Wizard.
- After reviewing the steps, the wizard will go to the next screen where we enter a name for the dimension that we will call Product.
Unlock access to the largest independent learning library in Tech for FREE!
Get unlimited access to 7500+ expert-authored eBooks and video courses covering every tech area you can think of.
Renews at $19.99/month. Cancel anytime
- We'll then proceed to step 2, which is where we will select the ROLAP: Relational storage option for relational, as we did for the Time dimension.
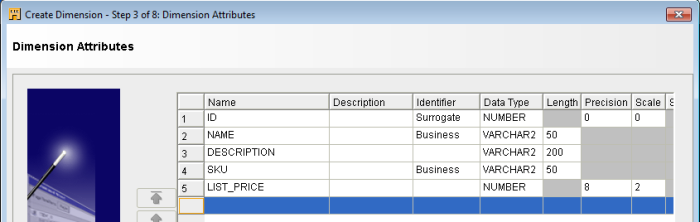
- Proceeding to step 3, we will be able to list the attributes that we want contained in our Product dimension. We see that the wizard was nice enough to create three attributes for us already—an ID, a NAME, and a DESCRIPTION as shown here:

Notice that the wizard has already labeled the ID as the Surrogate Identifier and the Name as the Business Identifier, and selected data types for those attributes for us. If we scroll that window to the right, we'll see that it has chosen sizes for the character attributes also. We can change all of these options at this point, so let's modify and add to this list to suit our Product dimension.
We'll make the following changes:
- Enter SKU in the name column on line 4 and leave the data type as VARCHAR2, but change the length to 50. Scroll the window to the right if any columns are not visible that need to be changed. We can also expand the dialog box to show additional columns.
- Enter LIST_PRICE in the name column on line 5, leave the data type as NUMBER, and leave the precision and scale as eight and two as it suggested.
- Make SKU a Business Identifier field in addition to Name. (Click on the drop-down box in the identifier column for SKU, and select Business.)
- Change the length of the NAME column from 25 to 50.
- Change the length of the DESCRIPTION column from 40 to 200.
Notice how the precision and scale were entered automatically for us by the Wizard when we entered names for our attributes. Moreover, they tended to make sense for the type of attribute. The LIST_PRICE had a default of eight for precision and two for the scale that we did not have to modify. If we choose logical names for our measures, it is able to make very good guesses as to what the precision and scale should be. SKU is a character field created with a varchar2 type with a reasonable length. Likewise, a LIST_PRICE amount implies money which requires a number having two decimal places (scale 2).
Suppose we make a mistake and enter a value and then decide not to keep it. Then we can delete the row by right-clicking on the row number to the left of the row, and then selecting Delete from the pop-up menu.
The screen should now look like the following, expanded slightly to the right to see the additional length, precision, and scale columns:
(Move the mouse over the image to enlarge.)
If we were to scroll that window all the way to the right, or expand it completely, we'd see even more columns such as the Seconds Precision and Descriptor column. If we press the Help button, it will explain what each column is. Briefly, the Seconds Precision is applicable to only TIMESTAMP data types, and expresses the precision of the seconds' portion of the value. The Descriptor is applicable to MOLAP (multidimensional) implementations and provides six standard descriptions that can be assigned to columns. It presets two columns, the Long description and the Short description. We can safely ignore them for our application.
- The next step is where we can specify the levels in our dimension. There must be at least one level identified, but we are going to have four in our Product dimension. They are to be entered on this screen in order from top to bottom with the highest level listed first, then down to the lowest level. For our dimension, we'll enter DEPARTMENT, CATEGORY, BRAND, and ITEM in that order from top to bottom.
You might have noticed there is no step where we get to input hierarchies. The wizard will automatically create a default hierarchy called Standard that will contain the levels we enter here in this order. To create additional hierarchies, we must use the data object editor for dimensions after creating the dimension in the wizard.
The dialog box should now look like this:

- Moving on to the next screen, we get to specify the level attributes. At the top are the levels, and at the bottom is the list of attributes with checkboxes beside each. If we click on each level in the top portion of the dialog box, we can see in the bottom portion that the wizard has preselected attributes for us. It chooses the three default attributes it created for us to be level attributes for each level, and the other two attributes—the SKU and LIST_PRICE—that we entered as level attributes for the bottom-most level—the ITEM level. We are not going to make any changes on this screen. The wizard has chosen wisely in this case. We could edit the descriptions of each of the level attributes if we wanted to.

 United States
 Great Britain
 India
India
 Germany
 France
 Canada
 Russia
 Spain
Spain
 Brazil
 Australia
 Singapore
 Canary Islands
 Hungary
 Ukraine
 Luxembourg
 Estonia
 Lithuania
 South Korea
 Turkey
 Switzerland
 Colombia
 Taiwan
 Chile
Chile
 Norway
 Ecuador
 Indonesia
 New Zealand
 Cyprus
 Denmark
 Finland
 Poland
 Malta
Malta
 Czechia
 Austria
 Sweden
 Italy
Italy
 Egypt
Egypt
 Belgium
 Portugal
 Slovenia
 Ireland
 Romania
 Greece
 Argentina
 Netherlands
 Bulgaria
 Latvia
 South Africa
 Malaysia
 Japan
Japan
 Slovakia
 Philippines
 Mexico
 Thailand


