


In this article by Andriy Lesyuk, author of Mastering Redmine, whentalking about the web interface (that is, not system files), all of the global configuration of Redmine can be done on the Settings page of the Administration menu. This is actually the page that this articleis based around. Some settings on this page, however, depend on special system files or third-party tools that need to be installed. And these are the other things that we will discuss.
You might expect to see detailed explanations for all the administration settings here, but instead, we will review in detail only a few of them, as I believe that the others do not need to be explained or can easily be tested. So generally, we will focus on hard-to-understand settings and thosesettings that need to be configured additionally in some special way or have some obscurities.
So, why should you read this articleif you are not an administrator? Some features of Redmine are available only if they have been configured, so by reading this article, you will learn what extra features exist and get an idea of how to enable them.
In this article, we will cover the following topics:
- The first thing to fix
- The general settings
- Authentication
(For more resources related to this topic, see here.)
The first thing to fix
A fresh Redmine installation has only one user account, which has administrator privileges. You can see it in the following screenshot:

This account is exactly the same by default on all Redmine installations. That’s why it is extremely important to change its credentials immediately after you complete the installation, especially for Redmine instances that can be accessed publicly.
The administrator credentials can be changed on the Users page of the Administration menu. To do this, click on the admin link. You will see this screen:
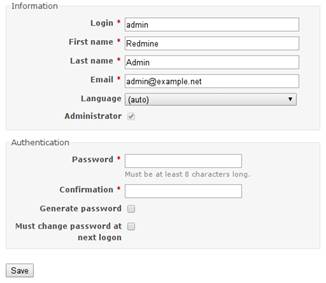
In this form, you should specify a new password in the Password and Confirmation fields. Also, it’s recommended that you change the login to something different. Additionally, consider specifying your e-mail instead of [email protected] (at least), changing the First name and Last name.
The general settings
Everything that is possible to configure at the global level (the opposite is the project level) can be found under the Administration link in the top-left menu. Of course, this link is available only for administrators
If you click on the Administrationlink, you will get the list of available administration pages on the sidebar to the right. Most of them are for managing Redmine objects, such as projects and trackers. We will be discussing only general, system-wide configuration. Most of the settings that we are going to review are compiled on the Settings page, as shown in the following screenshot:

As all of these settings can’t fit on a single page, Redmine organizes them into tabs.
We will discuss the Authentication, Email notifications, Incoming emails, and Repositories tabs in the next sections.
The General tab
So let’s start with the General tab, which can be seen in the previous screenshot. Settings in this tab control the general behavior of Redmine, thus Application title is the name of the website that is shown at the top of non-project pages, Welcome text is displayed on the start page of Redmine, Objects per page options specifies how many objects users will be able to see on a page, such settings as Search results per page and Days displayed on project activity allow to control the number of objects that are shown on search results and activity pages correspondingly, the Protocol setting specifies the preferred protocol that will be used in links to the website, Wiki history compression controls whether the history of Wiki changes should be compressed to save the space, and finally Maximum number of items in Atom feeds sets the limit for the amount of items that are returned in the Atom feed.
Additionally, the General tab contains settings, which I want to discuss in detail.
The Cache formatted text setting
Redmine supports text formatting through the lightweight markup language Textile or Markdown. While conversion of text from such a language to HTML is quite fast, in some circumstances, you may want to cache the resulting HTML. If that is the case, the Cache formatted text checkbox is what you need.
When this setting is enabled, all Textile or Markdown content that is larger than 2 KB will be cached. The cached HTML will be refreshed only when any changes are made to the source text, so you should take this into account if you are using a Wiki extension that generates the dynamic content (such as my WikiNG plugin).
Unless performance is extremely critical for you, you should leave this checkbox unchecked.
Other settings tips
Here are some other tips for the General tab:
- The value of the Host name and path setting will be used to generate URLs in the e-mail messages that will be sent to users, so it’s important to specify a proper value here.
- For the Text formatting, select the markup language that is best for you. It’s also possible to select none here, but I would not recommend to do this.
The Display tab
As it comes from the name, this tab contains settings related to the look and feel of Redmine. Its settings can be seen in the following screenshot:
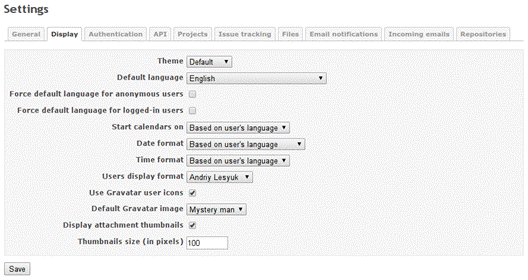
Using the Theme setting users can choose a theme for the Redmine interface. The Default language setting allows to specify which language will be used for the interface, if Redmine fails to determine the language of the user. Thus, for not logged-in users it will attempt to use the preferred language of the user’s browser, what can be disabled by the Force default language for anonymous users setting, and for logged-in users it will use the language that is chosen by users in their profiles, what can be disabled by the Force default language for logged-in users setting. By default the user’s language also affects the start day of the week, and date and time formats, what can also be changed by the Start calendars on, Date format and Time format settings correspondingly. The display format of the user name is controlled by the Users display format setting. Finally, the Thumbnails size (in pixels) setting specifies the size of thumbnail images in pixels.
Now let’s check what the rest of settings mean.
The Use Gravatar user icons setting
Once I used a WordPress form to leave a comment on someone’s blog. That form asked me to specify the first name, the last name, my e-mail address, and the text. After submitting it, I was surprised to see my photo near the comment. That’s what Gravatar does.
Gravatar stands for Globally Recognized Avatar. It’s a web service that allows you to assign an image for each user’s e-mail. Then, third-party sites can fetch the corresponding image by supplying a hash of the user’s e-mail address. The Use Gravatar user icons setting enables this behavior for Redmine.
Having this option checked is a good idea (unless potential users of your Redmine installation can be unable to access Internet because, for example, Redmine is going to be used in an isolated Intranet.
The Default Gravatar image setting
What happens if a Gravatar is not available for the user’s e-mail? In such cases, the Gravatar service returns a default image, which depends on the Default Gravatar image setting.
The following table shows the six available themes of the default avatar image:
|
Theme |
Sample image |
Description |
|
None |
|
The default image, which is shown if no other theme is selected |
|
Wavatars |
|
A generated face with differing features and background |
|
Identicons |
|
A geometric pattern |
|
Monster IDs |
|
A generated monster image with different colors, face, and so on |
|
Retro |
|
A generated 8-bit, arcade-style pixelated face |
|
Mystery man |
|
A simple, cartoon-style silhouetted outline of a person |


For all of these themes, except Mystery manandnone, Gravatar generates an avatar image that is based on the hash of the user’s e-mail and is therefore unique to it.
The Redmine Local Avatars plugin
Consider installing the Redmine Local Avatars plugin by Andrew Chaika, Luca Pireddu, and Ricardo Santos, if you preferwant users to upload their avatars directly onto Redmine:
https://github.com/thorin/redmine_local_avatars
This plugin will also let your users take their pictures with web cameras.
The Display attachment thumbnails setting
If the Display attachment thumbnails setting is enabled, all image attachments—no matter what object (for example, Wiki or issue) they are attached to—will be also seen under the attachment list as clickable thumbnails. If the user clicks on such a thumbnail, the full-size image will be opened.
The Redmine Lightbox 2 plugin
In pure Redmine, full-size images are opened in the same browser window. To open them in a lightbox, you can use the Lightbox 2 plugin that was created by Genki Zhang and Tobias Fischer:
https://github.com/paginagmbh/redmine_lightbox2
Note that in order for this setting to work, you must have the ImageMagick’s convert tool installed.
The API tab
In addition to the web interface that is intended for human Redmine comes with a special REST application programming interface (API) that is intended for third-party applications. Thus, Redmine REST API is used by Redmine Mylyn Connector for Eclipse and RedmineApp for iPhone. This interface can be enabled and configured under the API tab of the Settings page which is shown in the following screenshot:

Let’s check what these settings mean:
- If you need to support integration of third-party tools, you should turn on Redmine REST API using the Enable REST web service checkbox. But it is safe to keep this setting disabled, if you are not using any external Redmine tools.
- Redmine API can also be used via JavaScript in the web browser, but not if the API client (that is, a website, that runs JavaScript) is on different domain. In such cases to bypass the browser’s same-origin policy the API client may use the technique called JSONP. As this technique is considered to be insecure it should be explicitly enabled using the Enable JSONP support setting. So in most cases you should leave this option disabled.
The Files tab
The Files tab contains settings related to file display and attachment as shown in the following screenshot:

Here Allowed extensions and Disallowed extensions can be used to restrict file uploads by file extensions – thus you can use the former setting to allow certain extensions only or the latter one to forbid certain extensions only. Such settings as Maximum size of text files displayed inline and Maximum number of diff lines displayed control the amount of the file content that can be displayed.
The rest settings are used more often:
- You may need to change the Maximum attachment size setting to a large value (which is in kB). Thus, project files (releases) are attachments as well, so if you expect your users to upload large files, consider changing this setting to a bigger value.
- The value of the Attachments and repositories encodings option is used to convert commit messages to UTF-8.
Authentication
There are two pages in Redmine intended for configuring the authentication. The first one is the Authentication tab on the Settings page, and the second one is the special LDAP Authentication page, which can be found in the Administration menu. Let’s discuss these pages in detail.
The Authentication tab
The next tab in the administration settings is Authentication. The following screenshot shows the various options available under this tab:

If the Authentication required setting is enabled, users won’t be able to see the content of your Redmine without having logged in first. The Autologin setting can be used to let your users keep themselves logged in for some period of time using their browsers. The Self-registration setting controls, how user accounts are activated (the manual account activation option means that users should be enabled by administrators). The Allow users to delete their own account setting controls, whether users will be able to delete their accounts. The Minimum password length setting specifies the minimum size of the password in characters and the Require password change after setting can be used to force users to change their passwords periodically. The Lost password setting controls, whether users will be able to restore their passwords in cases when they, for example, have forgotten them. And finally the Maximum number of additional email addresses setting specifies the number of additional email addresses a user account may have.
After a user logs in Redmine opens a user session. The lifetime of such session is controlled by the Session maximum lifetime setting (value disabled means that the session hangs forever). Such session can also be automatically terminated, if the user was not active for some time, what is controlled by the Session inactivity timeout setting (value disabled means that the session never expires).
Now, let’s discuss the very special setting, which we skipped.
The Allow OpenID login and registration setting
If you are running a public website with open registration, you perhaps know (or you will know if you want your Redmine installation to be public and open for user registration) that users do not like to register on each new site. This is understandable, as they do not want to create another password to remember or share their existing password with a new and therefore untrusted website. Besides, it’s also a matter of sharing the e-mail address and—sometimes—remembering another login.
That’s when OpenID comes in handy. OpenID is an open-standard authentication protocol in which authentication (password verification) is performed by the OpenID provider. This popular protocol is currently supported by many companies, such as Yahoo!, PayPal, AOL, LiveJournal, IBM, VeriSign, and WordPress. In other words, servers of such companies can act as OpenID providers, and therefore users can log in to Redmine using their accounts that they have on these companies’ websites if the Allow OpenID login and registration setting is enabled.
Google used to support OpenID too, but they shut it down recently in favor of the OAuth2.0-based OpenID Connect authentication protocol. Despite the use of “OpenID” in its name, OpenID Connect is very different from OpenID.
So, if your Redmine installation is (or is going to be) public, consider enabling this setting. But note that to log in using this protocol, your users will need to specify OpenID URL (the URL of the OpenID provider) in addition to Login and Password, as it can be seen on the following Redmine login form:

LDAP authentication
Just as OpenID is convenient for public sites to be used to authenticate external users, LDAP is convenient for private sites—to authenticate corporate users. Like OpenID, LDAP is a standard that describes how to authenticate against a special LDAP directory server, and is widely used by many applications such as MediaWiki, Apache, JIRA, Samba, SugarCRM, and so on. Also, as LDAP is an open protocol, it is supported by some other directory servers, such as Microsoft Active Directory and Apple Open Directory. For this reason, it is often used by companies as a centralized users’ directory and an authentication server.
To allow users to authenticate against an LDAP server, you should add it to the list of supported authentication modes on the LDAP authentication page, which is available in the Administration menu. To add a mode, click on the New authentication mode link. This will open the form:

If the On-the-fly user creation option is checked, user accounts will be created automatically when users log in to the system for the first time. If this option is not checked, users will have to be added manually beforehand. Also, if you check this option, you need to specify all the attributes in the Attributes box, as they are going to be used to import user details from the LDAP server.
Check with your LDAP server administrator to find out what values should be used in this form.
In Redmine, LDAP authentication can be performed against many LDAP servers. Every such server is represented as an authentication source in the authentication mode list, which has just been mentioned. The corresponding source can also be seen in the user’s profile and can even be changed to the internal Redmine authentication if needed.
Summary
I guess you have become a bit tired with all those general details, installations, configurations, integrations, and so on. You might expect to see detailed explanations for all the administration settings here, but instead, we will review in detail only a few of them, as I believe that the others do not need to be explained or can easily be tested. So generally, we will focus on hard-to-understand settings and those settings that need to be configured additionally in some special way or have some obscurities.
Resources for Article:
Further resources on this subject:
- Project management with Redmine [article]
- Redmine – Permissions and Security [article]
- Installing and customizing Redmine [article]


