


The beauty of building a modern web application is being able to take advantage of functionalities such as a Progressive Web App (PWA)! But they can be a little complicated to work with. As always, the Create React App tool makes a lot of this easier for us but does carry some significant caveats that we’ll need to think about.
This article is taken from the book Create React App 2 Quick Start Guide by Brandon Richey. This book is intended for those that want to get intimately familiar with the Create React App tool. It covers all the commands in Create React App and all of the new additions in version 2. To follow along with the examples implemented in this article, you can download the code from the book’s GitHub repository.
In this article, we will learn what exactly PWAs are and how we can configure our Create React App project into a custom PWA. We will also explore service workers, their life cycle, and how to use them with Create React App.
Understanding and building PWAs
Let’s talk a little bit about what a PWA is because there is, unfortunately, a lot of misinformation and confusion about precisely what a PWA does! In very simple words, it’s simply a website that does the following:
- Only uses HTTPS
- Adds a JSON manifest (a web app manifest) file
- Has a Service Worker
A PWA, for us, is a React application that would be installable/runnable on a mobile device or desktop. Essentially, it’s just your app, but with capabilities that make it a little more advanced, a little more effective, and a little more resilient to poor/no internet. A PWA accomplishes these via a few tenets, tricks, and requirements that we’d want to follow:
- The app must be usable by mobile and desktop-users alike
- The app must operate over HTTPS
- The app must implement a web app JSON manifest file
- The app must implement a service worker
Now, the first one is a design question. Did you make your design responsive? If so, congratulations, you built the first step toward having a PWA! The next one is also more of an implementation question that’s maybe not as relevant to us here: when you deploy your app to production, did you make it HTTPS only? I hope the answer to this is yes, of course, but it’s still a good question to ask! The next two, though, are things we can do as part of our Create React App project, and we’ll make those the focus of this article.
Building a PWA in Create React App
Okay, so we identified the two items that we need to build to make this all happen: the JSON manifest file and the service worker! Easy, right? Actually, it’s even easier than that. You see, Create React App will populate a JSON manifest file for us as part of our project creation by default. That means we have already completed this step! Let’s celebrate, go home, and kick off our shoes, because we’re all done now, right?
Well, sort of. We should take a look at that default manifest file because it’s very unlikely that we want our fancy TodoList project to be called "Create React App Sample". Let’s take a look at the manifest file, located in public/manifest.json:
{
 "short_name": "React App",
 "name": "Create React App Sample",
 "icons": [
 {
 "src": "favicon.ico",
 "sizes": "64x64 32x32 24x24 16x16",
 "type": "image/x-icon"
 }
 ],
 "start_url": ".",
 "display": "standalone",
 "theme_color": "#000000",
 "background_color": "#ffffff"
}
Some of these keys are pretty self-explanatory or at least have a little bit of information that you can infer from them as to what they accomplish. Some of the other keys, though, might be a little stranger. For example, what does "start_url" mean? What are the different options we can pick for display? What’s a "theme_color" or "background_color"? Aren’t those just decided by the CSS of our application? Not really. Let’s dive deeper into this world of JSON manifest files and turn it into something more useful!
Viewing our manifest file in action with Chrome
First, to be able to test this, we should have something where we can verify the results of our changes. We’ll start off with Chrome, where if you go into the Developer tools section, you can navigate to the Application tab and be brought right to the Service Workers section! Let’s take a look at what it all looks like for our application:
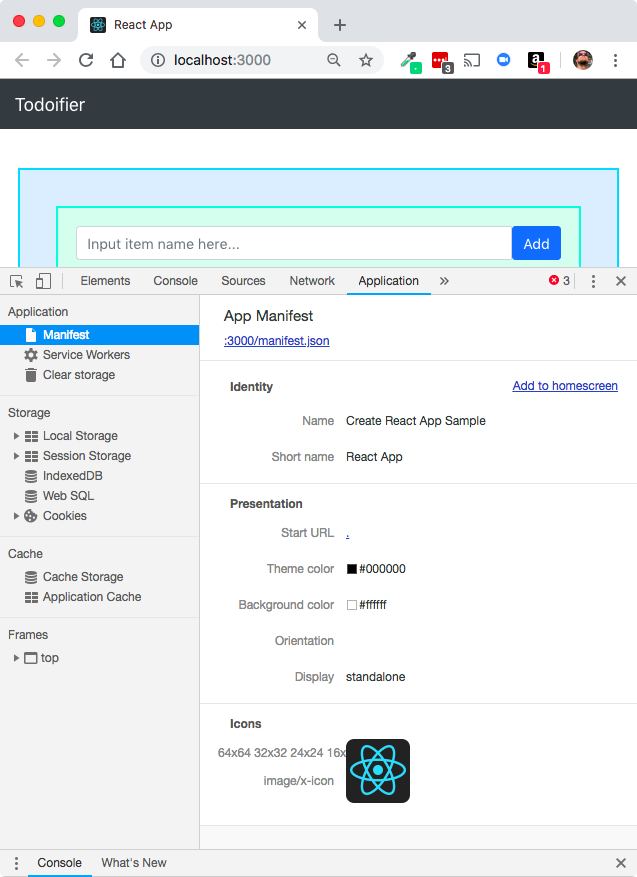
Exploring the manifest file options
Having a manifest file with no explanation of what the different keys and options mean is not very helpful. So, let’s learn about each of them, the different configuration options available to us, and some of the possible values we could use for each.
name and short_name
The first key we have is short_name. This is a shorter version of the name that might be displayed when, for example, the title can only display a smaller bit of text than the full app or site name. The counterpart to this is name, which is the full name of your application. For example:
{
 "short_name": "Todos",
 "name": "Best Todoifier"
}
icons
Next is the icons key, which is a list of sub-objects, each of which has three keys. This contains a list of icons that the PWA should use, whether it’s for displaying on someone’s desktop, someone’s phone home screen, or something else. Each "icon" object should contain an "src", which is a link to the image file that will be your icon. Next, you have the "type" key, which should tell the PWA what type of image file you’re working with. Finally, we have the "sizes" key, which tells the PWA the size of the icon. For best results, you should have at least a "512x512" and a "192x192" icon.
start_url
The start_url key is used to tell the application at what point it should start in your application in relation to your server. While we’re not using it for anything as we have a single page, no route app, that might be different in a much larger application, so you might just want the start_url key to be something indicating where you want them to start off from. Another option would be to add a query string on to the end of url, such as a tracking link. An example of that would be something like this:
{
 "start_url": "/?source=AB12C"
}
background_color
This is the color used when a splash screen is displayed when the application is first launched. This is similar to when you launch an application from your phone for the first time; that little page that pops up temporarily while the app loads is the splash screen, and background_color would be the background of that. This can either be a color name like you’d use in CSS, or it can be a hex value for a color.
display
The display key affects the browser’s UI when the application is launched. There are ways to make the application full-screen, to hide some of the UI elements, and so on. Here are the possible options, with their explanations:
ValueDescription.browserA normal web browser experience.fullscreenNo browser UI, and takes up the entire display.standaloneMakes the web app look like a native application. It will run in its own window and hides a lot of the browser UI to make it look and feel more native.
orientation
If you want to make your application in the landscape orientation, you would specify it here. Otherwise, you would leave this option missing from your manifest:
{
  "orientation": "landscape"
}
scope
Scope helps to determine where the PWA in your site lies and where it doesn’t. This prevents your PWA from trying to load things outside where your PWA runs. start_url must be located inside your scope for it to work properly! This is optional, and in our case, we’ll be leaving it out.
theme_color
This sets the color of the toolbar, again to make it feel and look a little more native. If we specify a meta-theme color, we’d set this to be the same as that specification. Much like background color, this can either be a color name, as you’d use in CSS, or it can be a hex value for a color.
Customizing our manifest file
Now that we’re experts on manifest files, let’s customize our manifest file! We’re going to change a few things here and there, but we won’t make any major changes. Let’s take a look at how we’ve set up the manifest file in public/manifest.json:
{
 "short_name": "Todos",
 "name": "Best Todoifier",
 "icons": [
 {
 "src": "favicon.ico",
 "sizes": "64x64 32x32 24x24 16x16",
 "type": "image/x-icon"
 }
 ],
 "start_url": "/",
 "display": "standalone",
 "theme_color": "#343a40",
 "background_color": "#a5a5f5"
}
So we’ve set our short_name and name keys to match the actual application. We’ve left the icons key alone completely since we don’t really need to do much of anything with that anyway.
Next, we’ve changed start_url to just be "/", since we’re working under the assumption that this application is the only thing running on its domain. We’ve set the display key to standalone since we want our application to have the ability to be added to someone’s home screen and be recognized as a true PWA.
Finally, we set the theme color to #343a40, which matches the color of the nav bar and will give a more seamless look and feel to the PWA. We also set the background_color key, which is for our splash screen, to #a5a5f5, which is the color of our normal Todo items!
If you think back to the explanation of keys, you’ll remember we also need to change our meta-theme tag in our public/index.html file, so we’ll open that up and quickly make that change:
<meta name="theme-color" content="#343a40" />
And that’s it! Our manifest file has been customized! If we did it all correctly, we should be able to verify the changes again in our Chrome Developer tools:

Hooking up service workers
Service workers are defined as a script that your browser runs behind the scenes, separate from the main browser threads. It can intercept network requests, interact with a cache (either storing or retrieving information from a cache), or listen to and deliver push messages.
The service worker life cycle
The life cycle for a service worker is pretty simple. There are three main stages:
- Registration
- Installation
- Activation
Registration is the process of letting the browser know where the service worker is located and how to install it into the background. The code for registration may look something like this:
if ('serviceWorker' in navigator) {
  navigator.serviceWorker.register('/service-worker.js')
  .then(registration => {
    console.log('Service Worker registered!');
   })
  .catch(error => {
    console.log('Error registering service worker! Error is:', error);
   });
}
Installation is the process that happens after the service worker has been registered, and only happens if the service worker either hasn’t already been installed, or the service worker has changed since the last time.
In a service-worker.js file, you’d add something like this to be able to listen to this event:
self.addEventListener('install', event => {
  // Do something after install
});
Finally, Activation is the step that happens after all of the other steps have completed. The service worker has been registered and then installed, so now it’s time for the service worker to start doing its thing:
self.addEventListener('activate', event => {
  // Do something upon activation
});
How can we use a service worker in our app?
So, how do we use a service worker in our application? Well, it’s simple to do with Create React App, but there is a major caveat: you can’t configure the service-worker.js file generated by Create React App by default without ejecting your project! Not all is lost, however; you can still take advantage of some of the highlights of PWAs and service workers by using the default Create React App-generated service worker.
To enable this, hop over into src/index.js, and, at the final line, change the service worker unregister() call to register() instead:
serviceWorker.register();
And now we’re opting into our service worker! Next, to actually see the results, you’ll need to run the following:
$ yarn build
We’ll create a Production build. You’ll see some output that we’ll want to follow as part of this:
The build folder is ready to be deployed.
You may serve it with a static server:
yarn global add serve
serve -s build
As per the instructions, we’ll install serve globally, and run the command as instructed:
$ serve -s build
We will get the following output:

Now open up http://localhost:5000 in your local browser and you’ll be able to see, again in the Chrome Developer tools, the service worker up and running for your application:

Hopefully, we’ve explored at least enough of PWAs that they have been partially demystified! A lot of the confusion and trouble with building PWAs tends to stem from the fact that there’s not always a good starting point for building one.
Create React App limits us a little bit in how we can implement service workers, which admittedly limits the functionality and usefulness of our PWA. It doesn’t hamstring us, by any means, but doing fun tricks with pre-caching networks and API responses, and loading up our application instantly, even if the browser doing the loading is offline in the first place. That being said, it’s like many other things in Create React App: an amazing stepping stone and a great way to get moving with PWAs in the future!
If you found this post useful, do check out the book, Create React App 2 Quick Start Guide. In addition to getting familiar with Create React App 2, you will also build modern, React projects with, SASS, and progressive web applications.
Read Next
ReactOS 0.4.11 is now out with kernel improvements, manifests support, and more!
React Native community announce March updates, post sharing the roadmap for Q4
React Native Vs Ionic: Which one is the better mobile app development framework?


