


This post will give you a basic introduction to the bitcoin protocol by guiding you through how to create a simple, real-time visualization of transactions in the bitcoin network.
Bitcoin is easy to understand on the surface, but very complex when you get into the details. The explanations in this guide are simplified to make the content accessible to people unfamiliar with bitcoins. In-depth documentation can be found at https://bitcoin.org.
Overview of the bitcoin network
Bitcoin is a public P2P payment network and ledger enabling people or machines to securely transfer value over the Internet without trusting a third party. The tokens used for this value exchange are called bitcoins (lowercase “b”). A bitcoin is divisible to eight decimal places. Currently one bitcoin has a market value of about $350.
Bitcoins “sit” at a bitcoin address, just like money “sits” in a bank account. A bitcoin address is a public identifier like a bank account number. In order to send bitcoins from one address to another you must prove ownership of the sending address by signing a transaction with the private key of the sending address. This private key is like the PIN or password to your bank account. Every bitcoin address has a unique corresponding private key.
The amount of bitcoins in each of the existing addresses is stored in a public ledger called the blockchain. The blockchain holds the history of all valid/accepted transactions sent through the bitcoin network. These transactions are what we will be visualizing.
To create a live visualization of the network we must connect to a bitcoin node or set of nodes. Nodes are servers in the bitcoin network responsible for propagating and relaying transactions. It’s important to note that not all transactions sent into the bitcoin network are valid, and most nodes will not relay an invalid transaction. Therefore, although a single node will eventually see any transaction accepted by the network, it will not see many of the spam or malicious transactions because most other nodes will not propagate them.
There are some very well connected nodes (super nodes) or clusters of nodes that can provide a more comprehensive view of the live state of the network. [Blockchain.info](https://blockchain.info) operates a super node and allows developers free access to its data through both REST and WebSockets APIs. We will be using their WebSockets API for this project.
Let’s get coding. You can see the finished project code here: https://github.com/leishman/btc_network_visualizer.
First we will create a basic index.html file with jQuery and our main.js file required.
The only HTML element we need is a <div> container:
<!DOCTYPE html>
  <head>
    <meta charset="utf-8">
    <meta http-equiv="X-UA-Compatible" content="IE=edge,chrome=1">
    <title></title>
    <meta name="description" content="">
    <meta name="viewport" content="width=device-width, initial-scale=1">
    <link rel="stylesheet" href="css/main.css">
  </head>
  <body>
  <h1>Bitcoin Network Visualizer</h1>

  <!-- Visualization Container -->
  <div class="vizContainer js-visualize"></div>

    <!-- Load jQuery -->
    <script>window.jQuery || document.write('<script src="js/vendor/jquery-1.11.1.min.js"></script>')</script>

    <!-- Link main.js, where our visualization code is located -->
    <script src="js/main.js"></script>
  </body>
</html>
Let’s throw some styling in there:
 /* gray container for visualization */
  .vizContainer {
    width: 100%;
    height: 500px;
    background: #EEE;
  }

  /* outer element for bubble */
  .txBubble {
    position: absolute;
  }

  /* inner element for bubble */
  .txBubbleInner {
    width: 100%;
    height: 100%;
    position: relative;
    background: green;
    border-radius: 50%;
    -webkit-animation: expand 1s ease-in-out;
  }

  /* box displaying information about a transaction on click */
  .toolTip {
    width: auto;
    height: 40px;
    padding: 0 5px;
    background: #AAA;
    border-radius: 4px;
    color: white;
    position: absolute;
  }

  /* words in tooltip */
  .toolTip p {
    margin: 0;
    line-height: 40px;
  }

  /* Animations */

  @-webkit-keyframes expand {
    0% {
      width: 0;
      height: 0;
      left: 50%;
      top: 50%;
    }

    100% {
      width: 100%;
      height: 100%;
      left: 0;
      top: 0;
    }
  }
To get started, we must establish a WebSocket connection with blockchain.info. You can view their documentation [here](https://blockchain.info/api/api_websocket).
The following code illustrates how to set up the WebSockets connection, subscribe to all unconfirmed (new) transactions in the network, and log the data to the console:
///////////////////////////////////////////
/// Connect with Blockchain Websockets API
////////////////////////////////////////////

// create new websocket object using a secure connection (wss)
var blkchainSocket = new WebSocket('wss://ws.blockchain.info/inv');

// once the socket connection is established
blkchainSocket.onopen = function(event) {
  var subMessage;

  // message to subscribe to all unconfirmed transactions
  subMessage = '{"op":"unconfirmed_sub"}';

  // send message to subscribe
  blkchainSocket.send(subMessage);
}

// callback to execute when a message is displayed
blkchainSocket.onmessage = function(event) {
  // Parse the data returned to convert to JSON
  var txData = JSON.parse(event.data);

  // log data to console
  console.log(txData);
}
If you run this code, you should see a live stream of transactions in your console. Let’s take a look at the data we receive:
{
   "op":"utx",
   "x":{
      "hash":"427937e561d2ab6236014d92509a1a872eec327de2b9f6d84cfcbce8af2db935",
      "vin_sz":1,
      "vout_sz":2,
      "lock_time":"Unavailable",
      "size":259,
      "relayed_by":"127.0.0.1",
      "tx_index":68494254,
      "time":1415169009,
      "inputs":[
         {
            "prev_out":{
               "value":29970360,
               "addr":"17L4qAEjVbKZ99iXJFhWMzRWv3c8LHrUeq",
               "type":0
            }
         }
      ],
      "out":[
         {
            "value":3020235,  // output 1, 3020235 Satoshis going to address 1DTnd....
            "addr":"1DTnd8vwpJT3yo64xZST5Srm9Z5JEWQ6nA",
            "type":0
         },
         {
            "value":26940125, // output 2, 26940125 Satoshis going to address 17L4....
            "addr":"17L4qAEjVbKZ99iXJFhWMzRWv3c8LHrUeq",
            "type":0
         }
      ]
   }
}
There is a lot of information here. The only thing we will concern ourselves with is the output, which specifies the amount and destination of the coins being sent in the transaction.
It is important to note that a single transaction can send various bitcoin amounts to multiple addresses. The output specifies the destinations and amounts of bitcoin sent by a transaction. Often a transaction has at least two outputs, where one of them sends bitcoins to a receiver and the other sends bitcoins as change back to the sender. The details of this are beyond the scope of this guide, but you can read more about it here.
Now that we have the data, we can visualize it.
Let’s make a function called visualize that can be passed data sent from the API and display it on the screen:
/////////////////////////
/// Visualize the data
/////////////////////////
// Input: JSON data object representing a new Bitcoin transaction from Blockchain.info API
// Result: Append a circle (bubble) to the DOM with a size proportional to the transaction value
function visualize(data) {
// declare variables
var r, outputs, txDot, vizHeight, vizWidth,
vizContainter, dot, txVal = 0, valNorm = 10000000;
// query DOM for viz Container
vizContainter = $('.js-visualize');
// get height and width of viz container
vizHeight = vizContainter.height();
vizWidth = vizContainter.width();
// get value of first tx ouput (for test only)
outputs = data.x.out;
// sum all unspent outputs to calculate total value of Tx
for(var i = 0; i < outputs.length; i++){
txVal += outputs[i].value;
}
// calculate radius of circle to display based on Tx value
r = (txVal / valNorm) / 2;
// generate random position
randTop = randomInt(vizHeight) + 88;
randLeft = randomInt(vizWidth) - r;
// set min and max sizes for radius (r)
if(r < 5) {
r = 5;
} else if(r > 100) {
r = 100;
}
// create HTML elements to use as bubble
txBubble = $('<div class="txBubble"><div class="txBubbleInner"></div></div>')
.css({'top': randTop, 'left': randLeft, 'width': r, 'height': r})
.attr('data-txvalue', txVal);
// add bubble element to DOM
dot = vizContainter.append(txBubble);
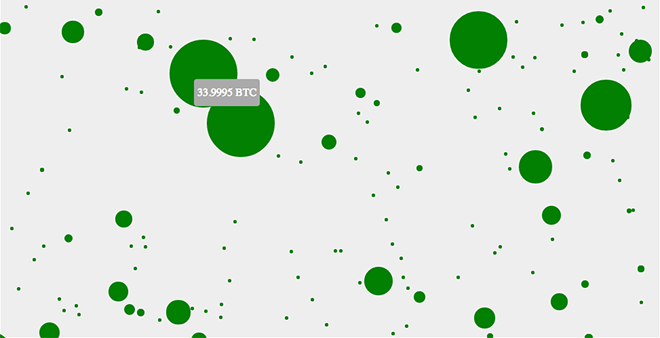
}This code creates a new element styled as a circle for each new transaction received. The size of the circle is represented by the total amount of bitcoins moved in a transaction. We set a max and min bound size of the circle to prevent invisible or over-sized circles from appearing.
We can then add a tooltip to each bubble to display the total value of the transaction. The values returned by blockchain.info are expressed in Satoshis (named after the mysterious creator of bitcoin – Satoshi Nakamoto). One bitcoin is equal to 100 million Satoshis, so we have a function called satoshi2btc do the conversion for us:
/////////////////////////////////////////
/// Create a tooltip to display Tx data
//////////////////////////////////////////

// Input: event, passed by calling function. showTooltip() acts as a callback function when a bubble is clicked
// see $(document).on('click', '.txBubble', showTooltip);

// Result: Display tooltip with the transaction value (in BTC) represented by the bubble

function showTooltip(event) {
  // declare variables
  var addrs, value, tooltip;

  // get value of tx stored as data attribute
  value = $(this).data('txvalue');

  // get coordinates of user's click
  xCoord = event.clientX;
  yCoord = event.clientY;

  // remove other tooltips to ensure only 1 is displayed at a time
  $('.toolTip').remove();

  // create a tooltip and position it at user's click
  tooltip = $('<div class="toolTip"></div>')
    .css({'top': yCoord, 'left': xCoord})
    .html('<p>' + satoshi2btc(value) + ' BTC</p>');

  // add tooltip to DOM
  $('.js-visualize').append(tooltip);
}

// define random integer function
// radomInt(5) will return a number from 0 to 4

function randomInt(range) {
  return Math.floor(Math.random() * range);
}

// convert Satoshis to BTC
// There are 100,000,000 Satoshis in 1 Bitcoin
function satoshi2btc(val) {
  return val / 100000000;
}


/////////////////////////////////////////
/// Bind Tooltip event on document load
//////////////////////////////////////////

// bind showTooltip function on DOM load
$(function() {
  $(document).on('click', '.txBubble', showTooltip);
});
In summary, we used the blockchain.info WebSockets API to create a live JavaScript visualization of the transactions in the bitcoin network. We used our new understanding of the bitcoin protocol to visually represent the value of each transaction. This is just the tip of the iceberg and a great way to get your feet wet with bitcoin development.
About the Author
Alex Leishman is a software engineer who is passionate about bitcoin and other digital currencies. He works at MaiCoin.com where he is helping to build the future of money.