


From 7th to 13th November we’re celebrating two of the hottest tools in the JavaScript universe. Check out our best Angular and React content here – and save up to 80%!
Dependency Injection is one of the biggest features of Angular. It allows you to inject dependencies in different components throughout your web application without needing to know how these dependencies are created.
So what does this actually mean? If a component depends on a service, you do not create this service. Instead, you have a constructor request this service, and the framework then provides it to you. You can actually view dependency injection as a design pattern or framework.
In Angular 1, you must tell the framework how to create a service. Let’s take a look at a code example.
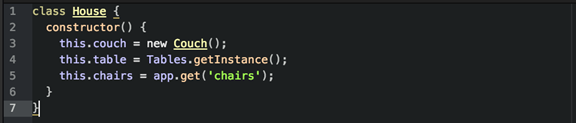
There is nothing out of the ordinary with this sample code. The class is set up to construct a house object when needed. However, the problem with this code example is that the constructor assigns the needed dependencies, and it knows how these objects are created.
What is the big deal you may ask? First, this makes the code very hard to maintain, and second, the code is even harder to test.
Let’s rewrite the code example as follows:

What just happened? The dependency creation is moved out of the constructor, and the constructor is extended to expect all of the needed dependencies. This is significant becauseyou want to create a new house object. All you have to do is pass all of the needed dependencies to the constructor.

This allows the dependencies to be decoupled from your class, allowing you to pass mocked dependencies when you write a test.
Angular 2 has made a drastic, but welcome, changeto dependency injection. Angular 2 provides more control for maintainability, and it is easier to test. In the new version of Angular, it focuses more on how to get these dependencies.
Dependency Injection consists of three things:
- Injector
- Provider
- Dependency
The injector object exposes the APIs in order for you to create instances of dependencies. A provider tells the injector how to create the instance of a dependency. This is done by the provider taking a token and map to a factory function that creates an object. A dependency is the type of which an object should be created.
What does this look like in code?
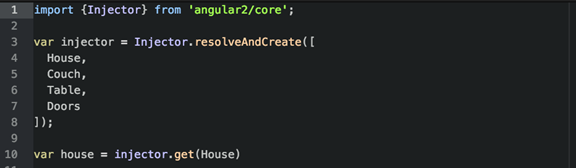
Let’s dissect this code. You have to import an injector from Angular 2 in order to expose some static APIs to create the injectors. The resolveAndCreate() function is a factory one that creates an injector and takes a list of providers. However, you must ask yourself, “How does the injector know which dependencies are needed in order to represent a house?” Easy! Lets take a look at the following code:

First, you need to import injectfrom the framework and apply the decorator to all of the parameters in the constructor. By attaching the Inject decorator to the House class, the metadata is used by the dependency injection system. To put it simply, you tell the dependency injectionthat the first constructor parameter should be of the Couch type, the second of the Table type, and the third of the Doors type. The class declares the dependencies, and the dependency injection can read this information whenever the application needs to create an object of House.
If you take a look at the resolveAndCreate() method, it creates an injector from an array of binding. The passed-in bindings, in this case, are types from the constructor parameters.
You might be wondering how dependency injection in Angular 2 works in the framework. Luckily, you do not have to create injectors manually when you build Angular 2 components. The developers behind Angular 2 have created an API that hides all of the injector system when you build components in Angular 2. Let’s explore how this actually works.
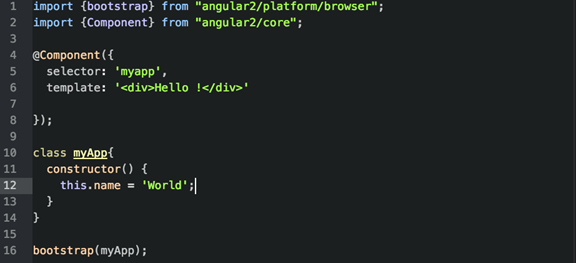
Here, we have a very basic component, but what happens if you expand this component? Take a look:
As you added a class, you now need to make it available in your application as an injectable. Do this by passing provider configurations to your application injector. Bootstrap() actually takes care of creating the root injector for you. It takes a list of providers as a second argument and then passes it straight to the injector when it is created. It looks similar to this:
![]()
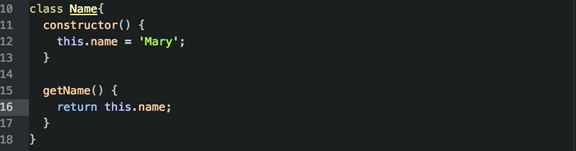
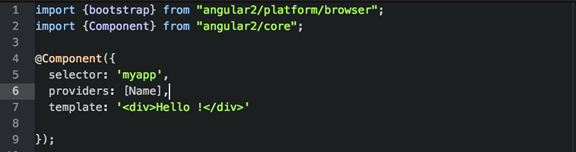
One last thing to consider when using dependency injection is: what do you do if you want a different binding configuration in a specific component? You just simply add a providers property to the component, as follows:
Remember that providers do not construct the instances that will be injected, but it does construct a child injector that is created for the component.
To conclude, Angular 2 introduces a new dependency injection system. The new dependency injection system allows for more control to maintain your code, to test it more easily, and to rely on interfaces. The new dependency injection system is built into Angular 2 and only has one API for dependency injection into components.

About the author
Mary Gualtieri is a full stack web developer and web designer who enjoys all aspects of the Web and creating a pleasant user experience. Web development, specifically frontend development, is an interest of hers because it challenges her to think outside of the box and solve problems, all while constantly learning. She can be found on GitHub as MaryGualtieri.


