


The ability of computers to perform tasks such as identifying objects has always been a humongous task for both the software and the required architecture. This isn’t the case anymore since the likes of Google, Amazon, and a few other companies have done all the hard work, providing the infrastructure and making it available as a cloud service. It should be noted that they are as easy to access as making REST API calls.
This article is taken from the book Learning Kotlin by building Android Applications by Eunice Adutwumwaa Obugyei and Natarajan Raman. This book will teach you programming in Kotlin including data types, flow control, lambdas, object-oriented, and functional programming while building Android Apps.
In this tutorial, you will learn how to use the face detection API from Google’s Mobile Vision API to detect faces and add fun functionalities such as adding rabbit ears to a user’s picture.
We will cover the following topics:
- Identifying human faces in an image
- Tracking human faces from a camera feed
- Identifying specific parts of the face (for example, eyes, ears, nose, and mouth)
- Drawing graphics on specific parts of a detected face in an image (for example, rabbit ears over the user’s ears)
Introduction to Mobile Vision
The Mobile Vision API provides a framework for finding objects in photos and videos. The framework can locate and describe visual objects in images or video frames, and it has an event-driven API that tracks the position of those objects.
Currently, the Mobile Vision API includes face, barcode, and text detectors.
Faces API concepts
Before diving into coding the features, it is necessary that you understand the underlying concepts of the face detection capabilities of the face detection API.
From the official documentation:
Face detection is the process of automatically locating human faces in visual media (digital images or video). A face that is detected is reported at a position with an associated size and orientation. Once a face is detected, it can be searched for landmarks such as the eyes and nose.
A key point to note is that only after a face is detected, will landmark such as eyes and a nose be searched for. As part of the API, you could opt out of detecting these landmarks.
We will be using a couple of terms in this section, so let me give you an overview of each of these before we go any further:
Face tracking extends face detection to video sequences. When a face appears in a video for any length of time, it can be identified as the same person and can be tracked.
It is important to note that the face that you are tracking must appear in the same video. Also, this is not a form of face recognition; this mechanism just makes inferences based on the position and motion of the face(s) in a video sequence.
A landmark is a point of interest within a face. The left eye, right eye, and nose base are all examples of landmarks. The Face API provides the ability to find landmarks on a detected face.
Classification is determining whether a certain facial characteristic is present. For example, a face can be classified with regards to whether its eyes are open or closed or smiling or not.
Getting started – detecting faces
You will first learn how to detect a face in a photo and its associated landmarks.
We will need some requirements in order to pursue this.
With a minimum of Google Play Services 7.8, you can use the Mobile Vision APIs, which provide the face detection APIs. Make sure you update your Google Play Services from the SDK manager so that you meet this requirement.
Get an Android device that runs Android 4.2.2 or later or a configured Android Emulator. The latest version of the Android SDK includes the SDK tools component.
Creating the FunyFace project
Create a new project called FunyFace. Open up the app module’s build.gradle file and update the dependencies to include the Mobile Vision APIs:
dependencies {
    implementation fileTree(dir: 'libs', include: ['*.jar'])
    implementation"org.jetbrains.kotlin:kotlin-stdlib-jre7:$kotlin_version"
    implementation 'com.google.android.gms:play-services-vision:11.0.4'
    ...
}
Now, update your AndroidManifest.xml to include meta data for the faces API:
<meta-data
 android:name="com.google.android.gms.vision.DEPENDENCIES"
 android:value="face" />
Now, your app is ready to use the face detection APIs.
To keep things simple, for this lab, you’re just going to process an image that is already present in your app. Add the following image to your res/drawable folder:

Now, this is how you will go about performing face detection.
You will first load the image into memory, get a Paint instance, and create a temporary bitmap based on the original, from which you will create a canvas. Create a frame using the bitmap and then call the detect method on FaceDetector, using this frame to get back SparseArray of face objects.
Well, let’s get down to business—this is where you will see how all of these play out.
First, open up your activity_main.xml file and update the layout so that it has an image view and a button. See the following code:
<?xml version="1.0" encoding="utf-8"?>
<FrameLayout
    xmlns:android="http://schemas.android.com/apk/res/android"
    xmlns:tools="http://schemas.android.com/tools"
    android:layout_width="match_parent"
    android:layout_height="match_parent"
    xmlns:app="http://schemas.android.com/apk/res-auto"
    tools:context="com.packtpub.eunice.funyface.MainActivity">

  <ImageView
      android:id="@+id/imageView"
      android:layout_width="match_parent"
      android:layout_height="match_parent"
      android:src="@mipmap/ic_launcher_round"
      app:layout_constraintBottom_toTopOf="parent"
      android:scaleType="fitCenter"/>

  <Button
      android:id="@+id/button"
      android:layout_width="wrap_content"
      android:layout_height="wrap_content"
      android:layout_gravity="bottom|center"
      android:text="Detect Face"/>

</FrameLayout>
That is all you need to do here so that you have FrameLayout with ImageView and a button. Now, open up MainActivity.kt and add the following import statements. This is just to make sure that you import from the right packages as you move along. In your onCreate() method, attach a click listener to the button in your MainActivity layout file:
package com.packtpub.eunice.funface

import android.graphics.*
import android.graphics.drawable.BitmapDrawable
import android.os.Bundle
import android.support.v7.app.AlertDialog
import android.support.v7.app.AppCompatActivity
import com.google.android.gms.vision.Frame
import com.google.android.gms.vision.face.FaceDetector
import kotlinx.android.synthetic.main.activity_main.*

class MainActivity : AppCompatActivity() {

override fun onCreate(savedInstanceState: Bundle?) {
super.onCreate(savedInstanceState)
setContentView(R.layout.activity_main)

button.setOnClickListener {
detectFace()
}
}
}
Loading the image
In your detectFace() method, you will first load your image from the drawable folder into memory and create a bitmap image from it. Since you will be updating this bitmap to paint over it when the face is detected, you need to make it mutable. This is what makes your bitmap mutable:
options.inMutable=true
See the following implementation:
private fun detectFace() {
    // Load the image
    val bitmapOptions = BitmapFactory.Options()
    bitmapOptions.inMutable = true
    val myBitmap = BitmapFactory.decodeResource(
            applicationContext.resources,
            R.drawable.children_group_picture,
            bitmapOptions)
}
Creating a Paint instance
Use the Paint API to get an instance of the Paint class. You will only draw around the face, and not paint the whole face. To do this, set a thin stroke, give it a color, which in our case is red, and set the style of paint to STROKE using Paint.Style.STROKE:
// Get a Paint instance
val myRectPaint = Paint()
myRectPaint.strokeWidth = 5F
myRectPaint.color = Color.RED
myRectPaint.style = Paint.Style.STROKE
Creating a canvas
To get the canvas, first create a bitmap using the dimensions from the bitmap you created earlier. With this canvas, you will paint over the bitmap to draw the outline of the face after it has been detected:
// Create a canvas using the dimensions from the image's bitmap
val tempBitmap = Bitmap.createBitmap(myBitmap.width, myBitmap.height, Bitmap.Config.RGB_565)
val tempCanvas = Canvas(tempBitmap)
tempCanvas.drawBitmap(myBitmap, 0F, 0F, null)
Creating the face detector
All you have done thus far is basically housekeeping. You will now access the FaceDetector API by which you will, well, detect the face in the image. You will disable tracking for now, as you only want to detect the face at this stage.
Note that on its first run, the Play Services SDK will take some time to initialize the Faces API. It may or may not have completed this process at the time you intend to use it. Therefore, as a safety check, you need to ensure its availability before using it. In this case, you will show a simple dialog to the user if the FaceDetector is not ready at the time the app is run.
Also, note that you may need an internet connection as the SDK initializes. You also need to ensure you have enough space, as the initialization may download some native library onto the device:
// Create a FaceDetector
val faceDetector = FaceDetector.Builder(applicationContext).setTrackingEnabled(false)
        .build()
if (!faceDetector.isOperational) {
    AlertDialog.Builder(this)
            .setMessage("Could not set up the face detector!")
            .show()
    return
}
Detecting the faces
Now, you will use the detect() method from the faceDetector instance to get the faces and their metadata. The result will be SparseArray of Face objects:
// Detect the faces
val frame = Frame.Builder().setBitmap(myBitmap).build()
val faces = faceDetector.detect(frame)
Drawing rectangles on the faces
Now that you have the faces, you will iterate through this array to get the coordinates of the bounding rectangle for the face. Rectangles require x, y of the top left and bottom right corners, but the information available only gives the left and top positions, so you have to calculate the bottom right using the top left, width, and height. Then, you need to release the faceDetector to free up resources. Here’s the code:
// Mark out the identified face
for (i in 0 until faces.size()) {
    val thisFace = faces.valueAt(i)
    val left = thisFace.position.x
    val top = thisFace.position.y
    val right = left + thisFace.width
    val bottom = top + thisFace.height
    tempCanvas.drawRoundRect(RectF(left, top, right, bottom), 2F, 2F, myRectPaint)
}
imageView.setImageDrawable(BitmapDrawable(resources, tempBitmap))
// Release the FaceDetector
faceDetector.release()
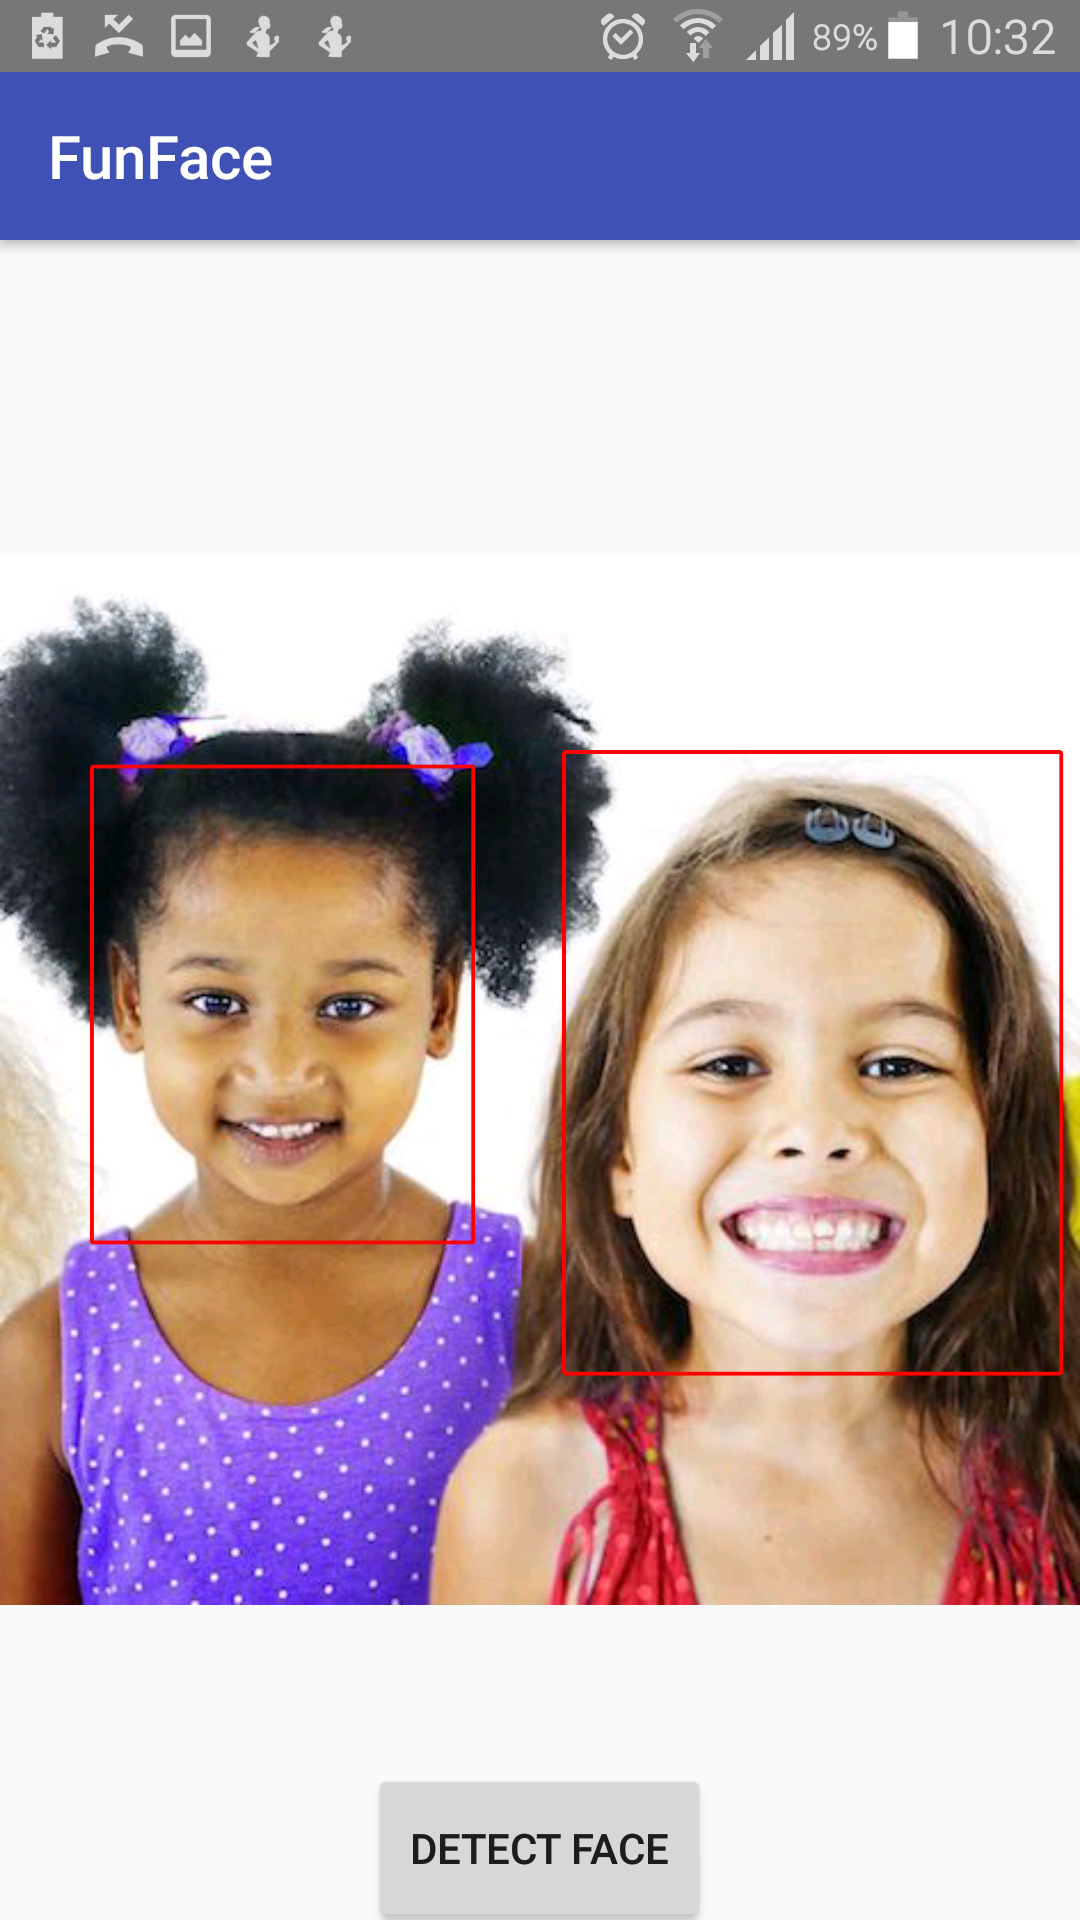
Results
All set. Run the app, press the DETECT FACE button, and wait a while…:
The app should detect the face and a square box should appear around the face, voila:
Okay, let’s move on and add some fun to their faces. To do this, you need to identify the position of the specific landmark you want, then draw over it.
To find out the landmark’s representation, you label them this time around, then later draw your filter to the desired position.
To label, update the for loop which drew the rectangle around the face:
// Mark out the identified face
for (i in 0 until faces.size()) {
    ...
for (landmark in thisFace.landmarks) {
val x = landmark.position.x
val y = landmark.position.y

when (landmark.type) {
NOSE_BASE -> {
val scaledWidth =
eyePatchBitmap.getScaledWidth(tempCanvas)
val scaledHeight =
eyePatchBitmap.getScaledHeight(tempCanvas)
tempCanvas.drawBitmap(eyePatchBitmap,
x - scaledWidth / 2,
y - scaledHeight / 2,
null)
}
}
}
}
Run the app and take note of the labels of the various landmarks:

There you have it! That’s funny, right?
Summary
In this tutorial, we learned how to use the Mobile Vision APIs, in this case, the Faces API. There are a few things to note here. This program is not optimized for production. Some things you can do on your own are, load the image and do the processing in a background thread. You can also provide a functionality to allow the user to pick and choose images from different sources other than the static one used. You can get more creative with the filters and how they are applied too. Also, you can enable the tracking feature on the FaceDetector instance, and feed in a video to try out face tracking.
To know more about Kotlin APIs as a preliminary for building stunning applications for Android, read our book Learning Kotlin by building Android Applications.
Read Next
6 common challenges faced by Android App developers
Google plans to let the AMP Project have an open governance model, soon!
Entry level phones to taste the Go edition of the Android 9.0 Pie version


