
In this post I will introduce you to pixi.js, a super-fast rending engine that is also a swiss-army-knife tool with a friendly API.
What ?
Pixi.js is a rendering engine that allows you to use the power of WebGL and canvas to render your content on your screen in a completely seamless way.

In fact, pixi.js features both a WebGL and a canvas renderer, and can fall back to the latter for lower-end devices. You can then harness the power of WebGL and hardware-accelerated graphics on devices that are powerful enough to use it.
If one of your users is on an older device, the engine falls back to the canvas renderer automatically and there is no difference for the person browsing your website, so you don’t have to worry about those users any more.
WebGL for 2D ?
If you have heard or browsed a web product that was showcased as using WebGL, you probably have memories of a 3D game, a 3D earth visualization, or something similar.
WebGL was originally highlighted and brought to the public for its capability to render 3D graphics in the browser, because it was the only way that was fast enough to allow them to do it.
But the underlying technology is not 3D only, nor is it 2D, you make it do what you want, so the idea behind pixi.js was to bring this speed and quality of rendering to 2D graphics and games, and of course to the general public.
You might argue that you do not need this level of accuracy and fine-grain control for 2D, and the WebGL API might be a bit of an overhead for a 2D application, but with browsers becoming more powerful, the expectations of the users are getting higher and higher and this technology with its speed allows you to compete with the applications that used to be flash-only.
Tour/Overview
Pixi.js was created by a former flash developer, so consequently its syntax is very similar to ActionScript3.
Here is a little tour of the core components that you need to create when using pixi.
The renderer
I already gave you a description of its features and capabilities, so the only thing to bear in mind is that there are two ways of creating a renderer. You can specify the renderer that you want, or let the engine decide according to the current device.
// When you let the engine decide : var renderer = PIXI.autoDetectRenderer(800,600);
// When you specifically want one or the other renderer: var renderer = new PIXI.WebGLRenderer(800,600);
// and for canvas you'd write : // var renderer = new PIXI.WebGLRenderer(800,600);
The stage
Pixi mimics the Flash API in how it deals with object’s positioning. Basically, the object’s coordinates are always relative to their parent container.
Flash and pixi allow you to create special objects that are called containers. They are not images or graphics, they are abstract ways to group objects together.
Say you have a landscape made of various things such as trees, rocks, and so on. If you add them to a container and move this container, you can move all of these objects together by moving the container.
Here is how it works:
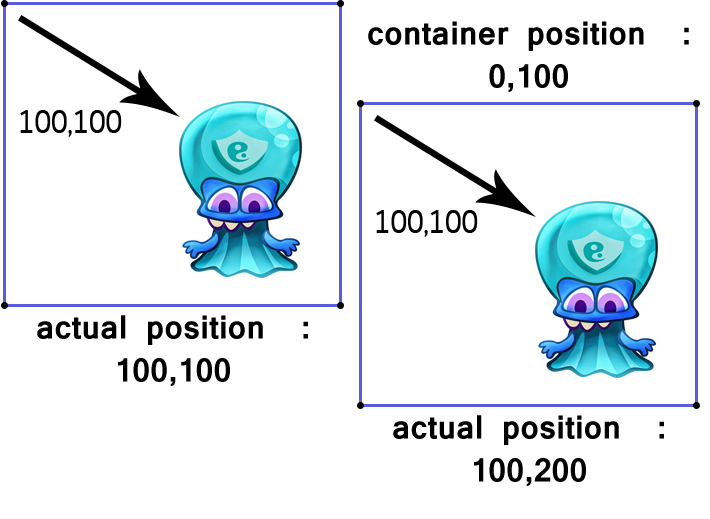
Don’t run away just yet, this is where the stage comes in. The Stage is the root container that everything is added to.
The stage isn’t meant to move, so when a sprite is added directly to the stage, you can be sure its position will be the same as its position on-screen (well, within your canvas).
// here is how you create a stage var stage = new PIXI.Stage(); Let’s make a thing
Ok, enough of the scene-graph theory, it’s time to make something.
As I wrote before, pixi is a rendering engine, so you will need to tell the renderer to render its stage, otherwise nothing will happen. So this is the bare bones template you’ll use for anything pixi:
// create an new instance of a pixi stage var stage = new PIXI.Stage(0x0212223);
    // create a renderer instance
    var renderer = PIXI.autoDetectRenderer(window.innerWidth, window.innerHeight);

    // add the renderer view element to the DOM
    document.body.appendChild(renderer.view);

    // create a new Sprite using the texture
    var bunny = new PIXI.Sprite.fromImage("assets/bunny.png");

    bunny.position.set(200,230);

    stage.addChild(bunny);

    animate();

    function animate() {
        // render the stage
        renderer.render(stage);

        requestAnimFrame(animate);
    }
First, you create a renderer and a stage, just like I showed you before, then you create the most important pixi object, a Sprite, which is basically an image rendered on your screen.
var sprite = new PIXI.Sprite.fromImage("assets/image.png");Sprites, are the core of your game, and the thing you will use the most in pixi and any major game framework.
However, pixi being not really a game framework, but a level lower, you need to manually add your sprites to the stage. So whenever something is not visible, make sure to double-check that you have added it to the stage like this:
stage.addChild(sprite);Then, you can create a function that creates a bunch of sprites.
function createParticles () {
        for (var i = 0; i < 40; i++) {
            // create a new Sprite using the texture
            var bunny = new PIXI.Sprite.fromImage("assets/bunny.png");
            bunny.xSpeed = (Math.random()*20)-10;
            bunny.ySpeed = (Math.random()*20)-10;

            bunny.tint = Math.random() * 0xffffff;

            bunny.rotation = Math.random() * 6;

            stage.addChild(bunny);
        }
    }
And then, you can leverage the update loop to move these sprites around randomly:
if(count > 10){
createParticles(); count = 0; }
        if(stage.children.length > 20000){ stage.children.shift()}

        for (var i = 0; i < stage.children.length; i++) {

            var sprite = stage.children[i];
            sprite.position.x += sprite.xSpeed;
            sprite.position.y += sprite.ySpeed;

            if(sprite.position.x > renderer.width){
                sprite.position.x = 0;
            }

            if(sprite.position.y > renderer.height){
                sprite.position.y = 0;
            }
        };
  </code>
That’s it, for this blog post. Feel free to have a play with pixi and browse the dedicated website.
Games development, web development, native apps… Visit our JavaScript page for more tutorials and content on the frameworks and tools essential for any software developers toolkit.
About the author
Alvin is a web developer fond of the web and the power of open standards. A lover of open source, he likes experimenting with interactivity in the browser. He currently works as an HTML5 game developer.