Use the powerful Xcode 4 suite of tools to build applications for the iPhone and iPad from scratch
The iPhone provides developers with many ways in which they can add informative messages to their applications to alert the user. We will be looking at the various types of notification methods, ranging from alerts, activity indicators, audio sounds, and vibrations.
Exploring the notification methods
The applications on the iPhone are user-centric, meaning that they don't operate without a user interface and don't perform any background operations.
These types of applications enable users to work with data, play games, or communicate with other users. Despite these, at some point an application will need to communicate with the user. This can be as simple as a warning message, or providing feedback or even asking the user to provide some information.
The iPhone and Cocoa-Touch use three special methods to gain your attention and are explained below:
CLASS
DESCRIPTION
UIAlertView
This class creates a simple modal alert window that presents the user with a message and a few options.
Modal elements require the user to interact with them before they can proceed. These types of elements are displayed (layered) on top of other windows and block the underlying objects until the user responds to one of the actions presented.
UIActionSheet
These types of classes are similar to the UIAlertView class, except that they can be associated with a given view, tab bar, or toolbar and become animated when it appears on the screen. Action Sheets do not have an associated message property; they contain a single title property.
System Sound Services
This enables playback and vibration and supports various file formats (CAF, AIF, and WAV Files) and makes use of the AudioToolBox framework.
Generating alerts
There is no doubt that you will need to incorporate alerts into your applications. These can be very useful to inform the user of when the application is running, and can be a simple message such as memory running low, or that an application or internal error has occurred. We can notify the user in a number of ways using the UIAlertView class, and it can be used to display a simple modal message or gather information from the user.
Time for action – creating the GetUsersAttention application
Before we can proceed with creating our GetUsersAttention application, we must first launch the Xcode development environment.
Select the View-based application template from the project template dialog box.
Ensure that you have selected iPhone from under the Device Family dropdown, as the type of view to create.
Next, you will need to provide a name for your project.
Enter GetUsersAttention and then choose a location where you would like to save the project.
Once your project has been created, you will be presented with the Xcode interface, along with the project files that the template created for you within the Project Navigator Window.
What just happened?
In this section, we looked at the steps involved in creating a View-based application for our GetUsersAttention application. In the next section, we will take a look at how we can add the AudioToolbox Framework into our project to incorporate sound.
Time for action – adding the AudioToolbox Framework to our application
Now that we have created our project, we need to add the AudioToolbox Framework to our project. This is an important framework which will provide us the ability to play sound and vibrate the phone.
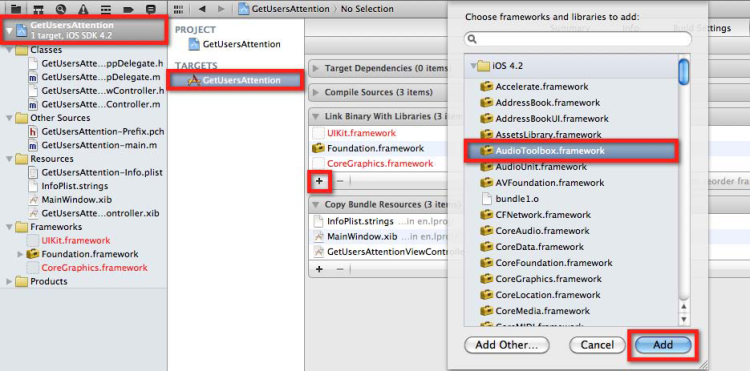
To add the new frameworks or additional frameworks into your project, select the Project Navigator Group, and then follow these simple steps as outlined below:
Select your Project within the Project Navigator Window.
Then select your project target from under the TARGETS group.
Select the Build Phases tab.
Expand the Link Library with Libraries disclosure triangle.
Then finally, use the + button to add the library that you want to add; if you want to remove a framework, highlight it from the group and click on the - button. You can also search for the framework if you can't find it in the list shown.
If you are still confused on how to go about adding these frameworks, refer to the following image, which highlights what parts you need to select (highlighted by a red rectangle):
(Move the mouse over the image to enlarge.)
Unlock access to the largest independent learning library in Tech for FREE!
Get unlimited access to 7500+ expert-authored eBooks and video courses covering every tech area you can think of.
Renews at $19.99/month. Cancel anytime
What just happened?
In the above section, we looked at how we are able to add frameworks to our application. We looked at the differences between the MediaPlayer and AudioToolbox frameworks, and the limitations of the two.
Adding frameworks to your application allows you to extend your application and utilise those features in your application to avoid reinventing the wheel. When you add frameworks to your application, the system loads them into memory as needed and shares the one copy of the resource among all applications whenever possible.
Now that we have added the AudioToolbox.framework to our project, our next step is to start creating our user interface. In the next section, we will be taking a look at how we start to build our user interface and create events.
Building our user interface
User interfaces provide a great way to communicate with the user in order to either obtain information or to display notifications. A good interface is one that provides a good consistent flow throughout your application as you navigate from screen to screen. This involves considering the screen size of your view. In the next section, we look at how to add some controls to our view to build our interface.
We will be adding five button (UIButton) controls which will be handling our actions to display alerts and Action Sheets, playing sounds, and vibrating the iPhone.
From the Object Library, select and drag a (UIButton) Round Rect Button control onto our view. Modify the Object Attributes of the Round Rect Button control and set its title to read "Show Activity Indicator".
From the Object Library, select and drag a (UIButton) Round Rect Button control onto our view. Modify the Object Attributes of the Round Rect Button control and set its title to read "Display Alert Dialog".
From the Object Library, select and drag a (UIButton) Round Rect Button control onto our view. Modify the Object Attributes of the Round Rect Button control and set its title to read "Display Action Sheet".
From the Object Library, select and drag a (UIButton) Round Rect Button control onto our view. Modify the Object Attributes of the Round Rect Button control and set its title to read "Play Alert Sound".
From the Object Library, select and drag a (UIButton) Round Rect Button control onto our view. Modify the Object Attributes of the Round Rect Button control and set its title to read "Vibrate iPhone".
If you have followed everything correctly, your view should look something like the following screenshot. If it doesn't look quite the same, feel free to adjust yours:
What just happened?
In the above section, we looked at how we are able to use the Object Library to add controls to our view and customize their properties in order to build our user interface. In the next section, we will take a look at how to create events to respond to button events.
Creating events
Now that we have created our user interface, we need to create the events that will respond when we click on each of the buttons.
We first need to create an instance of our UIAlertView class, called baseAlert, which will be used by our Show Activity indicator event and will be used to dismiss the activity after a period of time has lapsed.
Open the GetUsersAttentionViewController.h interface file and add the following highlighted code as shown in the code snippet below:
We could have declared this within our GetUsersAttentionViewController.m implementation file, but I prefer to declare it in this class as it can be referenced throughout your application.
You will notice from the code snippet above that we have made reference to two delegate protocols within our GetUsersAttentionViewController.h interface file; this enables us to capture and respond to the button event presses used by our Action Sheet and Alert Views. This will become apparent when we start adding the code events for our Alert Views and Action Sheets.

 United States
 Great Britain
 India
India
 Germany
 France
 Canada
 Russia
 Spain
Spain
 Brazil
 Australia
 Singapore
 Canary Islands
 Hungary
 Ukraine
 Luxembourg
 Estonia
 Lithuania
 South Korea
 Turkey
 Switzerland
 Colombia
 Taiwan
 Chile
Chile
 Norway
 Ecuador
 Indonesia
 New Zealand
 Cyprus
 Denmark
 Finland
 Poland
 Malta
Malta
 Czechia
 Austria
 Sweden
 Italy
Italy
 Egypt
Egypt
 Belgium
 Portugal
 Slovenia
 Ireland
 Romania
 Greece
 Argentina
 Netherlands
 Bulgaria
 Latvia
 South Africa
 Malaysia
 Japan
Japan
 Slovakia
 Philippines
 Mexico
 Thailand