Writing a 3D space rail shooter in Three.js, Part 1
Read more
Writing a 3D space rail shooter in Three.js, Part 1
Martin Naumann
420 min read
2015-10-01 00:00:00
0 Likes
0 Comments
In the course of this 3 part article series, you will learn how to write a simple 3D space shooter game with Three.js.
The game will look like this:
It will introduce the basic concepts of a Three.js application, how to write modular code and the core principles of a game, such as camera, player motion and collision detection.
But now it's time to get ready!
Prerequisites
I will introduce you to a small set of tools that have proven to work reliably and help build things in a quick and robust fashion.
Three.js - a wrapper around WebGL and other 3D rendering APIs
three-world - a highlevel wrapper around Three.js to reduce boilerplate.
uglify-js - a tool to minify and strip down Javascript code
To set up our project, create a directory and bring up a terminal inside this directory, e.g.
mkdir space-blaster
cd space-blaster
Initializing our package
As we'll use npm, it's a good idea to setup our project as an npm package. This way we'll get dependency management and some handy meta information - and it's easy:
npm init
Answer the questions and you're ready.
Getting the dependencies
Next up is getting the dependencies installed. This can be done conveniently by having npm install the dependencies and save them to our package.json as well.
This way others can quickly grab our source code along with the package.json and just run npm install to get all required dependencies installed. So we now do
The first line installs the two dependencies that our application needs to run, the second installs dependencies that we'll use throughout development.
Creating the scaffold
Now we'll need an HTML file to host our game and the main entry point Javascript file for our game.
Let's start with the index.html:
<!doctype html>
<html lang="en">
<head>
<meta charset="utf-8">
<title>Space Blaster</title>
<style>
html, body {
padding: 0;
margin: 0;
height: 100%;
height: 100vh;
overflow: hidden;
}
</style>
</head>
<body>
<script src="app.js"></script>
<noscript>Yikes, you'll need Javascript to play the game :/</noscript>
</body>
</html>
That is enough to get us a nice and level field to put our game on. Note that the app.js will be the result of running watchify while we're developing and browserify when making a release build, respectively.
Now we just create a js folder where our Javascript files will be placed in and we're nearly done with our setup, just one more thing:
Build scripts
In order to not have to clutter our system with globally-installed npm packages for our development tools, we can use npm's superpowers by extending the package.json a bit.
Replace the scripts entry in your package.json with:
build runs browserify and minifies the output into app.js, starting from js/main.js which will be our game code's entry point
dev runs watchify which will look for changes in our Javascript code and update app.js, but without minifying, which decreases the cycle time but produces a larger output file.
To kick off development, we now create an empty js/main.js file and run
npm run dev
which should output something like this:
> space-blaster@1.0.0 dev /code/space-blast
> watchify js/main.js -v -o app.js
498 bytes written to app.js (0.04 seconds)
With this running, open the js/main.js file in your favourite editor - it's time to start coding!
Example repository and assets
In the course of this article series, we will be using resources such as images and 3D models that are available for free on the internet. The models come from cgtrader, the space background from mysitemyway.
Unlock access to the largest independent learning library in Tech for FREE!
Get unlimited access to 7500+ expert-authored eBooks and video courses covering every tech area you can think of.
Renews at $19.99/month. Cancel anytime
Light, Camera, Action!
Let's start creating - first of all we need a world and a function that is updating this world on each frame:
var World = require('three-world')
function render() {
// here we'll update the world on each frame
}
World.init({ renderCallback: render })
// Things will be put into the world here
World.start()
Behind the curtain, this code creates a camera, a scene (think of this as our stage) and an ambient light. With World.start() the rendering loop is started and the world starts to "run".
But so far our world has been empty and, thus, just a black void.
Let's start to fill this void - we'll start with making a vortex in which we'll fly through space.
Into the vortex
To add things to our stage, we put more code in between World.init and World.start.
var tunnel = new THREE.Mesh(
new THREE.CylinderGeometry(100, 100, 5000, 24, 24, true),
new THREE.MeshBasicMaterial({
map: THREE.ImageUtils.loadTexture('images/space.jpg'),
side: THREE.BackSide
})
)
tunnel.rotation.x = -Math.PI/2
World.add(tunnel)
With this code we're creating a new mesh with a cylindrical geometry that is open at the ends and our space background, lay it on the side and add it to the world.
The THREE.BackSide means that the texture shall be drawn on the inside of the cylinder, which is what we need as we'll be inside the cylinder.
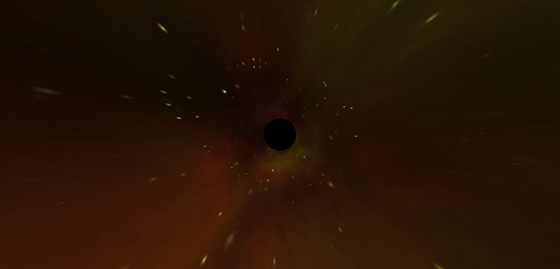
Now our world looks like this:
There's a few things that we should tweak at this point. First of all, there's an ugly black hole at the end - let's fix that.
First of all, we'll change the color that the World uses to clear out parts that are too far for the camera to see by adjusting the parameters to World.init:
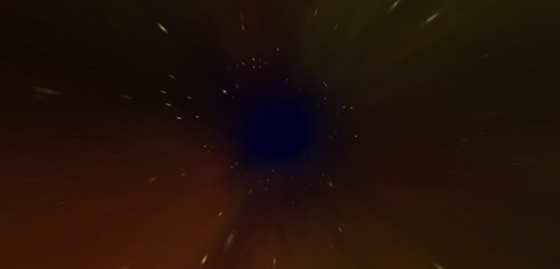
Note that the fog has the same color as the clearColor of the World and is added to the Scene.
And voilà: It looks much nicer!
Now let's do something about this stretched look of the space texture on the vortex by repeating it a few times to make it look better:
var tunnel = new THREE.Mesh(
new THREE.CylinderGeometry(100, 100, 5000, 24, 24, true),
new THREE.MeshBasicMaterial({
map: THREE.ImageUtils.loadTexture('images/space.jpg', null, function(tex) {
tex.wrapS = tex.wrapT = THREE.RepeatWrapping
tex.repeat.set(5, 10)
tex.needsUpdate = true
}),
side: THREE.BackSide
})
)
Alright, that looks good.
In Part 2 of this series we will add the spaceship and add asteroids to our game.
About the author
Martin Naumann is an open source contributor and web evangelist by heart from Zurich with a decade of experience from the trenches of software engineering in multiple fields. He works as a software engineer at Archilogic in front and backend. He devotes his time to moving the web forward, fixing problems, building applications and systems and breaking things for fun & profit. Martin believes in the web platform and is working with bleeding edge technologies that will allow the web to prosper.

 United States
 Great Britain
 India
India
 Germany
 France
 Canada
 Russia
 Spain
Spain
 Brazil
 Australia
 Singapore
 Canary Islands
 Hungary
 Ukraine
 Luxembourg
 Estonia
 Lithuania
 South Korea
 Turkey
 Switzerland
 Colombia
 Taiwan
 Chile
Chile
 Norway
 Ecuador
 Indonesia
 New Zealand
 Cyprus
 Denmark
 Finland
 Poland
 Malta
Malta
 Czechia
 Austria
 Sweden
 Italy
Italy
 Egypt
Egypt
 Belgium
 Portugal
 Slovenia
 Ireland
 Romania
 Greece
 Argentina
 Netherlands
 Bulgaria
 Latvia
 South Africa
 Malaysia
 Japan
Japan
 Slovakia
 Philippines
 Mexico
 Thailand