Drupal separates layout and styling information from processing code. HTML is usually stored in templates or theme functions. The CSS along with other styling information (including some images) are also stored separately from the functional code.
A theme is a collection of resources, (usually template files, CSS, JavaScript, and images) that can be plugged into Drupal to provide layout and styling to a site.
If we want to change the look and feel of a site, the best place to start is with a theme.
We've already created a JavaScript file that provides additional printing functionality. In this section, we are going to create a new theme, and then incorporate our new script.
Typically, a theme must provide the following things:
HTML markup for common Drupal structures such as pages, blocks, comments, and nodes. This will include navigational elements.
Any styles needed. This is typically done in the CSS files.
Any necessary images or media elements that will play a substantial role in layout.
Information about the theme, including a screenshot.
In addition to these, many themes will also provide:
JavaScript files that may be necessary for added functionality.
Other sorts of media, such as Flash animations, may occasionally be needed.
PHP code that performs complex layout tasks may sometimes be used.
A theme must have at least one pre-defined file (the theme's .info file). Commonly though, full themes have eight or more files.
Full themes and subthemes
The first step in creating our theme is deciding whether we want to start from scratch or begin with an existing theme. If we were to start from scratch, we would create a full theme. But if we wanted to build on another theme, we could create another kind of theme called a subtheme.
To create a full theme, we would need to implement all of the required features of a theme, and perhaps add on some other features as well. Typically, this would involve creating all of the necessary templates, a couple of CSS files, and a couple of helper files.
Sometimes, it is more expedient to begin with an existing theme and just override the things we want to change. This is the capability that subthemes, a new addition in Drupal 6, provide.
From a technical perspective, creating a full theme is not difficult, but it is time-consuming. In contrast, a subtheme can be created quickly. Since our focus is on JavaScript, and not theming, we will be creating a subtheme. That way, we can make the most of an existing project and keep our work to a minimum.
As the name implies, a subtheme is derived from another theme. Therefore, we will need to pick a theme to start with. Drupal comes with six themes pre-installed, and these vary in method and complexity. For example, Garland is a complex theme with templates, JavaScript, CSS, and lots of special PHP. In contrast, Chameleon generates simpler HTML, but does all of this in pure PHP code, without reliance on template files.
Since we want to focus our attention on JavaScript, it would be best to start with a simple theme. From there, we will selectively override only what we need.
Our theme of choice will be the Bluemarine theme, which has a very basic PHPTemplate-based structure that is easy to customize.
Looking for a good base theme to start with? Check out the Zen theme in the contributed themes at http://drupal.org/project/zen. It's built to enable subtheming. You will need to create some CSS content, but the HTML structure is all in place.
We will with Bluemarine and create a new subtheme, borrowing as much as possible from the base theme.
Creating a theme: first steps
To create a theme, we will do the following:
Create a directory for the theme.
Create the theme's .info (dot-info) file.
Add our first files.
After we've finished these three short steps, we will add our JavaScript to the theme.
A precaution for theme developers To get build our theme correctly, we will need to be able to view it. But to view it, we will need to have it enabled. What if we make a mistake that prevents Drupal from rendering correctly? We could lock ourselves out of the administration page. To prevent this from happening, it is wise to set the administration theme to one of the default themes. This is done in Administer | Site configuration | Administration theme.
Creating a theme directory
Every theme should have its own directory.
When you install Drupal, one of the directories created is called themes/. If you take a look inside that directory, you will see all of the top-level (non-subtheme) themes that Drupal provides. Do not put your themes in there. This directory is only for themes that come with Drupal's core.
Themes, like modules, go inside the sites/ subtree. The sites/ area also appears inside the Drupal directory and is created when you install Drupal. Inside the sites/ directory, two folders are created by default: sites/all/ and sites/default/.
To better understand these two directories, keep in mind that one installation of Drupal can serve multiple sites. For example, if I have a site called example.com and a site called anotherexample.com, I can use one installation of Drupal to serve both.
The first site I install will be installed in sites/default/. The next site I install will need to go in its own folder (for example, sites/anotherexample.com/). Content that only belongs to a single site should go in that site's directory.
For example, if I want to install a special theme for anotherexample.com, I should put the theme in sites/anotherexample.com/themes/.
In other cases, I may want to share a theme or module across all sites. In these cases, files would go in sites/all/. In this article, we will be putting all of our themes and modules in sites/all/themes/ and sites/all/modules/.
If in doubt, put files in sites/all/. This makes it easier to share your work between sites.
With that background material behind us, let's create our theme directory. The name we give to this directory will be the name of our theme.
Theme and module names should always be in a lower case, and may be composed only of letters, numbers, and underscores. In the .info file, we will be able to attach a human-readable name to the theme. That may use spaces, capital letters, and other special characters.
Our first theme will be in sites/all/themes/frobnitz/ as seen in the following screehshot:.
Unlock access to the largest independent learning library in Tech for FREE!
Get unlimited access to 7500+ expert-authored eBooks and video courses covering every tech area you can think of.
Renews at $19.99/month. Cancel anytime
If this is the first theme you create, you may also need to create the sites/all/themes/ directory.
Once the directory is created, we need to add a special file to tell Drupal about the theme.
Creating the .info file
Inside sites/all/themes/frobnitz/, we need to create a file to provide important information about our theme. The file will always be named after the theme, and end with the extension .info. Because of the extension, it is usually called the theme's dot-info file.
We will create frobnitz.info, and add the following contents to the file:
; $Id$ name = Frobnitz description = Table-based multi-column theme with JavaScript enhancements. version = 1.0 core = 6.x base theme = bluemarine
The .info file contains a handful of lines with the form name = value. These entries provide basic information about the theme.
Some of this information is displayed to the user (for example, name and description). Some information is used by Drupal to make sure that this theme will work with the installed version of Drupal. The core parameter is used for that.
Later in this article, we will see some other entries that contain information directly related to the display of the theme. With those parameters, we can change the way the theme looks and behaves just by altering the values.
The name, description, version, and core fields are required for all themes.
The name field is used to give our theme a human-friendly name. You can use capital letters and spaces in this field.
The description parameter is used to provide a one-sentence explanation of what the theme does.
The version field should indicate which version number of this theme is. As with most software, you typically start with 1.0.
Finally, the core field should indicate what version of Drupal this theme works with. For us, it will always be 6.x.
There's one additional parameter in our file:
base theme = bluemarine
The base theme parameter is what we use to inform Drupal that our theme is a subtheme, derived from bluemarine. If we were creating a theme from scratch, we would not include this line.
For the time being, this is all we need in our theme file. Later, we will add more.
Modifying .info files and clearing the cache To improve performance, Drupal caches theme information, particularly the theme's .info file. When you change the contents of that file (for example, when you add a new script or stylesheet), you will need to clear the theme information cache to force Drupal to re-read the .info file. The most reliable way to do this is through Administer | Site configuration | Performance. At the bottom of that page is a button labeled Clear cached data. Press that button to clear the cache.
Adding files to the theme
At this point, we've actually created a working theme. Only the theme's directory and .info file are required. With just those two elements, we can now go to Administer | Site building | Themes and select our Frobnitz theme.
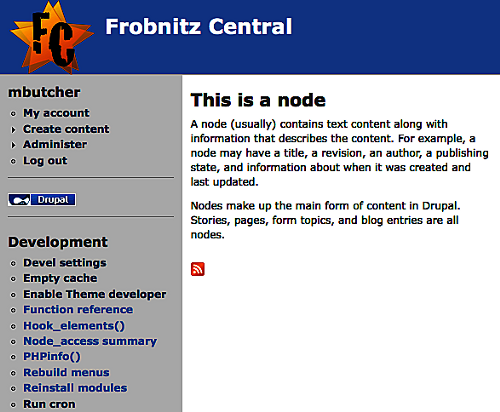
Of course, all Frobnitz will be at this point is an exact duplicate of Bluemarine The following screenshot shows a sample of the Frobnitz theme:
The logo image, titles, and all other information in the screenshot is showing through the regular site configuration. The look and feel should be identical whether we choose Bluemarine or our new Frobnitz style.
What we want to do now is add something new to our theme, and what better place to start than with a stylesheet.
Our theme will import all of the stylesheets of its parent. So in our theme, we inherit style.css from Bluemarine. Looking at the HTML source for a page rendered with Frobnitz, we would see a line like this:
If we didn't want that style to be loaded from Bluemarine, we could simply create another file named style.css in our own theme's directory. This new file would override Bluemarine's.
But we don't want to start over and rebuild the stylesheet. We just want to add a few extra styles. To do this, we will create a new stylesheet called frobnitz.css. This CSS file will also go inside our sites/all/themes/frobnitz/ folder.
Like PHP and JavaScript, the Drupal project defines coding standards for CSS. You can learn more about these here: http://drupal.org/node/302199.
To begin, all we will do is add a black, one-pixel border on the right side of the lefthand column. The stylesheet looks like this:
#sidebar-left { border-right: 1px solid black; }
Cascade: the 'C' in 'CSS' Drupal will add styles in a specific order, with theme styles added last. Because of this, you can predictably make use of the CSS cascading behavior. The previous declaration will be added to the declaration made in Bluemarine's style.css file. That means we will get the combination of styles in style.css and frobnitz.css, with frobnitz.css's declarations taking precedence.
But before our new stylesheet will have any effect, we need to tell Drupal to include it as part of the theme. This is done with a simple addition to the frobnitz.info file:
; $Id$ name = Frobnitz description = Table-based multi-column theme with JavaScript enhancements. version = 1.0 core = 6.x base theme = bluemarine stylesheets[all][] = frobnitz.css
Only that last line, which is highlighted, is different. This informs Drupal that there is a stylesheet that should be used on all format types for this page, and is named frobnitz.css.
The all keyword indicates that this stylesheet applies to all media format types. CSS format types include print (for printed media), screen (for screen displays), and other types.
While this directive uses an array-like syntax, it does not function like an array. You cannot, for example, refer to stylesheets[all][1].

 United States
 Great Britain
 India
India
 Germany
 France
 Canada
 Russia
 Spain
Spain
 Brazil
 Australia
 Singapore
 Canary Islands
 Hungary
 Ukraine
 Luxembourg
 Estonia
 Lithuania
 South Korea
 Turkey
 Switzerland
 Colombia
 Taiwan
 Chile
Chile
 Norway
 Ecuador
 Indonesia
 New Zealand
 Cyprus
 Denmark
 Finland
 Poland
 Malta
Malta
 Czechia
 Austria
 Sweden
 Italy
Italy
 Egypt
Egypt
 Belgium
 Portugal
 Slovenia
 Ireland
 Romania
 Greece
 Argentina
 Netherlands
 Bulgaria
 Latvia
 South Africa
 Malaysia
 Japan
Japan
 Slovakia
 Philippines
 Mexico
 Thailand