Calling a business rule from BPEL
Save the rule, and then switch back to our composite and double-click the LeaveRequest BPEL process to edit it. Drag a Business Rule from the BPEL Activities and Components palette into your BPEL process (before the Human Task activity). This will open the Business Rule dialog (as shown in the following screenshot):
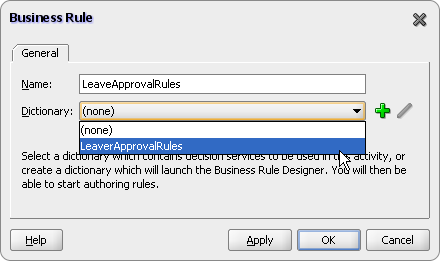
First, we need to specify a name for the Business Rule activity within our BPEL process, so give it a meaningful name such as LeaveApprovalRules.
Next we need to specify the Business Rule Dictionary that we wish to use. If we click on the drop-down list, it will list all the dictionaries within our composite application, which in our case is LeaveApprovalRules that we have just defined.
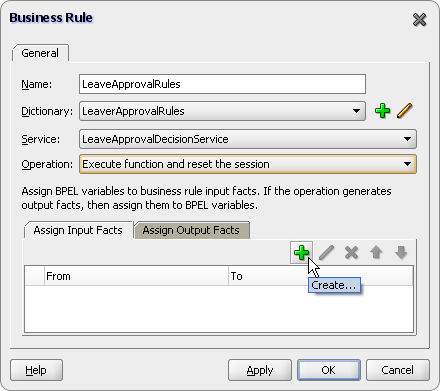
Select this and the rule dialog will be updated (as shown in the following screenshot) to enable us to specify additional information about how we want to invoke the rule. First, we need to select the decision service that we want to invoke from BPEL. Our rule only contains a single decision service, LeaveApprovalDecisionService, so select it.
Once we've specified the service, we need to specify how we want to invoke the decision service. We specify this through the Operation attribute. Here we have two options:
- Execute function and reset the session
- Execute function
If we choose the option Execute function and thus don't reset the session, if we were then to call the decision service several times within the same instance of our BPEL process, each new invocation would reuse the same session and would also evaluate facts asserted in any previous invocation. For our purposes, we just need to assert a single fact and run the ruleset, so accept the default value of Execute function and reset the session.
Assigning facts
The final step to invoke our business rules is to assign BPEL variables to the input and output facts. Click on the green plus symbol (as shown in the preceding screenshot), and this will launch the Decision Fact Map window, as shown in the following screenshot:
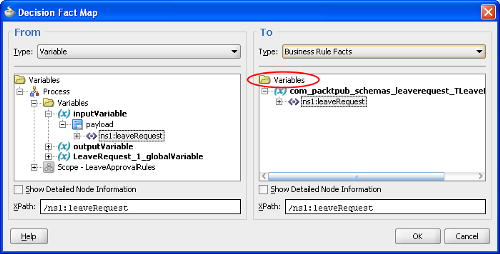
At first glance, this looks like the standard Create Copy Operation window that we use when carrying out assigns within BPEL (which in reality is exactly what it is).
The key difference is that we are using this to assign values to the input facts to be submitted to the rules engines, so the Type on the To side of the copy operation is a Business Rule Facts.
The reverse is true for an output fact, where we use this dialog to map the output from the decision service back into a corresponding BPEL variable.
For our purpose, we just want to map the initial LeaveRequest in the process inputVariable into the corresponding fact, as shown in the preceding screenshot. Then we will map the output fact, which will contain our updated LeaveRequest back into our inputVariable.
When JDeveloper opens the Decision Fact Map window, the Variables folder for the Business Rules Facts (circled in the preceding screenshot) is closed and it appears that there are no input facts. You must double-click on this to open it and expose the facts.
We have now wired the rule invocation into our BPEL process, before finally running our process; we need to modify our process to only invoke the workflow if the leave request hasn't been automatically approved.
To do this, just drag a switch onto your process, and then drag your workflow task into the first branch in the switch and define a test to check that the LeaveRequest hasn't been approved. You are now ready to deploy and run your modified process.
Using functions
Our current rule only approves vacations of one day in duration, requiring all other leave requests to be manually approved. Ideally, we would like to approve holidays of varying duration as long as sufficient notice has been given, for example:
To write these rules, we will need to calculate the duration of the leave period, as well as calculate how long it is before the start date. Out of the box, the rule engine provides the Duration extension methods, which allow us to calculate the number of days between two dates, but doesn't allow us to exclude weekends.
So we will need to write our own logic to calculate these values. Rather than embedding this logic directly in each rule, best practice dictates that we place this logic into a separate function. This not only ensures that we have a single version of the logic to implement but minimizes the size of our rules, thus making them simpler and easier to maintain. For our purposes, we will create the following functions:
- startsIn: Which returns the number of days before the specified start date
- leaveDuration: Which returns the number of days from the start date to the end date, excluding weekends
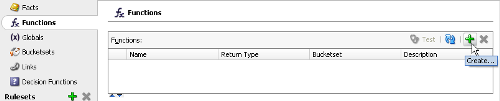
Creating a function
To create our first function, within the rule editor, click on the Functions tab. This will list all the functions currently defined to our ruleset. To create a new function, click on the green plus icon, as shown in the following screenshot:
Unlock access to the largest independent learning library in Tech for FREE!
Get unlimited access to 7500+ expert-authored eBooks and video courses covering every tech area you can think of.
Renews at $19.99/month. Cancel anytime
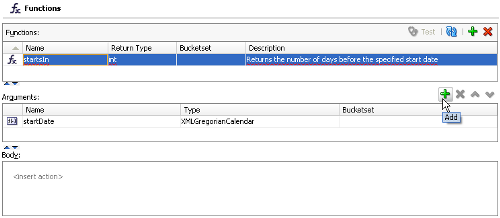
This will add a new function with a default name (for example, Function_1) to our list. Click on the function name to select it and update it to startsIn. From the drop-down list, select the Return Type of the function, which is int in our case.
Next, we need to specify the arguments we wish to pass to our function. Click on the green plus sign, as shown in the following screenshot, and this will add an argument to our list. Here we can specify the argument name (for example, startDate), and from the drop-down list, the argument Type, which should be XMLGregorianCalendar (when creating XML facts, the JAXB processor maps the type xsd:date to javax.xml.datatype.XMLGregorianCalendar).
The list of valid types is made up of the basic types (for example, int, double, char, and so on), plus the XML facts (excluding object factories) and the Java Facts (excluding the Rules Extension Method) defined in our rules dictionary.
The final step is to implement the business logic of our function, which consists of one or more actions. We enter these actions in the Body section of the function. The first action we need to create is one that creates a local variable of type calendar, which holds the current date.
To do this, click on <insert action> within the Body section of our function. The rule editor will display a drop-down list that lists all the available actions.
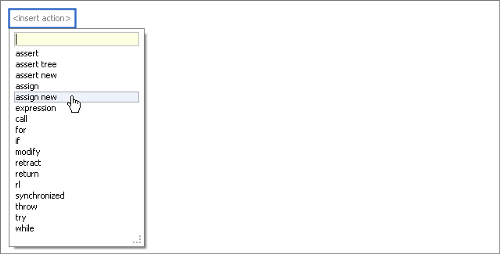
For our purpose, we want to create a new variable and assign a value to it, so select the assign new action, as shown in the preceding screenshot. This will insert atemplate for the assign new action into our function body (as shown in the following screenshot). We then configure the action by clicking on each part within the template and defining it as appropriate.

The first part we need to define is the type of variable we wish to create. Click on the <type> element within our <assign> statement, and the rule editor displays a drop-down list displaying all the available types. For our purposes, select Calendar.
Next, click on var. This will prompt us to enter the name of the variable that we want to create. Specify today, and hit enter.

Finally, we need to specify the value we want to initialize our variable with. Click on the <expression> element. The rule editor will display a drop-down box listing all the valid values we can assign to our variable, as shown in the following screenshot:
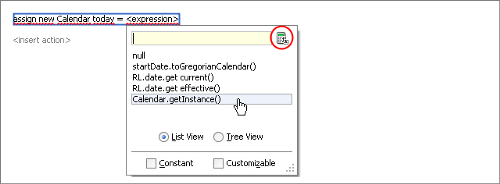
Select Calendar.getInstance(), which will initialize our variable to hold the current date.
For our second action, we want to calculate the number of days before the specified start date and place the result into the variable duration. To calculate this, we will make use of the Duration extension method provided with the rules engine.
We will do this by defining another assign new action in a similar way to the previous action. The key difference is how we specify the <expression>. This time, instead of selecting a value from the drop-down list, click on the Expression Builder icon (circled in the preceding screenshot) to launch the Expression Builder for the rules editor.
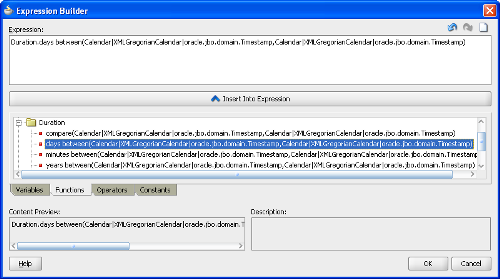
The Expression Builder provides a graphical tool for writing rule expressions and is accessed from various parts of the rule editor. It consists of the following areas:

 United States
 Great Britain
 India
India
 Germany
 France
 Canada
 Russia
 Spain
Spain
 Brazil
 Australia
 Singapore
 Canary Islands
 Hungary
 Ukraine
 Luxembourg
 Estonia
 Lithuania
 South Korea
 Turkey
 Switzerland
 Colombia
 Taiwan
 Chile
Chile
 Norway
 Ecuador
 Indonesia
 New Zealand
 Cyprus
 Denmark
 Finland
 Poland
 Malta
Malta
 Czechia
 Austria
 Sweden
 Italy
Italy
 Egypt
Egypt
 Belgium
 Portugal
 Slovenia
 Ireland
 Romania
 Greece
 Argentina
 Netherlands
 Bulgaria
 Latvia
 South Africa
 Malaysia
 Japan
Japan
 Slovakia
 Philippines
 Mexico
 Thailand


