


Web scraping is a necessary evil that takes unordered information from the Web and transforms it into something that can be used programmatically. The first big use of this was indexing websites for use in search engines like Google. Whether you like it or not, there will likely be a time in your life, career, academia, or personal projects where you will need to pull information that has no API or easy way to digest programatically. The simplest way to accomplish this is to do something along the lines of a curl request and then RegEx for the necessary information. That has been what the standard procedure for much of the history of web scraping until the single-page application came along. With the advent of Ajax, JavaScript became the mainstay of the Web and prevented much of it from being scraped with traditional methods such as curl that could only get static server rendered content. This is where Electron truly comes into play because it is a full-fledged browser but can be run programmatically.
Electron’s Advantages
Electron goes beyond the abilities of other programmatic browser solutions: PhantomJS, SlimerJS, or Selenium. This is because Electron is more than just a headless browser or automation framework. PhantomJS (and by extension SlimerJS), run headlessly only preventing most debugging and because they have their own JavaScript engines, they are not 100% compatible with node and npm. Selenium, used for automating other browsers, can be a bit of a pain to set up because it requires setting up a central server and separately installing a browser you would like to scrape with. On the other hand, Electron can do all the above and more which makes it much easier to setup, run, and debug as you start to create your scraper.
Applications of Electron
Considering the flexibility of Electron and all the features it provides, it is poised to be used in a variety of development, testing, and data collection situations. As far as development goes, Electron provides all the features that Chrome does with its DevTools, making it easy to inspect, run arbitrary JavaScript, and put debugger statements. Testing can easily be done on websites that may have issues with bugs in browsers, but work perfectly in a different environment. These tests can easily be hooked up to a continuous integration server too. Data collection, the real reason we are all here, can be done on any type of website, including those with logins, using a familiar API with DevTools for inspection, and optionally run headlessly for automation. What more could one want?
How to Scrape with Electron
Because of Electron’s ability to integrate with Node, there are many different npm modules at your disposal. This takes doing most of the leg work of automating the web scraping process and makes development a breeze. My personal favorite, nightmare, has never let me down. I have used it for tons of different projects from collecting info and automating OAuth processes to grabbing console errors, and also taking screenshots for visual inspection of entire websites and services.
Packt’s blog actually gives a perfect situation to use a web scraper. On the blog page, you will find a small single-page application that dynamically loads different blog posts using JavaScript. Using Electron, let’s collect the latest blog posts so that we can use that information elsewhere.
Full disclosure, Packt’s Blog server-side renders the first page and could possibly be scraped using traditional methods. This won’t be the case for all single-page applications.
Prerequisites and Assumptions
Following this guide, I assume that you already have Node (version 6+) and npm (version 3+) installed and that you are using some form of a Unix shell. I also assume that you are already inside a directory to do some coding in.
Setup
First of all, you will need to install some npm modules, so create a package.json like this:
{
  "scripts": {
    "start": "DEBUG=nightmare babel-node ./main.js"
  },
  "devDependencies": {
    "babel-cli": "6.18.0",
    "babel-preset-modern-node": "3.2.0",
    "babel-preset-stage-0": "6.16.0"
  },
  "dependencies": {
    "nightmare": "2.8.1"
  },
  "babel": {
    "presets": [
      [
        "modern-node",
        { "version": "6.0" }
      ],
      "stage-0"
    ]
  }
}
Using babel we can make use of some of the newer JavaScript utilities like async/await, making our code much more readable. nightmare has electron as a dependency, so there is no need to list that in our package.json (so easy). After this file is made, run npm install as usual.
Investgating the Content to be Scraped
First, we will need to identify the information we want to collect and how to get it:
- We go to here and we can see a page of different blog posts, but we are not sure of the order in which they are. We only want the latest and greatest, so let’s change the sort order to “Date of Publication (New to Older)”. Now we can see that we have only the blog posts that we want.
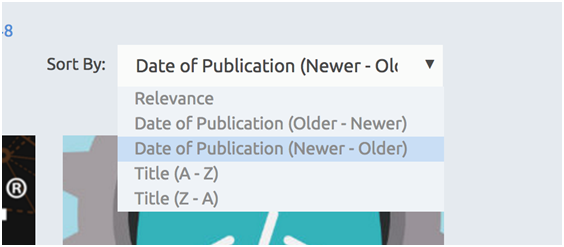
Changing the sort order
- Next, to make it easier to collect more blog posts, change the number of blog posts shown from 12 to 48.
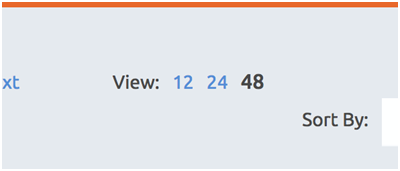
Changing post view
- Last, but not least, are the blog posts themselves.

Packt blog posts
Next, we will figure the selectors that we will be using with nightmare to change the page and collect data:
- Inspecting the sort order selector, we find something like the following HTML:
<div class="solr-pager-sort-selector"> <span>Sort By: </span> <select class="solr-page-sort-selector-select selectBox" style="display: none;"> <option value="" selected="">Relevance</option> <option value="ds_blog_release_date asc">Date of Publication (Older - Newer)</option> <option value="ds_blog_release_date desc">Date of Publication (Newer - Older)</option> <option value="sort_title asc">Title (A - Z)</option> <option value="sort_title desc">Title (Z - A)</option> </select> <a class="selectBox solr-page-sort-selector-select selectBox-dropdown" title="" tabindex="0" style="width: 243px; display: inline-block;"> <span class="selectBox-label" style="width: 220.2px;">Relevance</span> <span class="selectBox-arrow">▼</span> </a> </div> - Checking out the “View” options, we see the following HTML:
<div class="solr-pager-rows-selector"> <span>View: </span> <strong>12</strong> <a class="solr-page-rows-selector-option" data-rows="24">24</a> <a class="solr-page-rows-selector-option" data-rows="48">48</a> </div> - Finally, the info we need from the post should look similar to this:
<div class="packt-article-line-view float-left"> <div class="packt-article-line-view-image"> <a href="/books/content/mapt-v030-release-notes"> <noscript> <img src="//d1ldz4te4covpm.cloudfront.net/sites/default/files/imagecache/ppv4_article_thumb/Mapt FB PPC3_0.png" alt="" title="" class="bookimage imagecache imagecache-ppv4_article_thumb"/> </noscript> <img src="//d1ldz4te4covpm.cloudfront.net/sites/default/files/imagecache/ppv4_article_thumb/Mapt FB PPC3_0.png" alt="" title="" data-original="//d1ldz4te4covpm.cloudfront.net/sites/default/files/imagecache/ppv4_article_thumb/Mapt FB PPC3_0.png" class="bookimage imagecache imagecache-ppv4_article_thumb" style="opacity: 1;"> <div class="packt-article-line-view-bg"></div> <div class="packt-article-line-view-title">Mapt v.0.3.0 Release Notes</div> </a> </div> <a href="/books/content/mapt-v030-release-notes"> <div class="packt-article-line-view-text ellipsis"> <div> <p>New features and fixes for the Mapt platform</p> </div> </div> </a> </div>
Great! Now we have all the information necessary to start collecting data from the page!
Creating the Scraper
First things first, create a main.js file in the same directory as the package.json.
Now let’s put some initial code to get the ball rolling on the first step:
import Nightmare from 'nightmare';

const URL_BLOG = 'https://www.packtpub.com/books/content/blogs';
const SELECTOR_SORT = '.selectBox.solr-page-sort-selector-select.selectBox-dropdown';

// Viewport must have a width at least 1040 for the desktop version of Packt's blog
const nightmare = new Nightmare({ show: true }).viewport(1041, 800);

(async() => {
  await nightmare
    .goto(URL_BLOG)
    .wait(SELECTOR_SORT) // Always good to wait before performing an action on an element
    .click(SELECTOR_SORT);
})();
If you try to run this code, you will notice a window pop up with Packt’s blog, then resize the window, and then nothing. This is because the sort selector only listens for mousedown events, so we will need to modify our code a little, by changing click to mousedown:
await nightmare
  .goto(BLOG_URL)
  .wait(SELECTOR_SORT) // Always good to wait before performing an action on an element
  .mousedown(SELECTOR_SORT);
Running the code again, after the mousedown, we get a small HTML dropdown, which we can inspect and see the following:
<ul class="selectBox-dropdown-menu selectBox-options solr-page-sort-selector-select-selectBox-dropdown-menu selectBox-options-bottom" style="width: 274px; top: 354.109px; left: 746.188px; display: block;">
  <li class="selectBox-selected"><a rel="">Relevance</a></li>
  <li class=""><a rel="ds_blog_release_date asc">Date of Publication (Older - Newer)</a></li>
  <li class=""><a rel="ds_blog_release_date desc">Date of Publication (Newer - Older)</a></li>
  <li class=""><a rel="sort_title asc">Title (A - Z)</a></li>
  <li class=""><a rel="sort_title desc">Title (Z - A)</a></li>
</ul>
So, to select the option to sort the blog posts by date, we will need to alter our code a little further (again, it does not work with click, so use mousedown plus mouseup):
import Nightmare from 'nightmare';

const URL_BLOG = 'https://www.packtpub.com/books/content/blogs';
const SELECTOR_SORT = '.selectBox.solr-page-sort-selector-select.selectBox-dropdown';
const SELECTOR_SORT_OPTION = '.solr-page-sort-selector-select-selectBox-dropdown-menu > li > a[rel="ds_blog_release_date desc"]';

// Viewport must have a width at least 1040 for the desktop version of Packt's blog
const nightmare = new Nightmare({ show: true }).viewport(1041, 800);

(async() => {
  await nightmare
    .goto(URL_BLOG)
    .wait(SELECTOR_SORT) // Always good to wait before performing an action on an element
    .mousedown(SELECTOR_SORT)
    .wait(SELECTOR_SORT_OPTION)
    .mousedown(SELECTOR_SORT_OPTION) // Drop down menu doesn't listen for `click` events like normal...
    .mouseup(SELECTOR_SORT_OPTION);
})();
Awesome! We can clearly see the page reload, with posts from newest to oldest. After we have sorted everything, we need to change the number of blog posts shown (finally we can use click; lol!):
import Nightmare from 'nightmare';

const URL_BLOG = 'https://www.packtpub.com/books/content/blogs';
const SELECTOR_SORT = '.selectBox.solr-page-sort-selector-select.selectBox-dropdown';
const SELECTOR_SORT_OPTION = '.solr-page-sort-selector-select-selectBox-dropdown-menu > li > a[rel="ds_blog_release_date desc"]';
const SELECTOR_VIEW = '.solr-page-rows-selector-option[data-rows="48"]';

// Viewport must have a width at least 1040 for the desktop version of Packt's blog
const nightmare = new Nightmare({ show: true }).viewport(1041, 800);

(async() => {
  await nightmare
    .goto(URL_BLOG)
    .wait(SELECTOR_SORT) // Always good to wait before performing an action on an element
    .mousedown(SELECTOR_SORT)
    .wait(SELECTOR_SORT_OPTION)
    .mousedown(SELECTOR_SORT_OPTION) // Drop down menu doesn't listen for `click` events like normal...
    .mouseup(SELECTOR_SORT_OPTION)
    .wait(SELECTOR_VIEW)
    .click(SELECTOR_VIEW);
})();
Collecting the data is next; all we need to do is evaluate parts of the HTML and return the formatted information. The way the evaluate function works is by stringifying the function provided to it and injecting it into Electron’s event loop. Because the function gets stringified, only a function that does not rely on outside variables or functions will execute properly. The value that is returned by this function must also be able to be stringified, so only JSON, strings, numbers, and booleans are applicable.
import Nightmare from 'nightmare';

const URL_BLOG = 'https://www.packtpub.com/books/content/blogs';
const SELECTOR_SORT = '.selectBox.solr-page-sort-selector-select.selectBox-dropdown';
const SELECTOR_SORT_OPTION = '.solr-page-sort-selector-select-selectBox-dropdown-menu > li > a[rel="ds_blog_release_date desc"]';
const SELECTOR_VIEW = '.solr-page-rows-selector-option[data-rows="48"]';

// Viewport must have a width at least 1040 for the desktop version of Packt's blog
const nightmare = new Nightmare({ show: true }).viewport(1041, 800);

(async() => {
  await nightmare
    .goto(URL_BLOG)
    .wait(SELECTOR_SORT) // Always good to wait before performing an action on an element
    .mousedown(SELECTOR_SORT)
    .wait(SELECTOR_SORT_OPTION)
    .mousedown(SELECTOR_SORT_OPTION) // Drop down menu doesn't listen for `click` events like normal...
    .mouseup(SELECTOR_SORT_OPTION)
    .wait(SELECTOR_VIEW)
    .click(SELECTOR_VIEW)
    .evaluate(
      () => {
        let posts = [];
        document.querySelectorAll('.packt-article-line-view').forEach(
          post => {
            posts = posts.concat({
              image: post.querySelector('img').src,
              title: post.querySelector('.packt-article-line-view-title').textContent.trim(),
              link: post.querySelector('a').href,
              description: post.querySelector('p').textContent.trim(),
            });
          }
        );
        return posts;
      }
    )
    .end()
    .then(
      result => console.log(result)
    );
})();
Once you run your function again, you should get a very long array of objects containing information about each post. There you have it! You have successfully scraped a page using Electron! There’s a bunch more of possibilities and tricks with this, but hopefully this small example gives you a good idea of what can be done.
About the author
Dylan Frankland is a frontend engineer at Narvar. He is an agile web developer, with over 4 years of experience developing and designing for start-ups and medium-sized businesses to create a functional, fast, and beautiful web experiences.


