Using Web Pages in the Concept pane
The most common use of Web Pages is to provide context information for Topics. Look at the following image of the Outline for our example course:
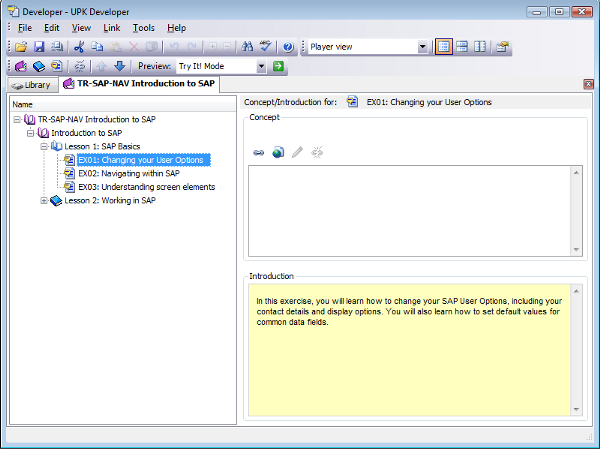
You will see that the upper-right section of the Outline window contains a pane labeled Concept. If you want any information to be displayed in this pane, then you need to create a Web Page and attach it to the content object in the Outline.
Version Difference
Although the Concept pane always appears in the Outline view, if it is empty, then it does not appear in the Player. This is, thankfully, a new feature in UPK 3.5. In previous versions, the Concept pane always appeared in the Player, often appearing as a blank frame, where developers couldn't be bothered to provide any concepts.
To create a new Web Page and attach it to a content object, carry out the following steps:
- Open the Outline containing the content object to which you want to attach the Web Page, in the Outline Editor.
- Click on the content object to select it. Although in this example we are attaching a Web Page to the concept pane for a Topic, Modules, and Sections also have concept panes, so you can also attach Web Pages to these as well.
- Click on the Create new web page button (
 ) in the Concept pane. The Save As dialog box is displayed.
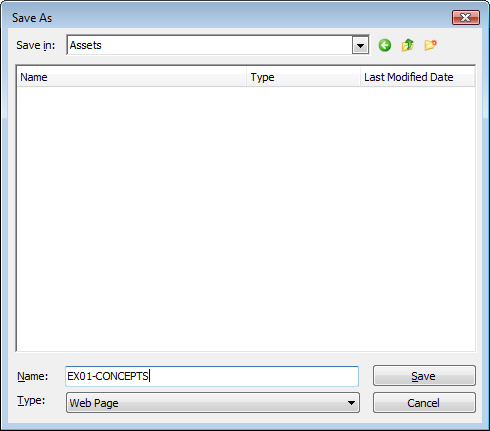
- Navigate to the folder in which you want to save the Web Page (we will use an Assets sub-folder for all of our Web Pages), enter a name for the Web Page (it makes sense to use a reference to the content object to which the Web Page relates), and then click on the Save button. The Web Page Editor is opened on the Developer screen, as shown in the next screenshot:
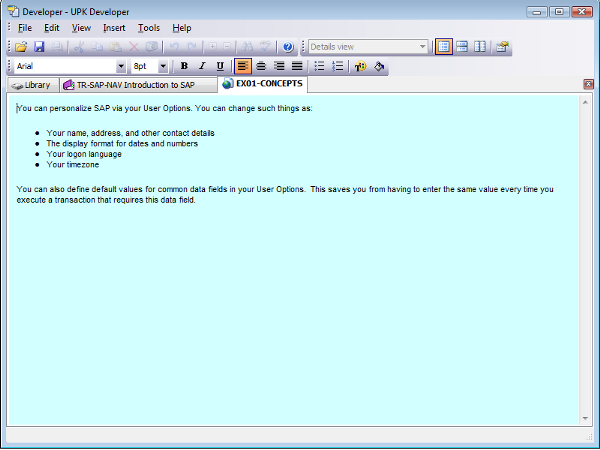
- Enter the information that you want to appear in the Concept pane in the editor (as has already been done in the previous example). You can set the font face and size; set text to bold, italics, and underlined; change the text color, and change change the background color (again, as has been done in the earlier example). You can also change the paragraph alignment, and format numbered and bulleted lists.
- Once you have entered the required text, click on the Save button (
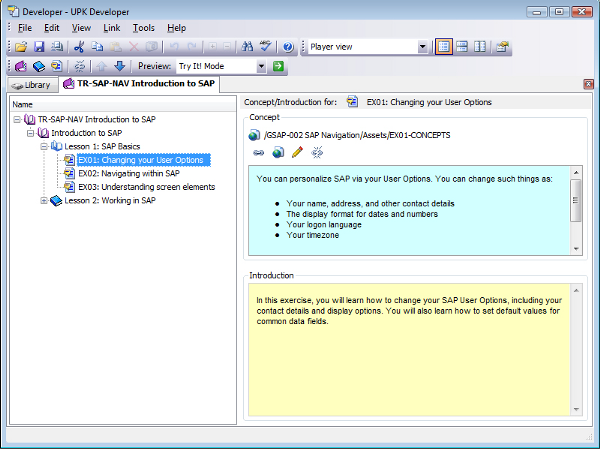
 ) to save your changes, and then close the Web Page Editor tabbed page. You are returned to the Outline Editor. Now, the Concept pane shows the contents of the Web Page, as shown in the next screenshot:
Version Difference
In UPK 3.5 (and OnDemand 9.1) you can only attach a single Web Page to the Concept pane. This is a change from OnDemand 8.7, where you could attach multiple Infoblocks and they would be displayed sequentially. (But note that if you convert content from OnDemand 8.7 where there are multiple Infoblocks in a single Concept pane, then all of the attached Infoblocks will be converted to a single Web Page in UPK 3.5.)
The above steps explain how to attach a Web Page to the Concept pane for an exercise from the Outline. Although this is done from the Outline, the Web Page is attached to the Topic content object and not to the outline element. If you subsequently insert the same Topic in another Outline, the same Web Page will be used in the Concept pane of the new Outline.
You can also attach a Web Page to the Concept pane for an exercise from within the Topic Editor. This is a useful option if you want to create concept Web Page but have not yet built an Outline to house the Topic. To do this, follow these steps:
- Open the Topic in the Topic Editor.
- Select menu option View|Concept Properties. The Concept Properties dialog box is displayed. This is very similar to the Concept pane seen in the Overview. It contains the same buttons.
- Create and save the Web Page as described above.
- When you have finished, and the Web Page is displayed in the Concept Properties dialog box, click on the OK button.
Using images in Web Pages
As stated above, a Web Page can contain an image. This can be instead of, or in addition to, any text (although if you only wanted to include a single image in the Web Page you could always use a Package, as explained later in this article).
Images are a nice way of adding interest to a Web Page (and therefore to your training), or of providing additional information that is better explained graphically (after all, a picture is worth a thousand words). However, if you are using images in the Concept pane, then you should consider the overall size of the image and the likely width of the Concept pane, bearing in mind that the trainee may run the Player in a smaller window than the one you design.
For our sample exercise, given that we are providing simulations for the SAP system, we will include a small SAP logo in the Web Page that appears in the Concept pane for our course Module. For the sake of variety, we will do this from the Library, and not from the Outline Editor.
To add an image to a Web Page, carry out the steps described below.
- In the Library, locate the folder containing the Web Page to which you want to add the image.
- Double-click on the Web Page, to open it in the Web Page Editor. As before, this is opened in a separate tab in the main UPK Developer window, as can be seen in the next screenshot:
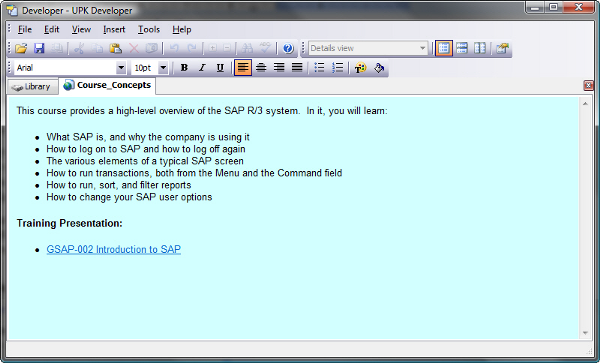
- Within the Web Page, position the cursor at the place in the text where you want the image to appear.
- Select menu option Insert|Image. The Insert Image dialog box is displayed, as shown in the next screenshot:
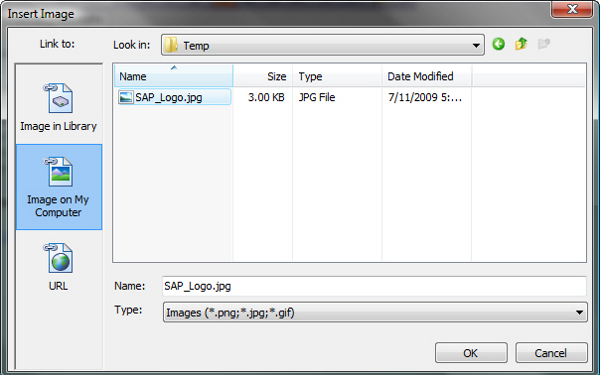
- In the Link to bar on the leftmost side of the dialog box, select the location of the image file that you want to insert into the Web Page. You can insert an image that you have already imported into your Library (for example, in a Package), an image that is located on your computer (or any attached drive) (option Image on My Computer), or an image from the Internet (option URL). For our sample exercise, we will insert an image from our computer.
- In the rightmost side of the dialog box, navigate to and select the image file that you want to insert into the Web Page.
- Click on OK. The image is inserted, as shown in the following screenshot:
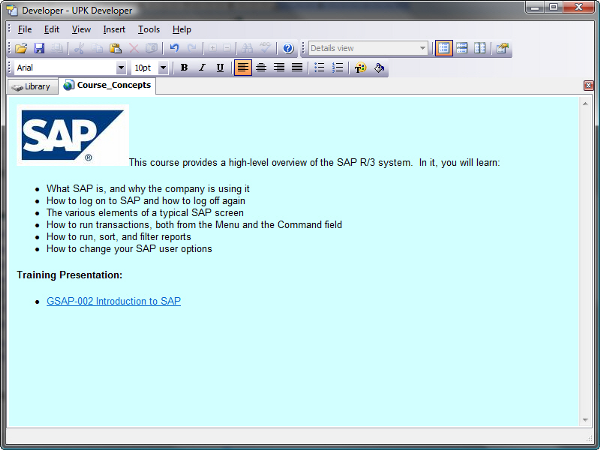
- Save the Web Page, and close the Web Page Editor, if you have finished editing this Web Page. (We have not; we want to adjust the image, as explained below).
Of course, this doesn't look too pretty. Thankfully, we can do something about this, because UPK provides some rudimentary features for adjusting images in Web Pages.
To adjust the size or position of an image in a Web Page, carry out the following steps:
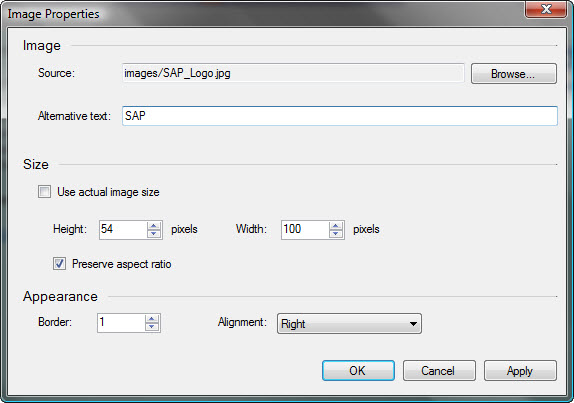
- With the Web Page open in the Web Page Editor, right-click on the image that you want to adjust, and then select Image Properties from the context menu. The Image Properties dialog box is displayed, as shown in the next screenshot:
Unlock access to the largest independent learning library in Tech for FREE!
Get unlimited access to 7500+ expert-authored eBooks and video courses covering every tech area you can think of.
Renews at $19.99/month. Cancel anytime
- In the Alternative Text field, enter a short text description of the image. This will be used as the ToolTip in some web browsers.
- Under Size, select whether you want to use the original image size or not, and specify a new height and width if you choose not.
- Under Appearance, select a border width and indicate where the image should be aligned on the Web Page. Your choices are: Top, Middle, Bottom, Left, and Right. The first three of these (the vertical options) control the position of the image relative to the line of text in which it is located. The last two (the horizontal options) determine whether the image is left-aligned or right-aligned within the overall Web Page. Although these are two independent things (vertical and horizontal), you can only select one, so if you want the image to be right-aligned and halfway down the page, you can't do it.
- Click on OK to confirm your changes.
- Save and close the Web Page.
For our sample exercise, we resized the image, set it to be right-aligned, and added a 1pt border around it (because it looked odd with a white background against the blue of the Web Page, without a border).
A better option would be to use an image with a transparent background. In this example we have used an image with a solid background just for the purposes of illustration.
These settings are as shown in the previous screenshot. This gives us a final Web Page as shown in the next screenshot. Note that this screenshot is taken from the Player, so that you can see how images are handled in the Player.
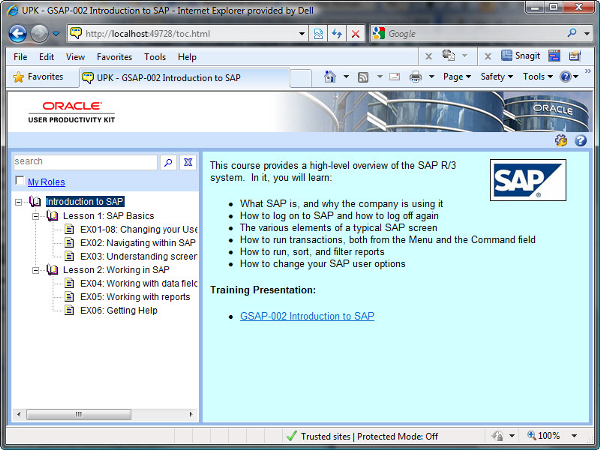
Note that the text flows around the image. You will see that there is a little more space to the right of the image than there is above it. This is to leave room for a scrollbar.
Creating independent Web Pages
In the previous section, we looked at how to use a Web Page to add information to the Concept pane of a content object. In this section, we will look at how to use Web Pages to provide information in other areas.
Observant readers will have noticed that a Web Page is in fact an independent content object itself. When you created a Web Page to attach to a Concept pane, you edited this Web Page in its own tabbed editor and saved it to its own folder (our Assets folder). Hopefully, you also noticed that in addition to the Create new web page button ( ), the Concept pane also has a Create link button (
 ) that can be used to attach an existing Web Page to the Concept pane. It should, therefore, come as no surprise to learn that Web Pages can be created independently of the Concept pane. In fact, the Concept pane is only one of several uses of Web Pages.
To create a Web Page that is independent of a Concepts pane (or anything else), carry out these steps.
- In the Library, navigate to the folder in which you want to store the Web Page. In our example, we are saving all of the Web Pages for a module in a sub-folder called Assets within the course folder.
- Select menu option File|New|Web Page. A Web Page Editor tabbed page is opened up on the Developer screen. The content and use of this is exactly as described above in the explanation of how to create a Web Page from within an Outline.
- Enter the required information into the Web Page, and format it as required. We have already covered most of the available options, above.
- Once you have made your changes, click on the Save button (
 ). You will be prompted to select the destination folder (which will default to the folder selected in Step 1, although you can change this) and a file name. Refer to the description of the Save As dialog box above for additional help if necessary.
- Close the Web Page Editor.
You have now created a new Web Page. Now let's look at how to use it.
Using Web Pages in Topics
If you recall our long-running exercise on maintaining your SAP user profile, you will remember that we ask the user to enter their last name and their first name. These terms may be confusing in some countries—especially in countries where the "family name" actually comes before the "given name"—so we want to provide some extra explanation of some common name formats in different countries, and how these translate into first name and last name. We'll provide this information in a Web Page, and then link to this Web Page at the relevant place(s) within our Topic.
First, we need to create the Web Page. How to do this is explained in the section Creating independent Web Pages, above. For our exercise, our created Web Page is as follows:
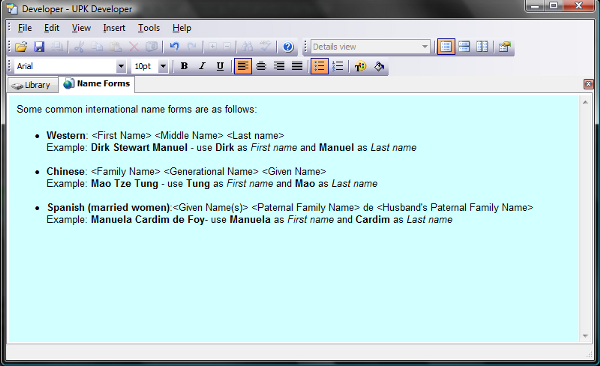
There are two ways in which you can link to a Web Page from a Topic. These are explained separately, below.
Linking via a hyperlink
With a hyperlink, the Web Page is linked from a word or phrase within the Bubble Text of a Frame. (Note that it is only possible to do this for Custom Text because you can't select the Template Text to hyperlink from.) To create a hyperlink to a Web Page from within a Frame in a Topic, carry out the steps described below:
- Open up the Topic in the Topic Editor.
- Navigate to the Frame from which you want to provide the hyperlink. In our exercise, we will link from the Explanation Frame describing the Last name field (this is Frame 5B).
- In the Bubble Properties pane, select the text that you want to form the hyperlink (that is, the text that the user will click on to display the Web Page).
- Click on the Bubble text link button (
 ) in the Bubble Properties pane. The Bubble Text Link Properties dialog box is displayed.
- Click on the Create link button (
 ) to create a link to an existing Web Page (you could also click on the Create new web page button (
 ) to create a new Web Page if you have not yet created it). The Insert Hyperlink dialog box is displayed, as shown in the next screenshot:
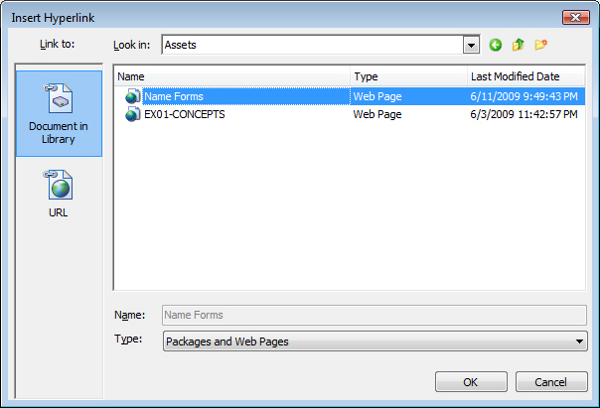
- Make sure that the Document in Library option is selected in the Link to: bar.
- In the Look in: field, navigate to the folder containing the Web Page (the Assets folder, in our example).
- In the file list, click on the Web Page to which you want to create a hyperlink.
- Click on the Open button.
- Back in the Bubble Text Link Properties dialog box, click on OK.
This hyperlink will now appear as follows, in the Player:
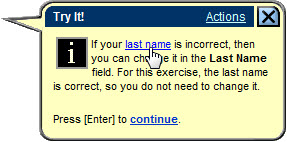
Note that there is no ToolTip for this hyperlink. There was no opportunity to enter one in the steps above, so UPK doesn't know what to use.
Version Difference
In OnDemand 8.7 the Infoblock name was used as the ToolTip, but this is not the case from OnDemand 9.x onwards.
 United States
 Great Britain
 India
India
 Germany
 France
 Canada
 Russia
 Spain
Spain
 Brazil
 Australia
 Singapore
 Canary Islands
 Hungary
 Ukraine
 Luxembourg
 Estonia
 Lithuania
 South Korea
 Turkey
 Switzerland
 Colombia
 Taiwan
 Chile
Chile
 Norway
 Ecuador
 Indonesia
 New Zealand
 Cyprus
 Denmark
 Finland
 Poland
 Malta
Malta
 Czechia
 Austria
 Sweden
 Italy
Italy
 Egypt
Egypt
 Belgium
 Portugal
 Slovenia
 Ireland
 Romania
 Greece
 Argentina
 Netherlands
 Bulgaria
 Latvia
 South Africa
 Malaysia
 Japan
Japan
 Slovakia
 Philippines
 Mexico
 Thailand


 ) in the Concept pane. The Save As dialog box is displayed.


 ) to save your changes, and then close the Web Page Editor tabbed page. You are returned to the Outline Editor. Now, the Concept pane shows the contents of the Web Page, as shown in the next screenshot:


 ), the Concept pane also has a Create link button (
 ) that can be used to attach an existing Web Page to the Concept pane. It should, therefore, come as no surprise to learn that Web Pages can be created independently of the Concept pane. In fact, the Concept pane is only one of several uses of Web Pages.
 ). You will be prompted to select the destination folder (which will default to the folder selected in Step 1, although you can change this) and a file name. Refer to the description of the Save As dialog box above for additional help if necessary.
 ) in the Bubble Properties pane. The Bubble Text Link Properties dialog box is displayed.
 ) to create a link to an existing Web Page (you could also click on the Create new web page button (
 ) to create a new Web Page if you have not yet created it). The Insert Hyperlink dialog box is displayed, as shown in the next screenshot:


