(For more resources related to this topic, see here.)
You must use patterns that were made in the FL Studio step sequencer in order to build an original musical production from scratch. In this way, you build, overdub, and continually layer in order to come up with an original work. You may also insert full-length WAV or MP3 files and function exclusively as a recording studio, where you would then record vocals on top of the completed instrumental. You can chop any type of material (patterns or audio) in the playlist. So, in the end it may be a true fusion, mixture, and mash up of digital music. All files exist as channels.
Using patterns to build a song
If you were a writer who is writing a novel, you would start with a blank document and build your story with words and paragraphs. If you were a painter, you would start with a blank canvas and use markers or a paintbrush to build your creative vision. When working with FL Studio, you will be pasting your various patterns in the step sequencer in the FL Studio playlist.
Getting ready…
In order to start using the playlist, you need to have some data entered in your steps within channels and patterns on the step sequencer. You can press F5 or use the VIEW menu to bring up the playlist. Press Tab to toggle between the various windows that are open in FL Studio.
How to do it…
Let's look at two quick start methods to paste/paint patterns into the playlist:
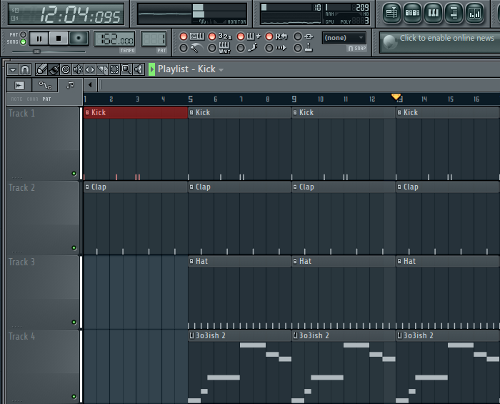
- Quick start: Hover your mouse over the PAT box and drag it up/down to select a pattern number. Click on the playlist (F5) to paint it in. In Fig 5.1, the PAT box is shown to the right of the TEMPO button, with a value of 162.000.
- Alternative method: You may also click where it says Kick, next to the word Playlist in Fig 5.1. Not only will it bring up a list of patterns, but also show a list of all the automation clips and audio files created in the current project. Right-click on the same area to open up a really cool PROJECT PICKER window, where you can select your patterns or channels laid out in an awesome interface.
Let's take a look at the multiple patterns being arranged using the following steps:
- Select a pattern in the step sequencer.
- Make sure you select the SONG mode, next to the transport controls in Fig 5.1. This will make your music project enter the SONG mode, and Play Position Marker (a small, orange-colored triangle) will be engaged when you press the Space bar to stop or play your project.
- Click with the Paint tool in the desired area in order to paste the pattern you have selected. You may also click-and-drag to the right with the Paint tool in order to smoothly paste the same pattern over and over again.
- Use the right-click button to erase patterns.
- The following screenshot shows that anything pasted in the Playlist section is like a small graphic of any given pattern in the step sequencer and the information inside it. You can see that the Hat and 303ish 2 patterns come in at bar 5. The 303ish 2 pattern shows Piano roll data because we have entered Piano roll data using a virtual instrument on that particular pattern. When you enter notes in the Piano roll on a given channel or pattern, the Playlist window will reflect this in order to help you see and organize your arrangement. The following screenshot shows the Playlist window:

Fig 5.1
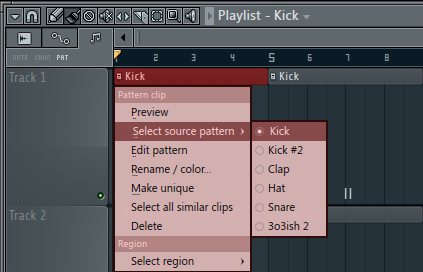
- Click on the small square button next to the name of your pattern and then select the source pattern to populate and choose available patterns as per Fig 5.2. Once your patterns are pasted into the Playlist window, you will have the option to toggle between your patterns present in the list, as shown in the following screenshot:

Fig 5.2
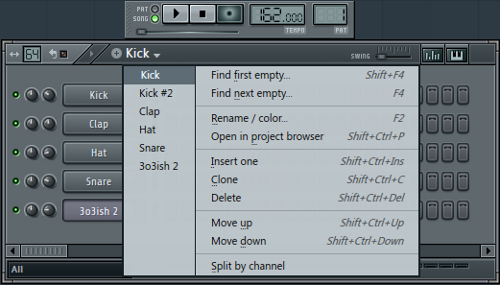
- In the following screenshot, we have opened the pattern selector under the step sequencer by hovering our mouse on Kick. Your cursor will turn into a hand when you hover over Kick or any generic pattern name, indicating that the drop-down menu will get populated.

Fig 5.3
How it works…
By pasting your patterns (which have your channel steps or notes) in the playlist, you can form a full music production project. This happens when you click on the SONG mode, and the small play-position marker is engaged at the very start of the playlist on bar 1. Now, when you press the Space bar key, any pattern you paste into the playlist will be in time from left-to-right, and you can see the position pointer move along while highlighting the grid in time. A regular pattern when operating in the PAT mode will simply play your data and loop back to the beginning. You can stretch patterns to extremely long lengths by using the Piano roll, but you still have to paint your given pattern into the playlist. The area where you paste your patterns in the playlist will also be the area that is used to export your project into the rendered audio.
Unlock access to the largest independent learning library in Tech for FREE!
Get unlimited access to 7500+ expert-authored eBooks and video courses covering every tech area you can think of.
Renews at $19.99/month. Cancel anytime
There's more…
You may also use the Slice tool directly (hover your mouse on the various tools at the upper left-hand corner of the playlist and look at the hint bar) in order to slice particular patterns and then edit or move them. Slicing is also exceedingly useful in the FL Studio Piano roll. If you select the Make unique option (shown in Fig 5.2), it will automatically create a new, unique pattern in the step sequencer. This can be handy if you want to tweak a pattern without navigating back to the step sequencer. This is also a great tool to remove part of your drums or incorporate a short silence to bring variety to your arrangement. Many times, you may want to slice off a certain part and then make it unique so that it becomes its own separate entity that you can mix later on. You can do this by pressing the Pattern clip drop-down box in Fig 5.2. This can prove handy because your song arrangement is affected and changed immediately. This method is used on any type of audio or samples. When working with vocals, you may want to make some of your pieces unique in order to change the volume of a specific word or add a different effect in the mixer.
You may also paste any pattern you want, even if it has no steps or notes yet. This means that you can paste a blank pattern in the playlist; you can go to this pattern while your arrangement is playing and add your notes later. The longer you stretch your notes in a channel/pattern, the longer will your pattern automatically stretch in the playlist. If your pattern is currently playing or being triggered in the playlist, you will clearly see the LEDs of the playing step (orange slits) at the bottom of your step sequencer.
A tremendous option when working with your arrangement is to double-click and drag your pattern where you see the numbers that represent the measures in your playlist and where the play position marker is located. When you do this, your selection will become in red color, and you can highlight the measure/sections that will be played and looped back around. This is handy to specify a particular area that you want to play back, which can then be edited and fine-tuned without listening to the whole song. If you only want to edit the intro, you can click-and-drag your mouse to highlight this area only. This feature allows you to specify which part of your song will play back and is helpful when adding/changing/revising/experimenting with pieces and parts, recording vocals, and drawing automation curves.
Comparing patterns and audio
The patterns that you paste into the FL Studio playlist reflect how you manage/arrange your project and decide which parts will play or not play during your song. This is easy to see on the FL Studio Playlist, where you will have a graphical readout of your patterns, audio, and automation clips. Audio clips will be shown on the playlist in a waveform readout, as will any type of MP3 or WAV file. Patterns in the playlist can stretch very far if your Piano roll is extended.
Getting ready…
In order start using the Playlist section and patterns, you need to have some data entered in your steps within the channels and patterns on the step sequencer. You may press F5 or use the VIEW menu to bring up the playlist. We will be working with a recorded vocal file. In some cases, your recording can show up directly on the FL Studio Playlist.
How to do it…
We will review the different types of patterns that are seen as specific images on the playlist using the following steps:
- Press the space bar key or click on play with your mouse on the FL Studio transport controls while in the SONG mode.
- Paste your patterns as discussed in the previous recipe of this article, Using patterns to build your song.
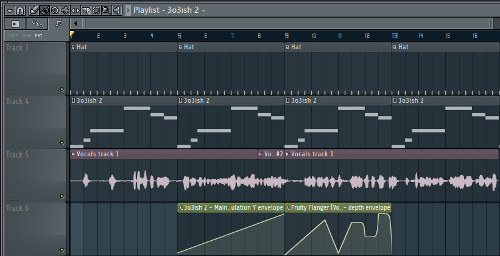
- If you have data in your steps and have not used the Piano roll on that channel, the data will be read out like the Hat pattern shown in Fig 5.4.
- If you have a channel/pattern that used a Piano roll, it will be similar to the 303ish 2 pattern in Fig 5.4.
- If you have vocals, an MP3 file, or a WAV file, it will show the audio data, as shown in Fig 5.4, next to Track 5 titled Vocals track 1 in the header.
- When working with automation clips, you will see automation curves and shapes as seen in the example in Fig 5.4.

Fig 5.4
How it works…
The readouts on various channels, patterns, audio data, and automation curves are a friendly way to keep your project organized and see exactly what is happening at specific moments (bars and beats) in time. You can use all of the features described in the previous recipe of this article, Using patterns to build your song. If you need to paste the same pattern multiple times in a row, you can use the paint tool and click-and-drag the pattern to the right. You can also use the Maximize / restore button to drag FL Studio's main window and drag audio files directly into the playlist. This restore button is shown in the following screenshot, directly to the left of the exit icon. You may click-and-drag an audio file from your desktop (or anywhere on your computer) into the FL Studio Playlist. The following screenshot shows the Maximize / restore button:

Fig 5.5
 United States
 Great Britain
 India
India
 Germany
 France
 Canada
 Russia
 Spain
Spain
 Brazil
 Australia
 Singapore
 Canary Islands
 Hungary
 Ukraine
 Luxembourg
 Estonia
 Lithuania
 South Korea
 Turkey
 Switzerland
 Colombia
 Taiwan
 Chile
Chile
 Norway
 Ecuador
 Indonesia
 New Zealand
 Cyprus
 Denmark
 Finland
 Poland
 Malta
Malta
 Czechia
 Austria
 Sweden
 Italy
Italy
 Egypt
Egypt
 Belgium
 Portugal
 Slovenia
 Ireland
 Romania
 Greece
 Argentina
 Netherlands
 Bulgaria
 Latvia
 South Africa
 Malaysia
 Japan
Japan
 Slovakia
 Philippines
 Mexico
 Thailand

