Using OpenStack Dashboard with OpenStack Orchestration
(For more resources related to this topic, see here.)
Using OpenStack Dashboard with LBaaS
The OpenStack Dashboard has the ability to view, create, and edit Load Balancers, add Virtual IPs (VIPs), and add nodes behind a Load Balancer. Dashboard also provides a user interface for creating HA Proxy server Load Balance services for our instances. We do this first by creating load balancing pools and then adding running instances to those pools.
In this section, we will create an HTTP Load Balance pool, create a VIP, and configure instances to be part of the pool. The result will be the ability to use the HTTP Load Balancer pool address to send traffic to two instances running Apache.
Getting ready
Load a web browser, point it to our OpenStack Dashboard address at http://192.168.100.200/, and log in as an admin user.
How to do it...
First we will create an HTTP Load Balance pool.
Creating pools
To create a Load Balancer pool for a logged in user, carry out the following steps:
To manage Load Balancers within our OpenStack Dashboard, select the Load Balancers tab:
This will show available Load Balancer pools. Since we currently do not have any created, click on the Add Pool button in the top-right corner to add a pool.
After clicking on the Add Pool button, we are presented with a modal window. Fill out the details to add a new pool:
Set name, description, and provider in the modal window. We name our pool web-pool and give an appropriate description. We choose to go with a default provider since we are creating an HA Proxy.
Select a subnet for the pool by clicking on the drop-down menu. All of our instances are attached to the private network, so we select 10.200.0.0/24.
We select the HTTP protocol, but HTTPS and TCP are also available. This selection will depend on what kind of applications you are running.
Select your preferred routing algorithm; we choose the ROUND_ROBIN balancing method. Other options are LEAST_CONNECTIONS, and SOURCE_IP.
We leave the Admin State set to UP.
Click on the Add button to create a new pool. You should see the new pool created in the pool list:
Adding pool members
To add instances to the Load Balancer, follow these steps:
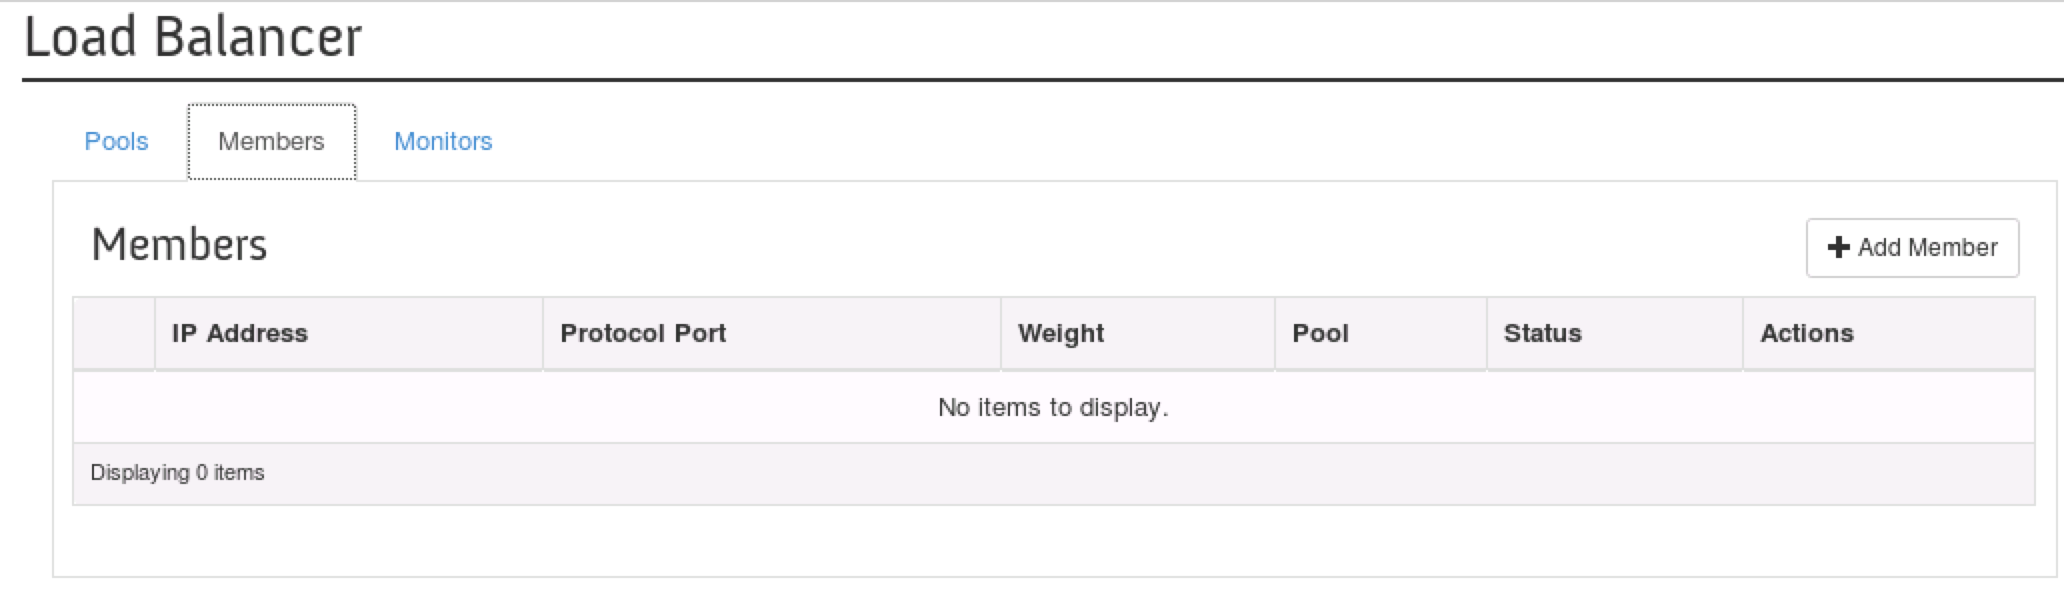
After adding a pool, you should still be on the Load Balancer page. Click on the Members tab. You should see a list of active members, if you have any, or an empty list:
On the Members tab, click on the Add Member button. This will present you with the following menu:
We select the pool we just created, web-pool, and specify members or instances that will be part of this pool.
Select weights for the members of the pool. In our case, both members of the pool will have equal weights, so we assign the weight as 1.
The selected protocol port will be used to access all members of the pool and, since we are using HTTP, we set the port to 80. We set Admin State to UP.
Click on the Add button to add members to the pool.
Now the member list should contain two newly added nodes:
Adding a VIP to the Load Balancer pool
Creating a VIP on the external network will allow access to the Load Balance pool and the instances behind it. To create the VIP, carry out the following steps:
From the Load Balancer page, select the Pools tab and click on the drop-down arrow next to the Edit Pool button. This will give you a drop-down menu with an option to add a VIP:
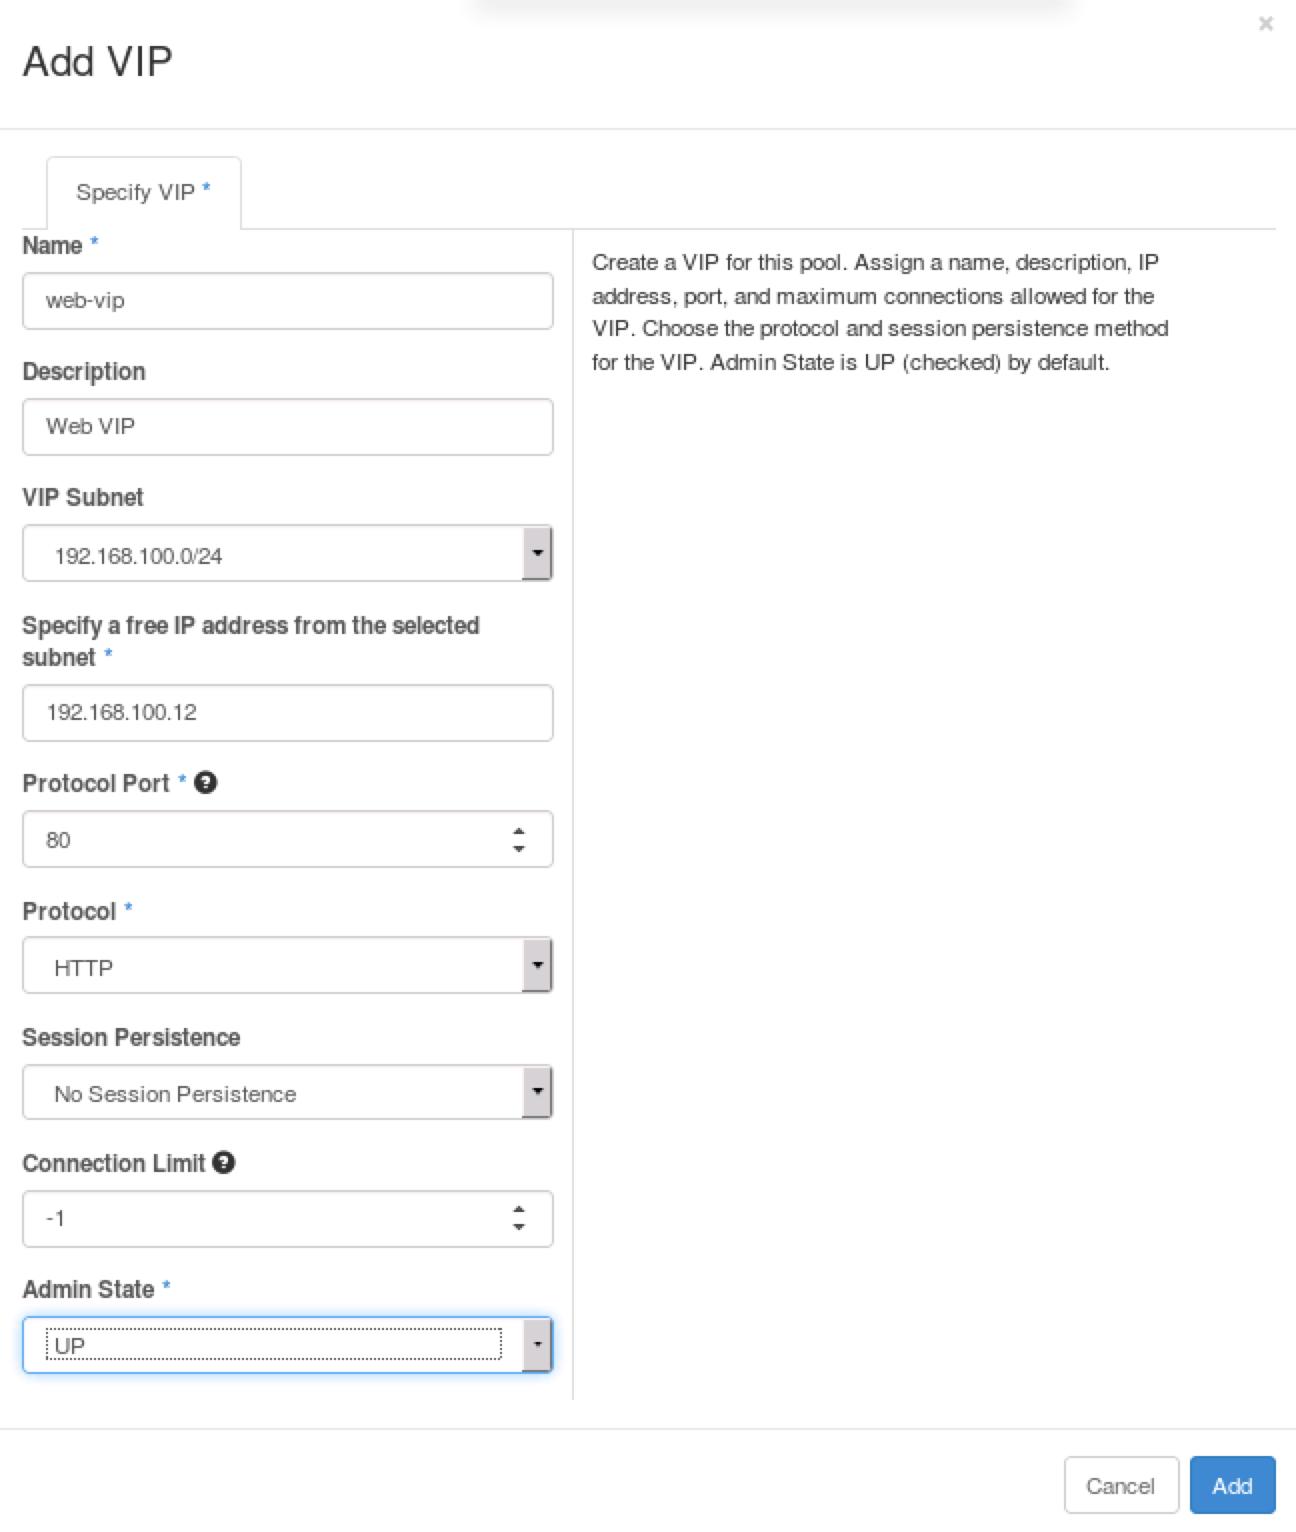
Click on the Add VIP option. This will present you with the modal window for creating a new VIP:
We enter a custom name and description for our VIP.
For VIP Subnet, we pick external subnet 192.168.100.0/24, followed by an available IP in that subnet. We choose 192.168.100.12.
Enter 80 for Protocol Port, followed by selecting HTTP for Protocol.
Set -1 for Connection Limit if you do not wish to have a maximum number of connections for this VIP.
Click on the Add button to create the VIP. This will create a new VIP and show the current pool list:
Now, when we click on web-pool, we will see the following details:
Click on the web-vip link in the details to view the VIP details:
You can test this Load Balancer by entering the VIP's IP in a browser. If you selected ROUND_ROBIN for your routing algorithm, each time you refresh your browser it should hit a different node.
Deleting the Load Balancer
To delete the Load Balancer, we will first need to delete the attached VIP and then delete the pool.
From the Load Balancer page, check the Pools tab and click on the drop-down arrow next to the Edit Pool button. This will give you a drop-down menu with an option to delete a VIP:
Selecting the Delete VIP drop-down option will give you a warning and ask you to confirm the deletion of the VIP. Click on the Delete VIP button to confirm:
After deleting the VIP, now we can delete the pool. From the Load Balancer page's Pools tab, click on the drop-down arrow next to the appropriate Edit Pool button:
Select the Delete Pool option from the drop-down list to delete the pool. You will get asked to confirm the deletion. If you are ready to delete the Load Balance pool, click on the Delete Pool button:
How it works...
We created a Load Balance pool and added two instances with Apache to it. We also created a virtual IP to be used on the external network and assigned it to our pool. To do this, we executed the following steps:
Unlock access to the largest independent learning library in Tech for FREE!
Get unlimited access to 7500+ expert-authored eBooks and video courses covering every tech area you can think of.
Renews at $19.99/month. Cancel anytime
Create a pool from the Load Balancer page's Pools tab.
Select the subnet to which all the nodes are attached when creating the pool.
Add members to the pool.
Create a VIP for the pool.
Both the pool and VIP can be edited after being created. Additional members can also be added to the pool at a later time.
Using OpenStack Dashboard with OpenStack Orchestration
Heat is the OpenStack Orchestration engine that enables users to quickly spin up whole environments using templates. Heat templates, known as Heat Orchestration Templates (HOT), are Yet Another Markup Language (YAML) based files. The files describe the resources being used, the type and the size of the instances, the network an instance will be attached to, among other pieces of information required to run that environment.
We showed you how to use the Heat command line client. In this section, we will show how to use an existing Heat template file in OpenStack Dashboard to spin up two web servers running Apache, connected to a third instance running HA Proxy.
Getting ready
Load a web browser, point it to our OpenStack Dashboard address at http://192.168.100.200/ and log in as an admin user.
How to do it...
First, we will launch stack within our OpenStack Dashboard.
Launching stacks
To launch a Heat stack for a logged in user, carry out the following steps:
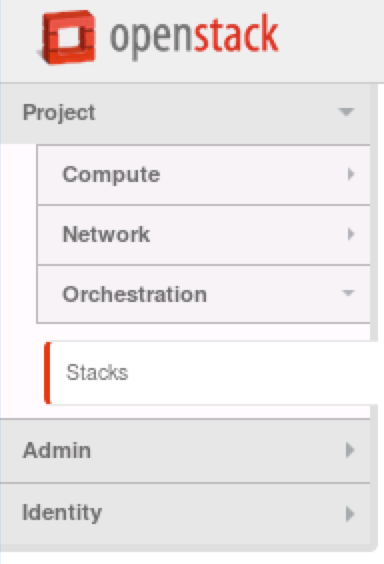
To view available Heat stacks within our OpenStack Dashboard, select the Stacks tab under the Orchestration menu:
After clicking on the Stacks tab, you will see all running stacks in your environment. In our case, our list is empty:
Click on the Launch Stack button to create a new stack. You will see the following window:
There are several ways to specify what template source to use in a stack: File, DirectInput, or URL. Choose which option is the most convenient for you. For our example, you can either use the URL directly or upload a file. The template file can be downloaded from https://raw.githubusercontent.com/OpenStackCookbook/OpenStackCookbook/master/cookbook.yaml. We will upload files from our system.
Just like we downloaded the cookbook.yaml file, we can also download the Environment Source file. In this case, we do not have to use the environment source, but it makes it convenient. The environment file stores the values we would have to enter into the browser manually, but instead loads the values for us on the Launch Stack screen, as shown in step 8. In our example, we are using the environment file that can be downloaded from https://raw.githubusercontent.com/OpenStackCookbook/OpenStackCookbook/master/cookbook-env.yaml. Update the public_net_id, private_net_id, and private_subnet_id fields to match your environment.
After selecting the Template Source and Environment Source files, click on Next:
Our sample environment file contains the following code:
Clicking on Next will give you a Launch Stack window with all the inputs:
Note that most of the inputs in our template are now populated. If you did not specify the environment source file in the previous step, you will need to enter the key_name, image, flavor, public_net_id, private_net_id, and private_subnet_id fields.
These fields are specific to each template used. Your templates may have different fields.
Enter the stack name and user password for your user. If you are logged in as admin or demo, the password is openstack.
Click on the Launch button to start stack creation. If all inputs were correct, you should see your stack being created:
After the stack creation finishes and if there were no errors during creation, you will see your stack's status updated to Complete:
Viewing stack details
After launching a stack, there is a lot of information associated with it, including inputs, outputs, and, in the case of errors, information about why stack creation failed.
To view the details of the stack, click on the stack name from the Stacks list. The first available view is Topology:
Explore the topology by clicking on the nodes. If the graph does not fully fit or you would like a different perspective, you can drag the graph around the window.
The next tab under Stack Detail will provide all of the information that was used in creating the stack:
Stack information available in the Overview tab is as follows:
Info
Status
Outputs
Stack parameters
Launch parameters
The Resources tab will show all the HEAT resources that were created during stack launch:
If there were any errors during stack launch, check this page to see which component's creation failed.
The Events tab shows all the events that occurred when the stack was created. This page can also be very helpful in troubleshooting Heat templates:
While your Heat stack is running, you can also see how many instances it created under the Compute tab's Instance option. The following is what our instances look like on the Instances page:
Note that the test1 instance was not part of the stack creation. All the other VMs were created during the stack launch.
Deleting stacks
Stack deletion is simple; however, it will delete all resources that were created during stack launch. Follow these steps:
To delete a stack, first view the available stacks on the Stacks page:
Click on the appropriate Delete Stack button to delete a stack. You will be asked to confirm the deletion:
After confirming deletion, all resources associated with the stack will be deleted.
How it works...
We have used the OpenStack Dashboard to launch, view, and delete Orchestration stacks. We first needed to download a sample HA Proxy Heat Orchestration Template from GitHub. Since we were using an environment file, we also had to modify the appropriate inputs. Your own templates may have different inputs.
After launching our HA Proxy stack, we explored its topology, resources, and events. Resources created during stack launch will also be reflected in the rest of your environment. If you are launching new instances, all of them will also be available on the Instance page. Delete and modify resources created during the stack launch only through Orchestration section in the OpenStack dashboard or on the command line. Deleting stacks through the dashboard will delete all associated resources.
Unlock the full potential of OpenStack with 'OpenStack Cloud Computing Third Edition' - updated and improved for the latest challenges and opportunities unleashed by cloud.

 United States
 Great Britain
 India
India
 Germany
 France
 Canada
 Russia
 Spain
Spain
 Brazil
 Australia
 Singapore
 Canary Islands
 Hungary
 Ukraine
 Luxembourg
 Estonia
 Lithuania
 South Korea
 Turkey
 Switzerland
 Colombia
 Taiwan
 Chile
Chile
 Norway
 Ecuador
 Indonesia
 New Zealand
 Cyprus
 Denmark
 Finland
 Poland
 Malta
Malta
 Czechia
 Austria
 Sweden
 Italy
Italy
 Egypt
Egypt
 Belgium
 Portugal
 Slovenia
 Ireland
 Romania
 Greece
 Argentina
 Netherlands
 Bulgaria
 Latvia
 South Africa
 Malaysia
 Japan
Japan
 Slovakia
 Philippines
 Mexico
 Thailand