This article, written by John Doran, the author of the Unreal Engine Game Development Cookbook, covers the following recipes:
- Creating a main menu
- Animating a menu
(For more resources related to this topic, see here.)
In order to create a good game project, you need to be able to communicate information to the player. To do this, we need to create a user interface (UI), which will allow us to display information such as the player's health, inventory, and so on.
Inside Unreal 4, we use the Slate UI framework to create user interfaces, however, it's a very complex system. To make things easier for end users, Unreal also released the Unreal Motion Graphics (UMG) UI Designer which is a visual UI authoring tool with a much easier workflow. This is what we will be using in this article.
For more information on Slate, refer to https://docs.unrealengine.com/latest/INT/Programming/Slate/index.html.
Creating a main menu
A main menu can serve as an introduction to your game and is a great place for us to discuss some additional things that UMG has, such as Texts and Buttons. We'll also learn how we can make buttons do things. Let's spend some time to see just how easy it is to create one!
For more information on the client-server model, refer to https://en.wikipedia.org/wiki/Client%E2%80%93server_model.
How to do it…
To give you an idea of how it works, let's take a simple example of a coin collectable:
- Create a new level by going to File | New Level and select Empty Level.
- Next, inside the Content Browser tab, go to our UI folder, then to Add New | User Interface | Widget Blueprint, and give it a name of MainMenu. Double-click on it to open the editor.
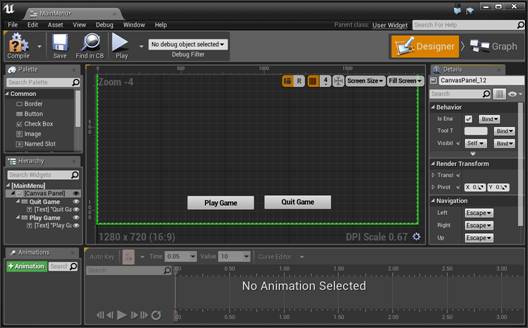
In this menu, we are going to have the title of the game and then a series of buttons the player can press:
- From the Palette tab, open up the Common section and drag and drop a Button onto the middle of the screen.
- Select the button and change its Size X to 400 and Size Y to 80. We will also rename the button to Play Game.
- Drag and drop a Text object onto the Play Game button and you should see it snap on to the button as a child. Under Content, change Text to Play Game. From here under Appearance, change the color of the button to black and change the Font size to 32.
- From the Hierarchy tab, select the Play Game button and copy and paste it to create duplicate. Move the button down, rename it to Quit Game, and change the Text to Content as well.
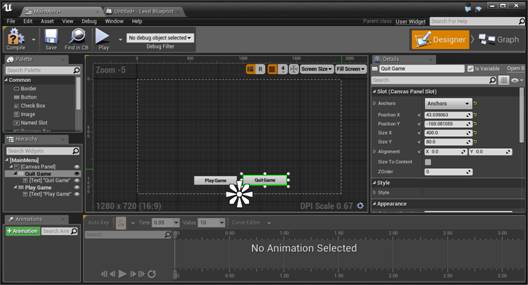
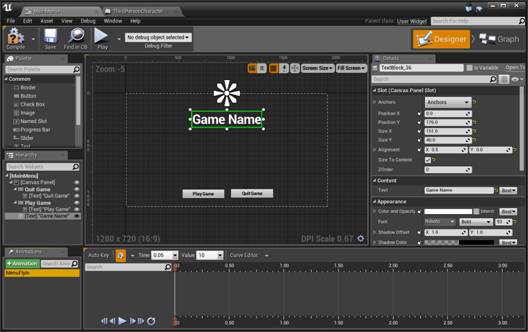
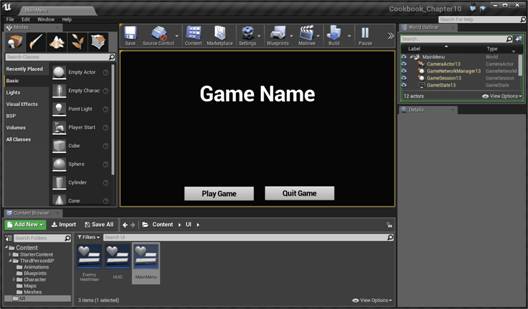
- Move both of the objects so that they're on the bottom part of the HUD, slightly above and side by side, as shown in the following image:
- Lastly, we'll want to set our pivots and anchors accordingly. When you select either the Quit Game or Play Game buttons, you may notice a sun-like looking widget that displays the Anchors of the object (known as the Anchor Medallion). In our case, open Anchors from the Details panel and click on the bottom-center option.
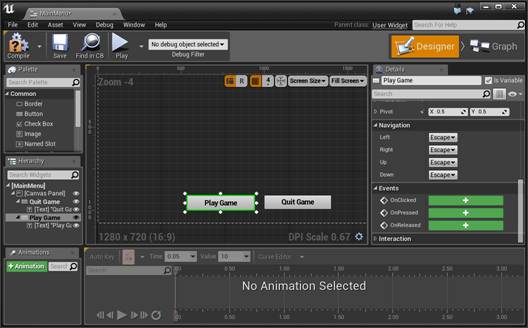
- Now that we have the buttons created, we want them to actually do something when we click on them. Select the Play Game button and from the Details tab, scroll down until you see the Events component. There should be a series of big green + buttons. Click on the green button beside OnClicked.
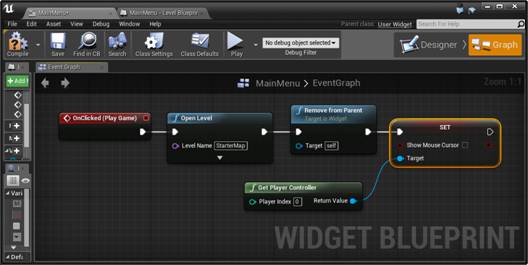
- Next, it will take us to the Event Graph with the appropriate event created for us. To the right of the event, right-click and create an Open Level action. Under Level Name, put in whatever level you like (for example, StarterMap) and then connect the output of the OnClicked action to the input of the Open Level action.
- To the right of that, create a Remove from Parent action to make sure that when we leave that, the menu doesn't stay.
- Finally, create a Get Player Controller action and to the right of it a Set Show Mouse Cursor action, which should be disabled, so that the mouse will no longer be visible since we will want to see the mouse in the menu. (Drag Return Value from the Get Player Controller action to create a new node and search for the mouse cursor action.)
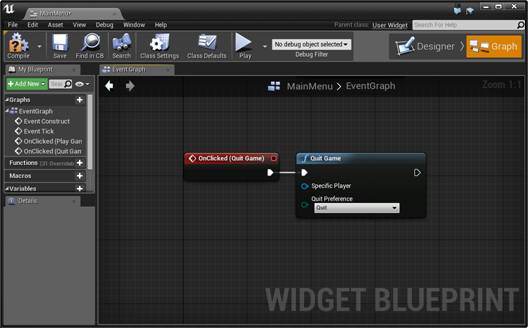
- Now, go back to the Designer button and then select the Quit Game button. Click on the OnClicked button as well and to the right of this one, create a Quit Game action and connect the output of the OnClicked action to the input of the Quit Game action.
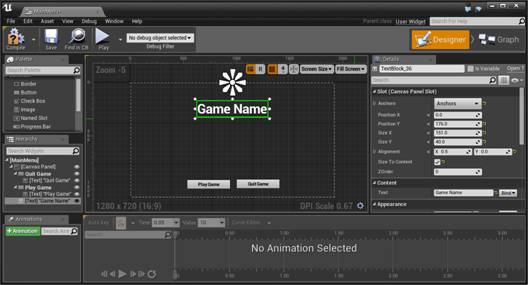
- Lastly, as a bit of polish, let's add our game's title to the screen. Drag and drop another Text object onto the scene, this time with Anchor at the top-center. From here, change Position X to 0 and Position Y to 176.
- Change Alignment in the X axis to .5 and check the Size to Content option for it to automatically resize.
- Set the Content component's Text property to the game's name (in my case, Game Name).
- Under the Appearance component, set the Font size to 93 and set Justification to Center.
There are a number of other styling options that you may wish to use when developing your HUDs. For more information about it, refer to https://docs.unrealengine.com/latest/INT/Engine/UMG/UserGuide/Styling/index.html.
- Compile the menu, and saveit. Now we need to actually have the widget show up. To do so, we'll need to take the same steps as we did earlier.
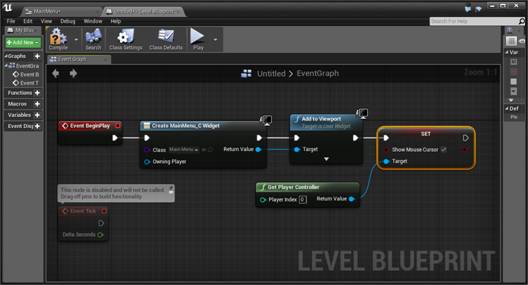
- Open up Level Blueprint by going to Blueprints | Open Level Blueprint and create an EventBeginPlay event.
- Then, to the right of this, right-click and create a Create Widget action. From the dropdown under Class, select MainMenu and connect the arrow from Event Begin Play to the input of Create MainMenu_C Widget.
- After this, click and drag the output arrow and create an Add to Viewport event. Then, connect Return Value of our Create Widget action to Target of the Add to Viewport action.
- Now lastly, we also want to display the player's cursor on the screen to show buttons. To do this, right-click and select Get Player Controller. Then, from Return Value of that, create a Show Mouse Cursor object in Set. Connect the output of the Add to Viewport action to the input of the Show Mouse Cursor action.
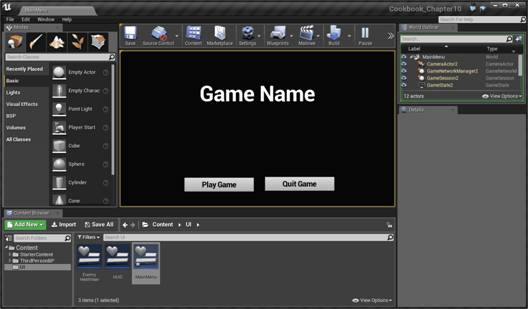
- Compile, save, and run the project!
Unlock access to the largest independent learning library in Tech for FREE!
Get unlimited access to 7500+ expert-authored eBooks and video courses covering every tech area you can think of.
Renews at $19.99/month. Cancel anytime
With this, our menu is completed! We can quit the game without any problem, and pressing the Play Game button will start our level!
Animating a menu
You may have created a menu or UI element at some point, but rather than having it static and non-moving, let's spend some time looking at how we can animate the menus by having them fly in and out or animating them in some way. This will help add to the polish of the title as well as enable players to notice things easier as they move in.
Getting ready
Before we start working on this, we need to have a project created and set up. Do the previous recipe all the way to completion.
How to do it…
- Open up the MainMenu blueprint once more and from the bottom-left in the Animations tab, click on the +Animation button and give the new animation a name of MenuFlyIn.
- Select the newly created animation and you should see the window on the right-hand side brighten up.
- Next, click on the Auto Key toggle to have the animation editor automatically set keys that are appropriate for our implementation.
- If it's not there already, move the timeline bar (the white line with two orange ends on the top and bottom) to the 0.00 mark on the animation timeline.
- Next, select the Game Name object and under Color and Opacity, open it and change the A (alpha) value to 0.
- Now move the timeline bar to the 1.00 mark and then open the color again and set the A value to 1.
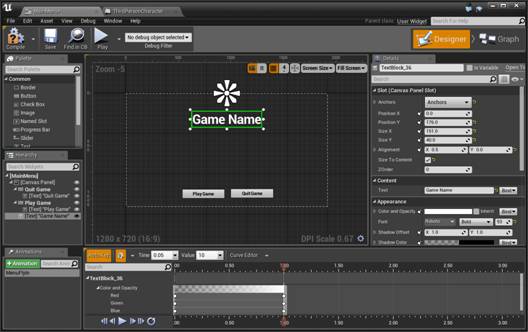
You'll notice a transition—going from a completely transparent text to a fully shown one. This is a good start. Let's have the buttons fly in after the text appears.
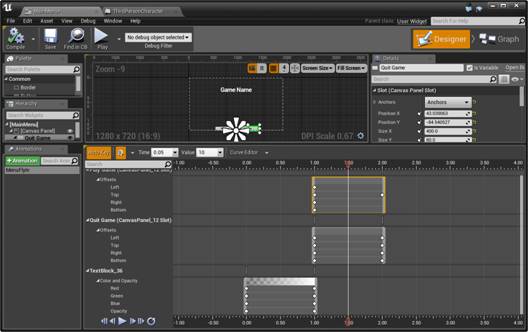
- Next, move the Time bar to the 2.00 mark and select the Play Game button. Now from the Details tab, you'll notice that under the variables, there are new + icons to the left of variables. This value will save the value for use in the animations. Click on the + icon by the Position Y value.
If you use your scroll wheel while inside the dark grey portion of the timeline bar (where the keyframe numbers are displayed), it zooms in and out. This can be quite useful when you create more complex animations.
- Now move the Time bar to the 1.00 mark and move the Play Game button off the screen. By doing the animation in this way, we are saving where we want it to be first at the end, and then going back in time to do the animations.
- Do the same animation for the Quit Game button.
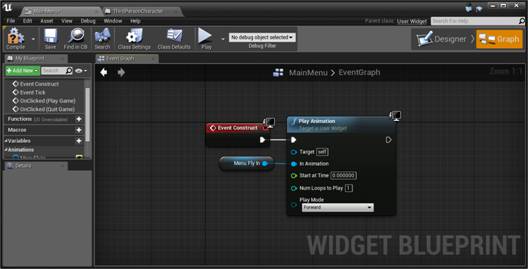
Now that our animation is created, let's make it in a way so that when the object starts, this animation is played.
- Click on the Graph button and from the MyBlueprint tab under the Graphs section, double-click on the Event Construct event, which is called as soon as we add the menu to the scene. Grab the pin on the end of it and create a Play Animation action.
- Drag and drop a MenuFlyIn animation into the scene and select Get. Connect its output pin to the In Animation property of the Play Animation action.
- Now that we have the animation work when we create the menu, let's have it play when we leave the menu.
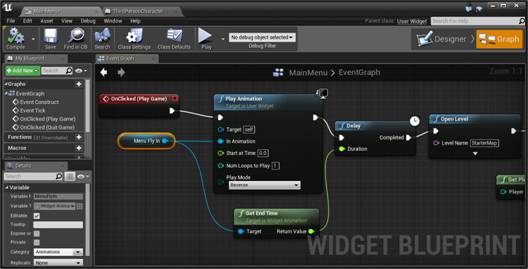
- Select the Play Animation and Menu Fly In variables and copy them. Then move to the OnClicked (Play Game) action. Drag the OnClicked event over to the left and remove its original connection to the Open Level action by holding down Alt and clicking.
- Now paste (Ctrl + V) the new objects and connect the out pin of OnClicked (Play Game) to the input of Play Animation. Now change Play Mode to Reverse.
- To the right of this, create a Delay action. For the Duration variable, we want it to wait as long as the animation is, so from the Menu Fly In variable, create another pin and create a Get End Time action. Connect Return Value of Get End Time to the input of the Delay action.
- Connect the output of the Play Animation action to the input of the Delay action and the Completed output of the Delay action to the input of the Open Level action.
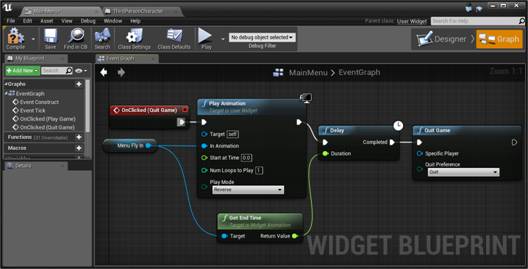
- Now we need to do the same for the OnClicked (Quit Game) event.
- Now compile, save, and run the game!
Our menu is now completed and we've learned about how animation works inside UMG!
For more examples of using UMG for animation, refer to https://docs.unrealengine.com/latest/INT/Engine/UMG/UserGuide/Animation/index.html.
Summary
This article gave you some insight on Slate and the UMG Editor to create a number of UI elements and an animated main menu to tie your whole game together. We created a main menu and also learned how to make buttons do things. We spent some time looking at how we can animate menus by having them fly in and out.
Resources for Article:
Further resources on this subject:

 United States
 Great Britain
 India
India
 Germany
 France
 Canada
 Russia
 Spain
Spain
 Brazil
 Australia
 Singapore
 Canary Islands
 Hungary
 Ukraine
 Luxembourg
 Estonia
 Lithuania
 South Korea
 Turkey
 Switzerland
 Colombia
 Taiwan
 Chile
Chile
 Norway
 Ecuador
 Indonesia
 New Zealand
 Cyprus
 Denmark
 Finland
 Poland
 Malta
Malta
 Czechia
 Austria
 Sweden
 Italy
Italy
 Egypt
Egypt
 Belgium
 Portugal
 Slovenia
 Ireland
 Romania
 Greece
 Argentina
 Netherlands
 Bulgaria
 Latvia
 South Africa
 Malaysia
 Japan
Japan
 Slovakia
 Philippines
 Mexico
 Thailand


