Typically, the background scene for the menu system will also be a scene from the game. But because the player will not be interacting with the menu's background scene, they will not be able to see it from all angles, jump on objects, and so on. It is possible to strip out many of the components from the scene to optimize it for use as a menu background.
Another option is to create a brand new background scene that incorporates game assets from multiple game levels into a single menu background to give the player a full picture of the scope of our game. Again, we can achieve this by being selective about the game assets that we use and stripping out all but the most essential visual components of those assets.
The background scene can be a teaser, it can include Easter Egg hints, it can contain character cameos from other games, and it can contain parts of other games.
Finally, the background scene can be a selling opportunity. It can contain advertising or it can contain objects that the player may be interested in purchasing, using game purchase. The contents of the menu background scene are limited only by what we can imagine.
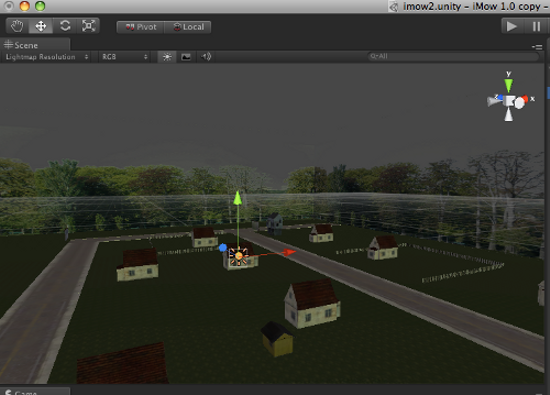
In the following image, we show the original first level of a game that we have selected to be used as the background scene for our game:
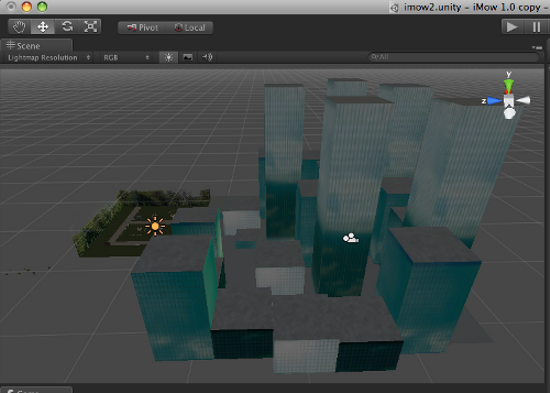
The scene is adequate and we could use it as the background for our game menu, but we want to give the game player a better idea, right on the main menu, of just how large the game is. So instead, we add some buildings from a second level (we could do more; we could make our menu level huge, but this should do for now), and come up with the new, much larger scene, as shown in the following screenshot to use as the background for our main menu:
Set up the camera path
Once we have decided on the final scene that we want to use as the background for our main menu, we need to decide on the path that the camera will follow as it moves through the scene.
While it is not a requirement that the camera moves along a path, it adds interest to the menu, and so we will continue with that menu theme for our game.
This is an opportunity for us to tease the player, since it may be some time before they arrive at a specific part of the menu scene during actual gameplay. We can flyby Easter Eggs or we can flyby specific objectives. Again, this is the part of the game where we get to be creative and draw the player into the game.
If we want to, we can even defy the physics of the game and fly through things, so that we don't give away the secret of how to achieve a game objective or how to obtain an Easter Egg, but we do let the player know that they are there. We need to be careful to do this in such a way as to fade through scenes rather than clip through the geometry, so that we don't disturb the immersive feel of the game in order to hide things from the player's view.
To set up a path, the first thing we need to do is create a gizmo. A gizmo is an image that appears in the Unity3D editor at the position of a game object's transform, but otherwise will not be visible in the game. As a game designer, we use gizmos to arrange these game objects graphically in the editor, rather than having to find each object in the game hierarchy, and enter x, y, and z values to position the transformation. Gizmos, while not necessary, are very useful because they allow us to create a visual representation of an otherwise empty game object in the Unity3D editor. To create a gizmo, you need two things:
A gizmo image
A gizmo script
The following is an example of a gizmo image. It can be anything you want. In this case, we have simply chosen an image of the letter W – for waypoint. The image file is named Waypoint.tif, and it has been imported into Unity3D as a standard GUITexture as follows:
The following is an example of a gizmo script that draws a waypoint gizmo image at the location of the game object transform to which it is attached:
// Draw the waypoint gizmo at the Game Object's // transform position.
// You can use any image that you want
// This gizmo will be pickable which means you // can click on it in the editor to select // the attached game object
function OnDrawGizmos () { //The image must be in Assets/Gizmos – the size of the image //is how large it will be drawn in the scene view Gizmos.DrawIcon (transform.position, "Waypoint.tif"); }
To use a waypoint in the editor, we need to do the following:
Create an empty game object
Attach the waypoint.js script to the game object
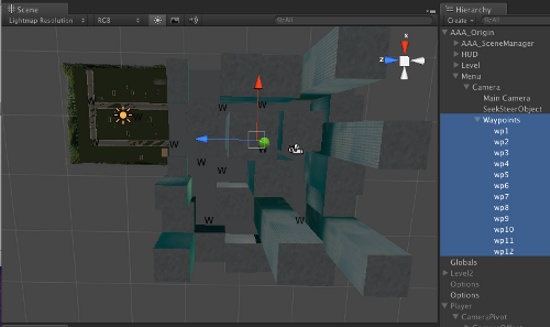
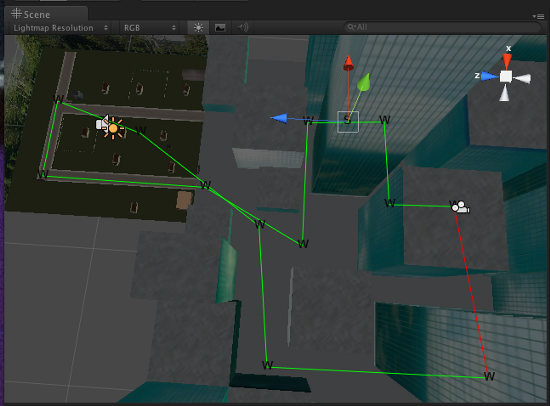
The following image shows our example level with a number of waypoints added to define the path that we want the camera to follow for our menu flyby. Everywhere you see the letter W in this image, denotes a waypoint along the path:
Adding waypoints and drawing a gizmo at a waypoint's location in the editor is helpful, but one more thing that we can do to make the order of the waypoints clear is to draw a line between the waypoints. So, for example, we would draw a line from wp1 to wp2, from wp2 to wp3, and so on. The following script fragment, which is part of the SeekSteer script, shows how to draw the lines between the waypoints:
Unlock access to the largest independent learning library in Tech for FREE!
Get unlimited access to 7500+ expert-authored eBooks and video courses covering every tech area you can think of.
Renews at $19.99/month. Cancel anytime
// draws a line from waypoint to waypoint
public void OnDrawGizmos() { Vector3 l_prevWaypointPosition; Vector3 l_currentWaypointPosition;
// Choose a color, it can be any color you like Gizmos.color = Color.red; // Draws a line between the last waypoint // and the first waypoint l_prevWaypointPosition = waypoints[waypoints.Length-1].position; l_currentWaypointPosition = waypoints[0].position;
// Choose another color, it can be any color you like // except the first color Gizmos.color = Color.green; // For each remaining waypoint, in the waypoints array // draw a line between the two points for (int i=1;i < waypoints.Length;i++) { l_currentWaypointPosition = waypoints[i].position; l_prevWaypointPosition = waypoints[i-1].position;
The following screenshot shows the new scene with lines being drawn between the waypoints. It's easy to identify the first and last waypoint, because they are the points with the red lines between them:
Once the waypoints have been set up, we need something to follow them. There are literally dozens of ways that we can use to follow a path, and many kinds of paths that we can follow. In fact, there are complete Unity3D projects devoted to path finding.
In this case, we have chosen to use the SteerSeaker method of following a path. The SteerSeaker creates an array (or list) of all the waypoints, and moves from one waypoint to the next in the same amount of time. In order to keep the time between waypoints constant, the SteerSeaker speeds up or slows down based on the distance between the waypoints, which makes it easy for us to predict the total time it will take to follow our path and create sections of both slow and fast movement. The rest of the SteerSeaker script (remember we looked at the previous image that draws lines between the waypoints) is shown as follows:
This script is written in C# rather than JavaScript. While many people new to Unity3D prefer to work in either JavaScript or C#, it's important that we become familiar with both scripting languages, so that we can take advantage of all the open source resources available in the Unity3D community. While we don't need to be able to program in both languages, we do need to be able to read both languages.
// SeekSteer.cs // Based on the original SeekSteer by Matthew Hughes // -- 19 April 2009 // -- Uploaded to Unify Community Wiki on 19 April 2009 // -- URL:
http://www.unifycommunity.com/wiki/index.php?title=SeekSteer // // Changes by BurningThumb Software // -- March 2010 //
using UnityEngine; using System.Collections;
public class SeekSteer : MonoBehaviour { // This is the array of waypoints public Transform[] waypoints;
// This is the radius, in meteres of a waypoint public float waypointRadius = 1.5f;
// Damping is used to limit the rate at which // the object turns towards the next waypoint. // Smaller numbers slow down turns, larger // numbers speed up turns public float damping = 0.1f;
// Set loop to true if the object loops // continuously around the waypoints and // to false if the object only goes around // one time public bool loop = false;
// The time between waypoints is constant // so the object will speed up or slow down to // achieve this time regardless of the distance // between the points public float transittime = 2.0f;
// Set faceHeading to true to make the object // turn to face the forward direction and to // false to not turn to face the forward // direction public bool faceHeading = true;
// The current heading of the object private Vector3 currentHeading;
// The desired heading of the object private Vector3 targetHeading;
// The array index of the waypoint that the // object is heading toward private int targetwaypoint;
// A reference to the transform of the object // used to speed up the script by caching the // reference which is used many times private Transform thisTransform;
// If the object has a rigid body then this // is a reference to the rigid body of the object // used to speed up the script by caching the // reference which is used several times private Rigidbody thisRigidbody;
// Use this for initialization protected void Start () {
// If the waypoints array is empty this script // logs a message and disables itself. You need // to add waypoints to the array in the Unity3D // editor
if (waypoints.Length <= 0) { Debug.Log("No waypoints on "+name); enabled = false; }
// Cache a reference to the transform to speed // up the execution of the script thisTransform = transform;
// Set the current heading to be forward currentHeading = thisTransform.forward;
// The first target waypoint, is the first // one in the array targetwaypoint = 0;
// Cache a reference to the attached Rigidbody to // speed up execution of the script. If // no Rigidbody is attached this will be null thisRigidbody = rigidbody;
}
// calculates a new heading. This is done in // fixed update just in case there is a // Rigidbody attached and physics are // involved protected void FixedUpdate () { // A simple Lerp with damping to adjust // the heading towards the current target // waypoint targetHeading = waypoints[targetwaypoint].position - thisTransform.position; currentHeading = Vector3.Lerp(currentHeading, targetHeading, damping * Time.deltaTime); }
// moves us along current heading protected void Update() { // If a Rigidbody is attached then // physics is in use so add velocity if (thisRigidbody) { thisRigidbody.velocity = currentHeading * transittime; } // Otherwise set the position directly else { thisTransform.position = thisTransform.position + (currentHeading * Time.deltaTime * transittime); }
// If the object needs to face the heading, // make it look that way if (faceHeading) { thisTransform.LookAt(thisTransform.position + currentHeading); }
// Check to see if the object is inside the // waypoint radius if (Vector3.Distance(thisTransform.position, waypoints[targetwaypoint].position) <= waypointRadius) { // Add one to the target waypoint to select // the next waypoint targetwaypoint++;
// if the next waypoint is past // the end of the array if(targetwaypoint>=waypoints.Length) { // set it back to the beginning targetwaypoint = 0;
// If the object is only supposed // to transit the waypoints one // time then disables the script if (!loop) { enabled = false; } } } }
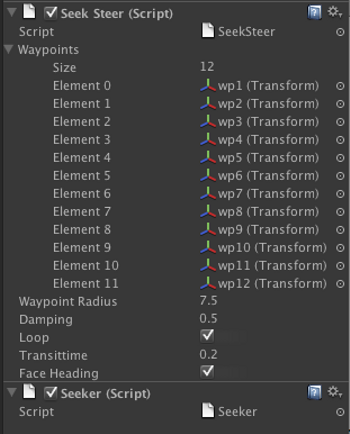
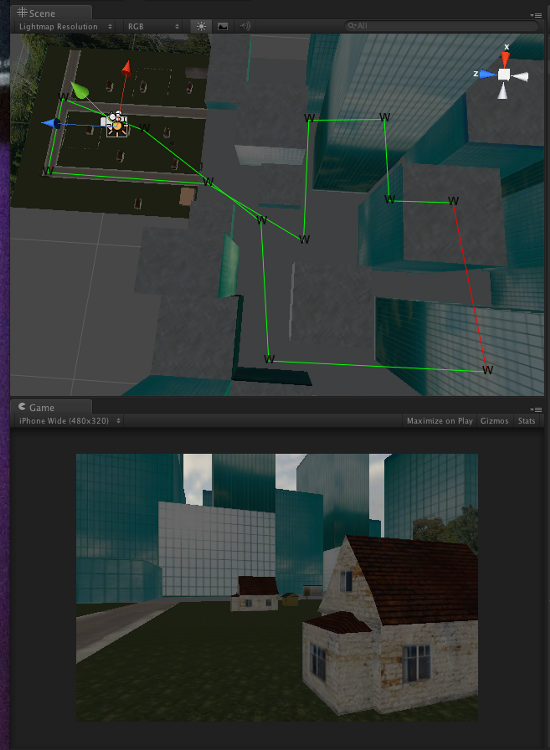
With this final script, we create the SteerSeeker game object and attach not only the SteerSeaker script, but also a gizmo script to display the letter S. This is done so that we can see the position of the game object in the Unity3D editor. The following image shows the SteerSeaker object settings in the Unity3D editor:
The variables declared as public in the script are the ones that will appear in the Unity3D editor.
The following image shows its position on the waypoint path, as we run the game in the editor:
Finally, we need to have the main camera follow the SteerSeaker object as it moves along the waypoint path.
The advantage of using a script, instead of a simple timeline, is that we can create more dynamic camera movement, for example, a rollercoaster effect where the camera changes angles as it moves, or a script that "gobbles" up jewels along the path as it moves. It's important to understand the concept of using a script and its benefits, rather than simply looking at what this specific example does. Often, as in this case, example code is kept simple to convey the concept or idea, and is not meant to be the final solution that we would deploy in a game.
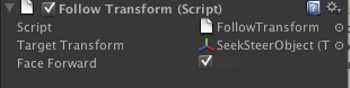
This is done by attaching the FollowTransform script from the iPhone Standard Assets to the main camera, while assigning the SeekSteerObject to the Target Transform and checking the box Face Forward on that script. This is shown as follows:

 United States
 Great Britain
 India
India
 Germany
 France
 Canada
 Russia
 Spain
Spain
 Brazil
 Australia
 Singapore
 Canary Islands
 Hungary
 Ukraine
 Luxembourg
 Estonia
 Lithuania
 South Korea
 Turkey
 Switzerland
 Colombia
 Taiwan
 Chile
Chile
 Norway
 Ecuador
 Indonesia
 New Zealand
 Cyprus
 Denmark
 Finland
 Poland
 Malta
Malta
 Czechia
 Austria
 Sweden
 Italy
Italy
 Egypt
Egypt
 Belgium
 Portugal
 Slovenia
 Ireland
 Romania
 Greece
 Argentina
 Netherlands
 Bulgaria
 Latvia
 South Africa
 Malaysia
 Japan
Japan
 Slovakia
 Philippines
 Mexico
 Thailand