


In this article by Priya Kuber, Rishi Gaurav Bhatnagar, and Vijay Varada, authors of the book Arduino for Kids explains structure and various components of a code:
- How does a code work
- What is code
- What is a System
- How to download, save and access a file in the Arduino IDE
(For more resources related to this topic, see here.)
What is a System?
Imagine system as a box which in which a process is completed. Every system is solving a larger problem, and can be broken down into smaller problems that can be solved and assembled. Sort of like a Lego set! Each small process has ‘logic’ as the backbone of the solution. Logic, can be expressed as an algorithm and implemented in code. You can design a system to arrive at solutions to a problem. Another advantage to breaking down a system into small processes is that in case your solution fails to work, you can easily spot the source of your problem, by checking if your individual processes work.

What is Code?
Code is a simple set of written instructions, given to a specific program in a computer, to perform a desired task. Code is written in a computer language. As we all know by now, a computer is an intelligent, electronic device capable of solving logical problems with a given set of instructions.
Some examples of computer languages are Python, Ruby, C, C++ and so on.
Find out some more examples of languages from the internet and write it down in your notebook.
What is an Algorithm?
A logical set by step process, guided by the boundaries (or constraints) defined by a problem, followed to find a solution is called an algorithm. In a better and more pictorial form, it can be represented as follows:
(Logic + Control = Algorithm) (A picture depicting this equation)
What does that even mean? Look at the following example to understand the process.
Let’s understand what an algorithm means with the help of an example.
It’s your friend’s birthday and you have been invited for the party (Isn’t this exciting already?). You decide to gift her something. Since it’s a gift, let’s wrap it. What would you do to wrap the gift? How would you do it?
- Look at the size of the gift
- Fetch the gift wrapping paper
- Fetch the scissors
- Fetch the tape
- Then you would proceed to place the gift inside the wrapping paper.
- You will start start folding the corners in a way that it efficiently covers the Gift.
- In the meanwhile, to make sure that your wrapping is tight, you would use a scotch tape.
- You keep working on the wrapper till the whole gift is covered (and mind you, neatly! you don’t want mommy scolding you, right?).
What did you just do? You used a logical step by step process to solve a simple task given to you.
Again coming back to the sentence: (Logic + Control = Algorithm)
‘Logic’ here, is the set of instructions given to a computer to solve the problem. ‘Control’ are the words making sure that the computer understands all your boundaries.
Logic
Logic is the study of reasoning and when we add this to the control structures, they become algorithms.
Have you ever watered the plants using a water pipe or washed a car with it? How do you think it works?
The pipe guides the water from the water tap to the car. It makes sure optimum amount of water reaches the end of the pipe. A pipe is a control structure for water in this case. We will understand more about control structures in the next topic.
How does a control structure work?
A very good example to understand how a control structure works, is taken from wikiversity. (https://en.wikiversity.org/wiki/Control_structures)
A precondition is the state of a variable before entering a control structure. In the gift wrapping example, the size of the gift determines the amount of gift wrapping paper you will use. Hence, it is a condition that you need to follow to successfully finish the task. In programming terms, such condition is called precondition. Similarly, a post condition is the state of the variable after exiting the control structure. And a variable, in code, is an alphabetic character, or a set of alphabetic characters, representing or storing a number, or a value. Some examples of variables are x, y, z, a, b, c, kitten, dog, robot
Let us analyze flow control by using traffic flow as a model. A vehicle is arriving at an intersection. Thus, the precondition is the vehicle is in motion. Suppose the traffic light at the intersection is red. The control structure must determine the proper course of action to assign to the vehicle.
Precondition: The vehicle is in motion.
Control Structure:
Is the traffic light green? If so, then the vehicle may stay in motion.
Is the traffic light red? If so, then the vehicle must stop.
End of Control Structure:
Post condition: The vehicle comes to a stop.
Thus, upon exiting the control structure, the vehicle is stopped.
If you wonder where you learnt to wrap the gift, you would know that you learnt it by observing other people doing a similar task through your eyes. Since our microcontroller does not have eyes, we need to teach it to have a logical thinking using Code.
The series of logical steps that lead to a solution is called algorithm as we saw in the previous task. Hence, all the instructions we give to a micro controller are in the form of an algorithm. A good algorithm solves the problem in a fast and efficient way.
Blocks of small algorithms form larger algorithms. But algorithm is just code! What will happen when you try to add sensors to your code? A combination of electronics and code can be called a system.
Picture: (block diagram of sensors + Arduino + code written in a dialogue box )
Logic is universal. Just like there can be multiple ways to fold the wrapping paper, there can be multiple ways to solve a problem too!
A micro controller takes the instructions only in certain languages. The instructions then go to a compiler that translates the code that we have written to the machine.
What language does your Arduino Understand?
For Arduino, we will use the language ‘processing’. Quoting from processing.org, Processing is a flexible software sketchbook and a language for learning how to code within the context of the visual arts.
Processing is an open source programming language and integrated development environment (IDE). Processing was originally built for designers and it was extensively used in electronics arts and visual design communities with the sole purpose of teaching the fundamentals of computer sciences in a visual context. This also served as the foundations of electronic sketchbooks.
From the previous example of gift wrapping, you noticed that before you need to bring in the paper and other stationery needed, you had to see the size of the problem at hand (the gift).
What is a Library?
In computer language, the stationery needed to complete your task, is called “Library”. A library is a collection of reusable code that a programmer can ‘call’ instead of writing everything again.
Now imagine if you had to cut a tree, make paper, then color the paper into the beautiful wrapping paper that you used, when I asked you to wrap the gift. How tiresome would it be? (If you are inventing a new type of paper, sure, go ahead chop some wood!)
So before writing a program, you make sure that you have ‘called’ all the right libraries.
Can you search the internet and make a note of a few arduino libraries in your inventor’s diary?
Please remember, that libraries are also made up of code! As your next activity, we will together learn more about how a library is created.
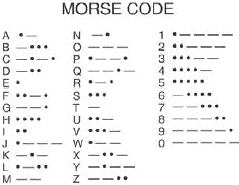
Activity: Understanding the Morse Code
During the times before the two-way mobile communication, people used a one-way communication called the Morse code. The following image is the experimental setup of a Morse code. Do not worry; we will not get into how you will perform it physically, but by this example, you will understand how your Arduino will work. We will show you the bigger picture first and then dissect it systematically so that you understand what a code contains.

The Morse code is made up of two components “Short” and “Long” signals. The signals could be in the form of a light pulse or sound. The following image shows how the Morse code looks like. A dot is a short signal and a dash is a long signal.
Interesting, right? Try encrypting your message for your friend with this dots and dashes. For example, “Hello” would be:
The image below shows how the Arduino code for Morse code will looks like.
![]()
The piece of code in dots and dashes is the message SOS that I am sure you all know, is an urgent appeal for help.
SOS in Morse goes: dot dot dot; dash dash dash; dot dot dot.
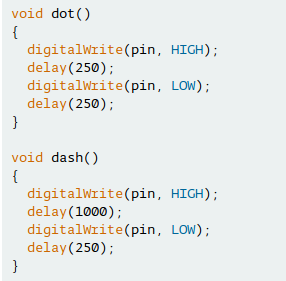
Since this is a library, which is being created using dots and dashes, it is important that we define how the dot becomes dot, and dash becomes dash first. The following sections will take smaller sections or pieces of main code and explain you how they work. We will also introduce some interesting concepts using the same.
What is a function?
Functions have instructions in a single line of code, telling the values in the bracket how to act. Let us see which one is the function in our code. Can you try to guess from the following screenshot?
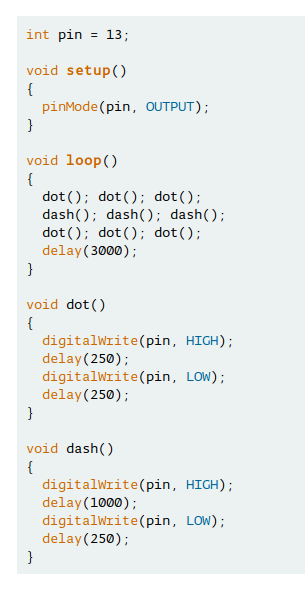
No? Let me help you! digitalWrite() in the above code is a Function, that as you understand, ‘writes’ on the correct pin of the Arduino.
delay is a Function that tells the controller how frequently it should send the message. The higher the delay number, the slower will be the message (Imagine it as a way to slow down your friend who speaks too fast, helping you to understand him better!)
Look up the internet to find out what is the maximum number that you stuff into delay.
What is a constant?
A constant is an identifier with pre-defined, non-changeable values. What is an identifier you ask? An identifier is a name that labels the identity of a unique object or value.
As you can see from the above piece of code, HIGH and LOW are Constants.
Q: What is the opposite of Constant?
Ans: Variable
The above food for thought brings us to the next section.
What is a variable?
A variable is a symbolic name for information. In plain English, a ‘teacher’ can have any name; hence, the ‘teacher’ could be a variable.
A variable is used to store a piece of information temporarily. The value of a variable changes, if any action is taken on it for example; Add, subtract, multiply etc. (Imagine how your teacher praises you when you complete your assignment on time and scolds you when you do not!)
What is a Datatype?
Datatypes are sets of data that have a pre-defined value.
Now look at the first block of the example program in the following image:
int as shown in the above screenshot, is a Datatype
The following table shows some of the examples of a Datatype.
| Datatype | Use | Example |
| int | describes an integer number is used to represent whole numbers | 1, 2, 13, 99 etc |
| float | used to represent that the numbers are decimal | 0.66, 1.73 etc |
| char | represents any character. Strings are written in single quotes | ‘A’, 65 etc |
| str | represent string | “This is a good day!” |
With the above definition, can we recognize what pinMode is?
Every time you have a doubt in a command or you want to learn more about it, you can always look it up at Arduino.cc website. You could do the same for digitalWrite() as well!
From the pinMode page of Arduino.cc we can define it as a command that configures the specified pin to behave either as an input or an output.
Let us now see something more interesting.
What is a control structure?
We have already seen the working of a control structure. In this section, we will be more specific to our code. Now I draw your attention towards this specific block from the main example above:
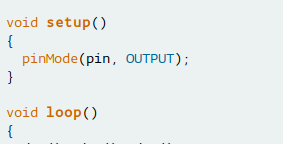
Do you see void setup() followed by a code in the brackets? Similarly void loop() ?
These make the basics of the structure of an Arduino program sketch. A structure, holds the program together, and helps the compiler to make sense of the commands entered.
A compiler is a program that turns code understood by humans into the code that is understood by machines.
There are other loop and control structures as you can see in the following screenshot:
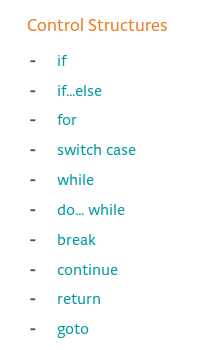
These control structures are explained next.
How do you use Control Structures?
Imagine you are teaching your friend to build 6 cm high lego wall. You ask her to place one layer of lego bricks, and then you further ask her to place another layer of lego bricks on top of the bottom layer. You ask her to repeat the process until the wall is 6 cm high.
This process of repeating instructions until a desired result is achieved is called Loop.
A micro-controller is only as smart as you program it to be. Hence, we will move on to the different types of loops.
- While loop: Like the name suggests, it repeats a statement (or group of statements) while the given condition is true. The condition is tested before executing the loop body.
- For loop: Execute a sequence of statements multiple times and abbreviates the code that manages the loop variable.
- Do while loop: Like a while statement, except that it tests the condition at the end of the loop body
- Nested loop: You can use one or more loop inside any another while, for or do..while loop.
Now you were able to successfully tell your friend when to stop, but how to control the micro controller? Do not worry, the magic is on its way! You introduce Control statements.
- Break statements: Breaks the flow of the loop or switch statement and transfers execution to the statement that is immediately following the loop or switch.
- Continue statements: This statement causes the loop to skip the remainder of its body and immediately retest its condition before reiterating.
- Goto statements: This transfers control to a statement which is labeled . It is no advised to use goto statement in your programs.
Quiz time: What is an infinite loop? Look up the internet and note it in your inventor-notebook.
The Arduino IDE
The full form of IDE is Integrated Development Environment.
IDE uses a Compiler to translate code in a simple language that the computer understands. Compiler is the program that reads all your code and translates your instructions to your microcontroller. In case of the Arduino IDE, it also verifies if your code is making sense to it or not. Arduino IDE is like your friend who helps you finish your homework, reviews it before you give it for submission, if there are any errors; it helps you identify them and resolve them.
Why should you love the Arduino IDE?
I am sure by now things look too technical. You have been introduced to SO many new terms to learn and understand. The important thing here is not to forget to have fun while learning. Understanding how the IDE works is very useful when you are trying to modify or write your own code. If you make a mistake, it would tell you which line is giving you trouble. Isn’t it cool?
The Arduino IDE also comes with loads of cool examples that you can plug-and-play. It also has a long list of libraries for you to access. Now let us learn how to get the library on to your computer. Ask an adult to help you with this section if you are unable to succeed.
Make a note of the following answers in your inventor’s notebook before downloading the IDE. Get your answers from google or ask an adult.
What is an operating system?
What is the name of the operating system running on your computer?
What is the version of your current operating system?
Is your operating system 32 bit or 64 bit?
What is the name of the Arduino board that you have?
Now that we did our homework, let us start playing!
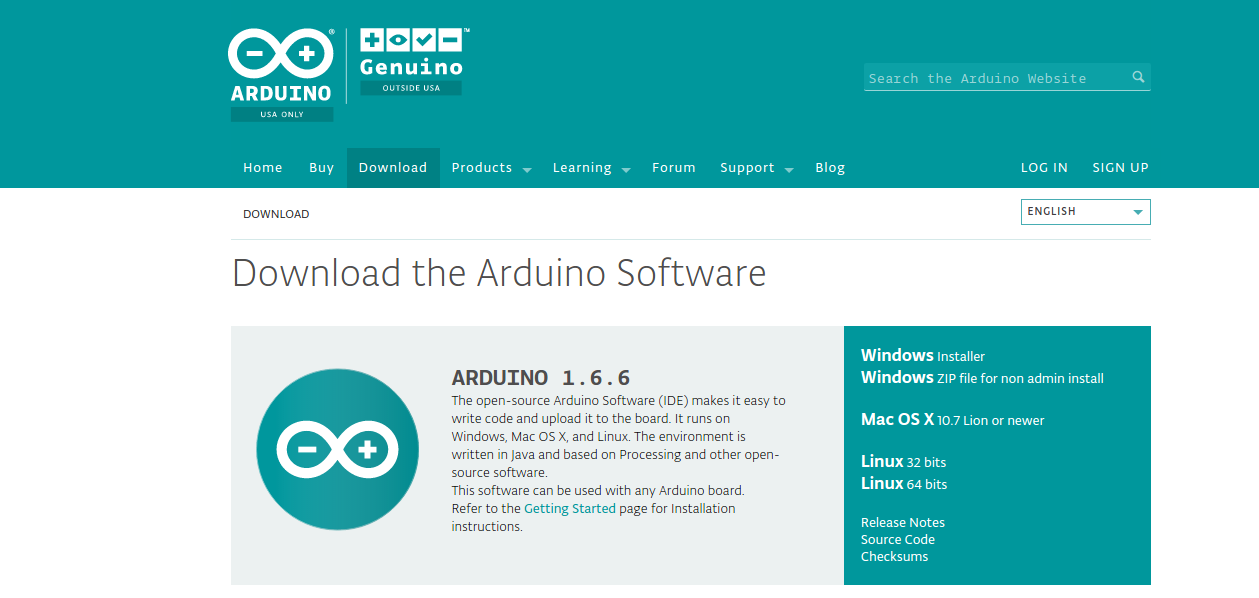
How to download the IDE?
Let us now, go further and understand how to download something that’s going to be our playground. I am sure you’d be eager to see the place you’ll be working in for building new and interesting stuff!
For those of you wanting to learn and do everything my themselves, open any browser and search for “Arduino IDE” followed by the name of your operating system with “32 bits” or “64 bits” as learnt in the previous section. Click to download the latest version and install!
Else, the step-by-step instructions are here:
- Open your browser (Firefox, Chrome, Safari)(Insert image of the logos of firefox, chrome and safari)
- Go to www.arduino.ccas shown in the following screenshot

- Click on the ‘Download’ section of the homepage, which is the third option from your left as shown in the following screenshot.

- From the options, locate the name of your operating system, click on the right version (32 bits or 64 bits) Then click on ‘Just Download’ after the new page appears.
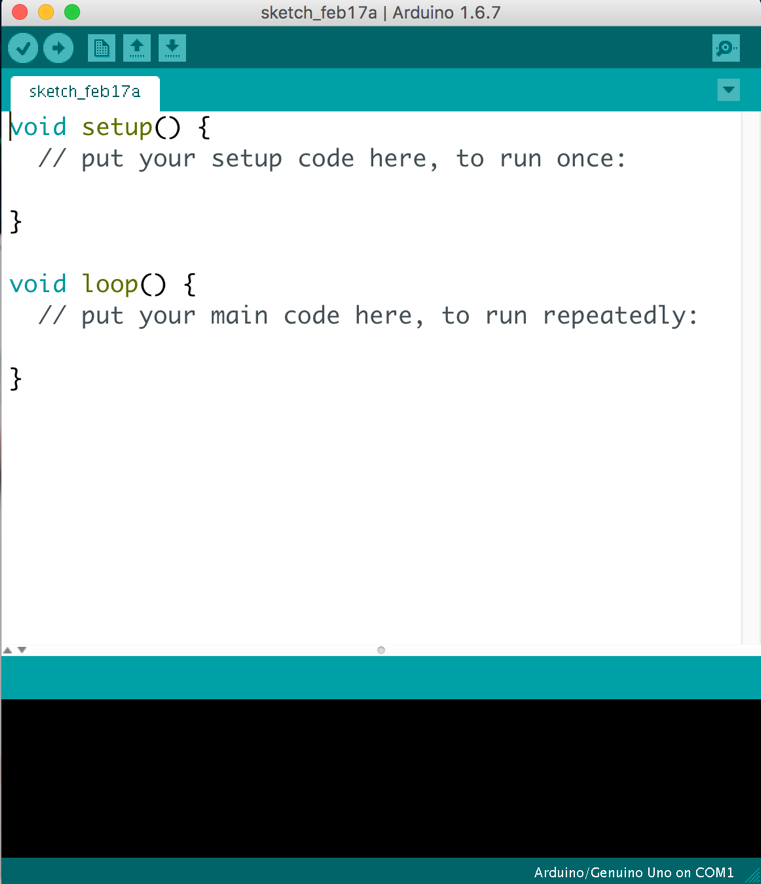
- After clicking on the desired link and saving the files, you should be able to ‘double click’ on the Arduino icon and install the software. If you have managed to install successfully, you should see the following screens. If not, go back to step 1 and follow the procedure again. The next screenshot shows you how the program will look like when it is loading.
This is how the IDE looks when no code is written into it.
Your first program
Now that you have your IDE ready and open, it is time to start exploring. As promised before, the Arduino IDE comes with many examples, libraries, and helping tools to get curious minds such as you to get started soon. Let us now look at how you can access your first program via the Arduino IDE.
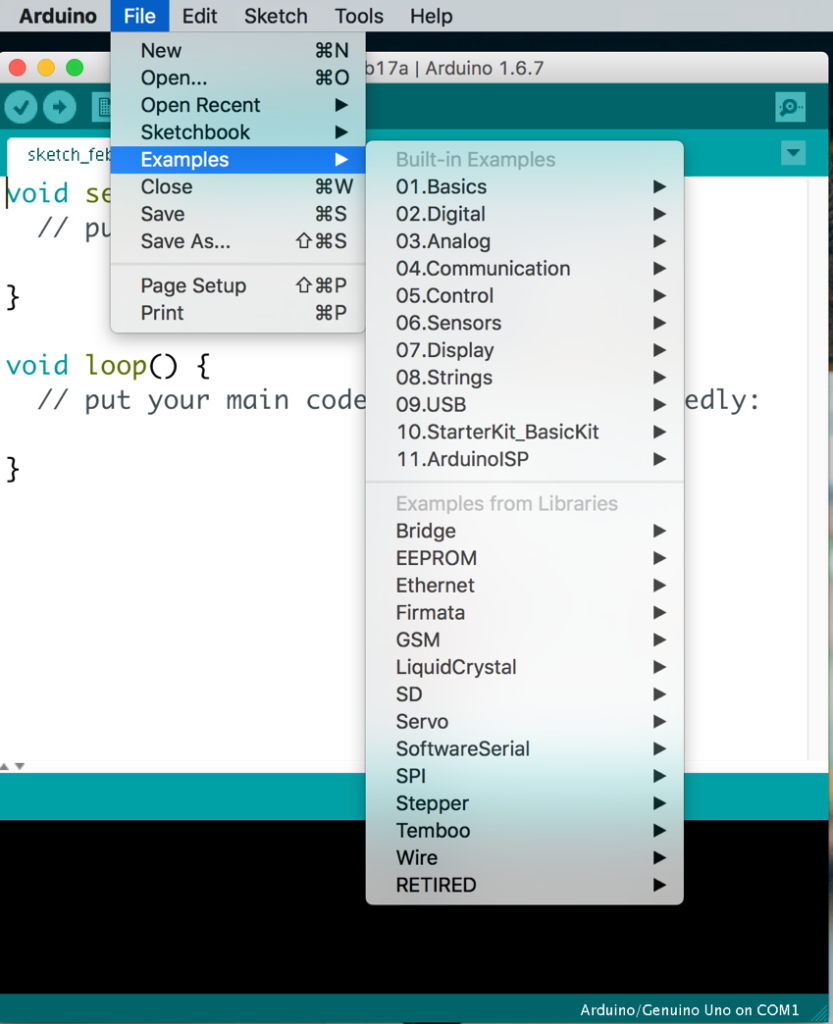
A large number of examples can be accessed in the File > Examples option as shown in the following screenshot.
Just like we all have nicknames in school, a program, written in in processing is called a ‘sketch’. Whenever you write any program for Arduino, it is important that you save your work. Programs written in processing are saved with the extension .ino
The name .ino is derived from the last 3 letters of the word ArduINO.
What are the other extensions are you aware of? (Hint: .doc, .ppt etc) Make a note in your inventor’s notebook.
Now ask yourself why do so many extensions exist. An extension gives the computer, the address of the software which will open the file, so that when the contents are displayed, it makes sense.
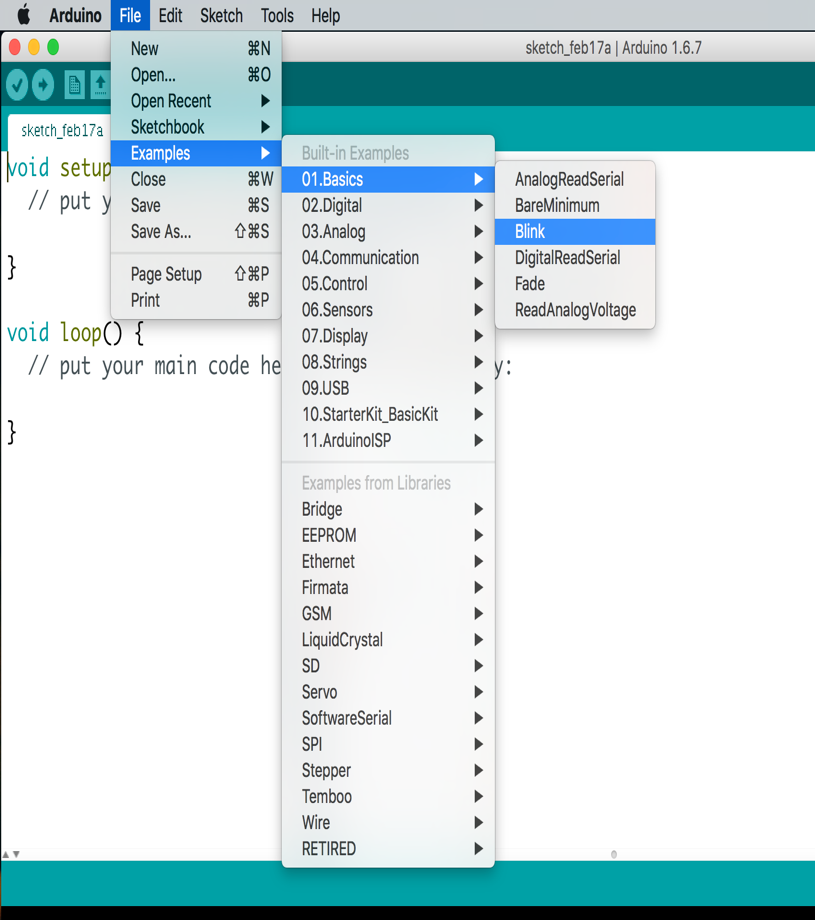
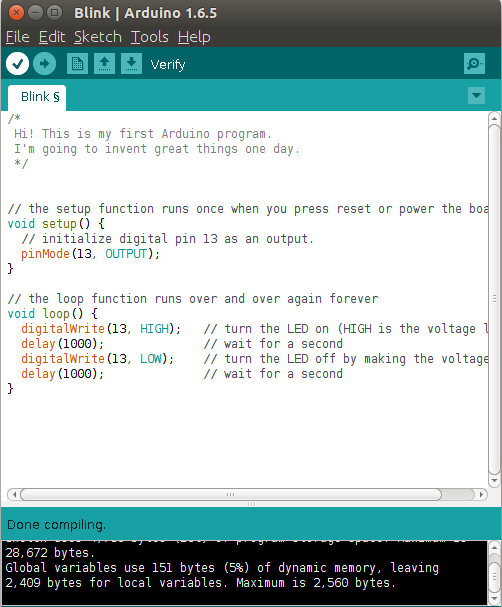
As we learnt above, that the program written in the Arduino IDE is called a ‘Sketch’. Your first sketch is named ‘blink’. What does it do? Well, it makes your Arduino blink! For now, we can concentrate on the code.
Click on File | Examples | Basics | Blink. Refer to next image for this.
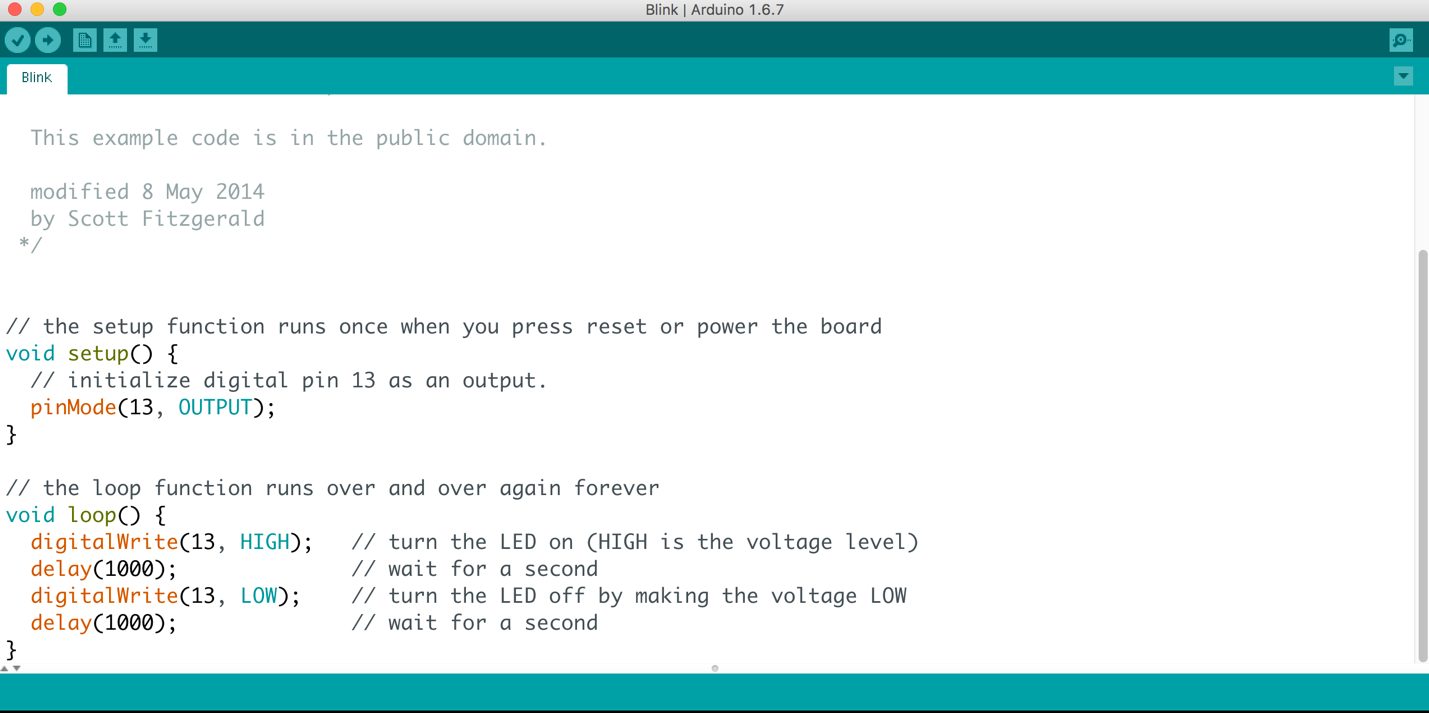
When you load an example sketch, this is how it would look like. In the image below you will be able to identify the structure of code, recall the meaning of functions and integers from the previous section.
We learnt that the Arduino IDE is a compiler too! After opening your first example, we can now learn how to hide information from the compiler. If you want to insert any extra information in plain English, you can do so by using symbols as following.
/* your text here*/
OR
// your text here
Comments can also be individually inserted above lines of code, explaining the functions. It is good practice to write comments, as it would be useful when you are visiting back your old code to modify at a later date.
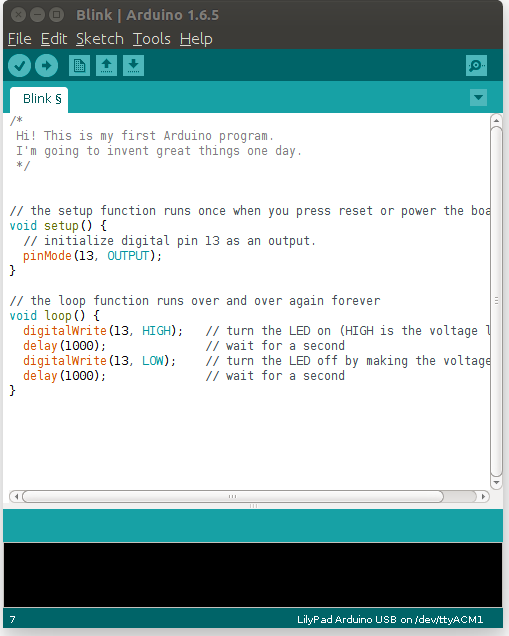
Try editing the contents of the comment section by spelling out your name. The following screenshot will show you how your edited code will look like.
Verifying your first sketch
Now that you have your first complete sketch in the IDE, how do you confirm that your micro-controller with understand?
You do this, by clicking on the easy to locate Verify button with a small ![]() .
.
You will now see that the IDE informs you “Done compiling” as shown in the screenshot below. It means that you have successfully written and verified your first code.
Congratulations, you did it!
Saving your first sketch
As we learnt above, it is very important to save your work. We now learn the steps to make sure that your work does not get lost.
Now that you have your first code inside your IDE, click on File > SaveAs.
The following screenshot will show you how to save the sketch.
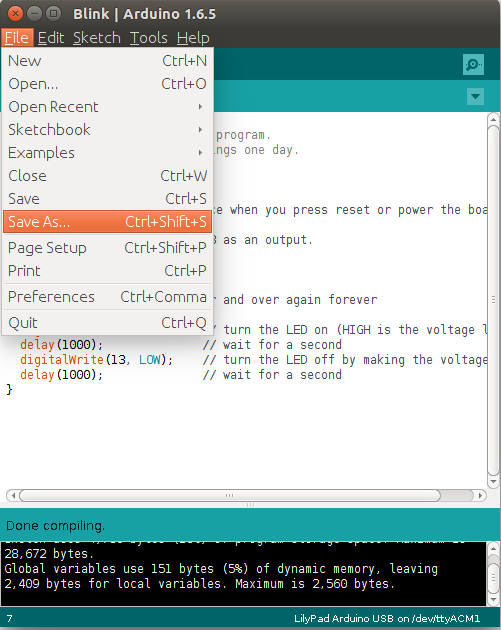
Give an appropriate name to your project file, and save it just like you would save your files from Paintbrush, or any other software that you use.
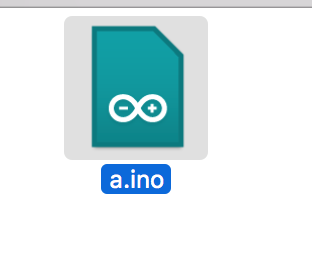
The file will be saved in a .ino format.
Accessing your first sketch
Open the folder where you saved the sketch. Double click on the .ino file. The program will open in a new window of IDE.
The following screen shot has been taken from a Mac Os, the file will look different in a Linux or a Windows system.
Summary
Now we know about systems and how logic is used to solve problems. We can write and modify simple code. We also know the basics of Arduino IDE and studied how to verify, save and access your program.
Resources for Article:
Further resources on this subject:
- Getting Started with Arduino [article]
- Connecting Arduino to the Web [article]
- Functions with Arduino [article]