What you will do
In this article, you will:
- Create a team
- Add Roles to support the team
- Define new Node Content types
- Configure permissions to support the Roles
- Handle a former (and disgruntled) team member
The Creative team
Let's take a quick look at Drupal's jargon regarding teams.
- Users—the logins of the individuals that make up a team
- Roles—the different 'job descriptions' based on a person's responsibilities
- Permissions—the granting of authorization to perform a Drupal function
As the system administrator, you are authorized to perform any action within the Drupal environment, but you would not want every member of a team to have this absolute capability, or else you would soon have chaos.
Let's first create a team. Then, we will look at assimilating that team into the Drupal environment.
Our Creative team will be made up of individuals, each having one or more of the responsibilities mentioned below (Note: the titles are not Drupal terms):
- Copy Writers—are the writers of short articles
- Feature Writers—are the writers of long pieces, in which style matters a much as content
- Ad Writers—are the writers of internal and external advertising that will appear in blocks
- Proofreaders—are the reviewers who check pieces for spelling, grammar and usage errors
- Associate Editors—are the reviewers that are concerned with style, readability, and continuity
- Style Editors—are responsible for the formatting of content
- Graphic Artists—are the creators of the illustrations and images that are used as copy
- Senior Editor—is responsible for the quality of all of the above
- Moderator—manages postings by site visitors, such as comments and blog posts
- Blogger—creates blog entries
- Administrator—addresses the aspects of the site unrelated to content
With our team assembled, let's move on to creating the roles in our site.
Roles
Drupal comes with three roles installed: creator (also known as userID1), authenticated user and anonymous user. Only the latter two are listed when assigning permissions, because the creator role can do everything, including things that you might not want the administrator to be able to do. It's best not to use the creator's login as the administrator login. A separate administrator role should be created and granted the appropriate permissions. So, looking at the list above, we will need to create roles for all of our team members. Creating roles in Drupal is a quick and easy process. Let's create them.
Activity 1: Creating Roles
The Name of the role is assigned as per the responsibilities of the team member.
- Login as the administrator.
- Select the User management option.
- Select the Roles option.
- Enter the name of the role in the text box, as shown in the following screenshot, and then click on the Add role button.

- We'll add the rest of the roles in the same way. After a couple of minutes, we have the entire team added, as seen in following screenshot.
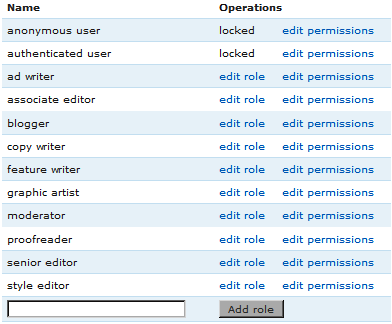
The edit role links are locked for anonymous user and authenticated user, because those roles should remain constant and never be edited or deleted.
Node Content types
The default installation of Drupal contains two Node Content types namely: Page and Story. Some modules, when activated, create additional Node Content types. One such example is the Blog entry, and another is an Event, which is used when using an event calendar.
We're using the term Node Content to differentiate content nodes in Drupal, such as Pages and Stories, from other non-node types of content, such as Blocks, which is the generic term for anything on the page.
What is the purpose of having different Node Content types? If we want a feature writer to be able to create Features, then how do we accomplish that?
Currently, we have Stories and Pages as our Node Content types. So, if we give the Feature writer the ability to create a Page, then what differentiates that Page from any other Page on our site? If we consider a Page as a Feature, then anyone who can create a Page has created a Feature, but that's not right, because not every Page is a Feature.
Activity 2: Node Content for our Roles
Because we have role types that we want to limit to working with their respective Node Content types, we will need to create those Node Content types. We will assign a Node Content type of Feature for Feature Writers, Ads for Ad Writers, and so on. Let's create them.
- From the admin menu, we'll select Content management.
- On the Content management page, we'll choose Content types.
- The Node Content types are listed, and from the top of the page we'll select Add content type.

- We're going to start with the Feature writer, so in the Name field we'll enter Feature.
- The next field, Type, determines the term that will be used to construct the default URL for this Node Content type. We'll enter feature as the text value for this field.
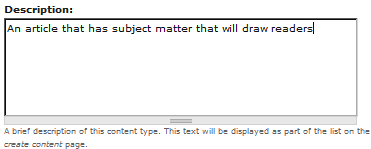
- In the Description field, we'll enter a short description, which will appear next to the Node Content type's link on the admin page, as follows:
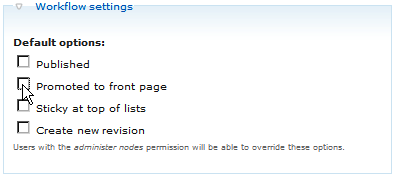
- Next, we'll click on the Workflow settings link to display the additional workflow fields. When our Feature Writer completes a piece, it will not be published immediately. It will have to be proofread and undergo an editorial review. So, we'll deselect the Published and Promote to front page boxes.
- At this point we've configured the new Node Content type as per our needs, so we'll click on the Save button, and then we can see it listed, as shown in the screenshot below.

We already have a Node Content type of Blog entry, which was created by the Blog module. The only other Role that requires its own Node Content type is the Ad Writer. This is because the other Roles defined will only edit existing Node Content, as opposed to creating it. It is here that we run into trouble.
The pieces that are 'grabbed' by Drupal to appear (usually) at the center of the screen, which we have been referring to as Node Content, are nodes, whether a Page, a Story, or now a Feature. The small blocks that appear around the sides, or on top, or at the bottom, are Blocks. Because they are placed in those positions, and are not available for selection as Node Content, they are not nodes.
The Benefit of Blocks
When looking at a typical web page of a CMS site, you will see a main body area with Node Content, such as articles, and also small blocks of information elsewhere on the page, such as in the left and right margins, or along the top or bottom. The main content, nodes, are limited, as to where they appear. However, each of the blocks can be configured to appear on any or every page of the site. That is why ads are best created as blocks, so that they can be placed where they will be the most effective.
Nodes are created via the Create content function, and that function is available from the front page to anyone who is granted the permission. Using the admin menu is not necessary. On the other hand, blocks are created and edited from the Block page, which is an admin function.
Although we can grant that capability to a user without granting any other admin capabilities, it would be much better if we could have an Ad Writer create ads in the same way that they create other Node Content. The reason for this is that with nodes, separate permission can be given to create a node and to administer a node. With blocks, there is only one permission. You can create, edit, delete, and rearrange all of the blocks, or none. This opens the door to an accidental disaster. We don't want the Ad Writer doing anything but creating ad copy.
Unlock access to the largest independent learning library in Tech for FREE!
Get unlimited access to 7500+ expert-authored eBooks and video courses covering every tech area you can think of.
Renews at $19.99/month. Cancel anytime
So, in order to address this concern, we've added a module to our site: Node blocks. This module allows us designate a Node Content type (other than Page and Story) to be used as a Block. With that in mind, let's create our final Node Content type.
Where can you find this module? This module, as well as other modules, can be found at http://drupal.org/project/modules.
Activity 3—creating a Block Node Content type
We'll start by repeating Steps 1 to 3 from the previous activity.
- In the Title field, we'll type in Ad.
- In the Type field, we'll type in ad.
- For the description, we'll enter Advertisement copy that will be used as blocks.
- We'll click on Workflow settings and deselect Published and Promoted to front page, as we did with the Feature.
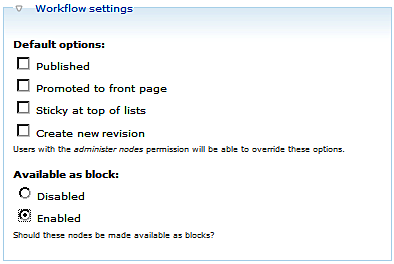
- There is a new heading in this dialog, Available as Block, as seen in the following screenshot. This comes from the module that we've added. We'll select Enabled, which will make any piece created with this Node Content type available as a Block.
- That's all we need to do, so now we'll save our new Node Content type
Permissions
The way that we enable one user to do something that the other cannot is by creating different user types (which we have done), different Node Content types—where necessary—(which again has been done), and then assign permissions to the user types (which we'll do now).
The administrator will not be listed as a user type under Permissions, because if permissions were accidentally removed from the administrator, there might be no other user type that has the permissions to restore them.
Activity 4: Granting Permissions
Let's now assign to the members of the Creative team the Permissions that suit them best.
- From the admin menu we'll select User management.
- On the User management page we'll choose Permissions.

- The screenshot below shows us the upper portion of the screen. There are numerous permissions, and we now have numerous User types, so the resulting grid is very large. Rather than step-by-step illustrations, I'll simply list each Role and the Permissions that should be enabled in the form of Heading→Permission.
- Ad Writer
- node module→access content
- node module→create ad content
- node module→delete any ad content
- node module→delete own ad content
- node module→edit any ad content
- node module→edit own ad content
- node module→view revisions
- fckeditor module→access fckeditor
Because of the number of Node Content types, each having several permissions as seen above, combined with the permissions being alphabetical by verb within the heading, instead of Content type, the necessary permissions are somewhat distant from each other and require scrolling to find them all.
- Feature Writer
- node module→access content
- node module→create feature content
- node module→delete any feature content
- node module→delete own feature content
- node module→edit any feature content
- node module→edit own feature content
- node module→view revisions
- fckeditor module→access fckeditor
- Blogger
- blog module→create blog entries
- blog module→delete own blog entries
- blog module→edit own blog entries
- node module→access content
- node module→view revisions
- fckeditor module→access fckeditor
- Associate Editor—The Associate Editor is concerned with content, which means editing it. The ability to create or delete content, to affect where the content appears, and so on, is not required for this Role.
- fckeditor module→access fckeditor
- node module→access content
- node module→edit any ad content
- node module→edit any feature content
- node module→edit any page content
- node module→edit any story content
- node module→revert revisions
- node module→view revisions
- path module→create URL aliases
- Copy Writer
- fckeditor module→access fckeditor
- node module→access content
- node module→create page content
- node module→create story content
- node module→delete own page content
- node module→delete own story content
- node module→edit own page content
- node module→edit own story content
- node module→view revisions
- Graphic Artist
- blog module→edit any blog entry
- fckeditor module→access fckeditor
- fckeditor module→allow fckeditor fle uploads
- node module→access content
- node module→edit any ad content
- node module→edit any feature content
- node module→edit any page content
- node module→edit any story content
- Moderator
- blog module→edit any blog entry
- comment module→access comments
- comment module→administer comments
- fckeditor module→access fckeditor
- node module→access content
- node module→edit any ad content
- node module→edit any feature content
- node module→edit any page content
- node module→edit any story content
- Proofreader
- blog module→edit any blog entry
- fckeditor module→access fckeditor
- node module→access content
- node module→edit any ad content
- node module→edit any feature content
- node module→edit any page content
- node module→edit any story content
- Style Editor
- block module→administer blocks
- fckeditor module→access fckeditor
- fckeditor module→allow fckeditor fle uploads
- node module→access content
- node module→edit any ad content
- node module→edit any feature content
- node module→edit any page content
- node module→edit any story content
- Senior Editor
- block module→administer blocks
- blog module→delete any blog entry
- blog module→edit any blog entry
- comment module→access comments
- comment module→administer comments
- fckeditor module→access fckeditor
- fckeditor module→allow fckeditor fle upload
- node module→access content
- node module→delete any ad content
- node module→delete any feature content
- node module→delete any page content
- node module→delete any story content
- node module→delete revisions
- node module→edit any ad content
- node module→edit any feature content
- node module→edit any page content
- node module→edit any story content
- node module→revert revisions
- node module→view revisions
- path module→create URL aliases
- view module→access all views
- view module→administer views
With that, we have assigned the required permissions to all of our team members, which will allow them to do their jobs, but keep them out of trouble! However, what do you do when someone intentionally gets into trouble?
The disgruntled team member
So, we've been marching along as one big happy team, and then it happens. Someone gets let go, and that someone isn't happy about it, to say the least.
Of course, we'll remove that person's login, but there is public access to our site as well, in the form of comments. Is there a way for us to stop this person from looking for ways to annoy us, or worse? Yes!
Activity 5: Blocking
Let's now perform the tasks necessary to keep disgruntled employees (and trouble-makers) at bay.
- From the admin menu, select User management.
- On the User management page, we'll select the Access rules option.
- We'll choose the Add rule option on the Access rules page.
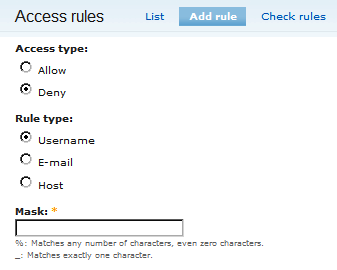
- On the Add rule page, we have the option to deny access to a user, email address, or host.
- The username and email address options will block someone from registering, but will not affect someone already registered.
- The host name will stop anyone with that host name from accessing the system at all.
- Wild cards can be used: % will match any number of characters, and _ will match one character.
- Allow rules can be used to give access to someone who would otherwise be blocked by a host or wild card rule.
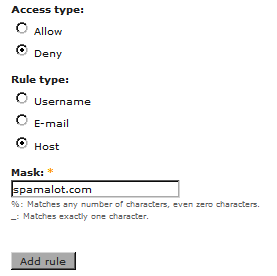
- In our case, let's say that the disgruntled former team member is spamming our comments from a host called spamalot.com, and is doing it from many emails. The first thing we want to do is create a 'deny' rule that will deny access to anyone from that host, as shown in the following figure, and then click on the Add rule button.
- We're also going to create an email deny rule for %@spamalot.com. We shouldn't have to (as we've already denied the host, which in turn would include all of the emails from that host), but we need to, because the rules testing logic ignores that hierarchy at this time.
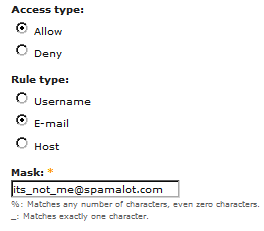
- Let's also say that we've received an email from someone whose email address is its_not_me@spamalot.com, who would like to be a member of our site, and we verify that this person is not our former team member. In such a scenario, we will need to create an Allow rule, as shown in the following screenshot, so that this person can get past our previous Deny rule.
- Our rules now appear, as shown below, when we click on the List button, which is at the top of the page.

- It's always good to check and make certain that we've created the rule(s) correctly. If we don't do this, then we might inadvertently block the wrong users. Let's click on the Check rules tab at the top of the Access rules page.
- In the email box, we'll first try disgruntled@spamalot.com.

- Next, we'll try its_not_me@spamalot.com.

In this last activity we have created some access rules. Drupal uses these access rules to determine who can and cannot access the site. In some cases, you may be having difficulty with a particular user adding comments to your site. Of course, if you set comments to require moderation, then the questionable ones won't appear, but it can still be a pain having to review a steady stream of them. In that case, you can block a specific user. You might be having difficulty with comments from more than one user at a given email domain. You can, if you like, block everyone from that location. On the other hand, your site might be meant for users of a particular domain, perhaps a university. In that case, you can allow users from that domain and only them.
Summary
In this article we learned about:
- Roles—defining types of users
- Permissions—defining capabilities for each role
- Node Content types—as they apply to Roles
- Access Rules—for those pesky, misbehaving users
These features have been explained and learned with the help of activities where we have:
- Created a team
- Added Roles to enable the team
- Defined new Node Content types to suit the requirements of some team members
- Configured permissions to support the Roles and Node Content types
- Handled a former (and disgruntled) team member
 United States
 Great Britain
 India
India
 Germany
 France
 Canada
 Russia
 Spain
Spain
 Brazil
 Australia
 Singapore
 Canary Islands
 Hungary
 Ukraine
 Luxembourg
 Estonia
 Lithuania
 South Korea
 Turkey
 Switzerland
 Colombia
 Taiwan
 Chile
Chile
 Norway
 Ecuador
 Indonesia
 New Zealand
 Cyprus
 Denmark
 Finland
 Poland
 Malta
Malta
 Czechia
 Austria
 Sweden
 Italy
Italy
 Egypt
Egypt
 Belgium
 Portugal
 Slovenia
 Ireland
 Romania
 Greece
 Argentina
 Netherlands
 Bulgaria
 Latvia
 South Africa
 Malaysia
 Japan
Japan
 Slovakia
 Philippines
 Mexico
 Thailand


