The term "social network" means different things to different people. However, the starting point of any network is the individuals within it. A user profile provides a place for site members to describe themselves, and for other site members to find out about them. In this article, we will examine how to create a user profile that is aligned with the goals of your site.
Identifying the Goals of Your Profile
User profiles can be used for a range of purposes. On one end of the spectrum, a profile can be used to store basic information about the user. On the other end of the spectrum, a user profile can be a place for a user to craft and share an online identity. As you create the functionality behind your user profile page, you should know the type of profile you want to create for your users.
Drupal ships with a core Profile module. This module is a great starting point, and for many sites will provide all of the functionality needed.
If, however, you want a more detailed profile, you will probably need to take the next step: building a node-based profile. This involves creating a content type that stores profile information. Node-based profiles offer several practical advantages; these nodes can be extended using CCK fields, and they can be categorized using a taxonomy. In Drupal 6, user profiles become nodes through using the Content Profile module.
The most suitable approach to user profiles will be determined by the goals of your site. Using Drupal's core Profile module provides some simple options that will be easy to set up and use. Extending profiles via the Content Profile module allows for a more detailed profile, but requires more time to set up.
In this article, we will begin by describing how to set up profiles using the core Profile module. Then we will look at how to use the Content Profile module.
Using the Core Profile Module
To use the core profile module, click on the Administer | Site building | Modules link, or navigate to admin/build/modules. In the Core – optional section, enable the Profile module. Click the Save configuration button to submit the form and save the settings.
Once the Profile module has been enabled, you can see a user's profile information by navigating to http://example.com/user/UID, where UID is the user's ID number on the site. To see your own user profile, navigate to http://example.com/user when logged in, or click the My Account link.

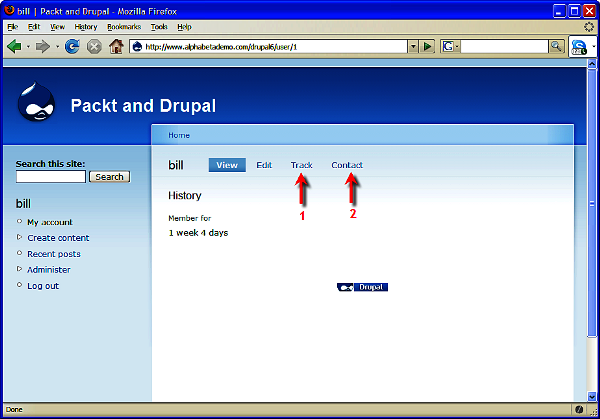
The default user profile page exposes some useful functionality. First, it shows the user's profile, and secondly, it provides the Edit tab that allows a user to edit their profile. The Edit tab will only be visible to the owner of the profile, or to administrative users with elevated permissions.
Unlock access to the largest independent learning library in Tech for FREE!
Get unlimited access to 7500+ expert-authored eBooks and video courses covering every tech area you can think of.
Renews at $19.99/month. Cancel anytime
Other modules can add tabs to the core Profile page. As shown in the preceding screenshot by Item 1, the core Tracker module adds a Track tab; this tab gives an overview of all of the posts to which this user has participated.
As shown in the preceding screenshot by item, the Contact tab has been added by the core Contact module. The Contact module allows users to contact one another via the site.
Customizing the Core Profile
The first step in customizing the user profile requires us to plan what we want the profile to show. By default, Drupal only requires users to create a username and provide an email address. From a user privacy perspective, this is great. However, for a teacher trying to track multiple students across multiple classes, this can be less than useful.
For this sample profile, we will add two fields using the core Profile module: a last name, and a birthday.
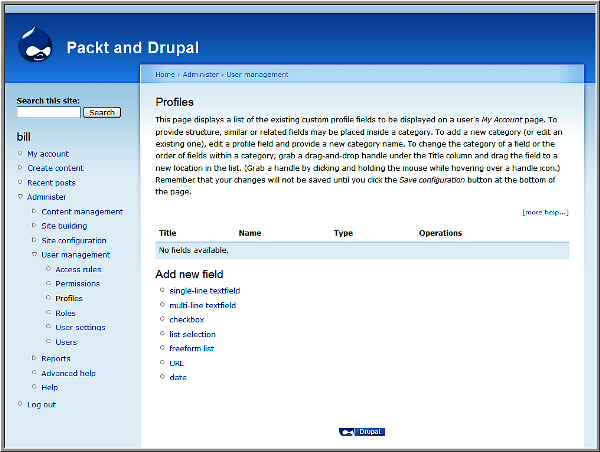
The admin features for the core profile module are accessible via the Administer | User Management | Profiles link, or you can navigate to admin/user/profile.

As seen in the preceding screenshot, the core profile module offers the following possibilities for customization:
- single-line textfield—adds a single line of text; useful for names or other types of brief information.
- multi-line text field—adds a larger textarea field; useful for narrative-type profile information.
- checkbox—adds a checkbox; useful for Yes/No options.
- list selection—allows the site admin to create a set of options; the user can then select from these pre-defined options. Functionally, this is similar to a controlled vocabulary created using the core Taxonomy module.
- freeform list—adds a field where the user can enter a comma-separated list. Functionally, this is similar to a tag-based vocabulary created using the core Taxonomy module.
- URL—allows users to enter a URL; this is useful for allowing users to add a link to their personal blog.
- date—adds a date field.
In our example profile—adding a last name and a birthday—our last name will be a single-line textfield; our birthday will be a date field.
 United States
 Great Britain
 India
India
 Germany
 France
 Canada
 Russia
 Spain
Spain
 Brazil
 Australia
 Singapore
 Canary Islands
 Hungary
 Ukraine
 Luxembourg
 Estonia
 Lithuania
 South Korea
 Turkey
 Switzerland
 Colombia
 Taiwan
 Chile
Chile
 Norway
 Ecuador
 Indonesia
 New Zealand
 Cyprus
 Denmark
 Finland
 Poland
 Malta
Malta
 Czechia
 Austria
 Sweden
 Italy
Italy
 Egypt
Egypt
 Belgium
 Portugal
 Slovenia
 Ireland
 Romania
 Greece
 Argentina
 Netherlands
 Bulgaria
 Latvia
 South Africa
 Malaysia
 Japan
Japan
 Slovakia
 Philippines
 Mexico
 Thailand


