Create optimum page layouts for your documents using productive tools of Scribus.
- Master desktop publishing with Scribus
- Create professional-looking documents with ease
- Enhance the readability of your documents using powerful layout tools of Scribus
- Packed with interesting examples and screenshots that show you the most important Scribus tools to create and publish your documents.
Resizing objects
Well it's time to work on the logo: it's really big and we would like it to be aligned the top part of the card. There are several ways to resize an object or frame.
Resizing with the mouse
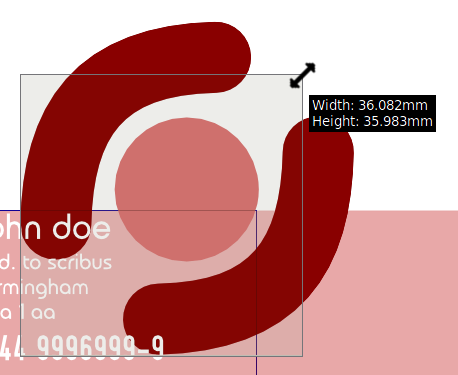
When an object is selected, for example, click on the logo, and you can see a red rectangle outline. This doesn't affect the object properties but only shows that it is selected. There are little red square handles at each corner and at the middle of each side. If the mouse gets over one of these handles, the cursor will change to a double arrow. If you press the left mouse button when the pointer is on one of them and then move the pointer, you'll see the size changing according to the mouse movements. Just release the button when you're done.
While resizing the frame an information box appears near the pointer and displays the new width. You will notice that the proportions of the object are not kept, and that the logo is modified. To avoid this, just press the Ctrl key while dragging the handles and you'll see that the logo will be scaled proportionally.
Resizing with the Properties Palette
As an alternative, you can use the Width and Height fields of the XYZ tab in the Properties Palette. If you need to keep the ratio, be sure that the chain button at the right-hand side of the field is activated.

You can set the size in three ways:
- By scrolling the mouse wheel within the field. Pressing Ctrl or Shift while scrolling will increase or decrease the effect.
- If you already know the size, you can directly write it. This is mostly the case when you have a graphical charter that defines it or when you're already recreating an existing document.
- You can also use the small arrows at the right-hand side of the field (the same modifiers apply as described for the mouse wheel).
Resizing with the keyboard
Another way to resize objects is by using the keyboard. It's useful when you're typing and you need some extra space to put some more text, and that don't want to put your hands on the mouse. In this case, just:
- Press Esc to enter the Layout mode and leave the Content mode
- Press Alt and one of the arrows at the same time
Unlock access to the largest independent learning library in Tech for FREE!
Get unlimited access to 7500+ expert-authored eBooks and video courses covering every tech area you can think of.
Renews at $19.99/month. Cancel anytime
- Press E to go back to Content Edit mode
If you do some tests, you'll find that each arrow controls a side: the left arrow affects the size by moving the left-hand side, the right arrow affects the right-hand side, and so on. You can see that with this method the shape can only grow.
Have a go hero – vector circle style
Since the past two or three years, you might have noticed that shapes are being used in their pure form. For example, check this easy sample and try to reproduce it in the best way you can: copy-paste, moving, and resizing are all you'll need to know.

Scaling objects
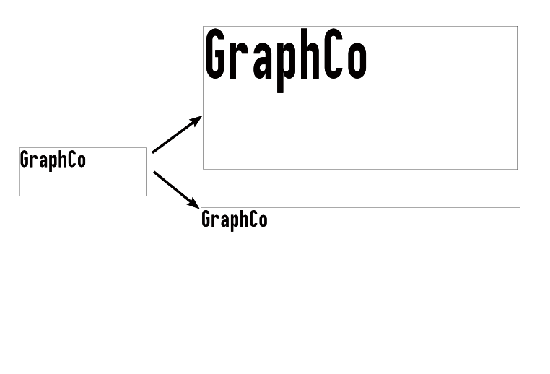
Scaling objects—what can be different here from resizing? Once more, it's on Text Frames that the difference is more evident. Compare the results you can get:

The difference is simple: in the top example the content has been scaled with the frame, and in the second only the frame is scaled. So it's scaling the content. You can scale a Text Frame (with its consent) by pressing the Alt key while resizing with the mouse. The Alt key applies, as always, while the mouse is pressed during the resizing movement.
So did you see something missing in our card?
Time for action – scaling the name of our company
Let's say that our company name is "GraphCo" as in the previous image and that we want to add it to the card.
- Take the Insert Text Frame tool and draw a little frame in the page. An alternative could be clicking on the page instead of dragging.
- Once you've clicked, the Object Size window is displayed and you can set 12mm or so as width, and 6mm as the height. Then click on OK to create the frame.
- Double-click in the frame and type the name of the company.
- Select the text and change the font family to one that you like (here the font is OpenDINSchriftenEngShrift), and decrease the size if the name is not completely visible.
- Scale the frame until it is about 50mm wide. We can fix the width later.
What just happened?
Most of the time, you will use simple resizing instead of scaling. When you want the text to match some area and you don't want to play indefinitely with the font size setting, you may prefer to use the scaling functionality.
Using the scale options makes it very easy to resize the frame and the text visually without trying to find the best font size in pt, which can sometimes be quite long.
 United States
 Great Britain
 India
India
 Germany
 France
 Canada
 Russia
 Spain
Spain
 Brazil
 Australia
 Singapore
 Canary Islands
 Hungary
 Ukraine
 Luxembourg
 Estonia
 Lithuania
 South Korea
 Turkey
 Switzerland
 Colombia
 Taiwan
 Chile
Chile
 Norway
 Ecuador
 Indonesia
 New Zealand
 Cyprus
 Denmark
 Finland
 Poland
 Malta
Malta
 Czechia
 Austria
 Sweden
 Italy
Italy
 Egypt
Egypt
 Belgium
 Portugal
 Slovenia
 Ireland
 Romania
 Greece
 Argentina
 Netherlands
 Bulgaria
 Latvia
 South Africa
 Malaysia
 Japan
Japan
 Slovakia
 Philippines
 Mexico
 Thailand


