Introduction
The ACT! program provides two different types of reports: Quick reports and Standard reports.
The standard report requires that a template be prepared in advance. The template may be brand new, an existing template, or a modified version of an existing template. While the standard report's template design is very flexible, it does require significant effort to design and organize the template. For complex reporting needs or reports that are frequently required, the standard reports are the best.
This article shows how to run the various quick reports available in the ACT! program. You'll be shown how to set up, control headers and footers and run the various quick reports. The ease of creating a quick report makes them ideal for single use reports. The configuration of a quick report can't be saved so if a quick report configuration is frequently required, you should consider creating a standard report template instead.
The ACT! Demo database is used for the tasks in this article.
Setting preferences for the quick reports
The preferences for all the quick reports can be individually set in the ACT! general preferences. Unless blocked, they can be set at the time you run the quick report. Here we will set the preferences for the contact list quick reports.
Getting ready
Because we are setting global preferences, there isn't any preparation required other than to have an ACT! database open.
How to do it...
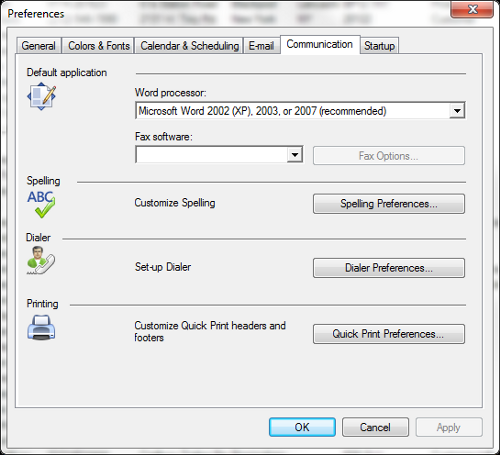
- From any screen in the ACT! program, click on the Tools menu and choose Preferences....
- In the Preferences dialog, click on the Communication tab.
- In the Printing section, click on the Quick Print Preferences... button.
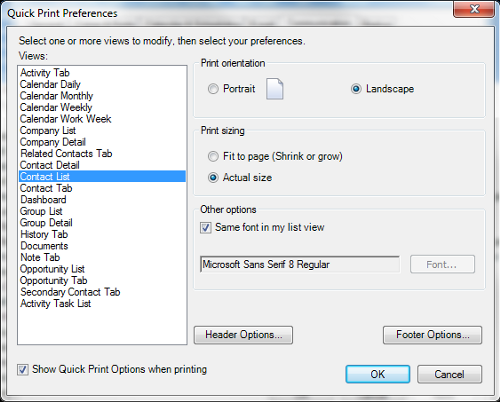
- In the Views section, select Contact List.
- For Print orientation, click on the radio button for Landscape.
- For Print sizing, click on the radio button for Actual size.
- For Other options, check Same font in my list view.
- Check Show Quick Print Options when printing.
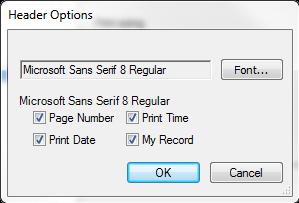
- Click the Header Options button.
- Check Page Number, Print Date, Print Time, and My Record.
- Click OK.
Unlock access to the largest independent learning library in Tech for FREE!
Get unlimited access to 7500+ expert-authored eBooks and video courses covering every tech area you can think of.
Renews at $19.99/month. Cancel anytime
- Click Footer Options button.
- Uncheck all options and click OK.
- Click OK to close the Quick Print Preferences dialog.
- Click OK to close the Preferences dialog.
How it works...
At this point, we are setting the general options for the Quick Print reports. In the Quick Print Preferences dialog Views section, all of the possible Quick Print report possibilities are shown and each can be configured separately. This task used the Contact List Quick Report as an example. The Portrait - Landscape option determines the orientation of the printed report. As a general rule the Print Sizing option should be set to actual size because the fit to page option shrinks the report both horizontally and vertically to fit on one page. Used with the Contact List Quick Report could result in a final report that was not legible. The font selection would most likely be the same as used on the contact list view, but it does provide for changing the desired font. The header and footer options are the same and typically one or the other would be used but not both. The My record option prints the name of the user running the report. The Show Quick Print options when printing allow for adjusting the report options when running the report. Unchecked, the report will go directly to the printer.
There's more...
The Quick Reports don't provide any means for setting the page margins. While the Fit to page option should typically be set to Actual size for a list view Quick Report, you will likely want to use the Fit to page option when doing a Quick Print of a detail view.
Selecting and organizing the columns for a Contact List Quick Report
In this task, we continue working with the Contact List Quick Report. The contact list is able to display all the fields in the contact table. While possible, in most cases this would be impractical. To create a meaningful report you need to decide which fields you want to show in the report. Because you will be printing the contact list, make sure the contact list is showing the fields that you want and that they are arranged in the desired order. In this task we will set up a name and address list.
Getting ready
There isn't any preparation required for the Contact List Quick Report other than having an ACT! database open.
How to do it...
- In the navigation bar, on the right-hand side of the screen, click on Contacts.
- In the tool bar, click on List View button.
- Anywhere in the List View, right-click and select Customize Columns....
- In the Customize Columns dialog, add fields to the list by clicking in the desired field in the Available fields box and then clicking the top arrow button (points right >).
- Remove unwanted fields by clicking on the field in the Show as columns in this order box and then clicking on the second from the top arrow button (points left <).
- Adjust the order of the fields by clicking on a field in the Show as columns in this order box and click on the Move Up or Move Down buttons to move the field to the desired location.
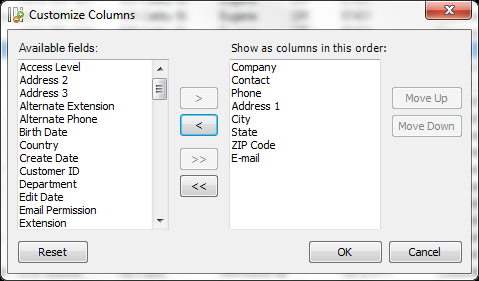
- Click the OK button to close and save the field configuration.
- In the title bar of the contact list, point the cursor to the division between columns and the cursor becomes a double ended arrow.
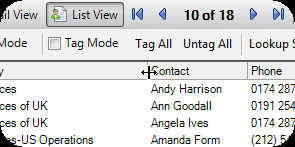
- Drag the division line to adjust the column width.
- Adjust the remaining columns in the same manner.
How it works...
Because the Quick Reports are basically screen image reports, it's necessary to make the screen look the way you want the report to look. For the Contact List Quick Report (and most list reports) this requires selecting the fields (columns) that you want in the report and arranging and sizing them so they look the way you want them to look on the printed report. The Customize Columns dialog provides the mechanism for selecting the fields to include and to position them in the desired order. Sizing the columns is a bit harder. The columns divisions can be dragged to widen or narrow a column. The column being sized is the column to the left of the column division.
There's more...
The Quick Reports don't provide any means for directly filtering the output. The best means of filtering the contacts included in the Contact List Quick Report is to use a lookup of the contacts to include in the report. You can also apply a simple sort on the contact list by clicking on the column title of the column you want to use for sorting. Each time you click on the column title, you reverse the sort order.
 United States
 Great Britain
 India
India
 Germany
 France
 Canada
 Russia
 Spain
Spain
 Brazil
 Australia
 Singapore
 Canary Islands
 Hungary
 Ukraine
 Luxembourg
 Estonia
 Lithuania
 South Korea
 Turkey
 Switzerland
 Colombia
 Taiwan
 Chile
Chile
 Norway
 Ecuador
 Indonesia
 New Zealand
 Cyprus
 Denmark
 Finland
 Poland
 Malta
Malta
 Czechia
 Austria
 Sweden
 Italy
Italy
 Egypt
Egypt
 Belgium
 Portugal
 Slovenia
 Ireland
 Romania
 Greece
 Argentina
 Netherlands
 Bulgaria
 Latvia
 South Africa
 Malaysia
 Japan
Japan
 Slovakia
 Philippines
 Mexico
 Thailand


