RESTful Web Service Mocking and Testing with SoapUI, RAML, and a JSON Slurper Script Assertion
Read more
RESTful Web Service Mocking and Testing with SoapUI, RAML, and a JSON Slurper Script Assertion
Packt
900 min read
2015-02-26 00:00:00
0 Likes
0 Comments
In this article written by Rupert Anderson, the author of SoapUI Cookbook, we will cover the following topics:
Installing the SoapUI RAML plugin
Generating a SoapUI REST project and mock service using the RAML plugin
Testing response values using JSON Slurper
As you might already know, despite being called SoapUI, the product actually has an excellent RESTful web service mock and testing functionality. Also, SoapUI is very open and extensible with a great plugin framework. This makes it relatively easy to use and develop plugins to support APIs defined by other technologies, for example RAML (http://raml.org/) and Swagger (http://swagger.io/). If you haven't seen it before, RESTful API Modeling Language or RAML is a modern way to describe RESTful web services that use YAML and JSON standards. As a brief demonstration, this article uses the excellent SoapUI RAML plugin to:
Generate a SoapUI REST service definition automatically from the RAML definition
Generate a SoapUI REST mock with an example response automatically from the RAML definition
Create a SoapUI TestSuite, TestCase, and TestStep to call the mock
Assert that the response contains the values we expect using a Script Assertion and JSON Slurper to parse and inspect the JSON content
This article assumes that you have used SoapUI before, but not RAML or the RAML plugin. If you haven't used SoapUI before, then you can still give it a shot, but it might help to first take a look at Chapters 3 and 4 of the SoapUI Cookbook or the Getting Started, REST, and REST Mocking sections at http://www.soapui.org/.
(For more resources related to this topic, see here.)
Installing the SoapUI RAML plugin
This recipe shows how to get the SoapUI RAML plugin installed and checked.
Getting ready
We'll use SoapUI open source version 5.0.0 here. You can download it from http://www.soapui.org/ if you need it.
First, we'll download the plugin, install it, restart SoapUI, and check whether it's available:
Download the RAML plugin zip file from sourceforge using the preceding link. It should be called soapui-raml-plugin-0.4-plugin-dist.zip.
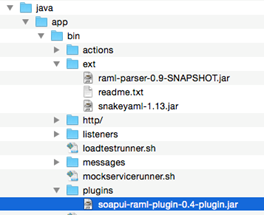
To install the plugin, if you're happy to, you can simply unzip the plugin zip file to <SoapUI Home>/java/app/bin; this will have the same effect as manually performing the following steps:
Create a plugins folder if one doesn't already exist in <SoapUI Home>/java/app/bin/plugins.
Copy the soapui-raml-plugin-0.4-plugin.jar file from the plugins folder of the expanded zip file into the plugins folder.
Copy the raml-parser-0.9-SNAPSHOT.jar and snakeyaml-1.13.jar files from the ext folder of the expanded zip file into the <SoapUI Home>/java/app/bin/ext folder.
The resulting folder structure under <SoapUI Home>/java/app/bin should now be something like:
If SoapUI is running, we need to restart it so that the plugin and dependencies are added to its classpath and can be used, and check whether it's available.
When SoapUI has started/restarted, we can confirm whether the plugin and dependencies have loaded successfully by checking the SoapUI tab log:
INFO:Adding [/Applications/SoapUI-5.0.0.app/Contents/Resources/app/bin/ext/raml-parser-0.9-SNAPSHOT.jar] to extensions classpath
INFO:Adding [/Applications/SoapUI-5.0.0.app/Contents/Resources/app/bin/ext/snakeyaml-1.13.jar] to extensions classpath
INFO:Adding plugin from [/Applications/SoapUI-5.0.0.app/Contents/java/app/bin/plugins/soapui-raml-plugin-0.4-plugin.jar]
To check whether the new RAML Action is available in SoapUI, we'll need a workspace and a project:
Create a new SoapUI Workspace if you don't already have one, and call it RESTWithRAML.
In the new Workspace, create New Generic Project; just enter Project Name of Invoice and click on OK.
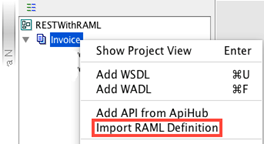
Finally, if you right-click on the created Invoice project, you should see a menu option of Import RAML Definition as shown in the following screenshot:
How it works...
In order to concentrate on using RAML with SoapUI, we won't go into how the plugin actually works. In very simple terms, the SoapUI plugin framework uses the plugin jar file (soapui-raml-plugin-0.4-plugin.jar) to load the standard Java RAML Parser (raml-parser-0.9-SNAPSHOT.jar) and the Snake YAML Parser (snakeyaml-1.13.jar) onto SoapUI's classpath and run them from a custom menu Action.
If you have Java skills and understand the basics of SoapUI extensions, then many plugins are quite straightforward to understand and develop. If you would like to understand how SoapUI plugins work and how to develop them, then please refer to Chapters 10 and 11 of the SoapUI Cookbook. You can also take a look at Ole Lensmar's (plugin creator and co-founder of SoapUI) RAML Plugin blog and plugin source code from the following links.
There's more...
If you read more on SoapUI plugins, one thing to be aware of is that open source plugins are now termed "old-style" plugins in the SoapUI online documentation. This is because the commercial SoapUI Pro and newer SoapUI NG versions of SoapUI feature an enhanced plugin framework with Plugin Manger to install plugins from a plugin repository (see http://www.soapui.org/extension-plugins/plugin-manager.html). The new Plugin Manager plugins are not compatible with open source SoapUI, and open source or "old-style" plugins will not load using the Plugin Manager.
See also
More information on using and understanding various SoapUI plugins can be found in Chapter 10, Using Plugins of the SoapUI Cookbook
More information on how to develop SoapUI extensions and plugins can be found in Chapter 11, Taking SoapUI Further of the SoapUI Cookbook
Generating a SoapUI REST service definition and mock service using the RAML plugin
In this section, we'll use the SoapUI RAML plugin to set up a SoapUI REST service definition, mock service, and example response using an RAML definition file. This recipe assumes you've followed the previous one to install the RAML plugin and create the SoapUI Workspace and Project.
Getting ready
For this recipe, we'll use the following simple invoice RAML definition:
This RAML definition describes the following RESTful service endpoint and resource:http://localhost:8080/v1.0/invoice/{id}.
The definition also provides example JSON invoice content (shown highlighted in the preceding code).
Unlock access to the largest independent learning library in Tech for FREE!
Get unlimited access to 7500+ expert-authored eBooks and video courses covering every tech area you can think of.
Renews at $19.99/month. Cancel anytime
How to do it...
First, we'll use the SoapUI RAML plugin to generate the REST service, resource, and mock for the Invoice project created in the previous recipe. Then, we'll get the mock running and fire a test REST request to make sure it returns the example JSON invoice content provided by the preceding RAML definition:
To generate the REST service, resource, and mock using the preceding RAML definition:
Right-click on the Invoice project created in the previous recipe and select Import RAML Definition.
Create a file that contains the preceding RAML definition, for example, invoicev1.raml.
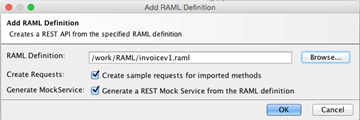
Set RAML Definition to the location of invoicev1.raml.
Check the Generate MockService checkbox.
The Add RAML Definition window should look something like the following screenshot; when satisfied, click on OK to generate.
If everything goes well, you should see the following log messages in the SoapUI tab:
Importing RAML from [file:/work/RAML/invoicev1.raml]
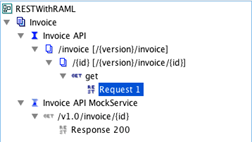
CWD:/Applications/SoapUI-5.0.0.app/Contents/java/app/bin Also, the Invoice Project should now contain the following:
An Invoice API service definition.
An invoice resource.
A sample GET request (Request 1).
An Invoice API MockService with a sample response (Response 200) that contains the JSON invoice content from the RAML definition. See the following screenshot:
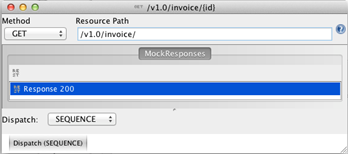
Before using the mock, we need to tweak Resource Path to remove the {id}, which is not a placeholder and will cause the mock to only respond to requests to /v1.0/invoice/{id} rather than /v1.0/invoice/12345 and so on. To do this:
Double-click on Invoice API MockService.
Double-click on the GET /v1.0/invoice/{id} action and edit the Resource Path as shown in the following screenshot:
Start the mock. It should now publish the endpoint at http://localhost:8080/v1.0/invoice/and respond to the HTTP GET requests.
Now, let's set up Request 1 and fire it at the mock to give it a quick test:
Double-click on Request 1 to edit it.
Under the Request tab, set Value of the id parameter to 12345.
Click on the green arrow to dispatch the request to the mock.
All being well, you should see a successful response, and under the JSON or RAW tab, you should see the JSON invoice content from the RAML definition, as shown in the following screenshot:
How it works...
Assuming that you're familiar with the basics of SoapUI projects, mocks, and test requests, the interesting part will probably be the RAML Plugin itself. To understand exactly what's going on in the RAML plugin, we really need to take a look at the source code on GitHub. A very simplified explanation of the plugin functionality is:
The plugin contains a custom SoapUI ActionImportRamlAction.java. SoapUI Actions define menu-driven functionality so that when Import RAML Definition is clicked, the custom Action invokes the main RAML import functionality in RamlImporter.groovy.
The RamlImporter.groovy class:
Loads the RAML definition and uses the Java RAML Parser (see previous recipe) to build a Java representation of the definition.
This Java representation is then traversed and used to create and configure the SoapUI framework objects (or Model items), that is, service definition, resource, mock, and its sample response.
Once the plugin has done its work, everything else is standard SoapUI functionality!
There's more...
As you might have noticed under the REST service's menu or in the plugin source code, there are two other RAML menu options or Actions:
Export RAML: This generates an RAML file from an existing SoapUI REST service; for example, you can design your RESTful API manually in a SoapUI REST project and then export an RAML definition for it.
Update from RAML definition: Similar to the standard SOAP service's Update Definition, you could use this to update SoapUI project artifacts automatically using a newer version of the service's RAML definition.
To understand more about developing custom SoapUI Actions, Model items, and plugins, Chapters 10 and 11 of the SoapUI Cookbook should hopefully help, as also the SoapUI online docs:
Model Items: http://www.soapui.org/scripting---properties/the-soapui-object-model.html
See also
The blog article of the creator of the RAML plugin and the cofounder of SoapUI can be found at http://olensmar.blogspot.se/2013/12/a-raml-apihub-plugin-for-soapui.html
The RAML plugin source code can be found at https://github.com/olensmar/soapui-raml-plugin
There are many excellent RAML tools available for download at http://raml.org/projects.html
For more information on SoapUI Mocks, see Chapter 3, Developing and Deploying Dynamic REST and SOAP Mocks of the SoapUI Cookbook
Testing response values using JsonSlurper
Now that we have a JSON invoice response, let's look at some options of testing it:
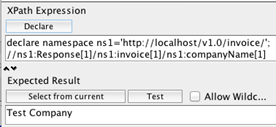
XPath: Because of the way SoapUI stores the response, it is possible to use XPath Assertions, for example, to check whether the company is "Test Company":
We could certainly use this approach, but to me, it doesn't seem completely appropriate to test JSON values!
JSONPath Assertions (SoapUI Pro/NG only): The commercial versions of SoapUI have several types of JSONPath Assertion. This is a nice option if you've got it, but we'll only use open source SoapUI for this article.
Script Assertion: When you want to assert something in a way that isn't available, there's always the (Groovy) Script Assertion option!
In this recipe, we'll use option 3 and create a Script Assertion using JsonSlurper (http://groovy.codehaus.org/gapi/groovy/json/JsonSlurper.html) to parse and assert the invoice values that we expect to see in the response.
How to do it..
First, we'll need to add a SoapUI TestSuite, TestCase, and REST Test RequestTestStep to our invoice project. Then, we'll add a new Script Assertion to TestStep to parse and assert that the invoice response values are according to what we expect.
Right-click on the Invoice API service and select New TestSuite and enter a name, for example, TestSuite.
Right-click on the TestSuite and select New TestCase and enter a name, for example, TestCase.
Right-click on TestCase:
Select Add TestStep | REST Test Request.
Enter a name, for example, Get Invoice.
When prompted to select REST method to invoke for request, choose Invoice API -> /{id} -> get -> Request 1.
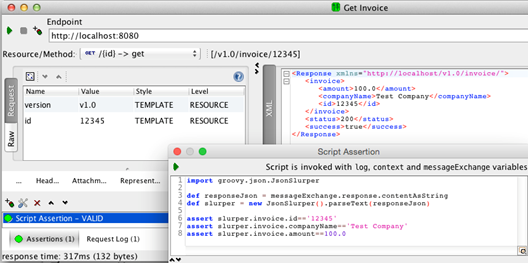
This should create a preconfigured REST Test Request TestStep, like the one in the following screenshot.
JsonSlurper is packaged as a part of the standard groovy-all-x.x.x,jar that SoapUI uses, so there is no need to add any additional libraries to use it in Groovy scripts. However, we do need an import statement for the JsonSlurper class to use it in our Script Assertion, as it is not part of the Groovy language itself.
Similar to Groovy TestSteps, Script Assertions have access to special variables that SoapUI populates and passes in when Assertion is executed. In this case, we use the messageExchange variable to obtain the response content as a JSON String. Then, JsonSlurper is used to parse the JSON String into a convenient object model for us to query and use in standard Groovy assert statements.
There's more
Another very similar option would have been to create a Script Assertion to use JsonPath (https://code.google.com/p/json-path/). However, since JsonPath is not a standard Groovy library, we would have needed to add its JAR files to the <SoapUI home>/java/app/bin/ext folder, like the RAML Parser in the previous recipe.
See also
You may also want to check the response for JSON schema compliance. For an example of how to do this, see the Testing response compliance using JSON schemas recipe in Chapter 4, Web Service Test Scenarios of the SoapUI Cookbook.
To understand more about SoapUI Groovy scripting, the SoapUI Cookbook has numerous examples explained throughout its chapters, and explores many common use-cases when scripting the SoapUI framework.
In this article, you learned about installing the SoapUI RAML plugin, generating a SoapUI REST project and mock service using the RAML plugin, and testing response values using JSON Slurper.

 United States
 Great Britain
 India
India
 Germany
 France
 Canada
 Russia
 Spain
Spain
 Brazil
 Australia
 Singapore
 Canary Islands
 Hungary
 Ukraine
 Luxembourg
 Estonia
 Lithuania
 South Korea
 Turkey
 Switzerland
 Colombia
 Taiwan
 Chile
Chile
 Norway
 Ecuador
 Indonesia
 New Zealand
 Cyprus
 Denmark
 Finland
 Poland
 Malta
Malta
 Czechia
 Austria
 Sweden
 Italy
Italy
 Egypt
Egypt
 Belgium
 Portugal
 Slovenia
 Ireland
 Romania
 Greece
 Argentina
 Netherlands
 Bulgaria
 Latvia
 South Africa
 Malaysia
 Japan
Japan
 Slovakia
 Philippines
 Mexico
 Thailand