


Sometimes, you end up creating a whole new page, or a whole new app, just to see what your component can do on its own. This can be a painful process and, which is why Storybook exists in React. With Storybook, you’re automating a sandboxed environment to work with. It also handles all the build steps, so you can write a story for your components and see the result.
In this article we are going to use the Storybook add-ons, which you can test on any aspect of your component before worrying about integrating it in your application. To be specific we are going to look at Actions, which is a by default add-on in Storybook.
This React tutorial is an extract from the book React 16 Tools written by Adam Boduch. Adam Boduch has been involved with large-scale JavaScript development for nearly 10 years. He has practical experience with real-world software systems, and the scaling challenges they pose.
Working with Actions in React Storybook
The Actions add-on is enabled in your Storybook by default. The idea with Actions is that once you select a story, you can interact with the rendered page elements in the main pane. Actions provide you with a mechanism that logs user interactions in the Storybook UI. Additionally, Actions can serve as a general- purpose tool to help you monitor data as it flows through your components.
Let’s start with a simple button component:
import React from 'react';

const MyButton = ({ onClick }) => (

<button onClick={onClick}>My Button</button>

);

export default MyButton;
The MyButton component renders a button element and assigns it an onClick event handler. The handler is actually defined by MyComponent; it’s passed in as a prop. So let’s create a story for this component and pass it an onClick handler function:
import React from 'react';

import { storiesOf } from '@storybook/react'; import { action } from '@storybook/addon-actions'; import MyButton from '../MyButton';

storiesOf('MyButton', module).add('clicks', () => (

<MyButton onClick={action('my component clicked')} />

));
Do you see the action() function that’s imported from @storybook/addon-actions? This is a higher-order function—a function that returns another function. When you call action(‘my component clicked’), you’re getting a new function in return. The new function behaves kind of like console.log(), in that you can assign it a label and log arbitrary values. The difference is that functions created by the Storybook action() add-on function is that the output is rendered right in the actions pane of the Storybook UI:
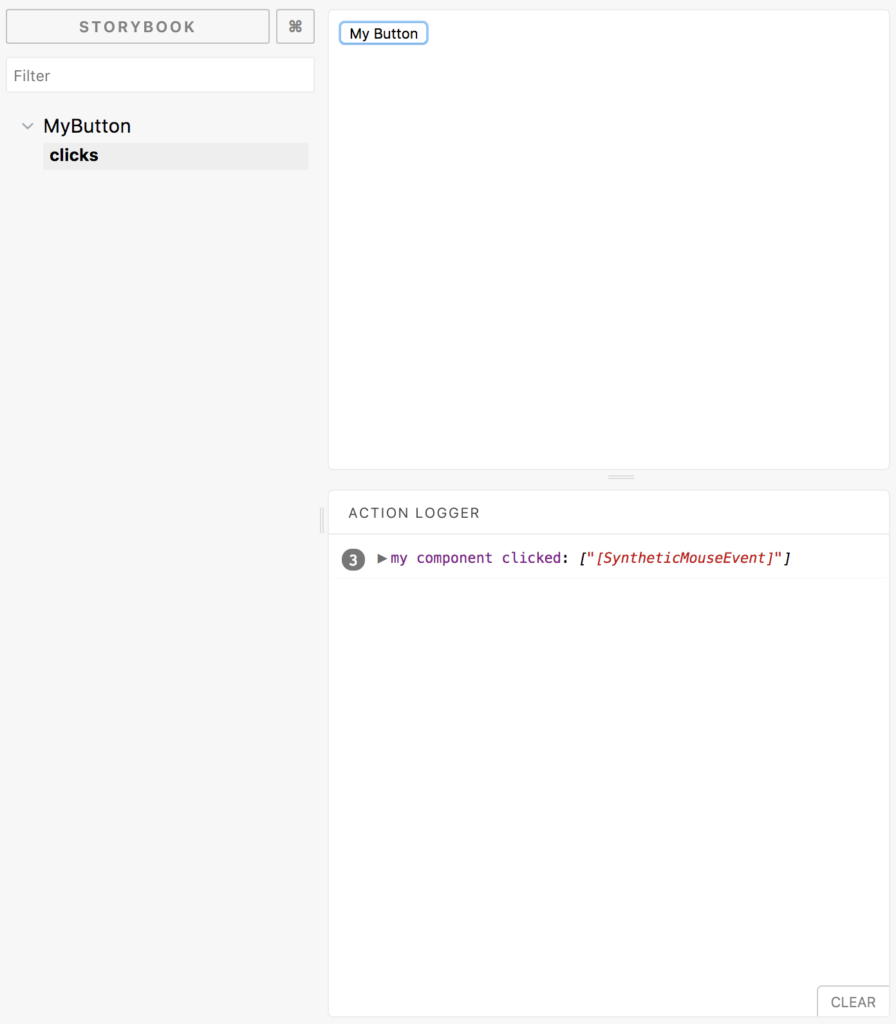
As usual, the button element is rendered in the main pane. The content that you’re seeing in the actions pane is the result of clicking on the button three times. The output is the exact same with every click, so the output is all grouped under the my component clicked label that you assigned to the handler function.
In the preceding example, the event handler functions that action() creates are useful for as a substitute for actual event handler functions that you would pass to your components. Other times, you actually need the event handling behavior to run. For example, you have a controlled form field that maintains its own state and you want to see what happens as the state changes.
For cases like these, I find the simplest and most effective approach is to add event handler props, even if you’re not using them for anything else. Let’s take a look at an example of this:
import React, { Component } from 'react';

class MyRangeInput extends Component { static defaultProps = {

onChange() {},

onRender() {}

};

state = { value: 25 };

onChange = ({ target: { value } }) => { this.setState({ value }); this.props.onChange(value);

};
render() {
const { value } = this.state; this.props.onRender(value); return (
<input
type="range" min="1" max="100" value={value}
onChange={this.onChange}
/>
);
}
}
export default MyRangeInput;Let’s start by taking a look at the defaultProps of this component. By default, this component has two default handler functions for onChange and onRender—these do nothing so that if they’re not set, they can still be called and nothing will happen. As you might have guessed, we can now pass action() handlers to MyRangeInput components. Let’s try this out. Here’s what your stories/index.js looks like now:
import React from 'react';

import { storiesOf } from '@storybook/react'; import { action } from '@storybook/addon-actions'; import MyButton from '../MyButton';

import MyRangeInput from '../MyRangeInput';

storiesOf('MyButton', module).add('clicks', () => (

<MyButton onClick={action('my component clicked')} />

));

storiesOf('MyRangeInput', module).add('slides', () => (

<MyRangeInput

onChange={action('range input changed')} onRender={action('range input rendered')}

/>

));
Now when you view this story in the Storybook UI, you should see lots of actions logged when you slide the range input slider:
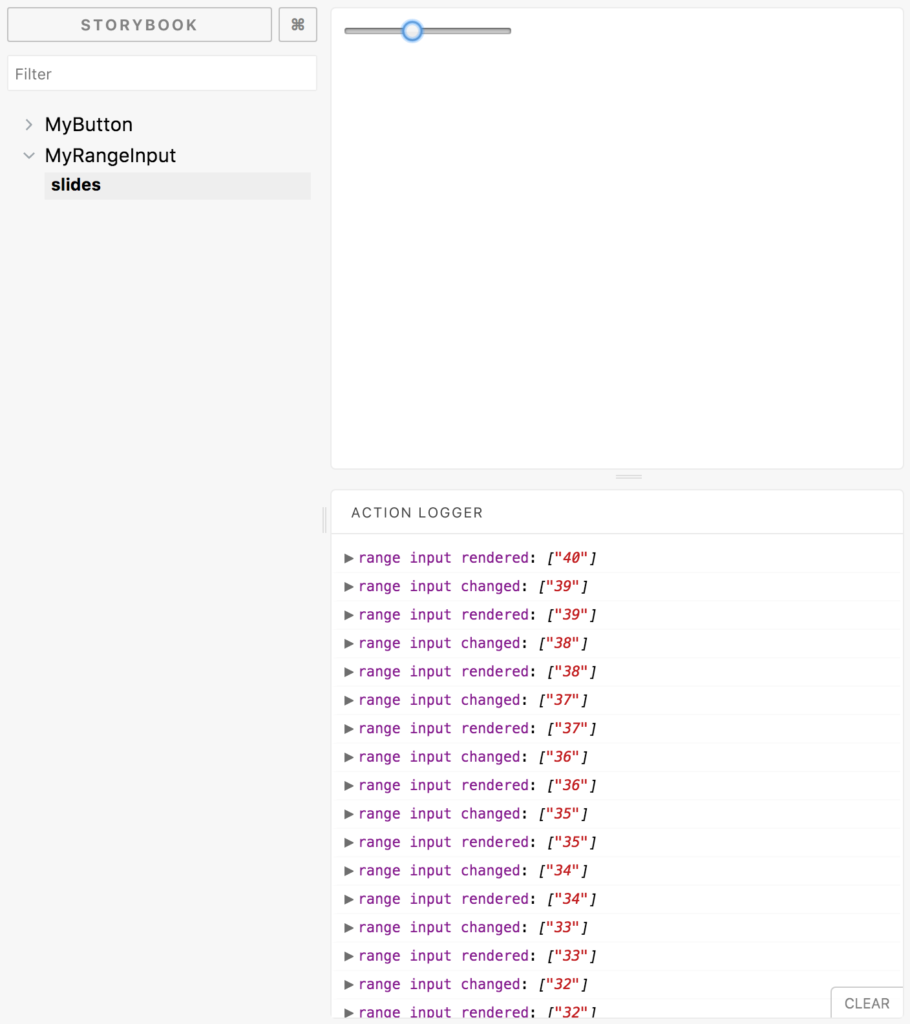
As the slider handle moves, you can see the two event handler functions that you’ve passed to the component are logging the value at different stages of the component rendering life cycle. The most recent action is logged at the top of the pane, unlike browser dev tools which logs the most recent value at the bottom.
Let’s revisit the MyRangeInput code for a moment. The first function that’s called when the slider handle moves is the change handler:
onChange = ({ target: { value } }) => { this.setState({ value }); this.props.onChange(value);

};
This onChange() method is internal to MyRangeInput. It’s needed because the input element that it renders uses the component state as the single source of truth. These are called controlled components in React terminology. First, it sets the state of the value using the target.value property from the event argument. Then, it calls this.props.onChange(), passing it the same value. This is how you can see the even value in the Storybook UI.
Note that this isn’t the right place to log the updated state of the component. When you call setState(), you have to make the assumption that you’re done dealing with state in the function because it doesn’t always update synchronously. Calling setState() only schedules the state update and the subsequent re-render of your component.
Here’s an example of how this can cause problems. Let’s say that instead of logging the value from the event argument, you logged the value state after setting it:
There’s a bit of a problem here now. The onChange handler is logging the old state while the onRender handler is logging the updated state. This sort of logging output is super confusing if you’re trying to trace an event value to rendered output—things don’t line up! Never log state values after calling setState().
If the idea of calling noop functions makes you feel uncomfortable, then maybe this approach to displaying actions in Storybook isn’t for you. On the other hand, you might find that having a utility to log essentially anything at any point in the life cycle of your component without the need to write a bunch of debugging code inside your component. For such cases, Actions are the way to go.
To summarize, we learned about Storybook add-on Actions. We saw it help with logging and the links provide a mechanism for navigation beyond the default.
Grab the book React 16 Tooling today. This book covers the most important tools, utilities, and libraries that every React developer needs to know — in detail.
Read Next:
What is React.js and how does it work?
Is React Native is really Native framework?
React Native announces re-architecture of the framework for better performance


