(For more resources related to this topic, see here.)
Queuing chain pattern
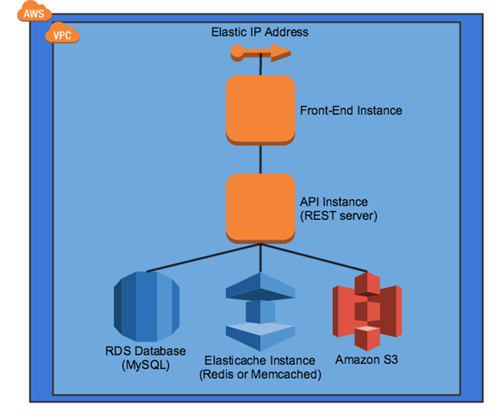
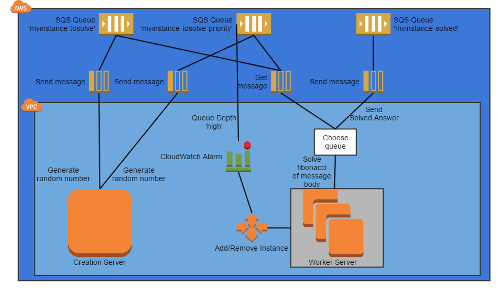
In the queuing chain pattern, we will use a type of publish-subscribe model (pub-sub) with an instance that generates work asynchronously, for another server to pick it up and work with. This is described in the following diagram:
The diagram describes the scenario we will solve, which is solving fibonacci numbers asynchronously. We will spin up a Creator server that will generate random integers, and publish them into an SQS queue myinstance-tosolve. We will then spin up a second instance that continuously attempts to grab a message from the queue myinstance-tosolve, solves the fibonacci sequence of the numbers contained in the message body, and stores that as a new message in the myinstance-solved queue.
This scenario is very basic as it is the core of the microservices architectural model. In this scenario, we could add as many worker servers as we see fit with no change to infrastructure, which is the real power of the microservices model.
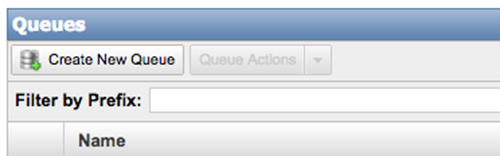
The first thing we will do is create a new SQS queue. From the SQS console select Create New Queue.
From the Create New Queue dialog, enter myinstance-tosolve into the Queue Name text box and select Create Queue.
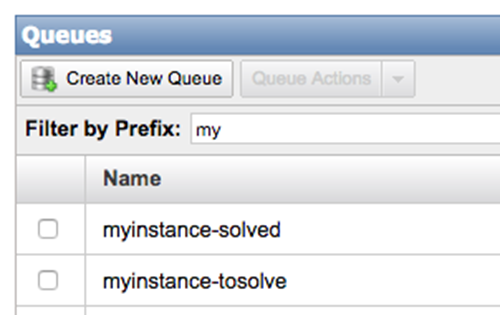
This will create the queue and bring you back to the main SQS console where you can view the queues created. Repeat this process, entering myinstance-solved for the second queue name. When complete, the SQS console should list both the queues.
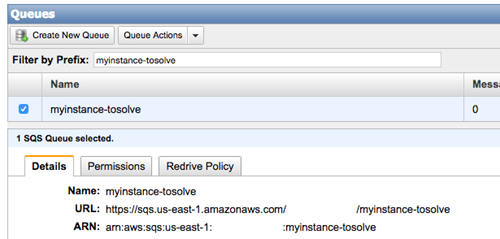
In the following code snippets, you will need the URL for the queues. You can retrieve them from the SQS console by selecting the appropriate queue, which will bring up an information box. The queue URL is listed as URL in the following screenshot:
Next, we will launch a creator instance, which will create random integers and write them into the myinstance-tosolve queue via its URL noted previously. From the EC2 console, spin up an instance as per your environment from the AWS Linux AMI. Once it is ready, SSH into it (note that acctarn, mykey, and mysecret need to be replaced with your actual credentials):
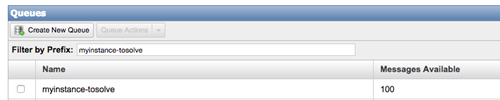
Once the snippet completes, we should have 100 messages in the myinstance-tosolve queue, ready to be retrieved.
Now that those messages are ready to be picked up and solved, we will spin up a new EC2 instance: again as per your environment from the AWS Linux AMI. Once it is ready, SSH into it (note that acctarn, mykey, and mysecret need to be valid and set to your credentials):
[ec2-user@ip-10-203-10-169 ~]$ [[ -d ~/.aws ]] && rm -rf ~/.aws/config || mkdir ~/.aws [ec2-user@ip-10-203-10-169 ~]$ echo $'[default]naws_access_key_id=mykey naws_secret_access_key=mysecretnregion=us-east-1' > .aws/config [ec2-user@ip-10-203-10-169 ~]$ sudo yum install -y ruby-devel gcc >/dev/ null 2>&1 [ec2-user@ip-10-203-10-169 ~]$ sudo gem install json >/dev/null 2>&1 [ec2-user@ip-10-203-10-169 ~]$ cat <<EOF | sudo tee -a /usr/local/bin/ fibsqs >/dev/null 2>&1 #!/bin/sh while [ true ]; do function fibonacci { a=1 b=1 i=0 while [ $i -lt $1 ] do printf "%dn" $a let sum=$a+$b let a=$b let b=$sum let i=$i+1 done } message=$(aws sqs receive-message --queue-url https://queue.amazonaws. com/acctarn/myinstance-tosolve) if [[ -n $message ]]; then body=$(echo $message | ruby -e "require 'json'; p JSON.parse(gets) ['Messages'][0]['Body']" | sed 's/"//g') handle=$(echo $message | ruby -e "require 'json'; p JSON. parse(gets)['Messages'][0]['ReceiptHandle']" | sed 's/"//g') aws sqs delete-message --queue-url https://queue.amazonaws.com/ acctarn/myinstance-tosolve --receipt-handle $handle echo "Solving '${body}'." solved=$(fibonacci $body) parsed_solve=$(echo $solved | sed 's/n/ /g') echo "'${body}' solved." aws sqs send-message --queue-url https://queue.amazonaws.com/acctarn/ myinstance-solved --message-body "${parsed_solve}" fi sleep 1 done EOF [ec2-user@ip-10-203-10-169 ~]$ sudo chown ec2-user:ec2-user /usr/local/ bin/fibsqs && chmod +x /usr/local/bin/fibsqs
There will be no output from this code snippet yet, so now let's run the fibsqs command we created. This will continuously poll the myinstance-tosolve queue, solve the fibonacci sequence for the integer, and store it into the myinstance-solved queue:
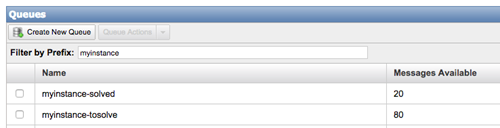
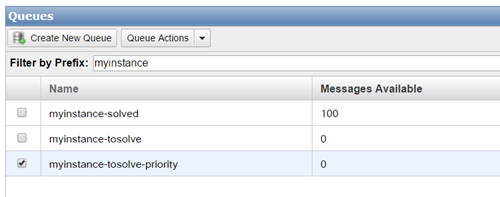
While this is running, we can verify the movement of messages from the tosolve queue into the solved queue by viewing the Messages Available column in the SQS console.
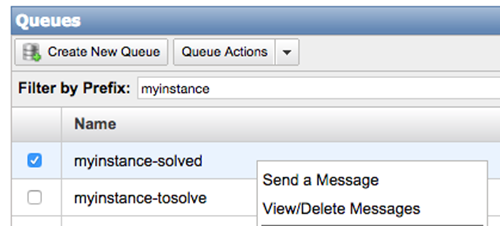
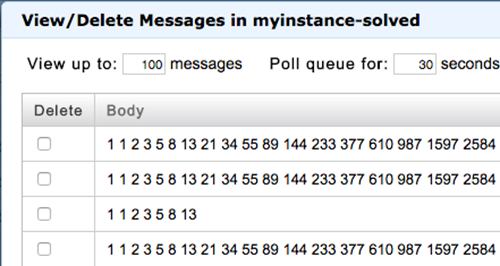
This means that the worker virtual machine is in fact doing work, but we can prove that it is working correctly by viewing the messages in the myinstance-solved queue. To view messages, right click on the myinstance-solved queue and select View/Delete Messages.
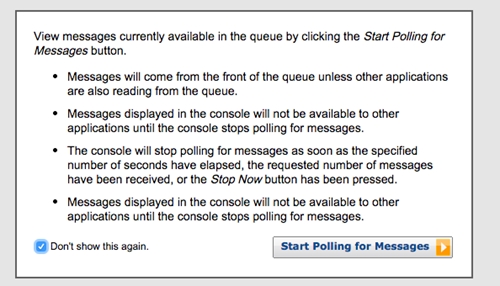
If this is your first time viewing messages in SQS, you will receive a warning box that displays the impact of viewing messages in a queue. Select Start polling for Messages.
From the View/Delete Messages in myinstance-solved dialog, select Start Polling for Messages. We can now see that we are in fact working from a queue.
Job observer pattern
The previous two patterns show a very basic understanding of passing messages around a complex system, so that components (machines) can work independently from each other. While they are a good starting place, the system as a whole could improve if it were more autonomous. Given the previous example, we could very easily duplicate the worker instance if either one of the SQS queues grew large, but using the Amazon-provided CloudWatch service we can automate this process. Using CloudWatch, we might end up with a system that resembles the following diagram:
Unlock access to the largest independent learning library in Tech for FREE!
Get unlimited access to 7500+ expert-authored eBooks and video courses covering every tech area you can think of.
Renews at $19.99/month. Cancel anytime
For this pattern, we will not start from scratch but directly from the previous priority queuing pattern. The major difference between the previous diagram and the diagram displayed in the priority queuing pattern is the addition of a CloudWatch alarm on the myinstance-tosolve-priority queue, and the addition of an auto scaling group for the worker instances.
The behavior of this pattern is that we will define a depth for our priority queue that we deem too high, and create an alarm for that threshold. If the number of messages in that queue goes beyond that point, it will notify the auto scaling group to spin up an instance. When the alarm goes back to OK, meaning that the number of messages is below the threshold, it will scale down as much as our auto scaling policy allows.
Before we start, make sure any worker instances are terminated.
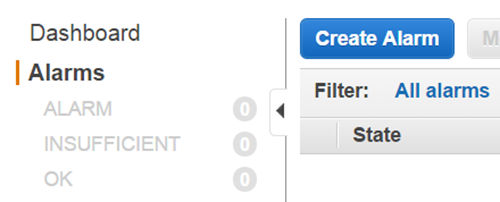
The first thing we should do is create an alarm. From the CloudWatch console in AWS, click Alarms on the side bar and select Create Alarm.
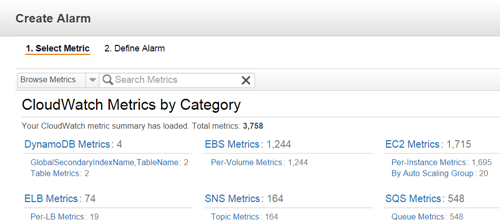
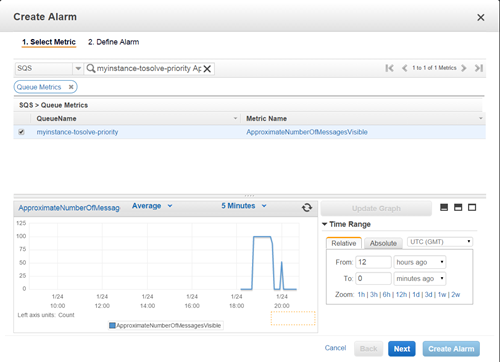
From the new Create Alarm dialog, select Queue Metrics under SQS Metrics.
This will bring us to a Select Metric section. Type myinstance-tosolve-priority ApproximateNumberOfMessagesVisible into the search box and hit Enter. Select the checkbox for the only row and select Next.
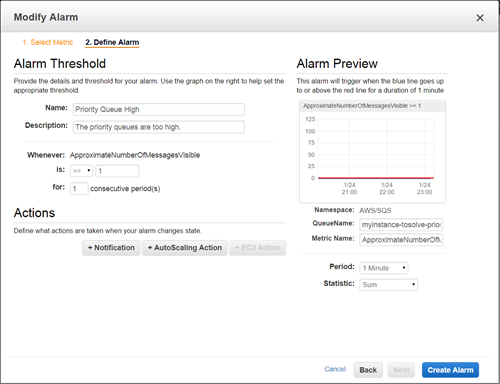
From the Define Alarm, make the following changes and then select Create Alarm:
In the Name textbox, give the alarm a unique name.
In the Description textbox, give the alarm a general description.
In the Whenever section, set 0 to 1.
In the Actions section, click Delete for the only Notification.
In the Period drop-down, select 1 Minute.
In the Statistic drop-down, select Sum.
Now that we have our alarm in place, we need to create a launch configuration and auto scaling group that refers this alarm.
Create a new launch configuration from the AWS Linux AMI with details as per your environment. However, set the user data to (note that acctarn, mykey, and mysecret need to be valid):
#!/bin/bash [[ -d /home/ec2-user/.aws ]] && rm -rf /home/ec2-user/.aws/config || mkdir /home/ec2-user/.aws echo $'[default]naws_access_key_id=mykeynaws_secret_access_ key=mysecretnregion=us-east-1' > /home/ec2-user/.aws/config chown ec2-user:ec2-user /home/ec2-user/.aws -R cat <<EOF >/usr/local/bin/fibsqs #!/bin/sh function fibonacci { a=1 b=1 i=0 while [ $i -lt $1 ] do printf "%dn" $a let sum=$a+$b let a=$b let b=$sum let i=$i+1 done } number="$1" solved=$(fibonacci $number) parsed_solve=$(echo $solved | sed 's/n/ /g') aws sqs send-message --queue-url https://queue.amazonaws.com/acctarn/ myinstance-solved --message-body "${parsed_solve}" exit 0 EOF chown ec2-user:ec2-user /usr/local/bin/fibsqs chmod +x /usr/local/bin/fibsqs yum install -y libxml2 libxml2-devel libxslt libxslt-devel gcc ruby-devel >/dev/null 2>&1 gem install nokogiri -- --use-system-libraries >/dev/null 2>&1 gem install shoryuken >/dev/null 2>&1 cat <<EOF >/home/ec2-user/config.yml aws: access_key_id: mykey secret_access_key: mysecret region: us-east-1 # or <%= ENV['AWS_REGION'] %> receive_message: attributes: - receive_count - sent_at concurrency: 25, # The number of allocated threads to process messages. Default 25 delay: 25, # The delay in seconds to pause a queue when it's empty. Default 0 queues: - [myinstance-tosolve-priority, 2] - [myinstance-tosolve, 1] EOF cat <<EOF >/home/ec2-user/worker.rb class MyWorker include Shoryuken::Worker shoryuken_options queue: 'myinstance-tosolve', auto_delete: true def perform(sqs_msg, body) puts "normal: #{body}" %x[/usr/local/bin/fibsqs #{body}] end end class MyFastWorker include Shoryuken::Worker shoryuken_options queue: 'myinstance-tosolve-priority', auto_delete: true def perform(sqs_msg, body) puts "priority: #{body}" %x[/usr/local/bin/fibsqs #{body}] end end EOF chown ec2-user:ec2-user /home/ec2-user/worker.rb /home/ec2-user/config. yml screen -dm su - ec2-user -c 'shoryuken -r /home/ec2-user/worker.rb -C / home/ec2-user/config.yml'
Next, create an auto scaling group that uses the launch configuration we just created. The rest of the details for the auto scaling group are as per your environment. However, set it to start with 0 instances and do not set it to receive traffic from a load balancer.
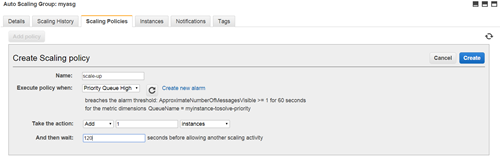
Once the auto scaling group has been created, select it from the EC2 console and select Scaling Policies. From here, click Add Policy to create a policy similar to the one shown in the following screenshot and click Create:
Next, we get to trigger the alarm. To do this, we will again submit random numbers into both the myinstance-tosolve and myinstance-tosolve-priority queues:
[ec2-user@ip-10-203-10-79 ~]$ [[ -d ~/.aws ]] && rm -rf ~/.aws/config || mkdir ~/.aws [ec2-user@ip-10-203-10-79 ~]$ echo $'[default]naws_access_key_id=mykey naws_secret_access_key=mysecretnregion=us-east-1' > .aws/config [ec2-user@ip-10-203-10-79 ~]$ for i in {1..100}; do value=$(shuf -i 1-50 -n 1) aws sqs send-message --queue-url https://queue.amazonaws.com/acctarn/myinstance-tosolve --message-body ${value} >/dev/null 2>&1 done [ec2-user@ip-10-203-10-79 ~]$ for i in {1..100}; do value=$(shuf -i 1-50 -n 1) aws sqs send-message --queue-url https://queue.amazonaws.com/acctarn/myinstance-tosolvepriority
--message-body ${value} >/dev/null 2>&1 done
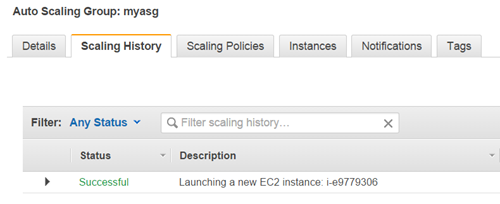
After five minutes, the alarm will go into effect and our auto scaling group will launch an instance to respond to it. This can be viewed from the Scaling History tab for the auto scaling group in the EC2 console.
Even though our alarm is set to trigger after one minute, CloudWatch only updates in intervals of five minutes. This is why our wait time was not as short as our alarm.
Our auto scaling group has now responded to the alarm by launching an instance.
Launching an instance by itself will not resolve this, but using the user data from the Launch Configuration, it should configure itself to clear out the queue, solve the fibonacci of the message, and finally submit it to the myinstance-solved queue. If this is successful, our myinstance-tosolve-priority queue should get emptied out. We can verify from the SQS console as before.
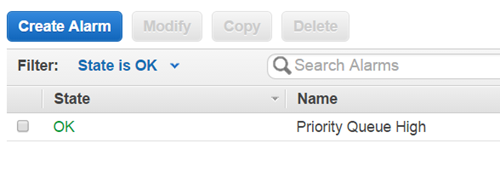
And finally, our alarm in CloudWatch is back to an OK status.
We are now stuck with the instance because we have not set any decrease policy. I won't cover this in detail, but to set it, we would create a new alarm that triggers when the message count is a lower number such as 0, and set the auto scaling group to decrease the instance count when that alarm is triggered. This would allow us to scale out when we are over the threshold, and scale in when we are under the threshold. This completes the final pattern for data processing.
Summary
In this article, in the queuing chain pattern, we walked through creating independent systems that use the Amazon-provided SQS service that solve fibonacci numbers without interacting with each other directly. Then, we took the topic even deeper in the job observer pattern, and covered how to tie in auto scaling policies and alarms from the CloudWatch service to scale out when the priority queue gets too deep.

 United States
 Great Britain
 India
India
 Germany
 France
 Canada
 Russia
 Spain
Spain
 Brazil
 Australia
 Singapore
 Canary Islands
 Hungary
 Ukraine
 Luxembourg
 Estonia
 Lithuania
 South Korea
 Turkey
 Switzerland
 Colombia
 Taiwan
 Chile
Chile
 Norway
 Ecuador
 Indonesia
 New Zealand
 Cyprus
 Denmark
 Finland
 Poland
 Malta
Malta
 Czechia
 Austria
 Sweden
 Italy
Italy
 Egypt
Egypt
 Belgium
 Portugal
 Slovenia
 Ireland
 Romania
 Greece
 Argentina
 Netherlands
 Bulgaria
 Latvia
 South Africa
 Malaysia
 Japan
Japan
 Slovakia
 Philippines
 Mexico
 Thailand