(For more resources related to this topic, see here.)
Features
Let's get started. First, we will look at some background information on what Features does. The code that the Features module will give us is in the form of module files sitting in a module folder that we can save to our /sites/all/modules directory, as we would do for any other contributed module. Using this method, we will have the entire configuration that we spent hours on building, saved into a module file and in code. The Features module will keep track of the tweaks we make to our content type configuration or importer for us. If we make changes to our type or importer we simply save a new version of our Features module.
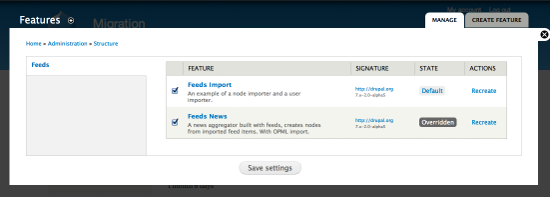
The Features module configuration and the setup screen is at Structure | Features or you can go to this path: admin/structure/features. There is no generic configuration for Features that you need to worry about setting up. If you have the Feeds module installed as we do, you'll see two example features that the Feeds module provides—Feeds Import and Feeds News. You can use these provided features or create your own. We're going to create our own in the next section. You should see the following screen at this point:
Building a content type feature
We have two custom content types so far on our site, FireDepartment and Organization Type. Let's package up the Fire Department content type as a feature so that the Features module can start to keep track of each content type configuration and any changes we make going forward.
Creating and enabling the feature
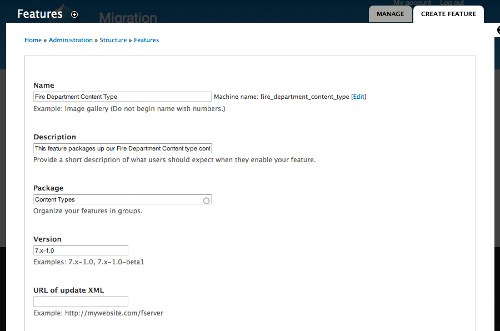
First click on the Create Feature tab on your Features administration screen. The screen will load a new create feature form. Now follow these steps to create your first feature. We're going to package up our Fire Department content type:
Enter a name for your feature. This should be something specific such as Fire Department Content Type.
Add a description for the feature. This should be something like This feature packages up our Fire Department Content type configuration.
You can create a specific package for your feature. This will help to organize and group your features on the main Features admin screen. Let's call this package Content Types.
Version your feature. This is very important as your feature is going to be a module. It's a good idea to version number your feature each time you make a change to it. Our first version will be 7.x-1.0.
Leave the URL of update XML blank for now. By this point you should see the following:
Now we're going to add our components to the feature. As this feature will be our Fire Department content type configuration, we need to choose this content type as our component. In the drop-down box select Content types: node.
Now check the Fire Department checkbox. When you do this you'll see a timer icon appear for a second and then magically all of your content type fields, associated taxonomy, and dependencies will appear in the table to the right. This means that your feature is adding the entire content type configuration.
Features is a smart module. It will automatically associate any fields, taxonomy or other dependencies and requirements to your specific feature configuration. As our content type has taxonomy vocabulary associated with it (in the form of the term reference fields) you'll notice that both country and fire_department_type are in the Taxonomy row of the feature table. You should now see the following:
Now click on the Download feature button at the bottom of the screen to download the actual module code for our Fire Department feature module. Clicking on Download feature will download the .tar file of the module to your local computer.
Find the .tar file and then extract it into your /sites/all/modules/directory. For organizational best practices, I recommend placing it into a / custom directory within your /sites/all/modules as this is really a custom module. So now you should see a folder called fire_department_content_ type in your /sites/all/modules/custom folder. This folder contains the feature module files that you just downloaded.
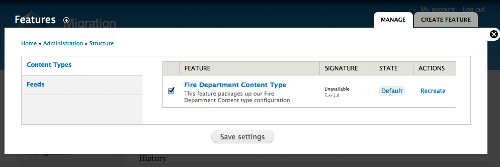
Now if you go back to your main Features administration screen you will see a new tab titled Content Types that contains your new feature module called Fire Department Content Type. Currently this feature is disabled. You can notice the version number in the same row.
Go ahead and check the checkbox next to your feature and then click on the Save settings button. What you are doing here is enabling your feature as a module on your site and now your content type's configuration will always be running from this codebase.
Unlock access to the largest independent learning library in Tech for FREE!
Get unlimited access to 7500+ expert-authored eBooks and video courses covering every tech area you can think of.
Renews at $19.99/month. Cancel anytime
When you click on Save settings, your feature should now be enabled and showing Default status.
When a feature is in Default state this means that your configuration (in this case the Fire Department content type) matches your feature modules codebase. This specific feature is now set up to keep track of any changes that may occur to the content type. So for example if you added a new field to your content type or tweaked any of its existing fields, display formatters or any other part of its configuration, that feature module would have a status of Overridden. We'll demonstrate this in the next section.
The custom feature module
Before we show the overridden status however, let's take a look at the actual custom feature module code that we've saved. You'll recall that we added a new folder for our Fire Department content type feature to our /sites/all/modules/custom folder. If you look inside the feature module's folder you'll see the following files that are the same as the constructs of a Drupal module:
Anyone familiar with Drupal modules should see here that this is indeed a Drupal module with info, .module, and .inc files. If you inspect the .info file in an editor you'll see the following code (this is an excerpt):
name = Fire Department Content Type
description = This feature packages up our Fire Department Content
type configuration
core = 7.x
package = Content Types
version = 7.x-1.0
project = fire_department_content_type
dependencies[] = features
The brunt of our module is in the fire_department_content_type.features. field.inc file. This file contains all of our content type's fields defined as a series of the $fields array (see the following excerpt of code):
If you view the taxonomy.inc file you'll see two arrays that return the vocabs which we're referencing via the term references of our content type. As you can see, this module has packaged up our entire content type configuration. It's beyond the scope of this book to get into more detail about the actual module files, but you can see how powerful this can be. If you are a module developer you could actually add code to the specific feature module's files to extend and expand your content type directly from the code. This would then be synced to your feature module codebase. Generally, you do not use this method for tweaking your feature but you do have access to the code and can make tweaks to the feature code. What we'll be doing is overriding our feature from the content type configuration level.
Additionally, if you load your module's admin screen on your site and scroll down until you see the new package called Content Types, you'll see your feature module enabled here on the modules admin screen:
If you disable the Features module here, it will also disable the feature from your Features admin screen. The best practice dictates that you should first disable a Features module via the Features admin screen. This will then disable the module from the modules admin screen.

 United States
 Great Britain
 India
India
 Germany
 France
 Canada
 Russia
 Spain
Spain
 Brazil
 Australia
 Singapore
 Canary Islands
 Hungary
 Ukraine
 Luxembourg
 Estonia
 Lithuania
 South Korea
 Turkey
 Switzerland
 Colombia
 Taiwan
 Chile
Chile
 Norway
 Ecuador
 Indonesia
 New Zealand
 Cyprus
 Denmark
 Finland
 Poland
 Malta
Malta
 Czechia
 Austria
 Sweden
 Italy
Italy
 Egypt
Egypt
 Belgium
 Portugal
 Slovenia
 Ireland
 Romania
 Greece
 Argentina
 Netherlands
 Bulgaria
 Latvia
 South Africa
 Malaysia
 Japan
Japan
 Slovakia
 Philippines
 Mexico
 Thailand