


There are various novel training strategies that we can employ with multiple agents and/or brains in an environment, from adversarial and cooperative self-play to imitation and curriculum learning. In this tutorial, we will look at how to build multi-agent environments in Unity as well as explore adversarial self-play.
This tutorial is an excerpt taken from the book ‘Learn Unity ML-Agents – Fundamentals of Unity Machine Learning’ by Micheal Lanham.
Let’s get started!
Multi-agent environments
A multi-agent environment consists of multiple interacting intelligent agents competing against each other, thereby, making the game more engaging. It started out as just a fun experiment for game developers, but as it turns out, letting agents compete against themselves can really amp up training.
There are a few configurations we can set up when working with multiple agents. The BananaCollector example we will look at, uses a single brain shared among multiple competing agents. Open up Unity and follow this exercise to set up the scene:
- Load the BananaCollectorBananaRL scene file located in the Assets/ML-Agents/Examples/BananaCollectors/ folder.
- Leave the Brain on Player; if you changed it, change it back.
- Run the scene in Unity. Use the WASD keys to move the agent cubes around the scene and collect bananas. Notice how there are multiple cubes responding identically. That is because each agent is using the same brain.
- Expand the RLArea object in the Hierarchy window, as shown in the following screenshot:
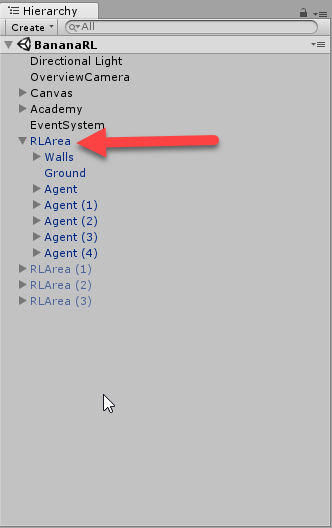
- Notice the five Agent objects under the RLArea. These are the agents that will be training against the single brain. After you run the first example, you come back and duplicate more agents to test the effect this has on training.
- Switch the Brain to External. Be sure your project is set to use an external brain. If you have run an external brain with this project, you don’t need any additional setup.
- From the menu, select File | Build Settings…. Uncheck any other active scenes and make sure the BananaRL scene is the only scene active. You may have to use the Add Open Scene button.
- Build the environment to the python folder.
- Open a Python or Anaconda prompt. Activate ml-agents and navigate to the 'ml-agents' folder.
- Run the trainer with the following code:
python python/learn.py python/python.exe --run-id=banana1 --train
- Watch the sample run. The Unity environment window for this example is large enough so that you can see most of the activities going on. The objective of the game is for the agents to collect yellow bananas while avoiding the blue bananas. To make things interesting, the agents are able to shoot lasers in order to freeze opposing agents. This sample is shown in the following screenshot:
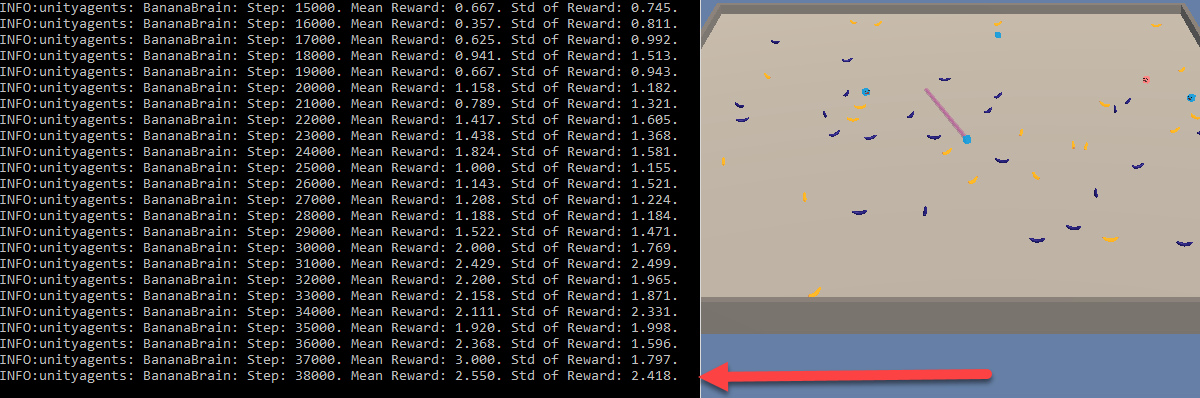
You will notice that the mean and standard deviation of reward accumulates quickly in this example. This is the result of a few changes in regards to reward values for one, but this particular example is well-suited for multi-agent training. Depending on the game or simulation you are building, using multi-agents with a single brain could be an excellent way to train.
Feel free to go back and enable multiple environments in order to train multiple agents in multiple environments using multiple A3C agents. Next, we will look at another example that features adversarial self-play using multiple agents and multiple brains.
Adversarial self-play
The last example we looked at is best defined as a competitive multi-agent training scenario where the agents are learning by competing against each other to collect bananas or freeze other agents out. Now, we will look at another similar form of training that pits agent vs. agent using an inverse reward scheme called Adversarial self-play. Inverse rewards are used to punish an opposing agent when a competing agent receives a reward. Let’s see what this looks like in the Unity ML-Agents Soccer (football) example by following this exercise:
- Open up Unity to the SoccerTwos scene located in the Assets/ML-Agents/Examples/Soccer/Scenes folder.
- Run the scene and use the WASD keys to play all four agents. Stop the scene when you are done having fun.
- Expand the Academy object in the Hierarchy window.
- Select the StrikerBrain and switch it to External.
- Select the GoalieBrain and switch it to External.
- From the menu, select File | Build Settings…. Click the Add Open Scene button and disable other scenes so only the SoccerTwos scene is active.
- Build the environment to the python folder.
- Launch a Python or Anaconda prompt and activate ml-agents. Then, navigate to the ml-agents folder.
- Launch the trainer with the following code:
python python/learn.py python/python.exe --run-id=soccor1 --train
- Watching the training session is quite entertaining, so keep an eye on the Unity environment window and the console in order to get a sense of the training progress. Notice how the brains are using an inverse reward, as shown in the following screenshot:

The StrikerBrain is currently getting a negative reward and the GoalieBrain is getting a positive reward. Using inverse rewards allows the two brains to train to a common goal, even though they are self-competing against each other as well. In the next example, we are going to look at using our trained brains in Unity as internal brains.
Using internal brains
It can be fun to train agents in multiple scenarios, but when it comes down to it, we ultimately want to be able to use these agents in a game or proper simulation. Now that we have a training scenario already set up to entertain us, let’s enable it so that we can play soccer (football) against some agents. Follow this exercise to set the scene so that you can use an internal brain:
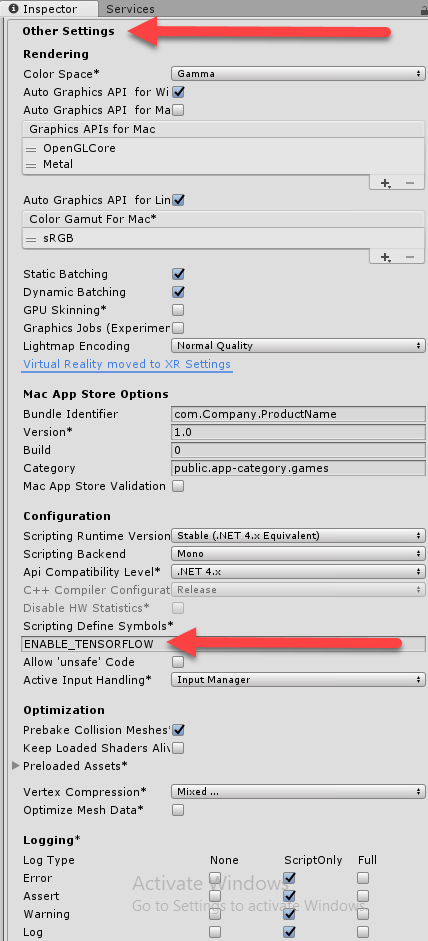
- From the menu, select Edit | Project Settings | Player.
- Enter ENABLE_TENSORFLOW in the Scripting Define Symbols underneath Other Settings, as shown in the following screenshot:
- Setting this will enable the internal running of TensorFlow models through TensorFlowSharp.
- Locate the Academy object and expand it to expose the StrikerBrain and GoalieBrain objects. Select the StrikerBrain and press Ctrl + D (Command+D on macOS) to duplicate the brain.
- Set the original StrikerBrain and GoalieBrain to use an Internal brain type. When you switch the brain type, make sure that the Graph Model under the TensorFlow properties is set to Soccer, as shown in the following screenshot:

- Leave the new StrikerBrain(1) you just duplicated to the Player brain type. This will allow you to play the game against the agents.
- Expand the SoccerFieldsTwos->Players objects to expose the four player objects. Select the Striker(1) object and set its Brain to the StrikerBrain(1) player brain, as shown in the following screenshot:
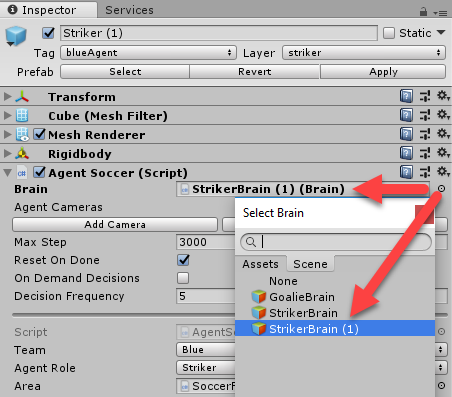
- This sets the agent (player) to use the Player brain type we duplicated.
- Press the Play button to run the game. Use the WASD keys to control the striker and see how well you can score. After you play for a while, you will soon start to realize how well the agents have learned.
This is a great example and quickly shows how easily you can build agents for most game scenarios given enough training time and setup. What’s more is that the decision code is embedded in a light TensorFlow graph that blazes trails around other Artificial Intelligence solutions. We are still not using new brains we have trained, so we will do that next.
Using trained brains internally
Here, we will use the brains we previously trained as agent’s brains in our soccer (football) game. This will give us a good comparison to how the default Unity trained brain compares against the one we trained in our first exercise.
We are getting to the fun stuff now and you certainly don’t want to miss the following exercise where we will be using a trained brain internally in a game we can play:
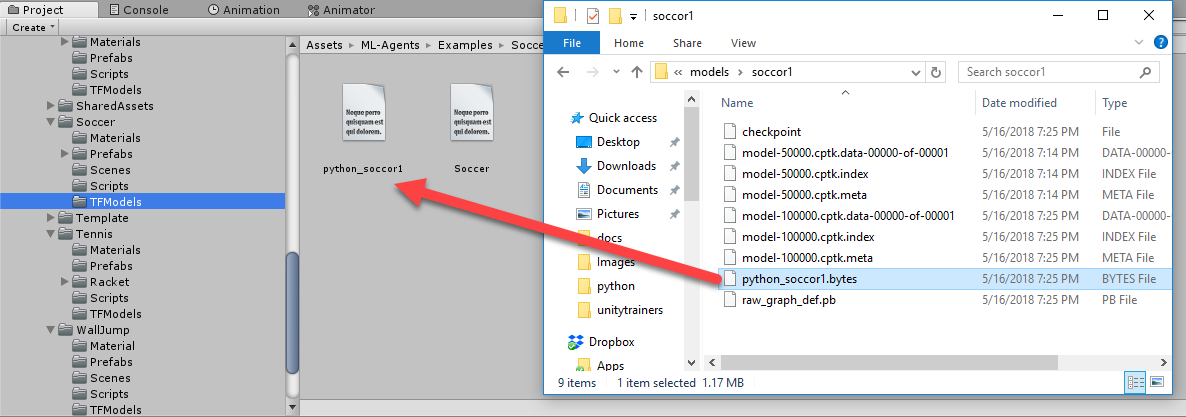
- Open a File Explorer and open the 'ml-agents'/models/soccor1 folder. The name of the folder will match the run-id you used in the training command-line parameter.
- Drag the .bytes file, named python_soccer.bytes in this example, to the Assets/ML-Agents/Examples/Soccer/TFModels folder, as shown in the following screenshot:
- Locate the StrikerBrain and set the Graph Model by clicking the target icon and selecting the python_soccor1 TextAsset, as shown in the following screenshot:
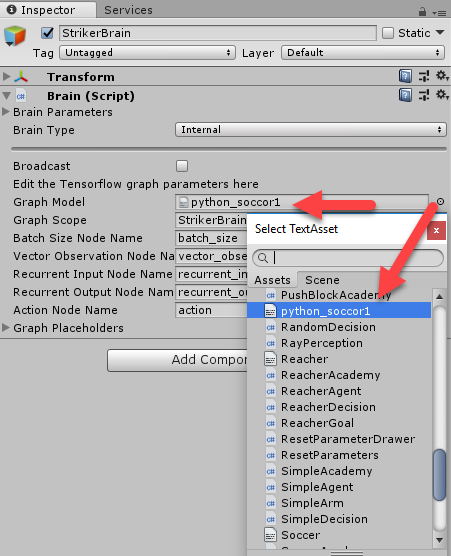
- The file is called a TextAsset, but it is actually a binary byte file holding the TensorFlow graph.
- Change the GoalieBrain to the same graph model. Both brains are included in the same graph. We can denote which brain is which with the Graph Scope parameter. Again, leave the player striker brain as it is.
- Press Play to run the game. Play the game with the WASD keys.
The first thing you will notice is that the agents don’t quite play as well. That could be because we didn’t use all of our training options. Now would be a good time to go back and retrain the soccer (football) brains using A3C and other options we covered thus far.
In this tutorial, we were able to play with several variations of training scenarios. We started by looking at extending our training to multi-agent environments that still used a single brain. Next, we looked at a variety of multi-agent training called Adversarial self-play, that allows us to train pairs of agents using a system of inverse rewards.
If you found this post useful, and want to learn other methods such as imitation and curriculum learning, then be sure to check out the book ‘Learn Unity ML-Agents – Fundamentals of Unity Machine Learning’.
Read Next
Implementing Unity game engine and assets for 2D game development [Tutorial]
Creating interactive Unity character animations and avatars [Tutorial]
Unity 2D & 3D game kits simplify Unity game development for beginners


