
Implement Moodle in your business to streamline your interview, training, and internal communication processes
Using Moodle to manage compliance training
Compliance training is a very important part of an organization's risk management strategy. Moodle has a number of tools that you can use to deliver and manage required training for your employees. In this article we will explore the lesson module as well as some useful user management tools to ensure your employees receive the training they need.
Using the lesson module as a training tool
Every human resources manager must understand and comply with a multitude of regulations and establish policies and procedures to ensure their company is in compliance. Additionally, there are several internal risks to consider including work-life discrimination, protection of confidential information, workplace privacy risks, and so on. Many companies develop training programs as a way to mitigate and avoid certain risks by making employees aware of the company policies and procedures. Moodle's lesson module is a useful tool for this type of training. Using Moodle's inbuilt lesson module is also a time and cost-effective alternative to relying on third-party authoring tools that publish Scorm.
The lesson module uses two different page types, which can be implemented in several different ways to create an interactive learning experience for the user. First, the question page asks the user a question and then provides the user with feedback based on their response. The question pages are graded and contribute to a user's grade. The second page type, the content page, presents content and navigation options without grading the user's response.
Creating a lesson module
Let's take a business case study example. You are developing a lesson module on basic office safety. To train employees on basic fire safety, you decide to use a common active training method—the case study. Before we dive into the lesson module, let's take a moment to decide how we're going to implement this. First, we are going to use a content page to present a realistic building fire scenario and have the learner choose their first action. Second, we will create a question page to present the learner with a scored choice regarding fire safety. Third, we need to then come up with feedback based on their responses.
In reality, the fire safety plan would probably be part of a larger emergency action plan. However, for the purposes of this article we are going to keep things simple and address a scenario that may be used when training employees on fire safety.
Lesson modules can get quite complicated if you let them, depending on how many choices the reader has for a given scenario and how long the chain of reasoning is. Many experts suggest developing a flowchart to plan out your lesson module before creating it in Moodle. For our purposes, we will just take it through the first choice to show you how to use the content page and then a question page. Once you have that down, it will be easy to keep repeating the process to make your lesson module as simple or complicated as you'd like.
Time for action - creating a lesson module
- Log in to your Moodle site as an administrator. Create a course for your compliance training by following the instructions in Getting Started with Moodle 2.0 for Business.
- Click the Turn editing on button in the top-right corner.
- Go to the section you want to add the lesson to and from the Add an activity... drop-down menu, select Lesson. You should now be on the Adding a new Lesson page.
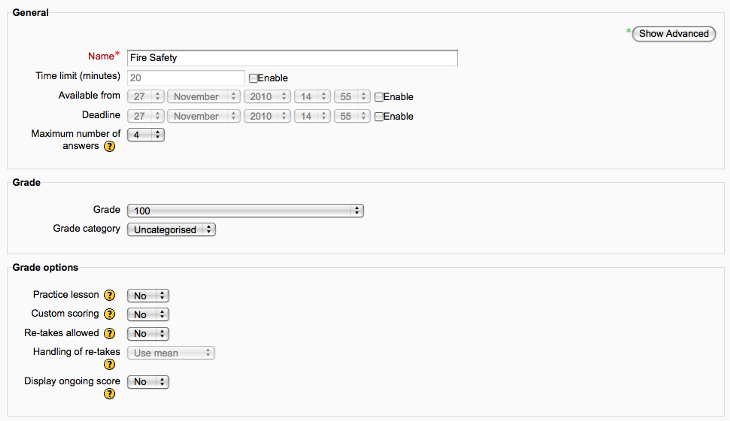
- The first section of the page is the General section.
- In the Name field, enter the title of your lesson, for example "Fire Safety".
- If you want to enter a time limit for the lesson, click the checkbox to the left of Enable at the Time limit (minutes) field and enter the time limit you want implemented, in minutes, for the lesson. For the purposes of this example, assume that if I do not give you a specific value to enter for a field, leave it set at the default.
- If you want to restrict the availability of the lesson to certain dates, then click the checkboxes next to Enable and enter the Available from date and Deadline date.
- Under Maximum number of answers, select the maximum number of answers that may be used in the lesson. For example, if it only consists of True/False questions, this would be 2.
There are a lot of settings in the lesson module. You are not expected to remember them all. I don't! Next to most of the settings is a ? icon. Select this icon for a description of the setting anytime you can't remember what its purpose is.
- Grade is the next section on the Adding a new Lesson page.
- For Grade, select the maximum score that can be given for the lesson from the drop-down menu. If there is no grade, then select no grade from the drop-down menu. We are not going to use question pages for our case study example, so for here select no grade.
- The Grade category refers to the category in the grade book. We have not set the grade book up yet, so leave this as the default Uncategorised. There will be nothing else available yet in this drop-down menu if you have not set up categories in the grade book.
- Next go to the Grade options section and select your settings.
- In the Practice lesson setting, select No from the drop-down menu if you want the grades for this lesson to be recorded.
- The Custom scoring setting allows you to give a score (positive or negative) for each answer. For our example, select No. This could be a useful tool if there are different levels of right and wrong answers and you wish to capture this in the grade book.
- If you want to allow re-takes, select Yes from the drop-down menu at the Re-takes allowed setting.
- If you selected Yes in the previous setting and are allowing re-takes, then you need to select the method for grading in the next setting—Handing of re-takes. Your two choices from the drop-down menu are Use mean or Use maximum.
- The Display ongoing score setting, if Yes is selected from the drop-down menu, will allow the user to see their current score out of total possible thus far in the lesson. The following screenshot shows the General, Grade, and Grade options sections of the Create a lesson page.
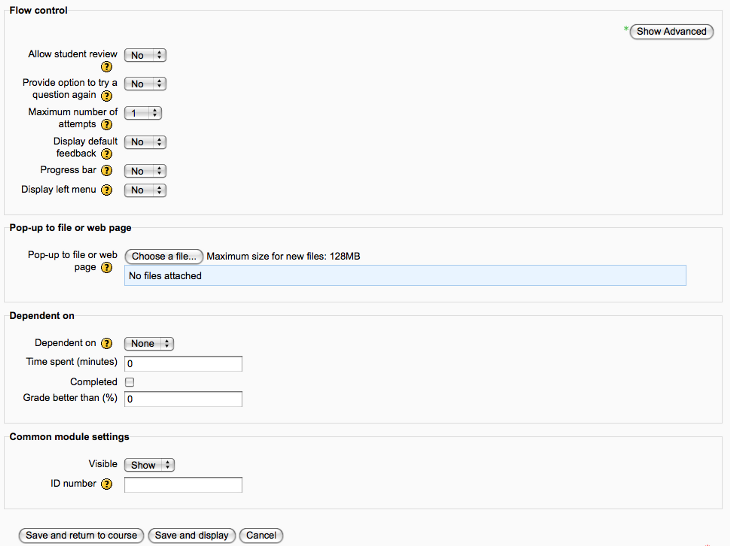
- Now go to the Flow control section and select your settings.
- Allow student review, if Yes is selected, gives the user the option of going through the lesson again from the start after they have completed the lesson.
- Provide option to try a question again, select Yes from the drop-down menu to give the user the option to take the question again for no credit or continue with the lesson if they answer a question incorrectly.
- If you selected Yes for the previous setting, then in the next setting, Maximum number of attempts, you must select the number of attempts allowed from the drop-down menu. If the user answers the question incorrectly repeatedly, once the maximum number of attempts is reached the user will proceed to the next page in the lesson.
- If you want the default feedback for correct and incorrect answers to be shown when no feedback has been specified for the question, then at the Display default feedback section, select Yes from the drop-down menu. Default feedback for a correct answer is "That's the correct answer" and for an incorrect answer is "That's the wrong answer".
- If Yes is selected for the Progress bar setting, then a progress bar is displayed at the bottom of each page.
- When set to Yes the Display left menu setting provides a list of all the pages in the lesson on the left side of each lesson page.
- The Pop-up to file or web page section allows you to choose a file to display in a pop-up window at the beginning of a lesson. It also displays a link to reopen the pop-up window in every subsequent page in the lesson.
- The Dependent on section allows you to restrict access to the lesson based on performance in another lesson in the same course. Restrictions can be based on any combination of completion, time spent, or minimum grade required.
- Under Dependent on, select the lesson required before access to this lesson from the drop-down menu.
- Time spent (minutes): If time spent is one of the requirements, then enter the minimum number of minutes required.
- Completed, if completion is a requirement, then check the box.
- If a minimum grade is required, then for the Grade better than (%) setting, enter the minimum grade required. The following screenshot shows the Flow control, Pop-up to file or web page, and Dependent on sections of the create a lesson page.
Unlock access to the largest independent learning library in Tech for FREE!
Get unlimited access to 7500+ expert-authored eBooks and video courses covering every tech area you can think of.
Renews at $19.99/month. Cancel anytime
- Once you have entered all your settings on the lesson page, click on the Save and display button at the bottom of the page. You are now on the editing page for the lesson you just created. See the following example:

What just happened?
We have just created the shell of a lesson activity for our learners. In the next steps we will add content to the lesson and learn how to ask the learner questions.
Time for action - creating a content page
Now that we have the shell of the lesson, we can begin to add content. We'll start with adding a simple content page.
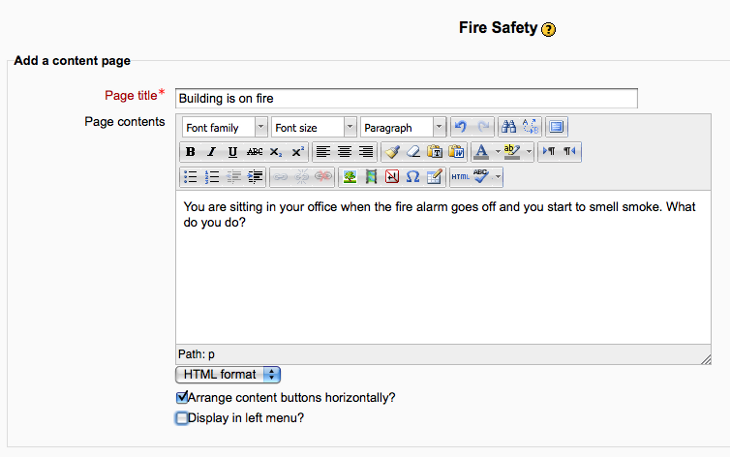
- From the editing page for the lesson you just created, select Add a content page.
- Enter a descriptive title in the box next to Page title. For our example, we will enter Building is on fire.
- Enter the content for this page in the Page contents text area.
- If you want the user's choices for the lesson page to be displayed horizontally, then check the box to the left of Arrange content buttons horizontally? You have now filled in the Add a content page section; see the following screenshot for our example:
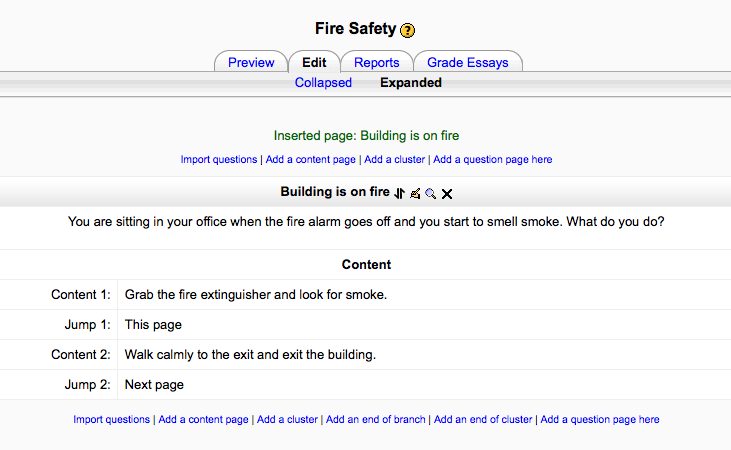
- In the Add a content page section you will find sections for Content 1, Content 2, and so on. This is where we will create the choices for the user. For our example, we will enter "Grab the fire extinguisher and look for smoke" in the Description text area for Content 1. Leave the drop-down menu below the text area on the default Moodle auto-format. For now leave the Jump drop-down menu as is; we will come back to this later.
- In the Content 2 section, enter your second choice in the Description text area. For our example, we will enter "Walk calmly to the exit and exit the building."
- Now scroll down to the bottom of the page and select Add a question page. This will save the content page you just created. You will now be on the editing page for the lesson you are creating and you should be able to see the content you just added. See the following screenshot for our example:
What just happened?
We have now added a content page to our lesson. Content pages can include a wide variety of media, including text, audio, video, and Flash. Next we will look at how to add a scored Question page to test the learner's understanding.
Time for action - creating a question page
Now we are going to create a question page in our lesson. Question pages are scored and provide the user with feedback on their choices.
- From the edit page, click the Expanded View option at the top of the page. Then select the Add a question page here link below the content page you just created.
- From the Select a question type drop-down menu select the question type you want to use. For our example, we are going to select Multichoice.
- Next click on the Add a question page button.
- For Page title, enter a title for your question page. For our example, we will enter "Why is this a bad idea?".
- In the Page contents text area, enter the question you want to ask the learner. For our example, we will enter "Why is grabbing the fire extinguisher and heading for smoke a bad idea?".
- Below the Page contents text area you will see an Options field; check the box next to Multiple-answer if you are creating a question with more than one correct answer. Our example is going to be single response; therefore we will not select this box.
- Below the Add a question page section, you will see the Answer 1, Answer 2, and so on, sections where you will enter the possible list of answers the learner will have to choose from. In the Answer 1 section, enter one of the possible answers to the question in the Answer text area. For our example, we will enter "It's dangerous. You should leave it to the professionals".
- Next in the Response text area, enter the response you want the learner to receive if they select this choice. For our example, we will enter "Firefighters are trained to put out the fire and have the necessary protective gear".
- Then move to the Answer 2 section and put your second choice and response. For this example, we will have "You can't put out an office fire with a fire extinguisher" for the Answer and "You might be able to put out the fire, but without a respirator you might be overcome by smoke" for the Response.
- For the correct answer, enter a "1" in the Score field located at the bottom of the corresponding Answer section.
- Once you have entered all your answers, scroll down to the bottom of the page and select Add a question page to save. Now you are back on the Lesson edit screen and will see the Content page and the Question page you just created. See the following screenshot.
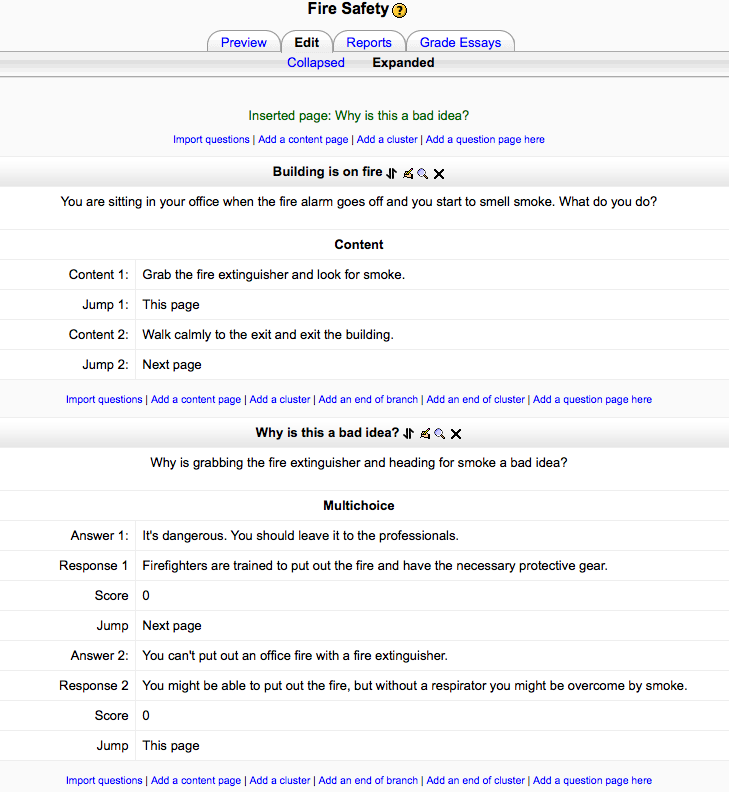
What just happened?
We have now created a question page to test the learner's understanding of the lesson material. We now need to go back and begin to link our pages together with page jumps.
Time for action - creating page jumps
You have now added a content page and a question page, but you're not done yet. Now we need to link the question page to the content page using a page jump. The page jump is simply the link between pages. We need to go back to the Jump field we skipped previously:
- Go back to the content page you created by selecting the edit icon to the right of the Building is on fire page. The edit icon looks like a hand holding a pencil.
- Scroll down to Content 1 and from the Jump drop-down menu, select the question page you created. For our example, it was Why is this a bad idea?.
- Set the jump for Content 2 to the End of the Lesson. If the user selects this option, they will end the lesson.
- Scroll down to the bottom of the page and click on the Save page button. You will now be back at the edit lesson page and the Jump 1: field will now read Why is this a bad idea?.
What just happened?
We have now linked our pages together using page jumps. In a lesson module, page jumps are used for both navigation and to provide feedback pages for questions. Now we need to go through and test our lesson to make sure everything works.

 United States
 Great Britain
 India
India
 Germany
 France
 Canada
 Russia
 Spain
Spain
 Brazil
 Australia
 Singapore
 Canary Islands
 Hungary
 Ukraine
 Luxembourg
 Estonia
 Lithuania
 South Korea
 Turkey
 Switzerland
 Colombia
 Taiwan
 Chile
Chile
 Norway
 Ecuador
 Indonesia
 New Zealand
 Cyprus
 Denmark
 Finland
 Poland
 Malta
Malta
 Czechia
 Austria
 Sweden
 Italy
Italy
 Egypt
Egypt
 Belgium
 Portugal
 Slovenia
 Ireland
 Romania
 Greece
 Argentina
 Netherlands
 Bulgaria
 Latvia
 South Africa
 Malaysia
 Japan
Japan
 Slovakia
 Philippines
 Mexico
 Thailand


