


PowerShell Key Concepts
In this chapter, we will cover the following:
- Using the help system
- Understanding command syntax and parameters
- Command aliases
- Setting up a PowerShell profile
- Understanding the pipeline
- Working with variables and objects
- Working with arrays and hash tables
- Looping through items
- Creating custom objects
- Using debugger functions
- Understanding the new execution policy
- Using the Save-Help function
- Working with script repositories
Introduction
So, your organization has decided to move to Exchange Server 2016 to take advantage of the many exciting new features such as integrated email archiving, discovery capabilities, and high availability functionality. Like it or not, you've realized that PowerShell is now an integral part of Exchange Server management and you need to learn the basics and have a point of reference for building your own scripts. That's what this book is all about. In this chapter, we'll cover some core PowerShell concepts that will provide you with a foundation of knowledge for using the remaining examples in this book. If you are already familiar with PowerShell, you may want to use this chapter as a review or as a reference for later after you've started writing scripts.
If you're completely new to PowerShell, the concept may be familiar if you've worked with UNIX command shells. Like UNIX-based shells, PowerShell allows you to string multiple commands together on one line using a technique called pipelining. This means that the output of one command becomes the input for another. But, unlike UNIX shells that pass text output from one command to another, PowerShell uses an object model based on the .NET Framework, and objects are passed between commands in a pipeline, as opposed to plain text. From an Exchange perspective, working with objects gives us the ability to access very detailed information about servers, mailboxes, databases, and more. For example, every mailbox you manage within the shell is an object with multiple properties, such as an email address, database location, or send and receive limits. The ability to access this type of information through simple commands means that we can build powerful scripts that generate reports, make configuration changes, and perform maintenance tasks with ease.
Performing some basic steps
To work with the code samples in this chapter, follow these steps to launch the Exchange Management Shell:
- Log onto a workstation or server with the Exchange Management Tools installed.
- You can connect using remote PowerShell if you for some reason don't have Exchange Management Tools installed. Use the following command:
    $Session = New-PSSession -ConfigurationName Microsoft.Exchange `
    -ConnectionUri http://servername/PowerShell/ `
    -Authentication Kerberos

    Import-PSSession $Session
- Alternatively, open the Exchange Management Shell by clicking the windows button and go to Microsoft Exchange Server 2016 | Exchange Management Shell.
Using the help system
The Exchange Management Shell includes over 830 cmdlets, each with a set of multiple parameters. For instance, the New-Mailbox cmdlet accepts up to more than 60 parameters, and the Set-Mailbox cmdlet has approximately 200 available parameters. It's safe to say that even the most experienced PowerShell expert would be at a disadvantage without a good help system. In this recipe, we'll take a look at how to get help in the Exchange Management Shell.
How to do it...
To get help information for a cmdlet, type Get-Help, followed by the cmdlet name. For example, to get help information about the Get-Mailbox cmdlet, run the following command:
Get-Help Get-Mailbox -full
How it works...
When running Get-Help for a cmdlet, a synopsis and description for the cmdlet will be displayed in the shell. The Get-Help cmdlet is one of the best discovery tools to use in PowerShell. You can use it when you're not quite sure how a cmdlet works or what parameters it provides.
You can use the following switch parameters to get specific information using the Get-Help cmdlet:
- Detailed: The detailed view provides parameter descriptions and examples and uses the following syntax:
Get-Help <cmdletname> -Detailed
- Examples: You can view multiple examples of how to use a cmdlet by running the following syntax:
Get-Help <cmdletname> -Examples
- Full: Use the following syntax to view the complete contents of the help file for a cmdlet:
Get-Help <cmdletname> -Full
- Online: Use the following syntax to view the online version of the contents for the help file of a cmdlet:
Get-Help <cmdletname> -Online
Some parameters accept simple strings as input, while others require an actual object. When creating a mailbox using the New-Mailbox cmdlet, you'll need to provide a secure string object for the -Password parameter. You can determine the data type required for a parameter using Get-Help:
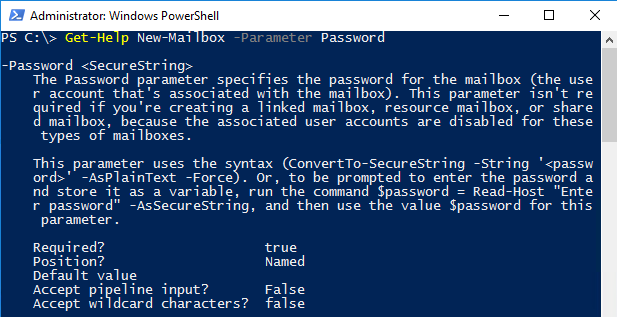
You can see from the command output that we get several pieces of key information about the -Password parameter. In addition to the required data type of <SecureString>, we can see that this is a named parameter. It is required when running the New-Mailbox cmdlet and it does not accept wildcard characters. You can use Get-Help when examining the parameters for any cmdlet to determine whether or not they support these settings.
You could run Get-Help New-Mailbox -Examples to determine the syntax required to create a secure string password object and how to use it to create a mailbox. This is also covered in detail in the recipe titled Adding, modifying, and removing mailboxes in Chapter 3, Managing Recipients.
There's more...
There will be times when you'll need to search for a cmdlet without knowing its full name. In this case, there are a couple of commands you can use to find the cmdlets you are looking for.
To find all cmdlets that contain the word "mailbox", you can use a wildcard, as shown in the following command:
Get-Command *Mailbox*
You can use the -Verb parameter to find all cmdlets starting with a particular verb:
Get-Command -Verb Set
To search for commands that use a particular noun, specify the name with the -Noun parameter:
Get-Command -Noun Mailbox
The Get-Command cmdlet is a built-in PowerShell core cmdlet, and it will return commands from both Windows PowerShell as well as the Exchange Management Shell. The Exchange Management Shell also adds a special function called Get-Ex command that will return only Exchange specific commands.
In addition to getting cmdlet help for cmdlets, you can use Get-Help to view supplemental help files that explain general PowerShell concepts that focus primarily on scripting. To display the help file for a particular concept, type Get-Help about_ followed by the concept name. For example, to view the help for the core PowerShell commands type the following:
Get-Help about_Core_Commands
You can view the entire list of conceptual help files using the following command:
Get-Help about_*
Don't worry about trying to memorize all the Exchange or PowerShell cmdlet names. As long as you can remember Get-Command and Get-Help, you can search for commands and figure out the syntax to do just about anything.
Getting help with cmdlets and functions
One of the things that can be confusing at first is the distinction between cmdlets and functions. When you launch the Exchange Management Shell, a remote PowerShell session is initiated to an Exchange server and specific commands, called proxy functions, are imported into your shell session. These proxy functions are essentially just blocks of code that have a name, such as Get-Mailbox, and that correspond to the compiled cmdlets installed on the server. This is true even if you have a single server and when you are running the shell locally on a server.
When you run the Get-Mailbox function from the shell, data is passed between your machine and the Exchange server through a remote PowerShell session. The Get-Mailbox cmdlet is actually executing on the remote Exchange server, and the results are being passed back to your machine. One of the benefits of this is that it allows you to run the cmdlets remotely regardless of whether your servers are on-premises or in the cloud.
We'll get into the details of all this throughout the remaining chapters in the book. The bottom line is that, for now, you need to understand that, when you are working with the help system, the Exchange 2016 cmdlets will show up as functions and not as cmdlets.
Consider the following command and output:

Here we are running Get-Command against a PowerShell v5 core cmdlet. Notice that the CommandType shows that this is a Cmdlet.
Now try the same thing for the Get-Mailbox cmdlet:

And as you can see, the CommandType for the Get-Mailbox cmdlet shows that it is actually a Function. So, there are a couple of key points to take away from this. First, throughout the course of this book, we will refer to the Exchange 2016 cmdlets as cmdlets, even though they will show up as functions when running Get-Command. Second, keep in mind that you can run Get-Help against any function name, such as Get-Mailbox, and you'll still get the help file for that cmdlet. But if you are unsure of the exact name of a cmdlet, use Get-Command to perform a wildcard search as an aid in the discovery process. Once you've determined the name of the cmdlet you are looking for, you can run Get-Help against that cmdlet for complete details on how to use it.
Try using the help system before going to the internet to find answers. You'll find that the answers to most of your questions are already documented within the built-in cmdlet help.
See also
- The Understanding command syntax and parameters recipe in this chapter
- The Manually configuring remote PowerShell connections recipe from Chapter 2, Exchange Management Shell Common Tasks
- The Working with Role Based Access Control recipe from Chapter 10, Exchange Security
Understanding command syntax and parameters
Windows PowerShell provides a large number of built-in cmdlets (pronounced command-lets) that perform specific operations. The Exchange Management Shell adds an additional set of PowerShell cmdlets used specifically for managing Exchange. We can also run these cmdlets interactively in the shell, or through automated scripts. When executing a cmdlet, parameters can be used to provide information, such as which mailbox or server to work with, or which attribute of those objects should be modified. In this recipe, we'll take a look at basic PowerShell command syntax and how parameters are used with cmdlets.
How to do it...
When running a PowerShell command, you type the cmdlet name, followed by any parameters required. Parameter names are preceded by a hyphen (-) followed by the value of the parameter. Let's start with a basic example. To get mailbox information for a user named testuser, use the following command syntax:
Get-Mailbox -Identity testuser
Alternatively, the following syntax also works and provides the same output, because the -Identity parameter is a positional parameter:
Get-Mailbox testuser
Most cmdlets support a number of parameters that can be used within a single command. We can use the following command to modify two separate settings on the testuser mailbox:
Set-Mailbox testuser -MaxSendSize 50Mb -MaxReceiveSize 50Mb
How it works...
All cmdlets follow a standard verb-noun naming convention. For example, to get a list of mailboxes you use the Get-Mailbox cmdlet. You can change the configuration of a mailbox using the Set-Mailbox cmdlet. In both examples, the verb (Get or Set) is the action you want to take on the noun (Mailbox). The verb is always separated from the noun using the hyphen (-) character. With the exception of a few Exchange Management Shell cmdlets, the noun is always singular.
Cmdlet names and parameters are not case sensitive. You can use a combination of upper and lowercase letters to improve the readability of your scripts, but it is not required.
Parameter input is either optional or required, depending on the parameter and cmdlet you are working with. You don't have to assign a value to the -Identity parameter since it is not required when running the Get-Mailbox cmdlet. If you simply run Get-Mailbox without any arguments, the first 1,000 mailboxes in the organization will be returned.
Notice that in the first two examples, we ran Get-Mailbox for a single user. In the first example, we used the -Identity parameter, but in the second example we did not. The reason we don't need to explicitly use the -Identity parameter in the second example is because it is a positional parameter. In this case, -Identity is in position 1, so the first argument received by the cmdlet is automatically bound to this parameter. There can be a number of positional parameters supported by a cmdlet, and they are numbered starting from 1. Other parameters that are not positional are known as named parameters, meaning we need to use the parameter name to provide input for the value.
The -Identity parameter is included with most of the Exchange Management Shell cmdlets, and it allows you to classify the object you want to take an action on.
When you run a cmdlet without providing input for a required parameter, you will be prompted to enter the information before execution. This is because the cmdlet needs to know which mailbox it should modify when the command is executed.
For example, you can enable or disable a send connector using the Set-SendConnector cmdlet with the -Enabled parameter:
Set-SendConnector Internet -Enabled $false
Switch parameters don't require a value. Instead they are used to turn something on or off, or to either enable or disable a feature or setting. One common example of when you might use a switch parameter is when creating an archive mailbox for a user:
Enable-Mailbox testuser -Archive
PowerShell also provides a set of common parameters that can be used with every cmdlet. Some of the common parameters, such as the risk mitigation parameters (-Confirm and -Whatif), only work with cmdlets that make changes.
Risk mitigation parameters allow you to preview a change or confirm a change that may be destructive. If you want to see what will happen when executing a command without actually executing it, use the -WhatIf parameter:

When making a change, such as removing a mailbox, you'll be prompted for confirmation, as shown in the following screenshot:
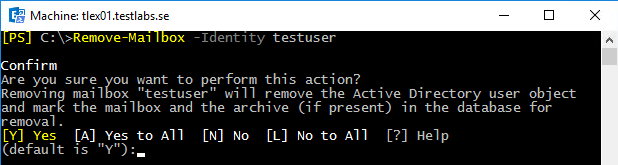
To suppress this confirmation, set the -Confirm parameter to false:
Remove-Mailbox testuser -Confirm:$false
Notice here, that when assigning the $false variable to the -Confirm parameter, we had to use a colon immediately after the parameter name and then the Boolean value. This is different to how we assigned this value earlier with the -Enabled parameter when using the Set-SendConnector cmdlet. Remember that the -Confirm parameter always requires this special syntax, and while most parameters that accept a Boolean value generally do not require this, it depends on the cmdlet with which you are working. Fortunately, PowerShell has a great built-in help system that we can use when we run into these inconsistencies.
Cmdlets and parameters support tab completion. You can start typing the first few characters of a cmdlet or a parameter name and hit the tab key to automatically complete the name or tab through a list of available names. This is very helpful in terms of discovery and can serve as a bit of a time saver.
In addition, you only need to type enough characters of a parameter name to differentiate it from another parameter name. The following command using a partial parameter name is completely valid:
Set-User -id testuser -Office Sales
Here we've used id as a shortcut for the -Identity parameter. The cmdlet does not provide any other parameters that start with id, so it automatically assumes you want to use the -Identity parameter.
Another helpful feature that some parameters support is the use of wildcards. When running the Get-Mailbox cmdlet, the -Identity parameter can be used with wildcards to return multiple mailboxes that match a certain pattern:
Get-Mailbox -id t*
In this example, all mailboxes starting with the letter t will be returned. Although this is fairly straightforward, you can reference the help system for details on using wildcard characters in PowerShell by running Get-Helpabout_Wildcards.
There's more...
Parameter values containing a space need to be enclosed in either single or double quotation marks. The following command would retrieve all of the mailboxes in the Sales Users OU in Active Directory. Notice that since the OU name contains a space, it is enclosed in single quotes:
Get-Mailbox -OrganizationalUnit 'testlabs.se/Sales Users/Seattle'
Use double quotes when you need to expand a variable within a string:
    $City = 'Seattle'
    Get-Mailbox -OrganizationalUnit "testlabs.se/Sales Users/$City"
You can see here that we first create a variable containing the name of the city, which represents a sub-OU under Sales Users. Next, we include the variable inside the string used for the organizational unit when running the Get-Mailbox cmdlet. PowerShell automatically expands the variable name inside the double quoted string where the value should appear and all mailboxes inside the Seattle OU are returned by the command.
See also
- The Using the help system recipe in this chapter
- The Working with variables and objects recipe in this chapter
Command aliases
Throughout this book and previous books, we have referred to command aliases or cmdlet aliases: for example, the short name of the full cmdlet.
These aliases can be very handy when writing scripts where you might want to optimize and keep them as small and as short as possible.
Let us take a look at some examples of the built-in aliases. For example, we have the cmdlet Where-Object, which is commonly used. We have two aliases for it, which are? or where. Another example on a regularly used cmdlet would be ForEach-Object; there are two aliases for it and those are % or foreach. The last example of a built-in alias is for the cmdlet Select-Object, where the alias is select.
How to do it...
When running a PowerShell command, instead of using the full cmdlet, we can create aliases for them. Let's have a look at a few examples of how to utilize the aliases:
    Get-Alias

 New-Alias -Name wh -Value Write-Host
 wh "Testing alias"

 New-Alias -Name list -Value Get-ChildItem
 list -Path "C:\Scripts"

 New-Alias -Name npp -Value "C:\Program Files ` (x86)\Notepad++\notepad++.exe"
 npp
How it works...
We start off with using the Get-Alias cmdlet. With the cmdlet, we will list all current aliases. If you haven't created any custom aliases only the built-in aliases are listed.
In the preceding examples, we have three different aliases created. Aliases could be created for cmdlets that you are using frequently or if you want to be able to launch an application using an alias directly from the PowerShell prompt.
The first example is set to wh, which is an alias for Write-Host. We can use this by type in wh "Testing alias", and the Write-Host cmdlet should be utilized in the background and show us the text on screen.
In our second example, we have to create an alias for Get-ChildItem; the alias we create for it is list. We can then get started to use list -Path "C:\Scripts" to retrieve all the files and folders from the folder C:\Scripts.
The third and final example is to create an alias for launching the Notepad++ application. This is simply done by setting the value of the alias to the full path to the .exe file of the application. Once it's done, you can from the PowerShell prompt, you can simply type in npp for launching Notepad++.
See also
- The Setting up a PowerShell profile recipe in this chapter
- The Working with variables and objects recipe in this chapter
- The Looping through items recipe in this chapter
Setting up a PowerShell profile
You can use a PowerShell profile to customize your shell environment and to load functions, modules, aliases, and variables into the environment when you start your Exchange Management Shell session. In this recipe, we'll take a look at how you can create a profile.
How to do it...
Profiles are not created by default, but you may want to verify one has not already been created.
- Start off by running the Test-Path cmdlet:
Test-Path $profile
- If the Test-Path cmdlet returns $true, then a profile has already been created for the current user. You can open an existing profile by invoking notepad.exe from the shell:
notepad $profile
- If the Test-Path cmdlet returns $false, you can create a new profile for the current user by running the following command:
New-Item -type file -path $profile -force
How it works...
A PowerShell profile is a just a script with a .ps1 extension that is run every time you start the shell. You can think of a profile as a logon script for your PowerShell or Exchange Management Shell session. Inside your profile you can add custom aliases, define variables, load modules, or add your own functions so that they will be available every time you start the shell. In the previous example, we used the automatic shell $profile variable to create a profile script for the current user, which, in this case, would create the profile in the $env:UserProfile\Documents\WindowsPowerShell\directory.
Since PowerShell is simply executing a .ps1 script to load your profile, your execution policy must allow the execution of scripts on your machine. If it does not, your profile will not be loaded when starting the shell and you'll receive an error.
There are four types of profiles that can be used with PowerShell:
- $Profile.AllUsersAllHosts: This profile applies to all users and all shells and is located in $env:Windir\system32\WindowsPowerShell\v1.0\profile.ps1
- $Profile.AllUsersCurrentHost: This profile applies to all users but only the PowerShell.exe host and is located in $env:Windir\system32\WindowsPowerShell\v1.0\Microsoft.PowerShell_profile.ps1
- $Profile.CurrentUserAllHosts: This profile applies to the current user and all shells and is located in $env:UserProfile\Documents\WindowsPowerShell\profile.ps1
- $Profile.CurrentUserCurrentHost: This profile applies to the current user and only to the PowerShell.exe host and is located in $env:UserProfile\Documents\WindowsPowerShell\Microsoft.PowerShell_profile.ps1
Using the $profile variable alone to create the profile will default to the CurrentUserCurrentHost location and is probably the most commonly-used profile type. If you need to create a profile for all the users on a machine, use one of the AllUsers profile types.
You may be wondering at this point what the difference is between the Current Host and All Hosts profile types. The PowerShell runtime can be hosted within third-party applications, so the All Hosts profile types apply to those instances of PowerShell. The Current Host profile types can be used with PowerShell.exe and when you are running the Exchange Management Shell.
In addition to defining custom aliases or functions in a profile, you may want to consider loading any other modules that may be useful. For example, you may want to load the Active Directory module for PowerShell so that those cmdlets are also available to you whenever you start the shell.
When you're done making changes to your profile, save and close the file. In order for the changes to take effect, you can either restart the shell, or you can dot-source the script to reload the profile:
.$profile
You can create multiple .ps1 scripts that include aliases, functions, and variables and then dot-source these scripts within your profile to have them loaded every time you start your PowerShell session.
To give an applicable example would be to use Import-Module inside the profile script to import PowerShell modules immediately when launching Windows PowerShell or Exchange Management Shell. Functions, modules, and other PS1 script files can also be loaded into the profile script.
You can reference the help system on this topic by running Get-Helpabout_profiles.
There's more...
Trying to remember all of the profile types and their associated script paths can be a little tough. There's actually a pretty neat trick that you can use with the $profile variable to view all of the profile types and file paths in the shell. To do this, access the psextended property of the $profile object:
$profile.psextended | Format-List
This will give you a list of each profile type and the path of the .ps1 script that should be used to create the profile.
See also
- The Command aliases recipe in this chapter
- The Working with variables and objects recipe in this chapter
Understanding the pipeline
The single most important concept in PowerShell is the use of its flexible, object-based pipeline. You may have used pipelines in UNIX-based shells, or when working with the cmd.exe command prompt. The concept of pipelines is similar in that you are sending the output from one command to another. But, instead of passing plain text, PowerShell works with objects, and we can accomplish some very complex tasks in just a single line of code. In this recipe, you'll learn how to use pipelines to string together multiple commands and build powerful one-liners.
How to do it...
The following pipeline command would set the office location for every mailbox in the DB2 database:
Get-Mailbox -Database DB2 | Set-User -Office "Headquarters"
How it works...
In a pipeline, you separate a series of commands using the pipe (|) character. In the previous example, the Get-Mailbox cmdlet returns a collection of mailbox objects. Each mailbox object contains several properties that contain information such as the name of the mailbox, the location of the associated user account in Active Directory, and more. The Set-User cmdlet is designed to accept input from the Get-Mailbox cmdlet in a pipeline, and with one simple command, we can pass along an entire collection of mailboxes that can be modified in one operation.
You can also pipe output to filtering commands, such as the Where-Object cmdlet. In this example, the command retrieves only the mailboxes with aMaxSendSize equal to 50 megabytes:
Get-Mailbox | Where-Object{$_.MaxSendSize -eq 50mb}
The code that the Where-Object cmdlet uses to perform the filtering is enclosed in curly braces ({}). This is called a script block, and the code within this script block is evaluated for each object that comes across the pipeline. If the result of the expression is evaluated as true, the object is returned; otherwise, it is ignored. In this example, we access the MaxSendSize property of each mailbox using the $_ object, which is an automatic variable that refers to the current object in the pipeline. We use the equals (-eq) comparison operator to check that the MaxSendSize property of each mailbox is equal to 50 megabytes. If so, only those mailboxes are returned by the command.
When running this command, which can also be referred to as a one-liner, each mailbox object is processed one at a time using stream processing. This means that as soon as a match is found, the mailbox information is displayed on the screen. Without this behavior, you would have to wait for every mailbox to be found before seeing any results. This may not matter if you are working in a very small environment, but without this functionality in a large organization with tens of thousands of mailboxes, you would have to wait a long time for the entire result set to be collected and returned.
One other interesting thing to note about the comparison being done inside our Where-Object filter is the use of the mb multiplier suffix. PowerShell natively supports these multipliers and they make it a lot easier for us to work with large numbers. In this example, we've used 50mb, which is the equivalent of entering the value in bytes because behind the scenes, PowerShell is doing the math for us by replacing this value with 1024*1024*50. PowerShell provides support for the following multipliers: kb, mb, gb, tb, and pb.
There's more...
You can use advanced pipelining techniques to send objects across the pipeline to other cmdlets that do not support direct pipeline input. For example, the following one-liner adds a list of users to a group:
    Get-User |
      Where-Object{$_.title -eq "Exchange Admin"} | Foreach-Object{
          Add-RoleGroupMember -Identity "Organization Management" `
          -Member $_.name
      }
This pipeline command starts off with a simple filter that returns only the users that have their Title set to Exchange Admin. The output from that command is then piped to the ForEach-Object cmdlet that processes each object in the collection. Similar to the Where-Object cmdlet, the ForEach-Object cmdlet processes each item from the pipeline using a script block. Instead of filtering, this time we are running a command for each user object returned in the collection and adding them to the Organization Management role group.
Using aliases in pipelines can be helpful because it reduces the number of characters you need to type. Take a look at the previous command, modified to use aliases:
    Get-User |
      ?{$_.title -eq "Exchange Admin"} | %{
        Add-RoleGroupMember -Identity "Organization Management" `
        -Member $_.name
      }
Notice the use of the question mark (?) and the percent sign (%) characters. The ? character is an alias for the Where-Object cmdlet, and the % character is an alias for the ForEach-Object cmdlet. These cmdlets are used heavily, and you'll often see them used with these aliases because it makes the commands easier to type.
The Where-Object and ForEach-Object cmdlets have additional aliases. Here's another way you could run the previous command:
    Get-User |
      where{$_.title -eq "Exchange Admin"} | foreach{
        Add-RoleGroupMember -Identity "Organization Management" `
        -Member $_.name
      }
Use aliases when you're working interactively in the shell to speed up your work and keep your commands concise. You may want to consider using the full cmdlet names in production scripts to avoid confusing others who may read your code.
See also
- The Looping through items recipe in this chapter
- The Creating custom objects recipe from in this chapter
Working with variables and objects
Every scripting language makes use of variables as placeholders for data, and PowerShell is no exception. You'll need to work with variables often to save temporary data to an object so you can work with it later. PowerShell is very different from other command shells in that everything you touch is, in fact, a rich object with properties and methods. In PowerShell, a variable is simply an instance of an object just like everything else. The properties of an object contain various bits of information depending on the type of object you're working with. In this recipe, we'll learn to create user-defined variables and work with objects in the Exchange Management Shell.
How to do it...
To create a variable that stores an instance of the testuser mailbox, use the following command:
$mailbox = Get-Mailbox testuser
How it works...
To create a variable, or an instance of an object, you prefix the variable name with the dollar sign ($). To the right of the variable name, use the equals (=) assignment operator, followed by the value or object that should be assigned to the variable. Keep in mind that the variables you create are only available during your current shell session and will be destroyed when you close the shell.
Let's look at another example. To create a string variable that contains an email address, use the following command:
$email = "testuser@contoso.com"
Even a simple string variable is an object with properties and methods. For instance, every string has a Length property that will return the number of characters that are in the string:
    [PS] C:\>$email.length
    20
When accessing the properties of an object, you can use dot notation to reference the property with which you want to work. This is done by typing the object name, then a period, followed by the property name, as shown in the previous example. You access methods in the same way, except that method names always end with parentheses ().
The string data type supports several methods, such as Substring, Replace, and Split. The following example shows how the Split method can be used to split a string:
    [PS] C:\>$email.Split("@")
    testuser
    contoso.com
You can see here that the Split method uses the @ portion of the string as a delimiter and returns two substrings as a result.
There's more...
At this point, you know how to access the properties and methods of an object, but you need to be able to discover and work with these members. To determine which properties and methods are accessible on a given object, you can use the Get-Member cmdlet, which is one of the key discovery tools in PowerShell along with Get-Help and Get-Command.
To retrieve the members of an object, pipe the object to the Get-Member cmdlet. The following command will retrieve all of the instance members of the $mailbox object we created earlier:
$mailbox | Get-Member
Let's take a look at a practical example of how we could use Get-Member to discover the methods of an object. Imagine that each mailbox in our environment has had a custom MaxSendSize restriction set and we need to record the value for reporting purposes. When accessing the MaxSendSize property, the following information is returned:
    [PS] C:\>$mailbox.MaxSendSize
    IsUnlimited Value
    ----------- -----
    False       50 MB (52,428,800 bytes)
We can see here that the MaxSendSize property actually contains an object with two properties: IsUnlimited and Value. Based on what we've learned, we should be able to access the information for the Value property using a dot notation:
    [PS] C:\>$mailbox.MaxSendSize.Value
    50 MB (52,428,800 bytes)
That works, but the information returned contains not only the value in megabytes, but also the total bytes for the MaxSendSize value. For the purpose of what we are trying to accomplish, we only need the total megabytes. Let's see if this object provides any methods that can help us out with this using Get-Member:
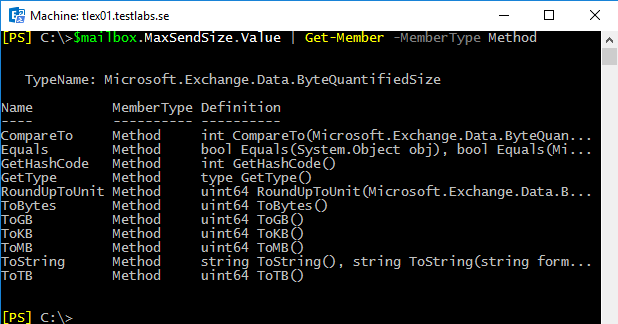
From the output shown in the previous screenshot, we can see this object supports several methods that can be used to convert the value. To obtain the MaxSendSize value in megabytes, we can call the ToMB method:
    [PS] C:\>$mailbox.MaxSendSize.Value.ToMB()
    50
In a traditional shell for Exchange on-premises, you would have to perform complex string parsing to extract this type of information, but PowerShell and the .NET Framework make this much easier. As you'll see over time, this is one of the reasons why PowerShell's object-based nature really outshines a typical text-based command shell.
An important thing to point out about this last example is that it would not work if the mailbox had not had a custom MaxSendSize limitation configured, which would be the case for newly created mailboxes in Exchange 2016, if not specified.
Nevertheless, this provides a good illustration of the process you'll want to use when you're trying to learn about an object's properties or methods.
Variable expansion in strings
As mentioned in the first recipe in this chapter, PowerShell uses quoting rules to determine how variables should be handled inside a quoted string. When enclosing a simple variable inside a double-quoted string, PowerShell will expand that variable and replace the variable with the value of the string. Let's take a look at how this works by starting off with a simple example:
    [PS] C:\>$name = "Bob"
    [PS] C:\> "The user name is $name"
    The user name is Bob
This is pretty straightforward. We stored the string value of Bob inside the $name variable. We then include the $name variable inside a double-quoted string that contains a message. When we hit return, the $name variable is expanded and we get back the message we expect to see on the screen.
Now let's try this with a more complex object. Let's say that we want to store an instance of a mailbox object in a variable and access the PrimarySmtpAddress property inside the quoted string:
    [PS] C:\>$mailbox = Get-Mailbox testuser
    [PS] C:\>"The email address is $mailbox.PrimarySmtpAddress"
    The email address is test user.PrimarySmtpAddress
Notice here that when we try to access the PrimarySmtpAddress property of our mailbox object inside the double-quoted string, we're not getting back the information that we'd expect. This is a very common stumbling block when it comes to working with objects and properties inside strings. We can get around this using a sub-expression notation. This requires that you enclose the entire object within $() characters inside the string:
    [PS] C:\>"The email address is $($mailbox.PrimarySmtpAddress)"
    The email address is testuser@testlabs.se
Using this syntax, the PrimarySmtpAddress property of the $mailbox object is properly expanded and the correct information is returned. This technique will be useful later when extracting data from objects and generating reports or log files.
Strongly typed variables
PowerShell will automatically try to select the correct data type for a variable based on the value being assigned to it. You don't have to worry about doing this yourself, but we do have the ability to explicitly assign a type to a variable if needed. This is done by specifying the data type in square brackets before the variable name:
[string]$var2 = 32
Here we've assigned the value of 32 to the $var2 variable. Had we not strongly typed the variable using the [string] type shortcut, $var2 would have been created using the Int32 data type, since the value we assigned was a number that was not enclosed in single or double quotes. Take a look at the following screenshot:
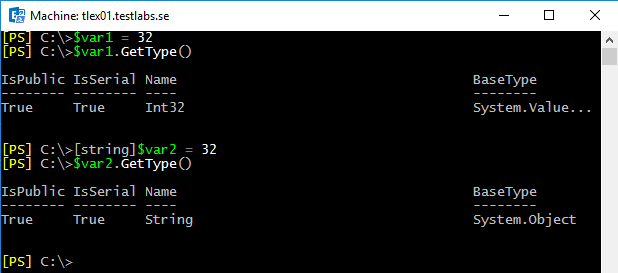
As you can see here, the $var1 variable is initially created without any explicit typing. We use the GetType() method, which can be used on any object in the shell, to determine the data type of $var1. Since the value assigned was a number not enclosed in quotes, it was created using the Int32 data type. When using the [string] type shortcut to create $var2 with the same value, you can see that it has now been created as a string.
It is good to have an understanding of data types because when building scripts that return objects, you may need to have some control over this. For example, you may want to report on the amount of free disk space on an Exchange server. If we store this value in the property of a custom object as a string, we lose the ability to sort on that value. There are several examples throughout the book that use this technique.
Working with arrays and hash tables
Like many other scripting and programming languages, Windows PowerShell allows you to work with arrays and hash tables. An array is a collection of values that can be stored in a single object. A hash table is also known as an associative array, and is a dictionary that stores a set of key-value pairs. You'll need to have a good grasp of arrays so that you can effectively manage objects in bulk and gain maximum efficiency in the shell. In this recipe, we'll take a look at how we can use both types of arrays to store and retrieve data.
How to do it...
You can initialize an array that stores a set of items by assigning multiple values to a variable. All you need to do is separate each value with a comma. The following command would create an array of server names:
$servers = "EX1","EX2","EX3"
To create an empty hash table, use the following syntax:
$hashtable = @{}
Now that we have an empty hash table, we can add key-value pairs:
    $hashtable["server1"] = 1
    $hashtable["server2"] = 2
    $hashtable["server3"] = 3
Notice in this example that we can assign a value based on a key name, not using an index number as we saw with a regular array. Alternatively, we can create this same object using a single command using the following syntax:
$hashtable = @{server1 = 1; server2 = 2; server3 = 3}
You can see here that we used a semicolon (;) to separate each key-value pair. This is only required if the entire hash table is created in one line.
You can break this up into multiple lines to make it easier to read:
$hashtable = @{
  server1 = 1
  server2 = 2
  server3 = 3
}
To create an empty array, use the following syntax:
$servers = @()
How it works...
Let's start off by looking at how arrays work in PowerShell. When working with arrays, you can access specific items and add or remove elements. In our first example, we assigned a list of server names to the $servers array. To view all of the items in the array, simply type the variable name and hit return:
    [PS] C:\>$servers
    EX1
    EX2
    EX3
Array indexing allows you to access a specific element of an array using its index number inside square brackets ([]). PowerShell arrays are zero-based, meaning that the first item in the array starts at index zero. For example, use the second index to access the third element of the array, as shown next:
    [PS] C:\>$servers[2]
    EX3
To assign a value to a specific element of the array, use the equals (=) assignment operator. We can change the value from the last example using following syntax:
    [PS] C:\>$servers[2] = "EX4"
    [PS] C:\>$servers[2]
    EX4
Let's add another server to this array. To append a value, use the plus equals (+=) assignment operator as shown here:
    [PS] C:\>$servers += "EX5"
    [PS] C:\>$servers
    EX1
    EX2
    EX4
    EX5
To determine how many items are in an array, we can access the Count property to retrieve the total number of array elements:
    [PS] C:\>$servers.Count
    4
We can loop through each element in the array with the ForEach-Object cmdlet and display the value in a string:
$servers | ForEach-Object {"Server Name: $_"}
We can also check for a value in an array using the -Contains or -NotContains conditional operators:
    [PS] C:\>$servers -contains "EX1"
    True
In this example, we are working with a one-dimensional array, which is what you'll commonly be dealing with in the Exchange Management Shell. PowerShell supports more complex array types such as jagged and multidimensional arrays, but these are beyond the scope of what you'll need to know for the examples in this book.
Now that we've figured out how arrays work, let's take a closer look at hash tables. When viewing the output for a hash table, the items are returned in no particular order. You'll notice this when viewing the hash-table we created earlier:
    [PS] C:\>$hashtable
    Name                           Value
    ----                           -----
    server2                        2
    server3                        3
    server1                        1
If you want to sort the hash table, you can call the GetEnumerator method and sort by the Value property:
    [PS] C:\>$hashtable.GetEnumerator() | sort value
    Name                           Value
    ----                           -----
    server1                        1
    server2                        2
    server3                        3
Hash tables can be used when creating custom objects, or to provide a set of parameter names and values using parameter splitting. Instead of specifying parameter names one by one with a cmdlet, you can use a hash table with keys that match the parameter's names and their associated values will automatically be used for input:
$parameters = @{
  Title = "Manager"
  Department = "Sales"
  Office = "Headquarters"
}
Set-User testuser @parameters
This command automatically populates the parameter values for Title, Department, and Office when running the Set-User cmdlet for the testuser mailbox.
For more details and examples for working with hash tables, run Get-Help about_Hash_Tables.
There's more...
You can think of a collection as an array created from the output of a command. For example, the Get-Mailbox cmdlet can be used to create an object that stores a collection of mailboxes, and we can work with this object just as we would with any other array. You'll notice that, when working with collections, such as a set of mailboxes, you can access each mailbox instance as an array element. Consider the following example:
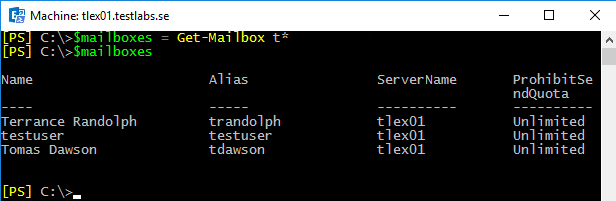
First, we retrieve a list of mailboxes that start with the letter t and assign that to the $mailboxes variable. From looking at the items in the $mailboxes object, we can see that the testuser mailbox is the second mailbox in the collection.
Since arrays are zero-based, we can access that item using the first index, as shown next:

In previous version(s) of Exchange Server, we had an issue when the command only returned one item; the output could not be accessed using array notation. If you, for some reason face this, it can be solved by using the following syntax:
$mailboxes = @(Get-Mailbox testuser)
You can see here that we've wrapped the command inside the @() characters to ensure that PowerShell will always interpret the $mailboxes object as an array. This can be useful when you're building a script that always needs to work with an object as an array, regardless of the number of items returned from the command that created the object. Since the $mailboxes object has been initialized as an array, you can add and remove elements as needed.
We can also add and remove items to multi-valued properties, just as we would with a normal array. To add an email address to the testuser mailbox, we can use the following commands:
    $mailbox = Get-Mailbox testuser
    $mailbox.EmailAddresses += "testuser2@testlabs.se"
    Set-Mailbox testuser -EmailAddresses $mailbox.EmailAddresses
In this example, we created an instance of the testuser mailbox by assigning the command to the $mailbox object. We can then work with the EmailAddresses property to view, add, and remove email addresses from this mailbox. You can see here that the plus equals (+=) operator was used to append a value to the EmailAddresses property.
We can also remove that value using the minus equals (-=) operator:
    $mailbox.EmailAddresses -= "testuser2@testlabs.se"
    Set-Mailbox testuser -EmailAddresses $mailbox.EmailAddresses
We've covered the core concepts in this section that you'll need to know when working with arrays. For more details, run Get-Help about_arrays.
See also
- The Working with variables and objects recipe in this chapter
- The Creating custom objects recipe in this chapter
Looping through items
Loop processing is a concept that you will need to master in order to write scripts and one-liners with efficiency. You'll need to use loops to iterate over each item in an array or a collection of items, and then run one or more commands within a script block against each of those objects. In this recipe, we'll take a look at how you can use foreach loops and the ForEach-Object cmdlet to process items in a collection.
How to do it...
The foreach statement is a language construct used to iterate through values in a collection of items. The following example shows the syntax used to loop through a collection of mailboxes, returning only the name of each mailbox:
foreach ($mailbox in Get-Mailbox) {$mailbox.Name}
In addition, you can take advantage of the PowerShell pipeline and perform loop processing using the ForEach-Object cmdlet. This example produces the same result as the one shown previously:
Get-Mailbox | ForEach-Object {$_.Name}
You will often see the given command written using an alias of the ForEach-Object cmdlet, such as the percent sign (%):
Get-Mailbox | %{$_.Name}
How it works...
The first part of a foreach statement is enclosed in parentheses and represents a variable and a collection. In the previous example, the collection is the list of mailboxes returned from the Get-Mailbox cmdlet. The script block contains the commands that will be run for every item in the collection of mailboxes. Inside the script block, the $mailbox object is assigned the value of the current item being processed in the loop. This allows you to access each mailbox one at a time using the $mailbox variable.
When you need to perform loop processing within a pipeline, you can use the ForEach-Object cmdlet. The concept is similar, but the syntax is different because objects in the collection are coming across the pipeline.
The ForEach-Object cmdlet allows you to process each item in a collection using the $_ automatic variable, which represents the current object in the pipeline. The ForEach-Object cmdlet is probably one of the most commonly-used cmdlets in PowerShell, and we'll rely on it heavily in many examples throughout the book.
The code inside the script block used with both looping methods can be more complex than just a simple expression. The script block can contain a series of commands or an entire script. Consider the following code:
Get-MailboxDatabase -Status | %{
  $DBName = $_.Name
  $whiteSpace = $_.AvailableNewMailboxSpace.ToMb()
  "The $DBName database has $whiteSpace MB of total white space"
}
In this example, we're looping through each mailbox database in the organization using the ForEach-Object cmdlet. Inside the script block, we've created multiple variables, calculated the total megabytes of whitespace in each database, and returned a custom message that includes the database name and corresponding whitespace value. This is a simple example, but keep in mind that inside the script block, you can run other cmdlets, work with variables, create custom objects, and more.
PowerShell also supports other language constructs for processing items such as for, while, and do loops. Although these can be useful in some cases, in the next recipe we will use while and do loops as examples. You can read more about them and view examples using the get-helpabout_for, get-helpabout_while, and get-help about_do commands in the shell.
There's more...
There are some key differences about the foreach statement and the ForEach-Object cmdlet that you'll want to be aware of when you need to work with loops. First, the ForEach-Object cmdlet can process one object at a time as it comes across the pipeline. When you process a collection using the foreach statement, this is the exact opposite. The foreach statement requires that all of the objects that need to be processed within a loop are collected and stored in memory before processing begins. We'll want to take advantage of the PowerShell pipeline and its streaming behavior whenever possible since it is much more efficient.
The other thing to make note of is that in PowerShell, foreach is not only a keyword, but also an alias. This can be a little counterintuitive, especially when you are new to PowerShell and you run into a code sample that uses the following syntax:
Get-Mailbox | foreach {$_.Name}
At first glance, this might seem like we're using the foreach keyword, but we're actually using an alias for the ForEach-Object cmdlet. The easiest way to remember this distinction is that the foreach language construct is always used before a pipeline. If you use foreach after a pipeline, PowerShell will use the foreach alias which corresponds to the ForEach-Object cmdlet.
Another common loop is the for loop; its ideal where the same sequence of statements need to be repeated a specific number of times. Explaining the for loop is probably most easily done by illustrating an example:
for (initialize; condition; increment) {
code block
}
Initialize section - You set a variable with a starting value. In the initialize segment, you can set one or more variables by separating them with commas.
Condition section - The condition is tested each time by PowerShell before it executes the code. If the condition is found to be true, your body of code will be executed. If the condition is found to be false, PowerShell stops executing the code.
Increment section - In this section, you specify how you want the variable to be updated after each run of the loop. This can be an increment or a decrement or any other change you need. After the code has been executed once, PowerShell will update your variable.
The for loop keeps on looping until your conditional turns false, just like the following example:
for ($i = 1; $i -le 10; $i++) {
Write-Host $i
}
In this example, initially $i is set to a value of 1. The loop will run until $i is less or equal to 10. Our example will write the value for $i on the screen.
Another common loop is the do while and while loop, this loop executes until the condition value is True. This kind of loop can be helpful when moving mailboxes. The loop can then be used for verifying that the move is proceeding as expected and has finished successfully. In that case, the move status would be the condition that the loop is using:
do { code block }
 while (condition)
The two different sections are shown in the preceding code and they are almost self-explanatory. Under the do section, the code is written; as our following example shows, we are using Write-Host.
Under the while section, the condition is set; in our example, the condition is that $i is less 10:
$i = 1
 do {  Write-Host $i
   $i++
 }
 while ($i -le 10)
See also
- The Working with arrays and hash tables recipe in this chapter
- The Understanding the pipeline recipe in this chapter
- The Creating custom objects recipe in this chapter
Creating custom objects
The fact that PowerShell is an object-based shell gives us a great deal of flexibility when it comes to writing one-liners, scripts, and functions. When generating detailed reports, we need to be able to customize the data output from our code so it can be formatted or piped to other commands that can export the data in a clean, structured format. We also need to be able to control and customize the output from our code so that we can merge data from multiple sources into a single object. In this recipe, you'll learn a few techniques used to build custom objects.
How to do it...
The first thing we'll do is create a collection of mailbox objects that will be used as the data source for a new set of custom objects:
$mailboxes = Get-Mailbox
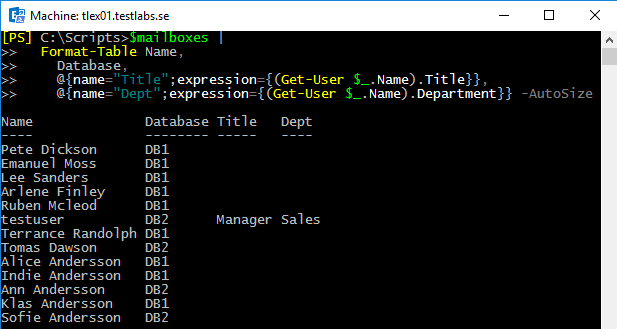
You can add custom properties to any object coming across the pipeline using calculated properties. This can be done using either the Select-Object or Format-Table together with the -AutoSize parameter:
$mailboxes |
  Format-Table Name,
    Database,
    @{name="Title";expression={(Get-User $_.Name).Title}},
    @{name="Dept";expression={(Get-User $_.Name).Department}} -AutoSize
Another easy way to do this is by assigning a hash table to the -Property parameter of the New-Object cmdlet:
$mailboxes | %{
  New-Object PSObject -Property @{
    Name = $_.Name
    Database = $_.Database
    Title = (Get-User $_.Name).Title
    Dept = (Get-User $_.Name).Department
  }
}
You can also use the New-Object cmdlet to create an empty custom object, and then use the Add-Member cmdlet to tack on any custom properties that are required:
$mailboxes | %{
  $obj = New-Object PSObject
  $obj | Add-Member NoteProperty Name $_.Name
  $obj | Add-Member NoteProperty Database $_.Database
  $obj | Add-Member NoteProperty Title (Get-User $_.Name).Title
  $obj | Add-Member NoteProperty Dept (Get-User $_.Name).Department
  Write-Output $obj
}
Each of these three code samples will output the same custom objects that combine data retrieved from both the Get-Mailbox and Get-User cmdlets. Assuming that the Title and Department fields have been defined for each user, the output would look similar to the following:
How it works...
The reason we're building a custom object here is because we want to merge data from multiple sources into a single object. The Get-Mailbox cmdlet does not return the Title or Department properties that are tied to a user account: the Get-User cmdlet needs to be used to retrieve that information. Since we may want to generate a report that includes information from both the Get-Mailbox and Get-User cmdlets for each individual user, it makes sense to build a custom object that contains all of the required information. We can then pipe these objects to other cmdlets that can be used to export this information to a file.
We can modify one of our previous code samples and pipe the output to a CSV file used to document this information for the current user population:
$mailboxes |
  Select-Object Name,
    Database,
    @{n="Title";e={(Get-User $_.Name).Title}},
    @{n="Dept";e={(Get-User $_.Name).Department}} |
      Export-CSV -Path C:\Scripts\report.csv -NoTypeInformation
Keep in mind that even though you can also create calculated properties using the Format-Table cmdlet, you'll want to use Select-Object, as shown previously, when converting these objects to CSV or HTML reports. These conversion cmdlets do not understand the formatting information returned by the Format-Table cmdlet, and you'll end up with a lot of useless data if you try to do this.
When building custom objects with the Select-Object cmdlet, we can select existing properties from objects coming across the pipeline and also add one or more calculated properties. This is done using a hash table that defines a custom property name in the hash table key and a script block within the hash table value. The script block is an expression where you can run one or more commands to define the custom property value. In our previous example, you can see that we've called the Get-User cmdlet to retrieve both the Title and Department properties for a user that will be assigned to calculated properties on a new object.
The syntax for creating a calculated property looks a little strange at first glance since it uses name and expression keywords to create a hash table that defines the calculated property. You can abbreviate these keywords as shown next:
$mailboxes |
  Select-Object Name,
    Database,
    @{n="Title";e={(Get-User $_.Name).Title}},
    @{n="Dept";e={(Get-User $_.Name).Department}}
The property name uses the string value assigned to n, and the property value is assigned to e using a script block. Abbreviating these keywords with n and e just makes it easier to type. You can also use label or l to provide the calculated property name.
Using the New-Object cmdlet and assigning a hash table to the -Property parameter is a quick and easy way to create a custom object. The only issue with this technique is that the properties can be returned in a random order. This is due to how the .NET Framework assigns random numeric values to hash table keys behind the scenes, and the properties are sorted based on those values, not in the order that you've defined them. The only way to get the properties back in the order you want is to continue to pipe the command to Select-Object and select the property names in order, or use one of the other techniques shown in this recipe.
Creating an empty custom object and manually adding note properties with the Add-Member cmdlet can require a lot of extra typing, so generally this syntax is not widely used. This technique becomes useful when you want to add script methods or script properties to a custom object, but this is an advanced technique that we won't need to utilize for the recipes in the remainder of this book.
There's more...
There is another useful technique for creating custom objects which utilizes the Select-Object cmdlet. Take a look at the following code:
$mailboxes | %{
  $obj = "" | Select-Object Name,Database,Title,Dept
  $obj.Name = $_.Name
  $obj.Database = $_.Database
  $obj.Title = (Get-User $_.Name).Title
  $obj.Dept = (Get-User $_.Name).Department
  Write-Output $obj
}
You can create a custom object by piping an empty string variable to the Select-Object cmdlet, specifying the property names that should be included. The next step is to simply assign values to the properties of the object using the property names that you've defined. This code loops through the items in our $mailboxes object and returns a custom object for each one. The output from this code returns the same exact objects as all of the previous examples.
See also
- The Looping through items recipe in this chapter
- The Working with variables and objects recipe in this chapter
- The Exporting reports to text and CSV files from Chapter 2, Exchange Management Shell Common Tasks
Using debugger functions
With PowerShell version 5, great functions such as debugging scripts and code in PowerShell were added. This was introduced in Windows Management Framework (WMF) 5.0. In this recipe, we will take a look at it in more depth. This recipe is more a general PowerShell function but can of course be applied to Exchange scripts.
Let us take a look at two of these functions in detail and start with the basics and then advance from there. Both these examples can be used in the PowerShell console and in Windows PowerShell ISE.
The first method we are going to take a look at is called Break All, introduced in PowerShell v5. This method gives us the option to debug the PowerShell workflow and supports command and tab completion. We can debug nested workflow functions both in local and remote sessions.
The second function in this recipe will be to use the Debug-Job cmdlet inside more complex and advanced scripts. It uses the same basis as the Break All function.
How to do it...
First we create a variable named $i with a value of 1 and then create a loop using the Do While operator. The loop will run until $i is less or equal to 20. Within the loop a text string is written to the console with a text Value: and the value of $i.
$i = 1
Do {
Write-Host "Value: $i"
   $i++
   Start-Sleep -Milliseconds 200
}
While ($i -le 20)
As this is a basic example on how the debugger can be used, this method would be helpful for production when executing scripts. The debugger mode can be used when the script is running by pressing Ctrl + Break or Ctrl + B. When breaking the script, it will look like the following screenshot:

We can see that the script called loop.ps1 is stopped and has entered debug mode. When pressing h or ?, the help information will show up.
In debug mode, we can see the full source code (using l) in the current script; we can also step through every row in the script (using s), step to the next statement (using v), and, of course, continue running the script (using c) or stop the operation and exit debug mode (using q).
How it works...
By initializing the debugging mode, the script is stopped until using either the Continue or Quit commands. The debugging can be very helpful; for example, you can step through the code, view source code, verify variables, view the environment state, and execute commands.
As an example, from the preceding screenshot, let us take a look at what the value in the variable $i is by typing the following:
    [PS] C:\Scripts>$i
    4
Here we see that the value was 4 as the loop was stopped at that stage.
There's more...
Together with the code debugger function, we can use the Debug-Job cmdlet that was introduced in version 5 of PowerShell.
The Debug-Job cmdlet lets you break into the script debugger while running a job in a similar way as the Break All function lets us break into running script from the console or ISE.
A typical scenario where we could use Debug-Job is when we are running a long, complex script as a job and, for one reason or another, we suspect the script is not executing correctly. It may be taking longer than expected or some of the output data doesn't seem right. Now we can drop the job into the debugger by using the Debug-Job which allows us to verify that the code is being executed the way it's expected to do. It's a great and helpful function.
As you probably are aware of, or will face in the future, is that while debugging scripts, interactively they work as expected, but when they are running as jobs in production they fail. However, this can now be debugged with this new feature by setting breakpoints or using the Wait-Debugger cmdlet.
In the following example, we are setting a breakpoint at line 4 to debug the script and run it as a job and use the Debug-Job cmdlet:
    $job = Start-Job -ScriptBlock { Set-PSBreakpoint `            C:\Scripts\MyJob.ps1-Line 4; C:\Scripts\MyJob.ps1 `
    }
    $job

    Debug-Job $job
By doing this, we will enter debugging mode and can reach variables, execute commands, view the environment state, view source code, and step through the code.

The preceding screenshot shows that the job state is AtBreakpoint, which means that it is waiting to be debugged. The method works similarly to the Break All method; it will only debug the script itself and cannot debug any external commands.
To continue the process and leave debugging mode, use the detach command.
See also
- The Understanding the new execution Policy recipe in this chapter
- The Creating custom objects recipe in this chapter
- The Using the Save-Help function recipe in this chapter
Understanding the new execution policy
Windows PowerShell implements script security to keep unwanted scripts from running in your environment. You have the option of signing your scripts with a digital signature to ensure that scripts that run are from a trusted source.
The policy has five (Unrestricted, RemoteSigned, AllSigned, Restricted, Default, Bypass, and Undefined) different states to be set in five different scopes (MachinePolicy, UserPolicy, Process, CurrentUser, and LocalMachine).
A short description of the different states and what they can or can't do follows:
- Undefined - There is no execution policy set for the current scope
- Restricted - No script, be it local, remote, or downloaded can be executed
- AllSigned - All script that is run required to be digitally signed
- RemoteSigned - All remote (UNC) or downloaded scripts required to be digitally signed
- Bypass - Nothing is blocked and there are no warnings or prompts
- Unrestricted - All scripts are allowed to be executed
And the following is a description of the different scopes:
- MachinePolicy - The execution policy set by a Group Policy applies to all users
- UserPolicy - The execution policy set by a Group Policy applies to the current user
- Process - The execution policy applies to the current Windows PowerShell process
- CurrentUser - The execution policy applies to the current user
- LocalMachine - The execution policy applies to all users of the computer
Windows PowerShell implements script security to keep unwanted scripts from running in your environment. You have the option of signing your scripts with a digital signature to ensure that scripts that are run are from a trusted source.
It is possible to manage Exchange 2016 through PowerShell remoting on a workstation or server without Exchange Tools installed. In this case, you'll need to make sure your script execution policy is set to either RemoteSigned or Unrestricted. To set the execution policy, use the following command:
Set-ExecutionPolicy RemoteSigned
Make sure you do not change the execution policy to AllSigned on machines where you'll be using the Exchange cmdlets. This will interfere with importing the commands through a remote PowerShell connection, which is required for the Exchange Management Shell cmdlets to run properly.
How to do it...
The following are some examples of cmdlets that can be used for configuring the execution policy:
    Get-ExecutionPolicy -List | Format-Table -AutoSize

    Set-ExecutionPolicy AllSigned

    Set-ExecutionPolicy -Scope CurrentUser -ExecutionPolicy ` RemoteSigned
How it works...
The default scope is set to LocalMachine if nothing is specified, which means it will apply to everyone on this machine. If the execution policy is set to Undefined in all scopes, the effective execution policy is Restricted.
We started with listing the current policy settings and then continued with configuring the LocalMachine policy to require scripts to be digitally signed or else they will be prohibited from being executed.
The last cmdlet which was used configured the CurrentUser to RemoteSigned instead of AllSigned, which was configured to the LocalMachine policy.
Once this change is done, the configuration would look like the following screenshot:

This makes it possible to have the execution policy configured to require digital signatures for scripts that are being executed by everyone, except the current logged in user.
If you are uncertain as to which user that is logged on, use the whoami command.
There's more...
Since the default execution policy is configured to RemoteSigned, the effect is that all remote (UNC) or downloaded scripts required to be digitally signed.
It is very common that when a script is downloaded, we need to unblock this file before it can be executed when the policy is set to default settings.
Of course, the recommendation before unblocking any downloaded file is to test it in a test environment so it doesn't harm any production environment or it doesn't contain any malicious code in some way:
    Unblock-File -Path C:\Scripts\HarmlessScript.ps1

    Get-ChildItem C:\DownloadFolder | Unblock-File
The first line unblocks the specified downloaded file, while the second line retrieves all files from a folder called DownloadFolder and then unblocks them. This, in the end, makes it possible to execute these files with the default configuration.
Unblock-File performs the same operation as the Unblock button on the Properties dialog box in File Explorer.
For more detailed information, use the Get-Help about_Execution_Policies cmdlet.
See also
- The Working with the desired state configuration recipe in this chapter
- The Working with script repositories recipe in this chapter
- The Using the Save-Help function recipe in this chapter
Using the Save-Help function
The useful help cmdlet, Get-Help, can provide useful information and examples. By default, PowerShell retrieves the help files from the internet if they are not available locally.
In PowerShell version 4 of Windows Management Framework (WMF), the function was introduced that made it possible to save the help files and import them into another server or client, which is great when a server or client is prohibited for having internet access.
This can be done with a few commands that will be described in the section How it works....
How to do it...
Let's take a look at the following example for updating the help files for the modules that have anything to do with Microsoft.PowerShell:
    Get-Module -Name Microsoft.PowerShell*

    Save-Help -Module Microsoft.PowerShell* -DestinationPath ` "C:\HelpFiles"

    Update-Help-SourcePath "C:\Help" -Force

    Update-Help -SourcePath "\\fileserver\HelpFilesShare" -Force
How it works...
Once the help files are downloaded, each module contains an XML and CAB file. These can be updated per module or all of them at one time. This is a basic task to perform.
In the preceding example, we are first retrieving the modules that are available that have a name of Microsoft.PowerShell followed by something. Then the help files are downloaded for these modules and saved into a local folder called Help.
If not specifying any modules, all help files for PowerShell will be downloaded into the specified folder.
Finally, these help files are then imported on another server or client, simply where they are needed by using the Update-Help cmdlet.
As shown in the preceding example, the Update-Help can either be pointing at a local folder or a UNC path or share.
Be aware that when running the Update-Help cmdlet, you may require using the Run as Admin or else it might not have the access needed for importing the files into the system.

A good idea would be to always keep these help files up to date and update them in the PowerShell profile to make sure that it's the current version.
See also
- The Using the help system recipe in this chapter
- The Using debugger functions recipe in this chapter
- The Creating custom objects recipe in this chapter
Working with script repositories
Windows Management Framework (WMF) version 5.1 includes a package manager called PowerShellGet, which enabled functionality such as find, get, install, and uninstall packages from internal and public sources. However, this recipe is not specific to Exchange. See this recipe as a tips and tricks recipe, since it's more PowerShell general than Exchange specific.
PowerShellGet is a package manager for Windows PowerShell. Basically, it is a wrapper around the Package Manager component which simplifies the package management for PowerShell modules. PowerShellGet is built on top of the well-known package management solution, NuGet.
Package Manager is a unified package management component which allows you to search for software install, uninstall, and inventory of any type of software that it supports through the provider interface.
Package Manager works with the community based software repository called PowerShell Gallery. Currently PowerShell Gallery has more than 1,500 unique packages to download and use for free.
Chocolatey is also still available; it's also a community based software repository. Some examples of how to use these can be found in the There's more section.
There are a bunch of galleries (also referred to as providers) to use and select between, such as Chocolatey, PowerShell Resource Gallery (Microsoft supported), MyGet, Inedo ProGet, JFrog Artifactory, and many more.
For a better understanding, let's take a look at the first example.
How to do it...
In this example, we will use PowerShellGet to install two example modules from PowerShell Gallery:
    Import-Module -Name PackageManagement

    Get-Command -Module PackageManagement

    Find-Package | Out-GridView

    Find-Package -Name "AzureAD"

    Find-Package -Name "GetUptime"

    Install-Package -Name "AzureAD"

    Install-Package -Name "GetUptime"

    Get-Package -ProviderName PowerShellGet
How it works...
For illustrating how the Package Manager works, see the preceding example.
First we imported the module of Package Management, for using the cmdlets for the Package Manager. We then used the Get-Command cmdlet to see what commands are available with this module.
With the Find-Package cmdlet, we searched for the available packages. First we piped the results to a GridView, since this can be user friendly to watch instead of text. Once we found the packages we were looking for (in this example Notepad++ and 7zip), we were using the Install-Package cmdlet to install these packages. The following screenshot shows when the installation had taken place, the packages were now available for use and could be found from the start button.

Once the packages/modules have been successfully installed they can be imported and utilized by using the following cmdlets:
    Import-Module GetUptime

    Get-Command -Module GetUptime

    Get-Uptime
The following screenshot shows an example of the GetUptime module, where the module shows the server uptime:

Once the packages are in place and it has been verified that everything is working as expected, let's finalize this by uninstalling them. Some examples of cmdlets for uninstalling packages are shown here:
    Uninstall-Package -Name "AzureAD"

    Uninstall-Package -Name "GetUptime"
There's more...
We have now been using the built-in package manager based on PowerShellGet. In the previous book called "Microsoft Exchange Server PowerShell Cookbook - Third Edition", we also used Chocolatey, where we can install third-party rich applications.
We'll take a look at how we can utilize chocolatey with Windows 2016 Server and Exchange 2016:
    iwr https://chocolatey.org/install.ps1 -UseBasicParsing | iex
    choco upgrade chocolatey

    choco install notepadplusplus.install
    choco upgrade notepadplusplus.install
    choco uninstall notepadplusplus.install

    choco install 7zip.install
    choco upgrade 7zip.install
    choco uninstall 7zip.install
In the preceding examples, we start by installing chocolatey. The second cmdlet is used for upgrading the existing installation of chocolatey. This is followed by two examples of how to install, upgrade, and uninstall two third-party application packages (Notepad++ and 7zip).
Chocolatey is great in many ways, but probably most companies, or at least enterprise companies, want to have their own "internal", more trusted and reliable repository, but still hosted on the internet.
Let's take a look at how this can be established. First let's sign up for an account at an optional provider.
In my case, I've used http://www.myget.org as the provider and created a feed when the account was created.
Now, let's see how the feed can be used as a repository. The feed that was created had an URL of: https://www.myget.org/F/tlpowershell/. Once it's created, we have to register it as a repository in PowerShell using the Register-PSRepository cmdlet:
    Register-PSRepository -Name MyGet -SourceLocation `
    https://www.myget.org/F/tlpowershell/api/v1 `
    -PublishLocation https://www.myget.org/F/tlpowershell/ `
    -InstallationPolicy Trusted

    Find-Package -Source MyGet
Since the MyGet repository is brand new, there are currently no packages. So the next action is to upload a package to MyGet. For being able to upload a module, the module itself should have a file extension of .psm1 together with the module manifest using an extension of .psd1. In the manifest, it's necessary to include the values of Author and Description, but I want to recommend that the value of RootModule, ModuleVersion, and CompanyName, are also included. The following examples show how the manifest was created and also how the modules were published to MyGet.
    New-ModuleManifest -Path ` C:\Windows\System32\WindowsPowerShell\v1.0\Modules\mailboxes.psd1` -Author "Jonas Andersson" -CompanyName "Testlabs, Inc." `
 -RootModule "mailboxes" -Description `
 "Module that lists mailboxes" -ModuleVersion "1.0"

    Import-Module PowerShellGet

 $PSGalleryPublishUri = ` 'https://www.myget.org/F/tlpowershell/api/v2/package'

 $PSGallerySourceUri = ` 'https://www.myget.org/F/tlpowershell/api/v2'


    Publish-Module -Name mailboxes -NuGetApiKey `
 a2d5b281-c862-4125-9523-be42ef21f55a -Repository MyGet

    Find-Package -Source MyGet

    Install-Package -Name "mailboxes" -Source MyGet
Before ending this recipe, we might want to remove the repository for some reason. This is done simply by running the following cmdlet:
Unregister-PSRepository -Name MyGet
See also
- The Understanding the new execution policy recipe in this chapter
- The Creating custom objects recipe in this chapter