Matrix and Pixel Manipulation along with Handling Files
Read more
Matrix and Pixel Manipulation along with Handling Files
Packt
840 min read
2015-08-11 00:00:00
0 Likes
0 Comments
In this article, by Daniel Lélis Baggio, author of the book OpenCV 3.0 Computer Vision with Java, you will learn to perform basic operations required in computer vision, such as dealing with matrices, pixels, and opening files for prototype applications.
In this article, the following topics will be covered:
Basic matrix manipulation
Pixel manipulation
How to load and display images from files
(For more resources related to this topic, see here.)
Basic matrix manipulation
From a computer vision background, we can see an image as a matrix of numerical values, which represents its pixels. For a gray-level image, we usually assign values ranging from 0 (black) to 255 (white) and the numbers in between show a mixture of both. These are generally 8-bit images. So, each element of the matrix refers to each pixel on the gray-level image, the number of columns refers to the image width, as well as the number of rows refers to the image's height. In order to represent a color image, we usually adopt each pixel as a combination of three basic colors: red, green, and blue. So, each pixel in the matrix is represented by a triplet of colors.
It is important to observe that with 8 bits, we get 2 to the power of eight (28), which is 256. So, we can represent the range from 0 to 255, which includes, respectively the values used for black and white levels in 8-bit grayscale images. Besides this, we can also represent these levels as floating points and use 0.0 for black and 1.0 for white.
OpenCV has a variety of ways to represent images, so you are able to customize the intensity level through the number of bits considering whether one wants signed, unsigned, or floating point data types, as well as the number of channels. OpenCV's convention is seen through the following expression:
CV_<bit_depth>{U|S|F}C(<number_of_channels>)
Here, U stands for unsigned, S for signed, and F stands for floating point. For instance, if an 8-bit unsigned single-channel image is required, the data type representation would be CV_8UC1, while a colored image represented by 32-bit floating point numbers would have the data type defined as CV_32FC3. If the number of channels is omitted, it evaluates to 1. We can see the ranges according to each bit depth and data type in the following list:
CV_8U: These are the 8-bit unsigned integers that range from 0 to 255
CV_8S: These are the 8-bit signed integers that range from -128 to 127
CV_16U: These are the 16-bit unsigned integers that range from 0 to 65,535
CV_16S: These are the 16-bit signed integers that range from -32,768 to 32,767
CV_32S: These are the 32-bit signed integers that range from -2,147,483,648 to 2,147,483,647
CV_32F: These are the 32-bit floating-point numbers that range from -FLT_MAX to FLT_MAX and include INF and NAN values
CV_64F: These are the 64-bit floating-point numbers that range from -DBL_MAX to DBL_MAX and include INF and NAN values
You will generally start the project from loading an image, but it is important to know how to deal with these values. Make sure you import org.opencv.core.CvType and org.opencv.core.Mat. Several constructors are available for matrices as well, for instance:
Mat image2 = new Mat(480,640,CvType.CV_8UC3);
Mat image3 = new Mat(new Size(640,480), CvType.CV_8UC3);
Both of the preceding constructors will construct a matrix suitable to fit an image with 640 pixels of width and 480 pixels of height. Note that width is to columns as height is to rows. Also pay attention to the constructor with the Size parameter, which expects the width and height order. In case you want to check some of the matrix properties, the methods rows(), cols(), and elemSize() are available:
The isCont property tells us whether this matrix uses extra padding when representing the image, so that it can be hardware-accelerated in some platforms; however, we won't cover it in detail right now. The isSubmat property refers to fact whether this matrix was created from another matrix and also whether it refers to the data from another matrix. The nativeObj object refers to the native object address, which is a Java Native Interface (JNI) detail, while dataAddr points to an internal data address. The element size is measured in the number of bytes.
Another matrix constructor is the one that passes a scalar to be filled as one of its elements. The syntax for this looks like the following:
Mat image = new Mat(new Size(3,3), CvType.CV_8UC3, new Scalar(new double[]{128,3,4}));
This constructor will initialize each element of the matrix with the triple {128, 3, 4}. A very useful way to print a matrix's contents is using the auxiliary method dump() from Mat. Its output will look similar to the following:
It is important to note that while creating the matrix with a specified size and type, it will also immediately allocate memory for its contents.
Pixel manipulation
Pixel manipulation is often required for one to access pixels in an image. There are several ways to do this and each one has its advantages and disadvantages. A straightforward method to do this is the put(row, col, value) method. For instance, in order to fill our preceding matrix with values {1, 2, 3}, we will use the following code:
for(int i=0;i<image.rows();i++){
for(int j=0;j<image.cols();j++){
image.put(i, j, new byte[]{1,2,3});
}
}
Note that in the array of bytes {1, 2, 3}, for our matrix, 1 stands for the blue channel, 2 for the green, and 3 for the red channel, as OpenCV stores its matrix internally in the BGR (blue, green, and red) format.
It is okay to access pixels this way for small matrices. The only problem is the overhead of JNI calls for big images. Remember that even a small 640 x 480 pixel image has 307,200 pixels and if we think about a colored image, it has 921,600 values in a matrix. Imagine that it might take around 50 ms to make an overloaded call for each of the 307,200 pixels. On the other hand, if we manipulate the whole matrix on the Java side and then copy it to the native side in a single call, it will take around 13 ms.
If you want to manipulate the pixels on the Java side, perform the following steps:
Unlock access to the largest independent learning library in Tech for FREE!
Get unlimited access to 7500+ expert-authored eBooks and video courses covering every tech area you can think of.
Renews at $19.99/month. Cancel anytime
Allocate memory with the same size as the matrix in a byte array.
Put the image contents into that array (optional).
Manipulate the byte array contents.
Make a single put call, copying the whole byte array to the matrix.
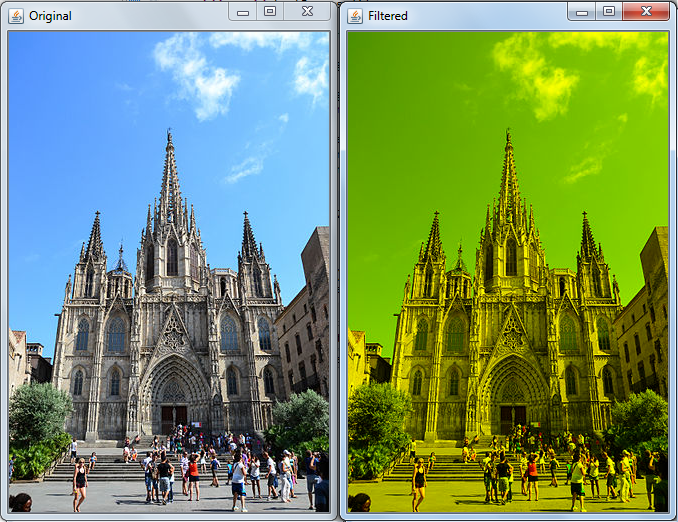
A simple example that will iterate all image pixels and set the blue channel to zero, which means that we will set to zero every element whose modulo is 3 equals zero, that is {0, 3, 6, 9, …}, as shown in the following piece of code:
public void filter(Mat image){
int totalBytes = (int)(image.total() * image.elemSize());
byte buffer[] = new byte[totalBytes];
image.get(0, 0,buffer);
for(int i=0;i<totalBytes;i++){
if(i%3==0) buffer[i]=0;
}
image.put(0, 0, buffer);
}
First, we find out the number of bytes in the image by multiplying the total number of pixels (image.total) with the element size in bytes (image.elemenSize). Then, we build a byte array with that size. We use the get(row, col, byte[]) method to copy the matrix contents in our recently created byte array. Then, we iterate all bytes and check the condition that refers to the blue channel (i%3==0). Remember that OpenCV stores colors internally as {Blue, Green, Red}. We finally make another JNI call to image.put, which copies the whole byte array to OpenCV's native storage. An example of this filter can be seen in the following screenshot, which was uploaded by Mromanchenko, licensed under CC BY-SA 3.0:
Be aware that Java does not have any unsigned byte data type, so be careful when working with it. The safe procedure is to cast it to an integer and use the And operator (&) with 0xff. A simple example of this would be int unsignedValue = myUnsignedByte & 0xff;. Now, unsignedValue can be checked in the range of 0 to 255.
Loading and displaying images from files
Most computer vision applications need to retrieve images from some where. In case you need to get them from files, OpenCV comes with several image file loaders. Unfortunately, some loaders depend on codecs that sometimes aren't shipped with the operating system, which might cause them not to load. From the documentation, we see that the following files are supported with some caveats:
Windows bitmaps: *.bmp, *.dib
JPEG files: *.jpeg, *.jpg, *.jpe
JPEG 2000 files: *.jp2
Portable Network Graphics: *.png
Portable image format: *.pbm, *.pgm, *.ppm
Sun rasters: *.sr, *.ras
TIFF files: *.tiff, *.tif
Note that Windows bitmaps, the portable image format, and sun raster formats are supported by all platforms, but the other formats depend on a few details. In Microsoft Windows and Mac OS X, OpenCV can always read the jpeg, png, and tiff formats. In Linux, OpenCV will look for codecs supplied with the OS, as stated by the documentation, so remember to install the relevant packages (do not forget the development files, for example, "libjpeg-dev" in Debian* and Ubuntu*) to get the codec support or turn on the OPENCV_BUILD_3RDPARTY_LIBS flag in CMake, as pointed out in Imread's official documentation.
The imread method is supplied to get access to images through files. Use Imgcodecs.imread (name of the file) and check whether dataAddr() from the read image is different from zero to make sure the image has been loaded correctly, that is, the filename has been typed correctly and its format is supported.
A simple method to open a file could look like the one shown in the following code. Make sure you import org.opencv.imgcodecs.Imgcodecs and org.opencv.core.Mat:
public Mat openFile(String fileName) throws Exception{
Mat newImage = Imgcodecs.imread(fileName);
if(newImage.dataAddr()==0){
throw new Exception ("Couldn't open file "+fileName);
}
return newImage;
}
Displaying an image with Swing
OpenCV developers are used to a simple cross-platform GUI by OpenCV, which was called as HighGUI, and a handy method called imshow. It constructs a window easily and displays an image within it, which is nice to create quick prototypes. As Java comes with a popular GUI API called Swing, we had better use it. Besides, no imshow method was available for Java until its 2.4.7.0 version was released. On the other hand, it is pretty simple to create such functionality.
Let's break down the work in to two classes: App and ImageViewer. The App class will be responsible for loading the file, while ImageViewer will display it. The application's work is simple and will only need to use Imgcodecs's imread method, which is shown as follows:
package org.javaopencvbook;
import java.io.File;
…
import org.opencv.imgcodecs.Imgcodecs;
public class App
{
static{ System.loadLibrary(Core.NATIVE_LIBRARY_NAME); }
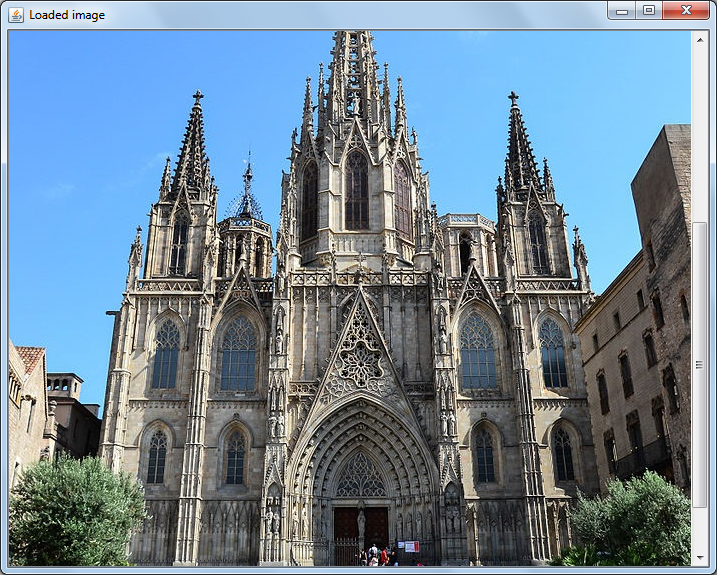
public static void main(String[] args) throws Exception {
String filePath = "src/main/resources/images/cathedral.jpg";
Mat newImage = Imgcodecs.imread(filePath);
if(newImage.dataAddr()==0){
System.out.println("Couldn't open file " + filePath);
} else{
ImageViewer imageViewer = new ImageViewer();
imageViewer.show(newImage, "Loaded image");
}
}
}
Note that the App class will only read an example image file in the Mat object and it will call the ImageViewer method to display it. Now, let's see how the ImageViewer class's show method works:
package org.javaopencvbook.util;
import java.awt.BorderLayout;
import java.awt.Dimension;
import java.awt.Image;
import java.awt.image.BufferedImage;
import javax.swing.ImageIcon;
import javax.swing.JFrame;
import javax.swing.JLabel;
import javax.swing.JScrollPane;
import javax.swing.UIManager;
import javax.swing.UnsupportedLookAndFeelException;
import javax.swing.WindowConstants;
import org.opencv.core.Mat;
import org.opencv.imgproc.Imgproc;
public class ImageViewer {
private JLabel imageView;
public void show(Mat image){
show(image, "");
}
public void show(Mat image,String windowName){
setSystemLookAndFeel();
JFrame frame = createJFrame(windowName);
Image loadedImage = toBufferedImage(image);
imageView.setIcon(new ImageIcon(loadedImage));
frame.pack();
frame.setLocationRelativeTo(null);
frame.setVisible(true);
}
private JFrame createJFrame(String windowName) {
JFrame frame = new JFrame(windowName);
imageView = new JLabel();
final JScrollPane imageScrollPane = new JScrollPane(imageView);
imageScrollPane.setPreferredSize(new Dimension(640, 480));
frame.add(imageScrollPane, BorderLayout.CENTER);
frame.setDefaultCloseOperation(WindowConstants.EXIT_ON_CLOSE);
return frame;
}
private void setSystemLookAndFeel() {
try {
UIManager.setLookAndFeel (UIManager.getSystemLookAndFeelClassName());
} catch (ClassNotFoundException e) {
e.printStackTrace();
} catch (InstantiationException e) {
e.printStackTrace();
} catch (IllegalAccessException e) {
e.printStackTrace();
} catch (UnsupportedLookAndFeelException e) {
e.printStackTrace();
}
}
public Image toBufferedImage(Mat matrix){
int type = BufferedImage.TYPE_BYTE_GRAY;
if ( matrix.channels() > 1 ) {
type = BufferedImage.TYPE_3BYTE_BGR;
}
int bufferSize = matrix.channels()*matrix.cols()*matrix.rows();
byte [] buffer = new byte[bufferSize];
matrix.get(0,0,buffer); // get all the pixels
BufferedImage image = new BufferedImage(matrix.cols(),matrix.rows(), type);
final byte[] targetPixels = ((DataBufferByte) image.getRaster().getDataBuffer()).getData();
System.arraycopy(buffer, 0, targetPixels, 0, buffer.length);
return image;
}
}
Pay attention to the show and toBufferedImage methods. Show will try to set Swing's look and feel to the default native look, which is cosmetic. Then, it will create JFrame with JScrollPane and JLabel inside it. It will then call toBufferedImage, which will convert an OpenCV Mat object to a BufferedImage AWT. This conversion is made through the creation of a byte array that will store matrix contents. The appropriate size is allocated through the multiplication of the number of channels by the number of columns and rows. The matrix.get method puts all the elements into the byte array. Finally, the image's raster data buffer is accessed through the getDataBuffer() and getData() methods. It is then filled with a fast system call to the System.arraycopy method. The resulting image is then assigned to JLabel and then it is easily displayed. Note that this method expects a matrix that is either stored as one channel's unsigned 8-bit or three channel's unsigned 8-bit. In case your image is stored as a floating point, you should convert it using the following code before calling this method, supposing that the image you need to convert is a Mat object called originalImage:
Mat byteImage = new Mat();
originalImage.convertTo(byteImage, CvType.CV_8UC3);
This way, you can call toBufferedImage from your converted byteImage property.
The image viewer can be easily installed in any Java OpenCV project and it will help you to show your images for debugging purposes. The output of this program can be seen in the next screenshot:
Summary
In this article, we learned dealing with matrices, pixels, and opening files for GUI prototype applications.

 United States
 Great Britain
 India
India
 Germany
 France
 Canada
 Russia
 Spain
Spain
 Brazil
 Australia
 Singapore
 Canary Islands
 Hungary
 Ukraine
 Luxembourg
 Estonia
 Lithuania
 South Korea
 Turkey
 Switzerland
 Colombia
 Taiwan
 Chile
Chile
 Norway
 Ecuador
 Indonesia
 New Zealand
 Cyprus
 Denmark
 Finland
 Poland
 Malta
Malta
 Czechia
 Austria
 Sweden
 Italy
Italy
 Egypt
Egypt
 Belgium
 Portugal
 Slovenia
 Ireland
 Romania
 Greece
 Argentina
 Netherlands
 Bulgaria
 Latvia
 South Africa
 Malaysia
 Japan
Japan
 Slovakia
 Philippines
 Mexico
 Thailand