


In this article, by Udita Gupta and Yohan Wadia, the authors of the book Mastering AWS Lambda, we are going to take things a step further by learning the anatomy of a typical Lambda Function and also how to actually write your own functions. We will cover the programming model for a Lambda function using simple functions as examples, the use of logs and exceptions and error handling.
(For more resources related to this topic, see here.)
The Lambda programming model
Certain applications can be broken down into one or more simple nuggets of code called as functions and uploaded to AWS Lambda for execution. Lambda then takes care of provisioning the necessary resources to run your function along with other management activities such as auto-scaling of your functions, their availability, and so on. So what exactly are we supposed to do in all this? A developer basically has three tasks to perform when it comes to working with Lambda:
- Writing the code
- Packaging it for deployment
- Finally monitoring its execution and fine tuning
In this section, we are going to explore the different components that actually make up a Lambda Function by understanding what AWS calls as a programming model or a programming pattern. As of date, AWS officially supports Node.js, Java, Python, and C# as the programming languages for writing Lambda functions, with each language following a generic programming pattern that comprises of certain concepts which we will see in the following sections.
Handler
The handler function is basically a function that Lambda calls first for execution. A handler function is capable of processing incoming event data that is passed to it as well as invoking other functions or methods from your code.
We will be concentrating a lot of our code and development on Node.js; however, the programming model remains more or less the same for the other supported languages as well.
A skeleton structure of a handler function is shown as follows:
exports.myHandler = function(event, context, callback) {
// Your code goes here.
callback();
}
Where, myHandler is the name of your handler function. By exporting it we make sure that Lambda knows which function it has to invoke first. The other parameters that are passed with the handler function are:
- event: Lambda uses this parameter to pass any event related data back to the handler.
- context: Lambda again uses this parameter to provide the handler with the function’s runtime information such as the name of the function, the time it took to execute, and so on .
- callback: This parameter is used to return any data back to its caller. The callback parameter is the only optional parameter that gets passed when writing handlers. If not specified, AWS Lambda will call it implicitly and return the value as null. The callback parameter also supports two optional parameters in the form of error and result where error will return any of the function’s error information back to the caller while result will return any result of your function’s successful execution.
Here are a few simple examples of invoking callbacks in your handler:
- callback()
- callback(null, ‘Hello from Lambda’)
- callback(error)
The callback parameter is supported only in Node.js runtime v4.3. You will have to use the context methods in case your code supports earlier Node.js runtime (v0.10.42)
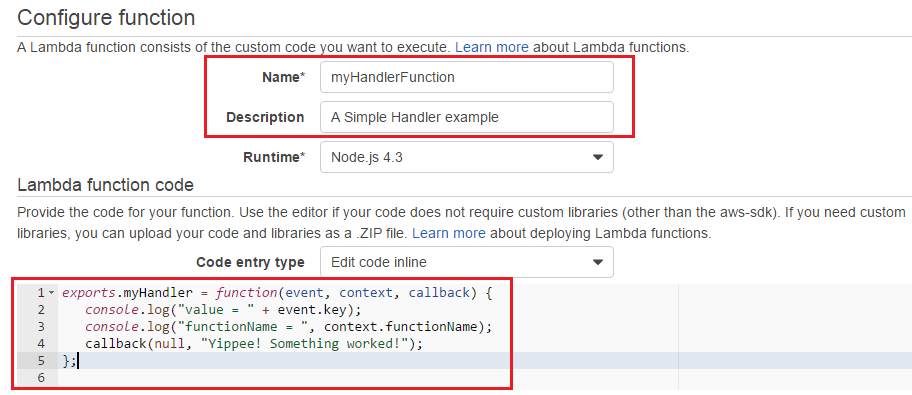
Let us try out a simple handler example with a code:
exports.myHandler = function(event, context, callback) {
console.log("value = " + event.key);
console.log("functionName = ", context.functionName);
callback(null, "Yippee! Something worked!");
};
The following code snippet will print the value of an event (key) that we will pass to the function, print the function’s name as part of the context object and finally print the success message Yippee! Something worked! if all goes well!
- Login to the AWS Management Console and select AWS Lambda from the dashboard.
- Select the Create a Lambda function option.
- From the Select blueprint page, select the Blank Function blueprint.
- Since we are not configuring any triggers for now, simple click on Next at the Configure triggers page.
- Provide a suitable Name and Description for your Lambda function and paste the preceding code snippet in the inline code editor as shown:
- Next, in the Lambda function handler and role section on the same page, type in the correct name of your Handler as shown. The handler name should match with the handler name in your function to work. Remember also to select the basic-lambda-role for your function’s execution before selecting the Next button:

- In the Review page, select the Create function option.
- With your function now created, select the Test option to pass the sample event to our function.
- In the Sample event, pass the following event and select the Save and test option:
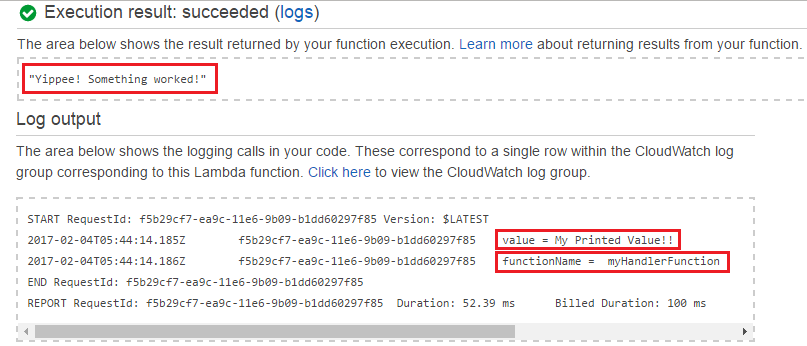
{ "key": "My Printed Value!!" }
With your code execution completed, you should get a similar execution result as shown in the following figure. The important things to note here are the values for the event, context and callback parameters. You can note the callback message being returned back to the caller as the function executed successfully. The other event and context object values are printed in the Log output section as highlighted in the following figure:
In case you end up with any errors, make sure the handler function name matches the handler name that you passed during the function’s configuration.
Context object
The context object is a really useful utility when it comes to obtaining runtime information about your function. The context object can provide information such as the executing function’s name, the time remaining before Lambda terminates your function’s execution, the log name and stream associated with your function and much more. The context object also comes with its own methods that you can call to correctly terminate your function’s executions such as context.succed(), context.fail(), context.done(), and so on. However, post April 2016, Lambda has transitioned the Node.js runtime from v0.10.42 to v4.3 which does support these methods however encourages to use the callback() for performing the same actions.
Here are some of the commonly used context object methods and properties described as follows:
- getRemainingTimeInMillis(): This property returns the number of milliseconds left for execution before Lambda terminates your function. This comes in really handy when you want to perform some corrective actions before your function exits or gets timed out.
- callbackWaitsForEmptyEventLoop: This property is used to override the default behaviour of a callback() function, such as to wait till the entire event loop is processed and only then return back to the caller. If set to false, this property causes the callback() function to stop any further processing in the event loop even if there are any other tasks to be performed. The default value is set to true.
- functionName: This property returns the name of the executing Lambda function.
- functionVersion: The current version of the executing Lambda function.
- memoryLimitInMB: The amount of resource in terms of memory set for your Lambda function.
- logGroupName: This property returns the name of the CloudWatch Log Group that stores function’s execution logs.
- logStreamName: This property returns the name of the CloudWatch Log Stream that stores function’s execution logs.
- awsRequestID: This property returns the request ID associated with that particular function’s execution.
If you are using Lambda functions as mobile backend processing services, you can then extract additional information about your mobile application using the context of identity and clientContext objects. These are invoked using the AWS Mobile SDK. To learn more, click here http://docs.aws.amazon.com/lambda/latest/dg/nodejs-prog-model-context.html.
Let us look at a simple example to understand the context object a bit better. In this example, we are using the context object callbackWaitsForEmptyEventLoop and demonstrating its working by setting the object’s value to either yes or no on invocation:
- Login to the AWS Management Console and select AWS Lambda from the dashboard.
- Select the Create a Lambda function option.
- From the Select blueprint page, select the Blank Function blueprint.
- Since we are not configuring any triggers for now, simple click on Next at the Configure triggers page.
- Provide a suitable Name and Description for your Lambda function and paste the following code in the inline code editor:
exports.myHandler = (event, context, callback) => { console.log('remaining time =', context.getRemainingTimeInMillis()); console.log('functionName =', context.functionName); console.log('AWSrequestID =', context.awsRequestId); console.log('logGroupName =', context.logGroupName); console.log('logStreamName =', context.logStreamName); switch (event.contextCallbackOption) { case "no": setTimeout(function(){ console.log("I am back from my timeout of 30 seconds!!"); },30000); // 30 seconds break break; case "yes": console.log("The callback won't wait for the setTimeout() n if the callbackWaitsForEmptyEventLoop is set to false"); setTimeout(function(){ console.log("I am back from my timeout of 30 seconds!!"); },30000); // 30 seconds break context.callbackWaitsForEmptyEventLoop = false; break; default: console.log("The Default code block"); } callback(null, 'Hello from Lambda'); }; - Next, in the Lambda function handler and role section on the same page, type in the correct name of your Handler as shown. The handler name should match with the handler name in your function to work. Remember also to select the basic-lambda-role for your function’s execution.
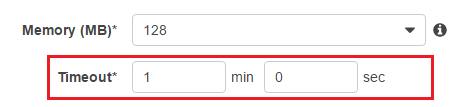
- The final change that we will do is change the Timeout value of our function from the default 3 seconds to 1 minute specifically for this example. Click Next to continue:
- In the Review page, select the Create function option.
- With your function now created, select the Test option to pass the sample event to our function.
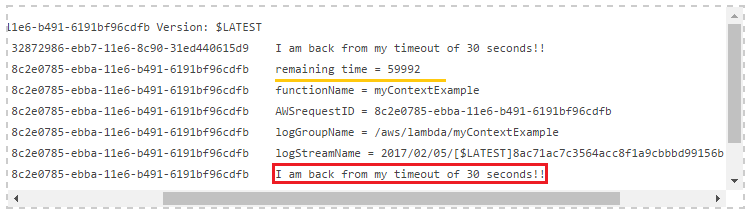
- In the Sample event, pass the following event and select the Save and test option. You should see a similar output in the Log output window as shown:
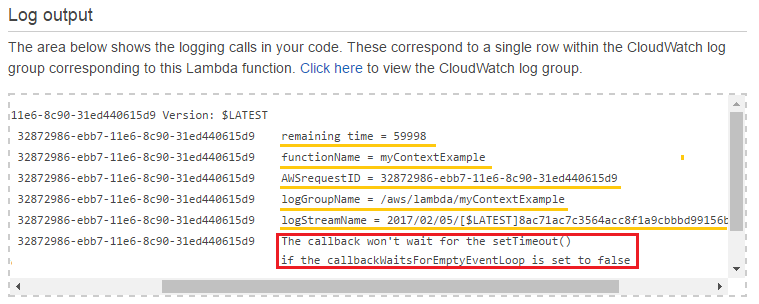
With the contextCallbackOption set to yes, the function does not wait for the 30 seconds setTimeout() function and will exit, however it prints the function’s runtime information such as the remaining execution time, the function name, and so on. Now set the contextCallbackOption to no and re-run the test and verify the output. This time, you can see the setTimeout() function getting called and verify the same by comparing the remaining time left for execution with the earlier test run.
Logging
You can always log your code’s execution and activities using simple log statements. The following statements are supported for logging with Node.js runtime:
- console.log()
- console.error()
- console.warn()
- console.info()
The logs can be viewed using both the Management Console as well as the CLI. Let us quickly explore both the options.
Using the Management Console
We have already been using Lambda’s dashboard to view the function’s execution logs, however the logs are only for the current execution. To view your function’s logs from the past, you need to view them using the CloudWatch Logs section:
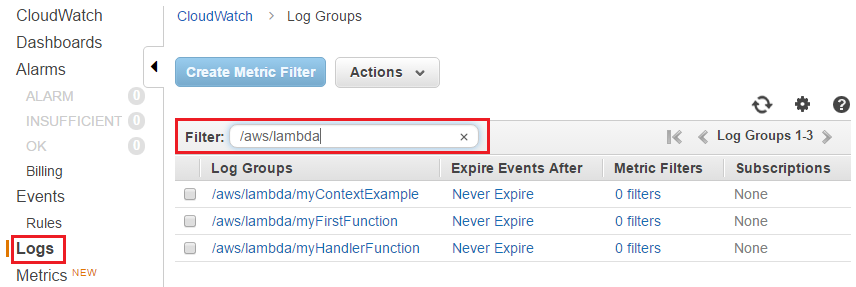
- To do so, search and select CloudWatch option from the AWS Management Console. Next, select the Logs option to display the function’s logs as shown in the following figure:
You can use the Filter option to filter out your Lambda logs by typing in the log group name prefix as /aws/lambda.
- Select any of the present Log Groups and its corresponding Log Stream Name to view the complete and detailed execution logs of your function.
If you do not see any Lambda logs listed out here it is mostly due to your Lambda execution role. Make sure your role has the necessary access rights to create the log group and log stream along with the capability to put log events.
Using the CLI
The CLI provides two ways using which you can view your function’s execution logs:
- The first is using the Lambda function’s invoke command itself. The invoke command when used with the –log-type parameter will print the latest 4 KB of log data that is written to CloudWatch Logs.
- To do so, first list out all available functions in your current region using the following command:
# aws lambda list-functions - Next, pick a Lambda function that you wish to invoke and substitute that function’s name and payload with the following example snippet:
# aws lambda invoke --invocation-type RequestResponse --function-name myFirstFunction --log-type Tail --payload '{"key1":"Lambda","key2":"is","key3":"awesome!"}' output.txt - The second way is by using a combination of the context() object and the CloudWatch CLI. You can obtain your function’s log group name and the log stream name using the context.logGroupName and the context.logStreamName.
- Next, substitute the data gathered from the output of these parameters in the following command:
# aws logs get-log-events
--log-group-name "/aws/lambda/myFirstFunction"
--log-stream-name
"2017/02/07/[$LATEST]1ae6ac9c77384794a3202802c683179a"
If you run into the error The specified log stream does not exist in spite of providing correct values for the log group name and stream name; then make sure to add the “” escape character in the [$LATEST] as shown.
Let us look at a few options that you can additionally pass with the get-log-events command:
- –start-time: The start of the log’s time range. All times are in UTC.
- –end-time: The end of the log’s time range. All times are in UTC.
- –next-token: The token for the next set of items to return. (You received this token from a previous call.)
- –limit: Used to set the maximum number of log events returned. By default the limit is set to either 10,000 log events.
Alternatively, if you don’t wish to use the context() objects in your code, you can still filter out the log group name and log stream name by using a combination of the following commands:
# aws logs describe-log-groups
--log-group-name-prefix "/aws/lambda/"
The describe-log-groups command will list all the log groups that are prefixed with /aws/lambda. Make a note of your function’s log group name from this output. Next, execute the following command to list your log group name’s associated log stream names:
# aws logs describe-log-streams --log-group-name
"/aws/lambda/myFirstFunction"
Make a note of the log stream name and substitute the same in the next and final command to view your log events for that particular log stream name:
# aws logs get-log-events
--log-group-name "/aws/lambda/myFirstFunction"
--log-stream-name "2017/02/07/[$LATEST]1ae6ac9c77384794a3202802c683179a"
Once again, make sure to add the backslash “” in the [$LATEST] to avoid the The specified log stream does not exist error. With the logging done, let’s move on to the next piece of the programming model called exceptions.
Exceptions and error handling
Functions have the ability to notify AWS Lambda in case it failed to execute correctly. This is primarily done by the function passing the error object to Lambda which converts the same to a string and returns it to the user as an error message.
The error messages that are returned also depend on the invocation type of the function; for example, if your function performs a synchronous execution (RequestResponse invocation type), then the error is returned back to the user and displayed on the Management Console as well as in the CloudWatch Logs. For any asynchronous executions (event invocation type), Lambda will not return anything. Instead it logs the error messages to CloudWatch Logs.
Let us examine a function’s error and exception handling capabilities with a simple example of a calculator function that accepts two numbers and an operand as the test events during invocation:
- Login to the AWS Management Console and select AWS Lambda from the dashboard.
- Select the Create a Lambda function option.
- From the Select blueprint page, select the Blank Function blueprint.
- Since we are not configuring any triggers for now, simple click on Next at the Configure triggers page.
- Provide a suitable Name and Description for your Lambda function and paste the following code in the inline code editor:
exports.myHandler = (event, context, callback) => { console.log("Hello, Starting the "+ context.functionName +" Lambda Function"); console.log("The event we pass will have two numbers and an operand value"); // operand can be +, -, /, *, add, sub, mul, div console.log('Received event:', JSON.stringify(event, null, 2)); var error, result; if (isNaN(event.num1) || isNaN(event.num2)) { console.error("Invalid Numbers"); // different logging error = new Error("Invalid Numbers!"); // Exception Handling callback(error); } switch(event.operand) { case "+": case "add": result = event.num1 + event.num2; break; case "-": case "sub": result = event.num1 - event.num2; break; case "*": case "mul": result = event.num1 * event.num2; break; case "/": case "div": if(event.num2 === 0){ console.error("The divisor cannot be 0"); error = new Error("The divisor cannot be 0"); callback(error, null); } else{ result = event.num1/event.num2; } break; default: callback("Invalid Operand"); break; } console.log("The Result is: " + result); callback(null, result); }; - Next, in the Lambda function handler and role section on the same page, type in the correct name of your Handler. The handler name should match with the handler name in your function to work. Remember also to select the basic-lambda-role for your function’s execution.
- Leave the rest of the values to their defaults and click Next to continue.
- In the Review page, select the Create function option.
- With your function now created, select the Test option to pass the sample event to our function.
- In the Sample event, pass the following event and select the Save and test option. You should see a similar output in the Log output window as shown:
{ “num1”: 3, “num2”: 0, “operand”: “div” }

So what just happened there? Well first, we can print simple user friendly error messages with the help of the console.error() statement. Additionally, we can also print the stackTrace array of the error by passing the error in the callback() as shown:
error = new Error(“The divisor cannot be 0”); callback(error, null);
You can also view the custom error message and the stackTrace JSON array both from the Lambda dashboard as well as from the CloudWatch Logs section. Next, give this code a couple of tries with some different permutations and combinations of events and check out the results. You can even write your own custom error messages and error handlers that can perform some additional task when an error is returned by the function.
With this we come towards the end of a function’s generic programming model and its components.
Summary
We deep dived into the Lambda programming model and understood each of its sub components (handlers, context objects, errors and exceptions) with easy to follow examples.


