In this article, by Patrick Li, author of the book, JIRA Agile Essentials, we will learn that Scrum is one of the agile methodologies supported by JIRA Agile. Unlike the old days, when a project manager would use either a spreadsheet or Microsoft project to keep track of the project progress, with JIRA Agile and Scrum, team participation is encouraged, to improve collaboration between different project stakeholders.
(For more resources related to this topic, see here.)
Roles in Scrum
In any Scrum team, there are three primary roles. Although each role has its own specific functions and responsibilities, you need all three to work together as a cohesive team in order to be successful at Scrum.
Product owner
The product owner is usually the product or project manager, who is responsible for owning the overall vision and the direction of the product that the team is working on. As the product owner, they are in charge of the features that will be added to the backlog list, the priority of each feature, and planning the delivery of these features through sprints. Essentially, the product owner is the person who makes sure that the team is delivering the most value for the stakeholders in each sprint.
The Scrum master
The Scrum master's job is to make sure that the team is running and using Scrum effectively and efficiently; so, they should be very knowledgeable and experienced with using Scrum. The Scrum master has the following two primary responsibilities:
- To coach and help everyone on the team to understand Scrum; this includes the product owner, delivery team, as well as external people that the project team interacts with. In the role of a coach, the Scrum master may help the product owner to understand and better manage the backlog and plan for sprints as well as explain the process with the delivery team.
- To improve the team's Scrum process by removing any obstacles in the way. Obstacles, also known as impediments, are anything that may block or negatively affect the team's adoption of Scrum. These can include things such as poorly-organized product backlog or the lack of support from other teams/management. It is the responsibility of the Scrum master to either directly remove these impediments or work with the team to find a solution.
Overall, the Scrum master is the advocate for Scrum, responsible for educating, facilitating, and helping people adopt and realize the advantages of using it.
The delivery team
The delivery team is primarily responsible for executing and delivering the final product. However, the team is also responsible for providing estimates on tasks and assisting the product owner to better plan sprints and delivery.
Ideally, the team should consist of cross-functional members required for the project, such as developers, testers, and business analysts. Since each sprint can be viewed as a mini project by itself, it is critical to have all the necessary resources available at all times, as tasks are being worked on and passed along the workflow.
Last but not least, the team is also responsible for retrospectively reviewing their performance at the end of each sprint, along with the product owner and Scrum master. This helps the team review what they have done and reveals how they can improve for the upcoming sprints.
Understanding the Scrum process
Now, we will give you a brief introduction to Scrum and an overview of the various roles that Scrum prescribes. Let's take a look at how a typical project is run with Scrum and some of the key activities.
First, we have the backlog, which is a one-dimensional list of the features and requirements that need to be implemented by the team. The item's backlogs are listed from top to bottom by priority. While the product owner is the person in charge of the backlog, defining the priority based on his vision, everyone in the team can contribute by adding new items to the backlog, discussing priorities, and estimating efforts required for implementation.
The team will then start planning their next immediate sprint. During this sprint planning meeting, the team will decide on the scope of the sprint. Usually, top priority items from the backlog will be included. The key here is that by the end of the sprint, the team should have produced a fully tested, potentially shippable product containing all the committed features.
During the sprint, the team will have daily Scrum meetings, usually at the start of each day, where every member of the team will give a quick overview of what they have done, plan to do, and any impediments. The goal is to make sure that everyone is on the same page, so meetings should be short and sweet.
At the end of the sprint, the team will have a sprint review meeting, where the team will present what they have produced to the stakeholder. During this meeting, new changes will often emerge as the product starts to take shape, and these changes will be added to the backlog, which the team will reprioritize before the next sprint commences.
Another meeting called the sprint retrospective meeting will also take place at the end of the sprint, where the team will come together to discuss what they have done right, what they have done wrong, and how they can improve.
Throughout this process, the Scrum master will act as the referee, where they will make sure all these activities are done correctly. For example, the Scrum master will guide the product owner and the team during the backlog and sprint planning meetings to make sure the items they have are scoped and described correctly. The Scrum master will also ensure that the meetings stay focused, productive, do not run overtime, and that the team members remain respectful without trying to talk over each other.
So, now you have seen some of the advantages of using Scrum, the different roles, as well as a simple Scrum process; let's see how we can use JIRA Agile to run projects with Scrum.
Creating a new Scrum board
The first step to start using JIRA Agile for Scrum is to create a Scrum board for your project. If you created your project by using the Agile Scrum project template, a Scrum board is automatically created for you along with the project.
However, if you want to create a board for existing projects, or if you want your board to span across multiple projects, you will need to create it separately. To create a new board, perform the following steps:
- Click on the Agile menu item from the top navigation bar and select the Manage Boards option.
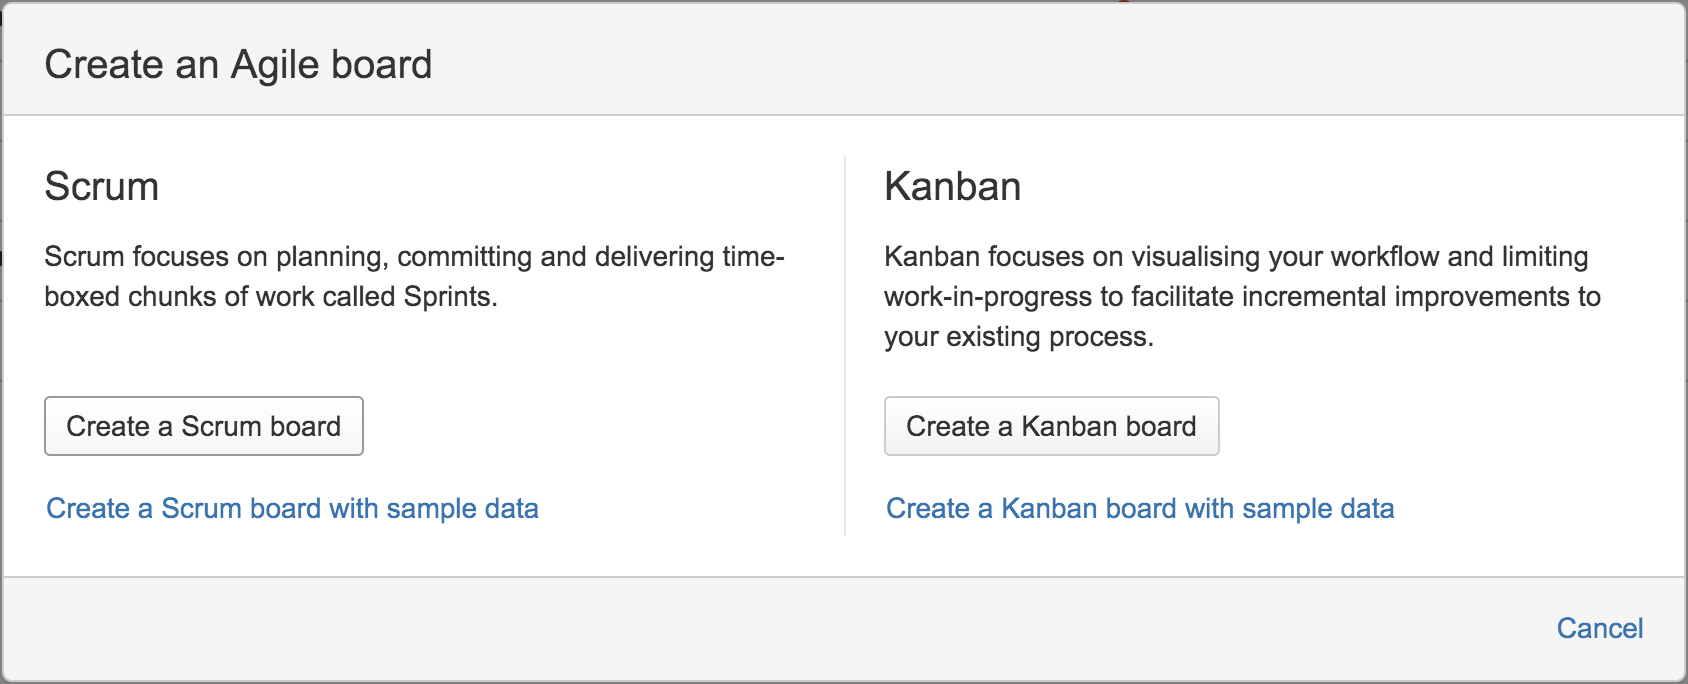
- Click on the Create board button. This will bring up the Create an Agile board dialog.
- Select the Create a Scrum board option, as shown in the following screenshot:
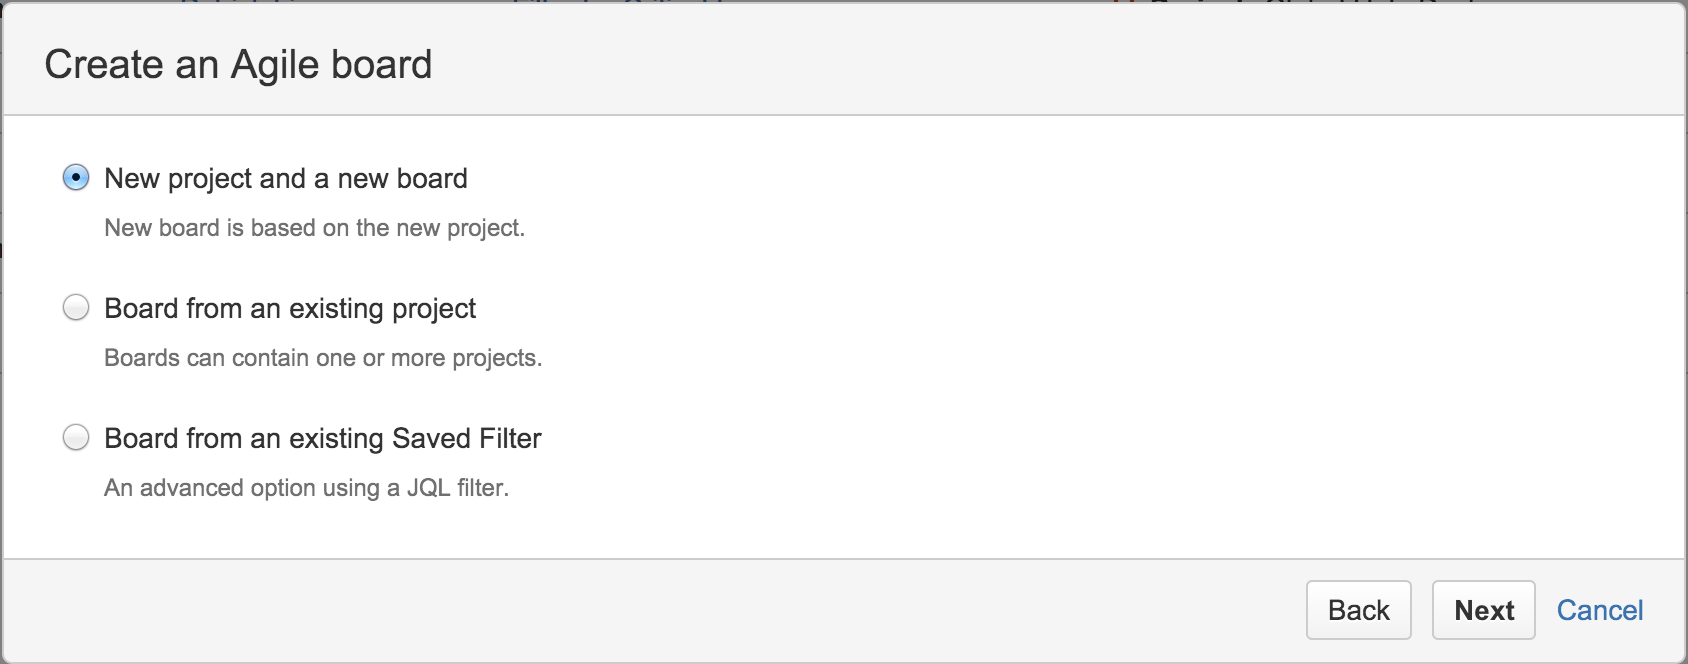
- Select the way you want to create your board and click on the Next button. There are three options to choose from, as follows:
- New project and a new board: This is the same as creating a project using the Scrum Agile project template. A new project will be created along with a new Scrum board dedicated to the project.
- Board from an existing project: This option allows you to create a new board from your existing projects. The board will be dedicated to only one project.
- Board from an existing Saved Filter: This option allows you to create a board that can span across multiple projects with the use of a filter. So, in order to use this option, you will first have to create a filter that includes the projects and issues you need.
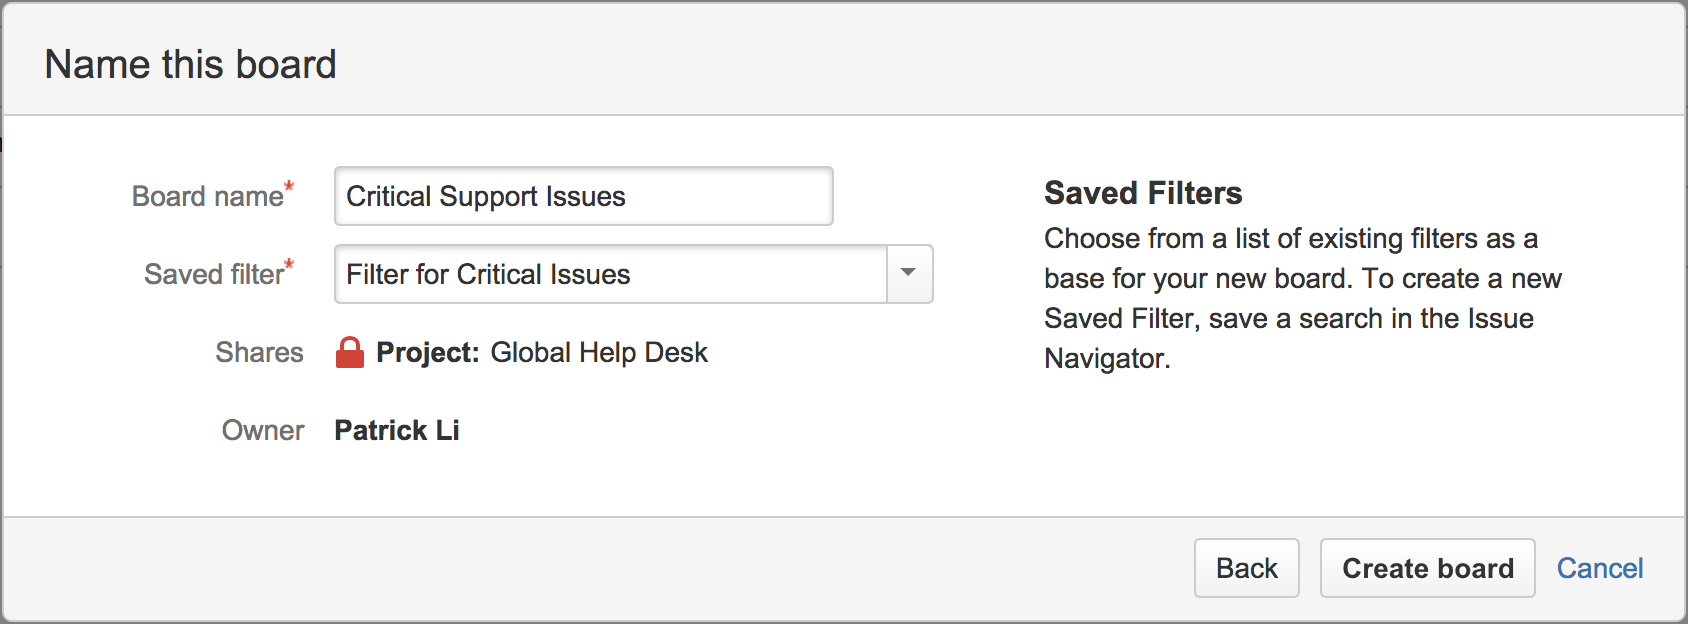
If you have many issues in your project, you can also use filters to limit the number of issues to be included.
- Fill in the required information for the board. Depending on the option you have selected, you will either need to provide the project details or select a filter to use. The following screenshot shows an example of how to create a board with a filter. Click on the Create board button to finish:
Understanding the Scrum board
The Scrum board is what you and your team will be using to plan and run your project. It is your backlog as well as your sprint activity board. A Scrum board has the following three major modes:
- Backlog: The Backlog mode is where you will plan your sprints, organize your backlog, and create issues
- Active sprints: The Active sprints mode is where your team will be working in a sprint
- Reports: The Reports mode is where you can track the progress of your sprint
The following screenshot shows a typical Scrum board in the Backlog mode. In the center of the page, you have the backlog, listing all the issues. You can drag them up and down to reorder their priorities. On the right-hand side, you have the issue details panel, which will be displayed when you click on an issue in the backlog:
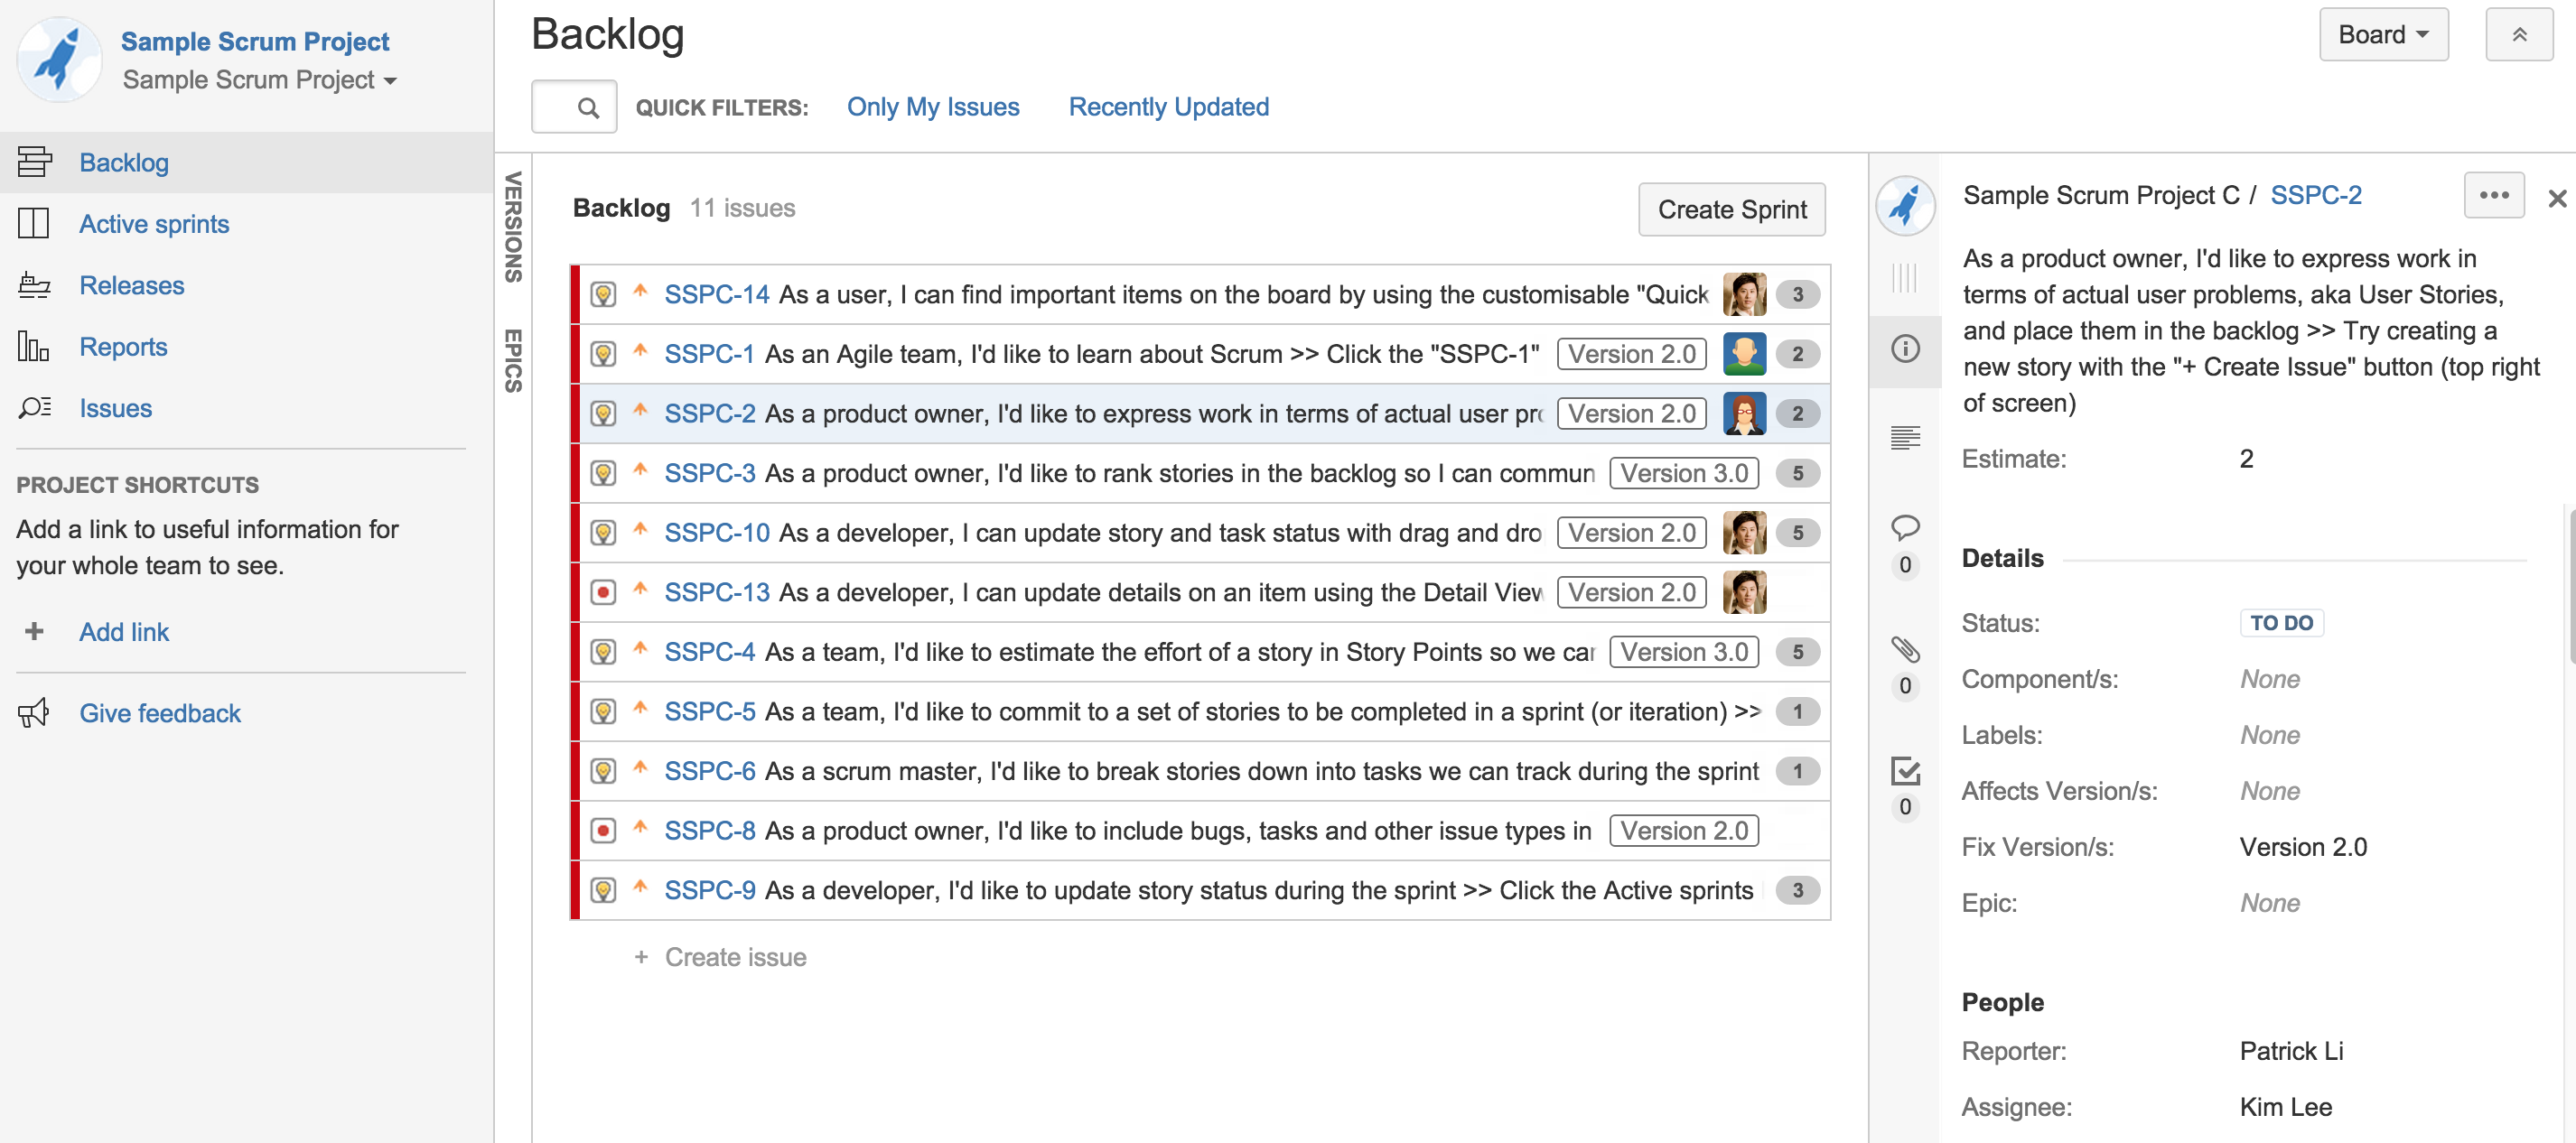
During the backlog planning meetings, the product owner and the team will use this Backlog mode to add new items to the backlog as well as decide on their priorities.
Creating new issues
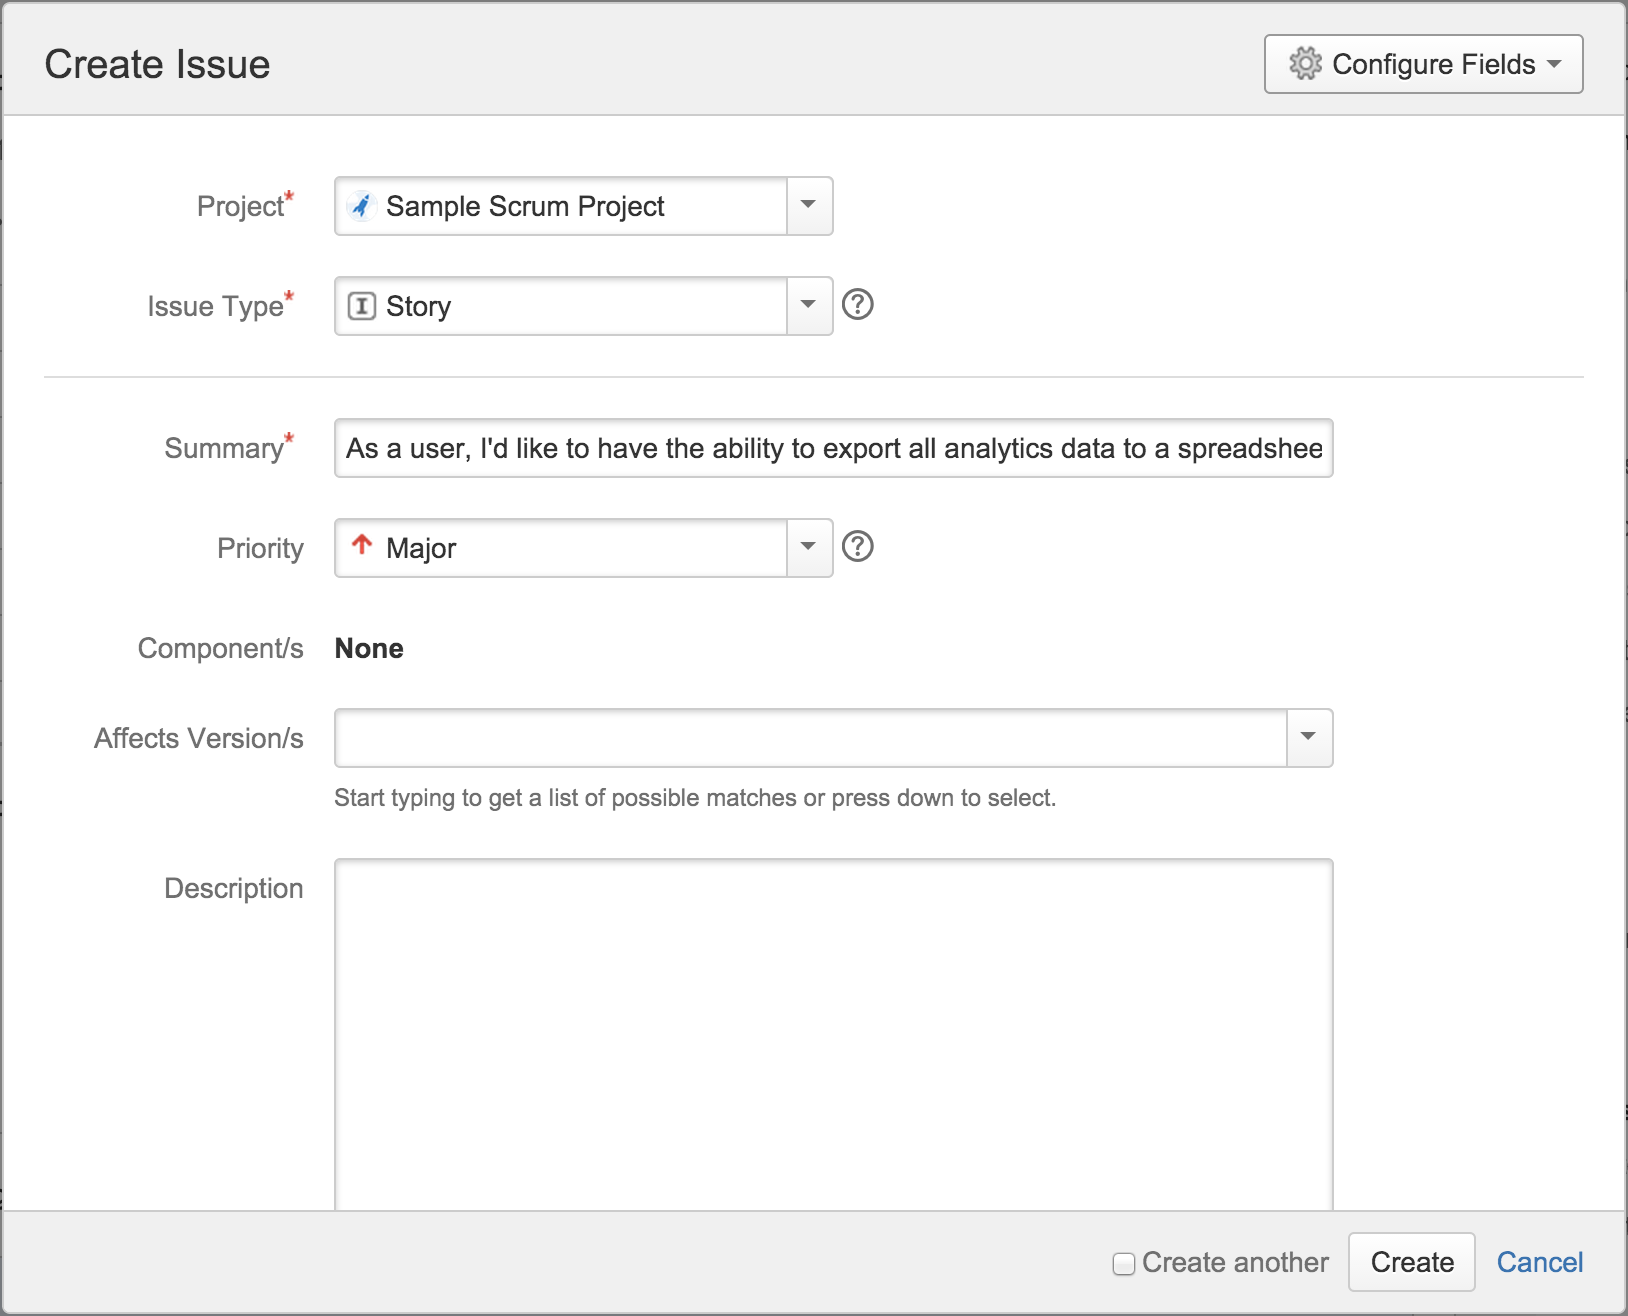
When a Scrum board is first created, all the issues, if any (called user stories or stories for short), are placed in the backlog. During your sprint planning meetings, you can create more issues and add them to the backlog as you translate requirements into user stories. To create a new issue, perform the following steps:
- Browse to your Scrum board.
- Click on the Create button from the navigation bar at the top or press C on your keyboard. This will bring up the Create Issue dialog.
- Select the type of issue (for example, Story) you want to create from the Issue Type field.
- Provide additional information for the issue, such as Summary and Description.
- Click on the Create button to create the issue, as shown in the following screenshot:
Once you have created the issue, it will be added to the backlog. You can then assign it to epics or version, and schedule it to be completed by adding it to sprints.
When creating and refining your user stories, you will want to break them down as much as possible, so that when it comes to deciding on the scope of a sprint, it will be much easier for the team to provide an estimate. One approach is by using the INVEST characteristics defined by Bill Wake:
- Independent: It is preferable if each story can be done independently. While this is not always possible, independent tasks make implementation easier.
- Negotiable: The developers and product owners need to work together so that both parties are fully aware of what the story entails.
- Valuable: The story needs to provide value to the customer.
- Estimable: If a story is too big or complicated for the development team to provide an estimate, then it needs to be broken down further.
- Small: Each story needs to be small, often addressing a single feature that will fit into a single sprint (roughly 2 weeks).
- Testable: The story needs to describe the expected end result so that after it is implemented, it can be verified.
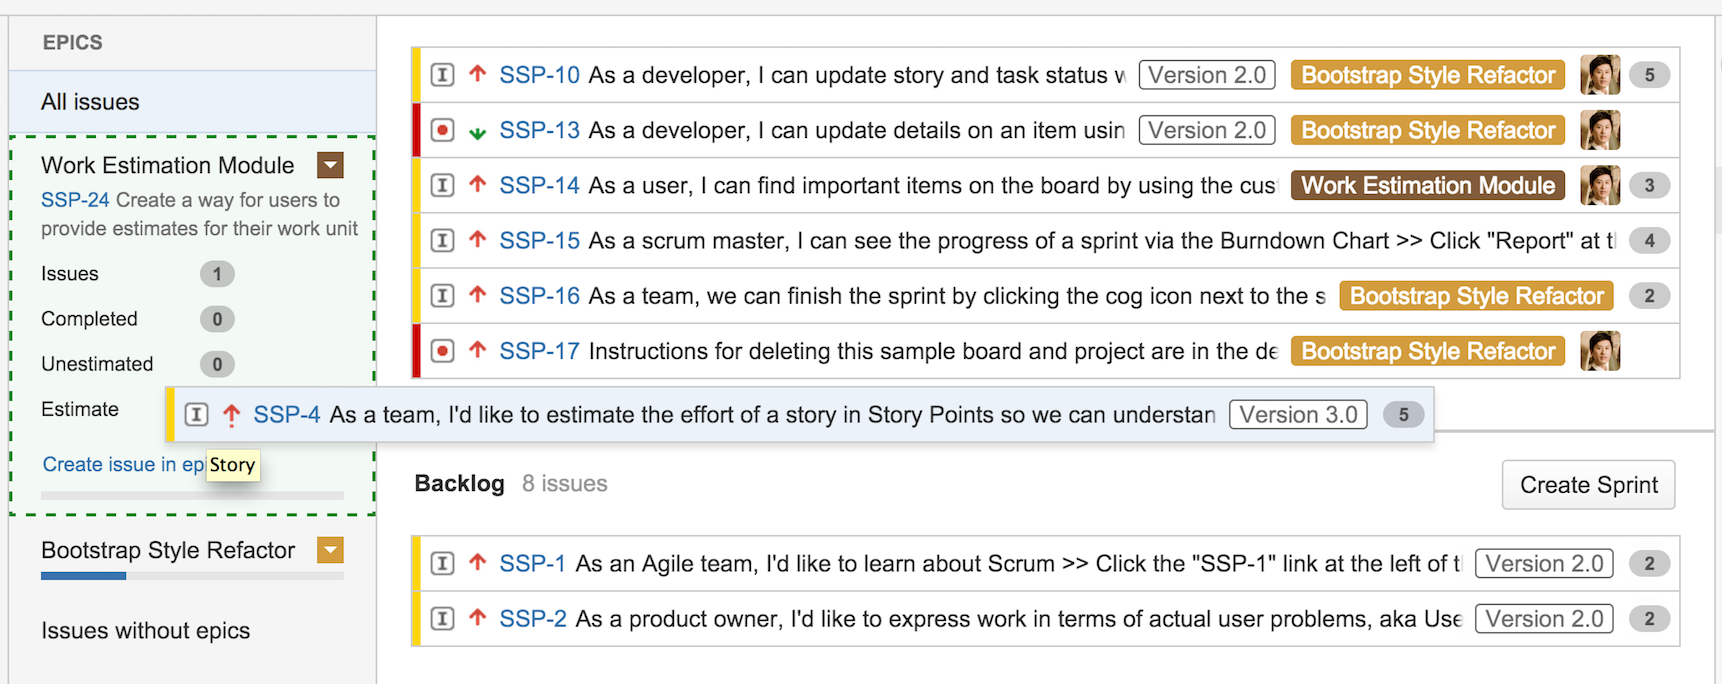
Creating new epics
Epics are big user stories that describe major application features. They are then broken down into smaller, more manageable user stories. In JIRA Agile, epics are a convenient way to group similar user stories together.
To create a new epic from your Scrum board, perform the following steps:
-
Expand the Epics panel if it is hidden, by clicking on EPICS from the left-hand side panel.
- Click on the Create Epic link from the Epics panel. The link will appear when you hover your mouse over the panel. This will bring up the Create Epic dialog, with the Project and Issue Type fields already preselected for you:

You can also open the Create issue dialog, and select Issue Type as Epic.
- Provide a name for the epic in the Epic Name field.
- Provide a quick summary in the Summary field.
- Click on the Create button.
Once you have created the epic, it will be added to the Epics panel.
Epics do not show up as cards in sprints or in the backlog.
After you have created your epic, you can start adding issues under it. Doing this helps you organize issues that are related to the same functionality or feature. There are two ways in which you can add issues to an epic:
- By creating new issues directly in the epic, expanding the epic you want, and clicking on the Create issue in epic link
- By dragging existing issues into the epic, as shown in the following screenshot:
Estimating your work
Estimation is an art and is a big part of Scrum. Being able to estimate well as a team will directly impact how successful your sprints will be. When it comes to Scrum, estimation means velocity. In other words, it means how much work your team can deliver in a sprint. This is different from the traditional idea of measuring and estimating by man hours.
The concept of measuring velocity is to decouple estimation from time tracking. So, instead of estimating the work based on how many hours it will take to complete a story, which will inadvertently make people work long hours trying to keep the estimates accurate, it can be easily done by using an arbitrary number for measurement, which will help us avoid this pitfall.
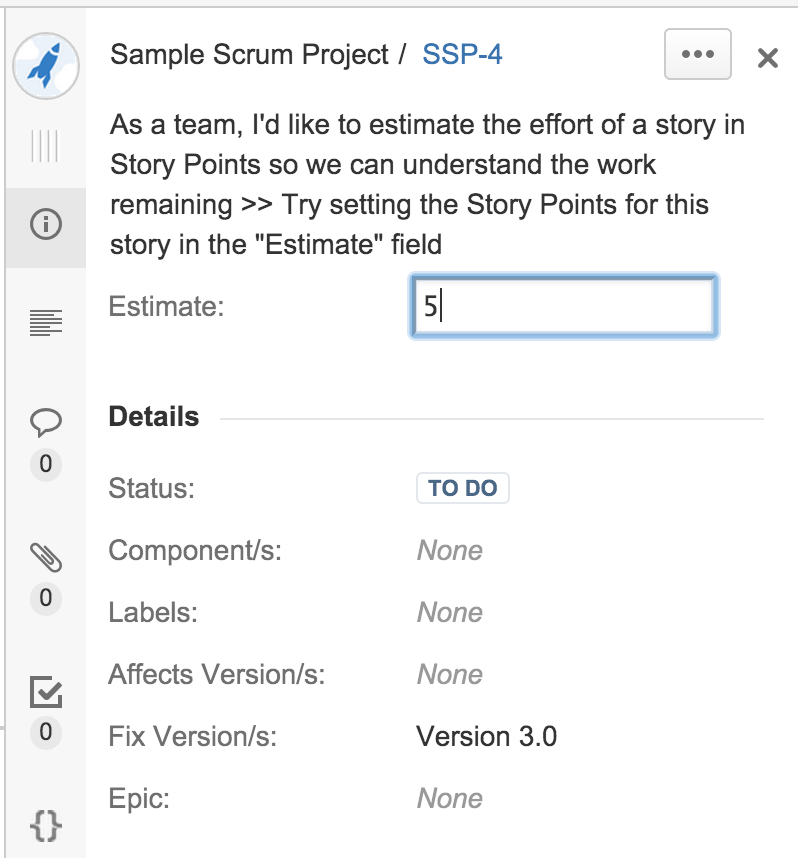
A common approach is to use what are known as story points. Story points are used to measure the complexity or level of effort required to complete a story, not how long it will take to complete it. For example, a complex story may have eight story points, while a simpler story will have only two. This does not mean that the complex story will take 8 hours to complete. It is simply a way to measure its complexity in relation to others.
After you have estimated all your issues with story points, you need to figure out how many story points your team can deliver in a sprint. Of course, you will not know this for your first sprint, so you will have to estimate this again. Let's say your team is able to deliver 10 story points worth of work in a one-week sprint, then you can create sprints with any number of issues that add up to 10 story points. As your team starts working on the sprint, you will likely find that the estimate of 10 story points is too much or not enough, so you will need to adjust this for your second sprint. Remember that the goal here is not to get it right the first time but to continuously improve your estimates to a point where the team can consistently deliver the same amount of story points' worth of work, that is, your team's velocity. Once you accurately start predicting your team's velocity, it will become easier to manage the workload for each sprint.
Now that you know how estimates work in Scrum, let's look at how JIRA Agile lets you estimate work.
JIRA Agile provides several ways for you to estimate issues, and the most common approach is to use story points. Each story in your backlog has a field called Estimate, as shown in the following screenshot. To provide an estimate for the story, you just need to hover over the field, click on it, and enter the story point value:
Unlock access to the largest independent learning library in Tech for FREE!
Get unlimited access to 7500+ expert-authored eBooks and video courses covering every tech area you can think of.
Renews at $19.99/month. Cancel anytime
You cannot set estimates once the issue is in active development, that is, the sprint that the issue belongs to is active.
Remember that the estimate value you provide here is arbitrary, as long as it can reflect the issues' complexity in relation to each other. Here are a few more points for estimation:
- Be consistent on how you estimate issues.
- Involve the team during estimation.
- If the estimates turn out to be incorrect, it is fine. The goal here is to improve and adjust.
Ranking and prioritizing your issues
During the planning session, it is important to rank your issues so that the list reflects their importance relative to each other. For those who are familiar with JIRA, there is a priority field, but since it allows you to have more than one issue sharing the same priority value, it becomes confusing when you have two issues both marked as critical.
JIRA Agile addresses this issue by letting you simply drag an issue up and down the list according to its importance, with the more important issues at the top and the less important issues at the bottom. This way, you end up with an easy-to-understand list.
Creating new versions
In a software development team, you will likely be using versions to plan your releases. Using versions allows you to plan and organize issues in your backlog and schedule when they will be completed. You can create multiple versions and plan your roadmap accordingly.
To create a new version, follow these steps:
- Expand the Versions panel if it is hidden, by clicking on VERSIONS from the left-hand side panel.
- Click on the Create Version link from the Versions panel. The link will appear when you hover your mouse over the panel. This will bring up the Create Version dialog with the Project field preselected for you, as shown in the following screenshot:
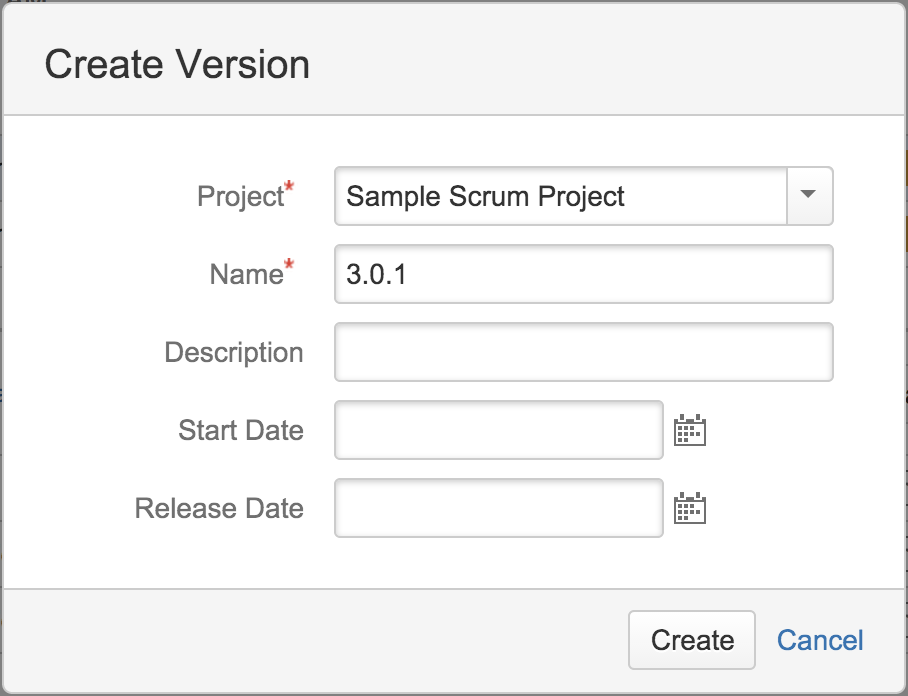
- Provide a name for the version in the Name field.
- You can also specify the start and release dates for the version. These fields are optional, and you can change them later.
- Click on the Create button.
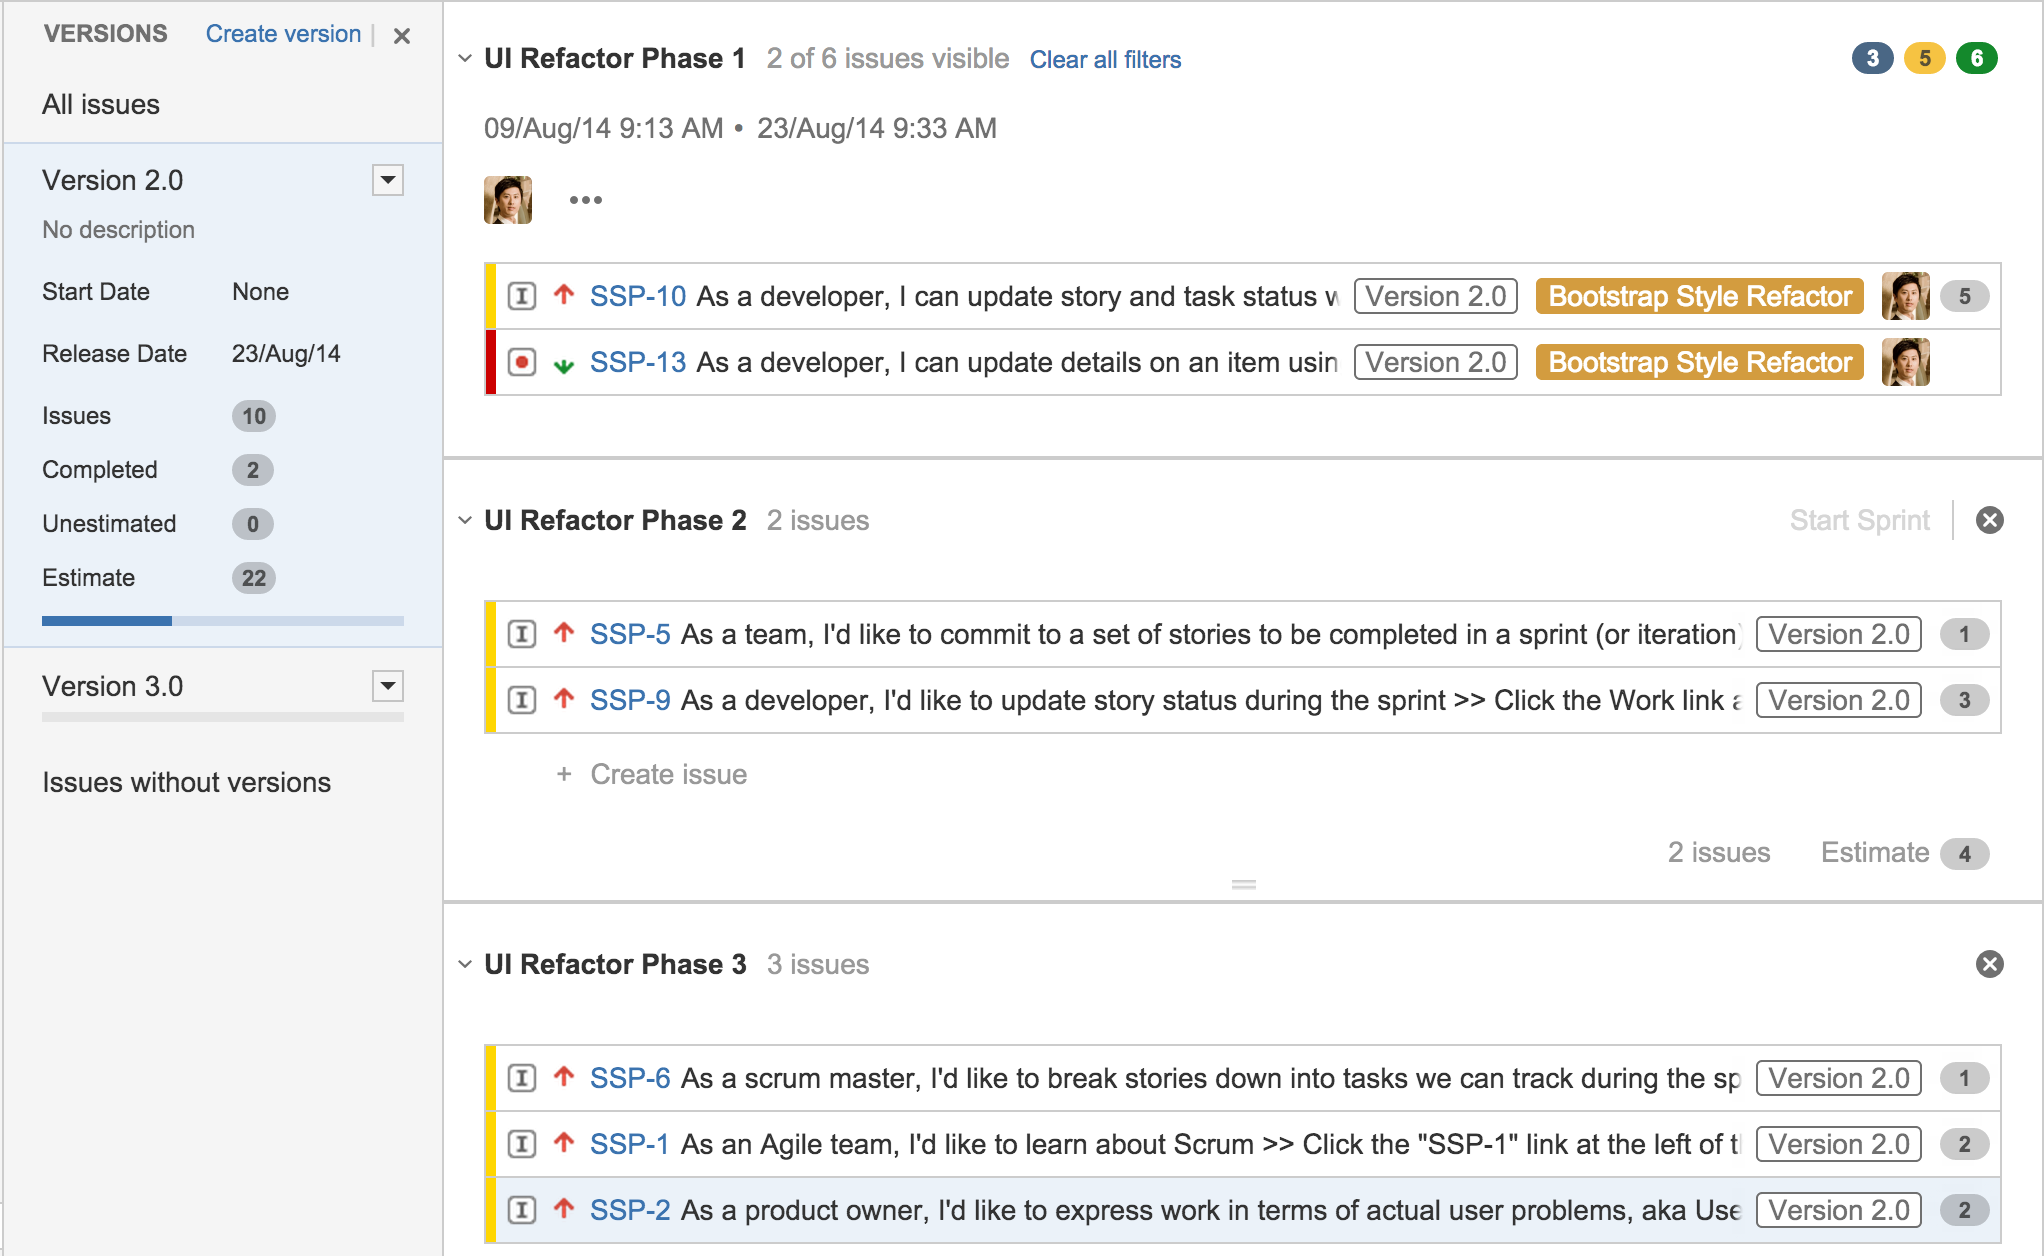
Once the version is created, it will be added to the Versions panel. Just like epics, you can add issues to a version by dragging and dropping the issue over onto the target version. In Scrum, a version can span across many sprints. Clicking on a version will display the issues that are part of the version. As shown in the following screenshot, Version 2.0 spans across three sprints:
Planning sprints
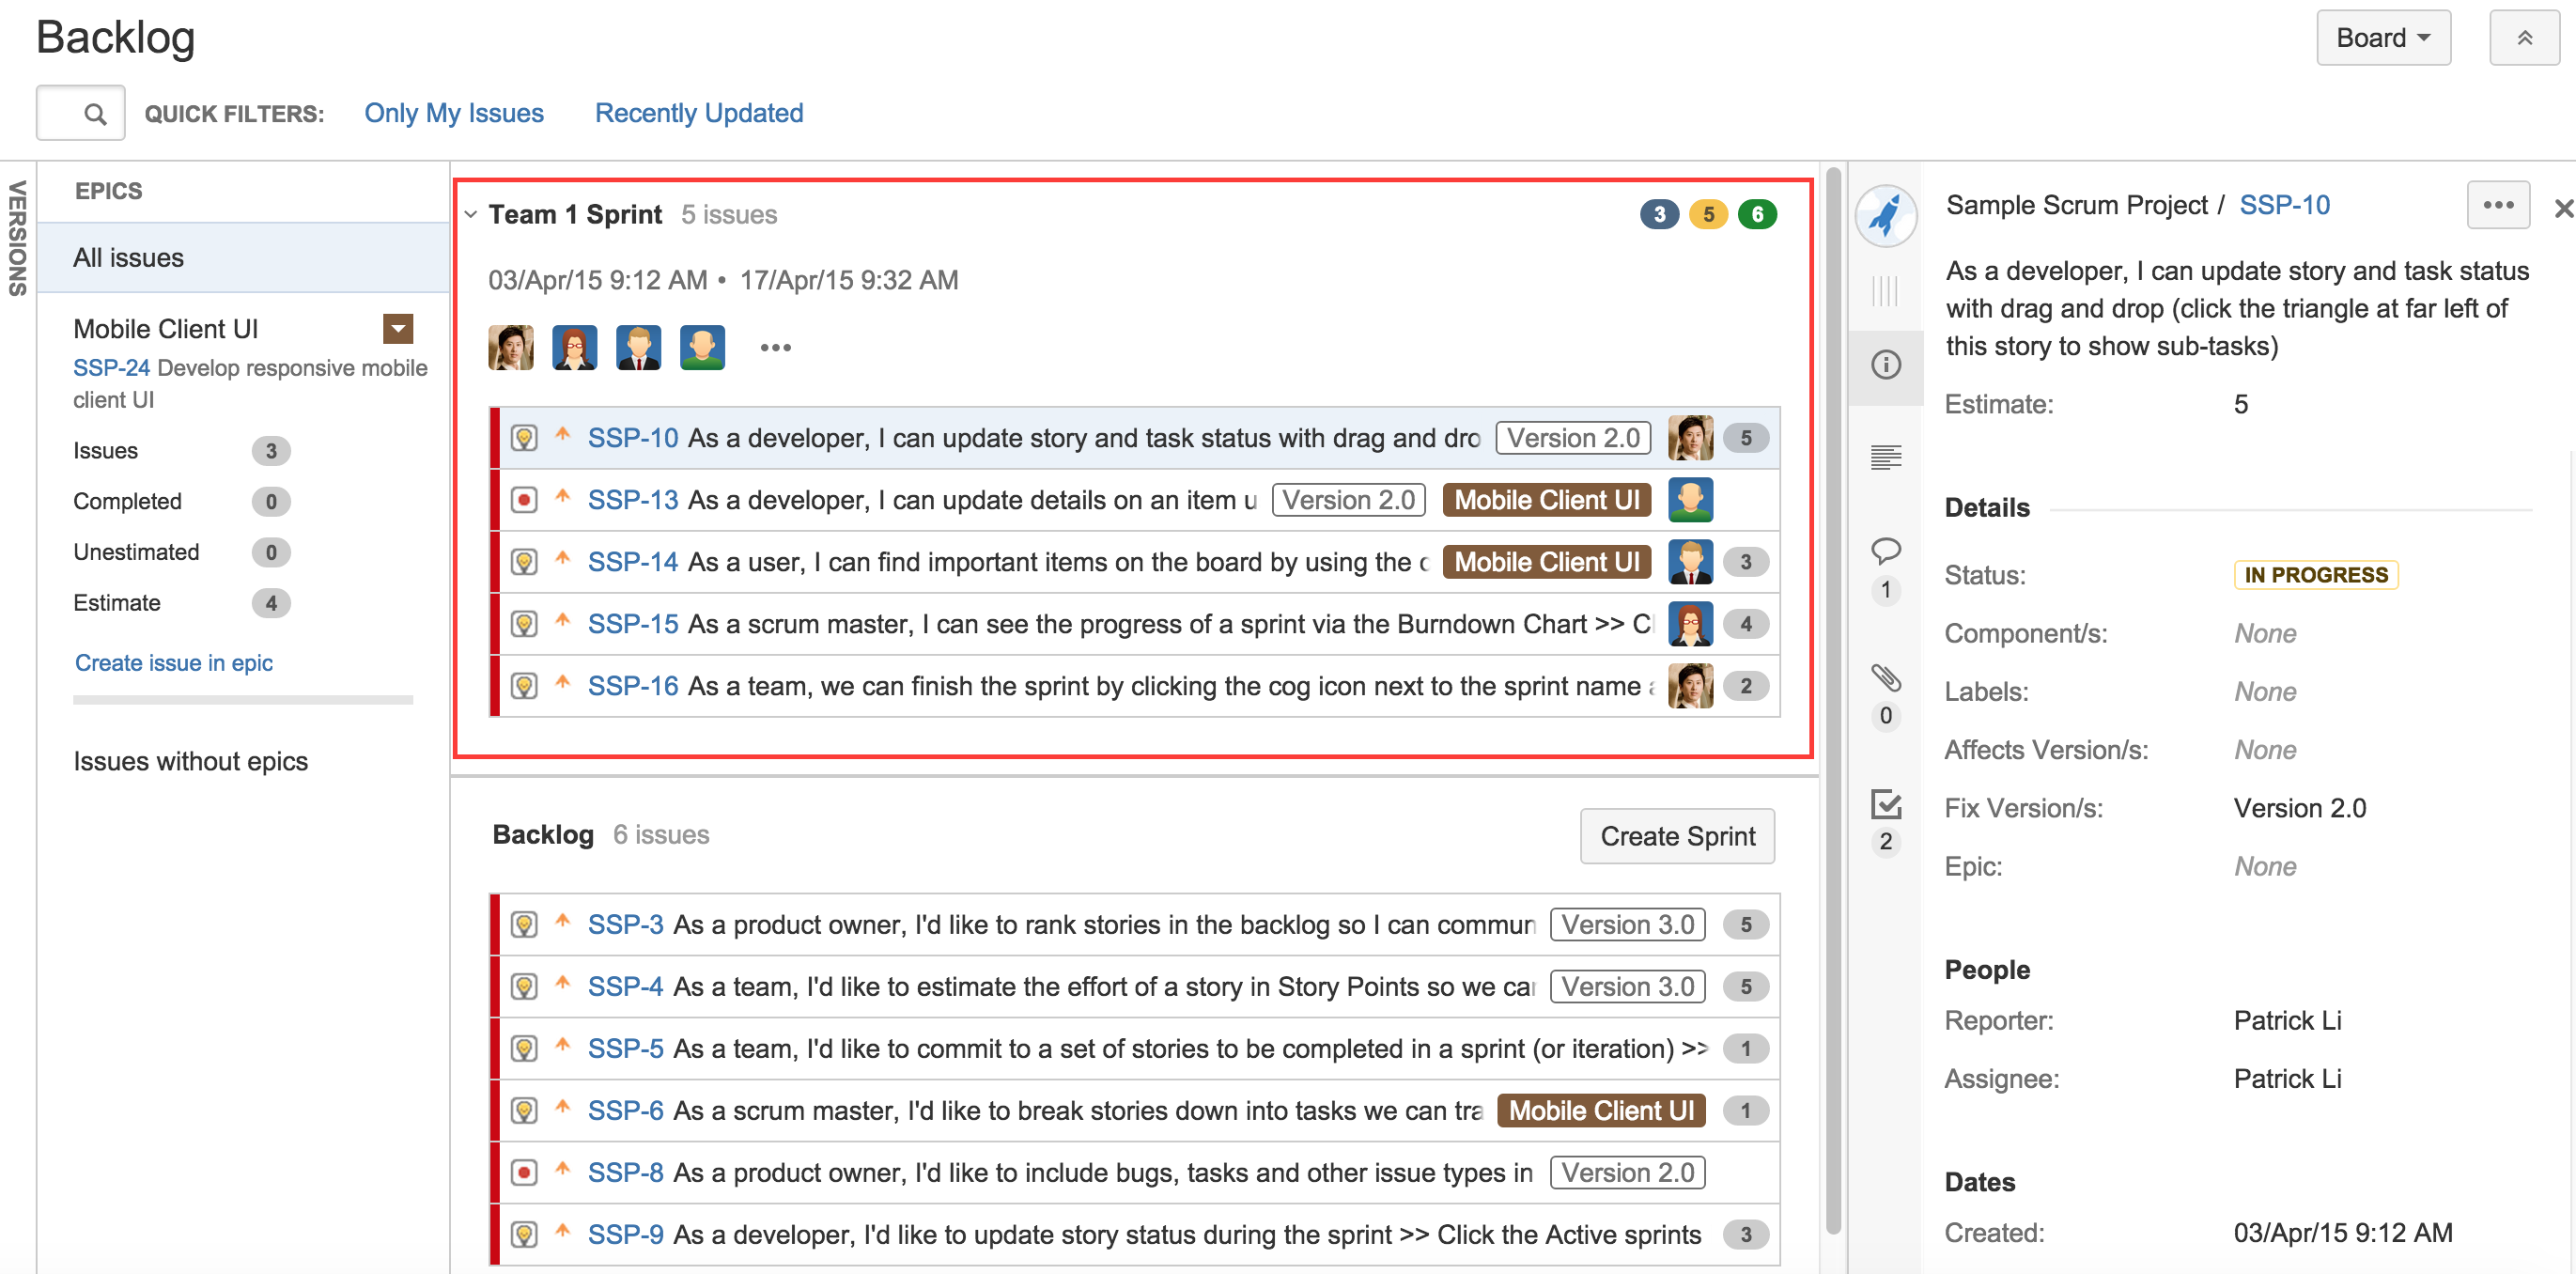
The sprint planning meeting is where the project team comes together at the start of each sprint and decides what they should focus and work on next. With JIRA Agile, you will be using the Backlog mode of your board to create and plan the new sprint's scope.
Now we illustrate some of the key components during sprint planning:
- Backlog: This includes all the issues that are not in any sprint yet. In other words, it includes the issues that are not yet scheduled for completion. For a new board, all existing issues will be placed in the backlog.
- Sprints: These are displayed above the backlog. You can have multiple sprints and plan ahead.
- Issue details: This is the panel on your right-hand side. It displays details of the issue you are clicking on.
- Epics: This is one of the panels on your left-hand side. It displays all the epics you have.
- Versions: This is the other panel on your left-hand side. It displays all the versions you have.
The highlighted area in the following screenshot is the new sprint, and the issues inside the sprint are what the team has committed to deliver at the end of the sprint:
Starting a sprint
Once all the epics and issues have been created, it is time to start preparing a sprint. The first step is to create a new sprint by clicking on the Create Sprint button.
There are two ways to add issues to a sprint:
- By dragging the issues you want from backlog and dropping them into the sprint
- By dragging the sprint footer down, to include all the issues you want to be part of the sprint
You can create multiple sprints and plan beyond the current one by filling each sprint with issues from your backlog.
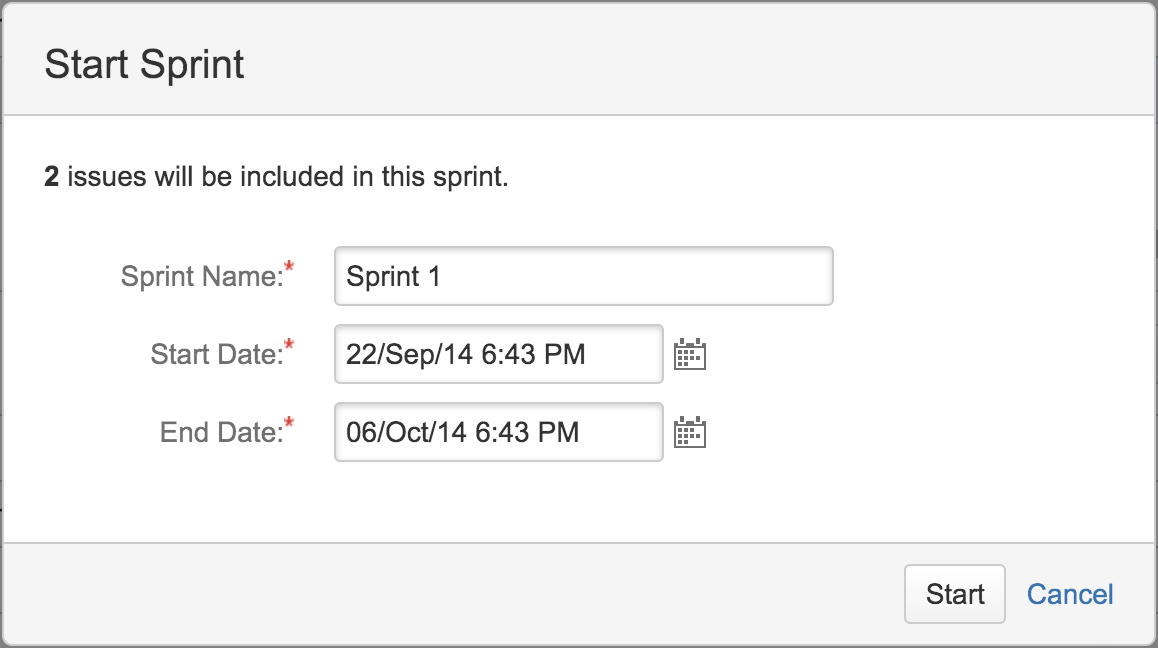
Once you have all the issues you want in the sprint, click on the Start Sprint link. As shown in the following screenshot, you will be asked to set the start and end dates of the sprint. By default, JIRA Agile will automatically set the start date to the current date, and the end date to one week after that. You can change these dates, of course. The general best practices include the following:
- Keeping your sprints short, usually 1 or 2 weeks long.
- Keeping the length of your sprints consistent; this way, you will be able to accurately predict your team's velocity:
Once you have started your sprint, you will be taken to the active sprints mode for the board.
Note that for you to start a sprint, you have to take following things into consideration:
- There must be no sprint already active. You can only have one active sprint per board at any time.
- You must have the Administer Projects permission for all projects included in the board.
Working on a sprint
You will enter the active sprint mode once you have started a sprint; all the issues that are part of the sprint will be displayed. In the active sprint mode, the board will be divided into two major sections.
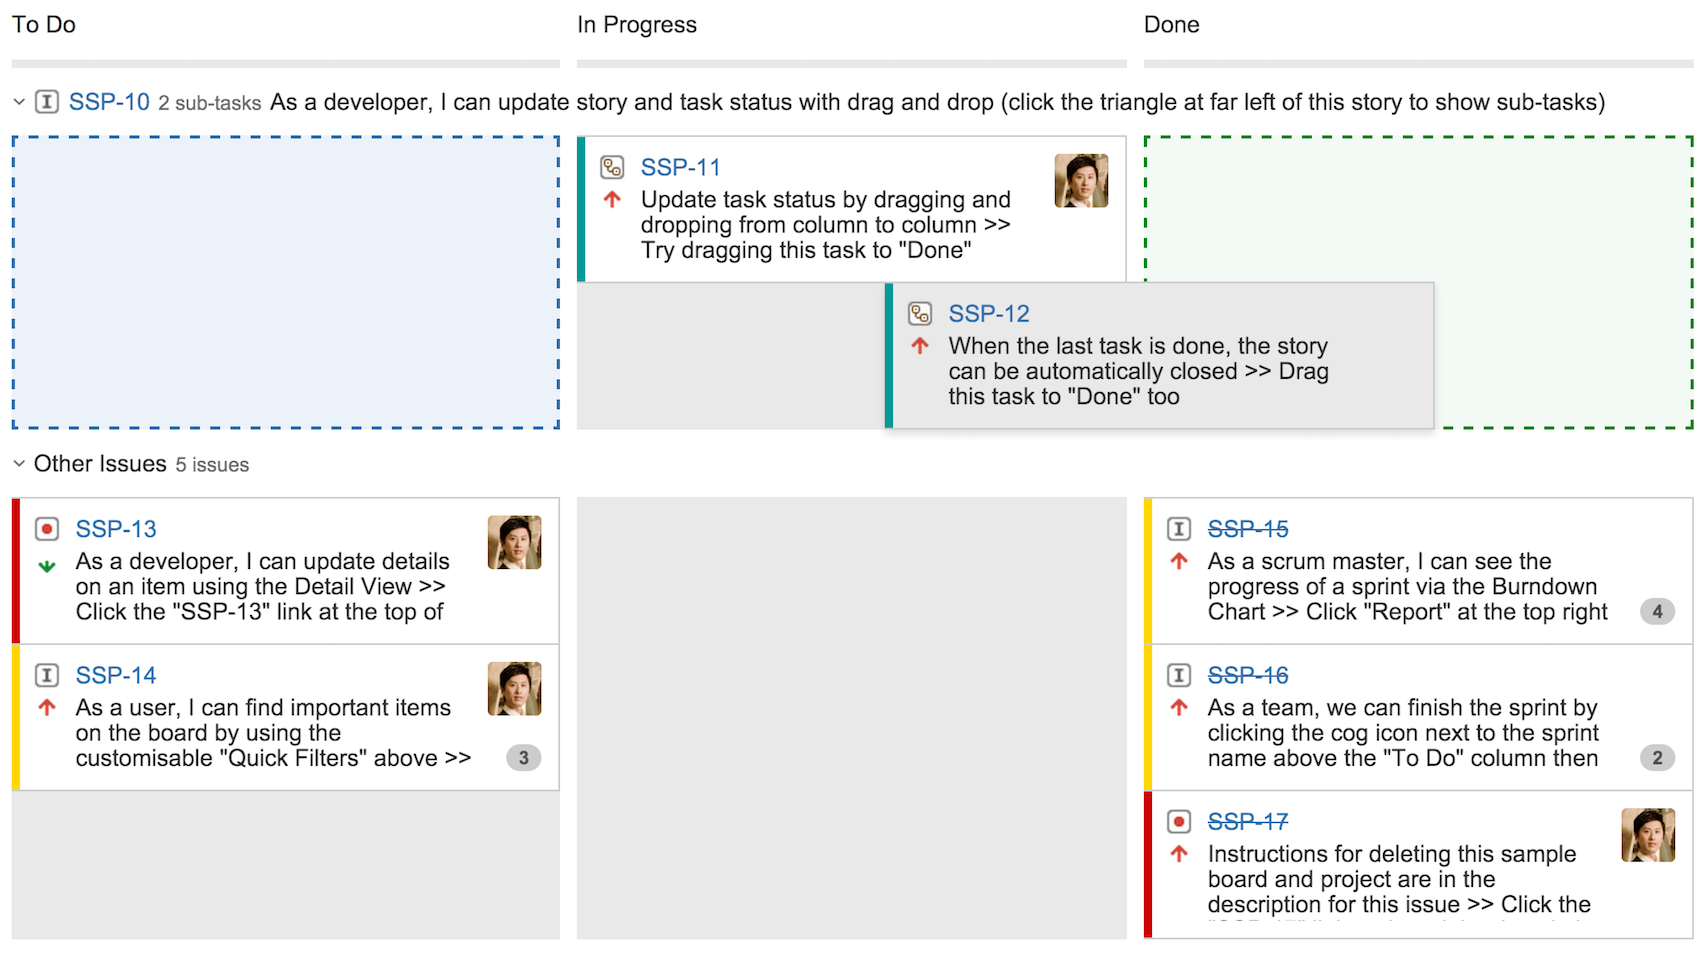
The left section will contain all the issues in the current sprint. You will notice that it is divided into several columns. These columns represent the various states or statuses that an issue can be in, and they should reflect your team's workflow. By default, there are three columns:
- To Do: The issue is waiting to start
- In Progress: The issue is currently being worked on
- Done: The issue has been completed
If you are using epics to organize your issues, this section will also be divided into several horizontal swimlanes. Swimlanes help you group similar issues together on the board. Swimlanes group issues by criteria, such as assignee, story, or epic. By default, swimlanes are grouped by stories, so subtasks for the same story will all be placed in one swimlane.
So, you can see that columns group issues by statuses, while swimlanes group issues by similarity. As shown in the following screenshot, we have three columns and two swimlanes:
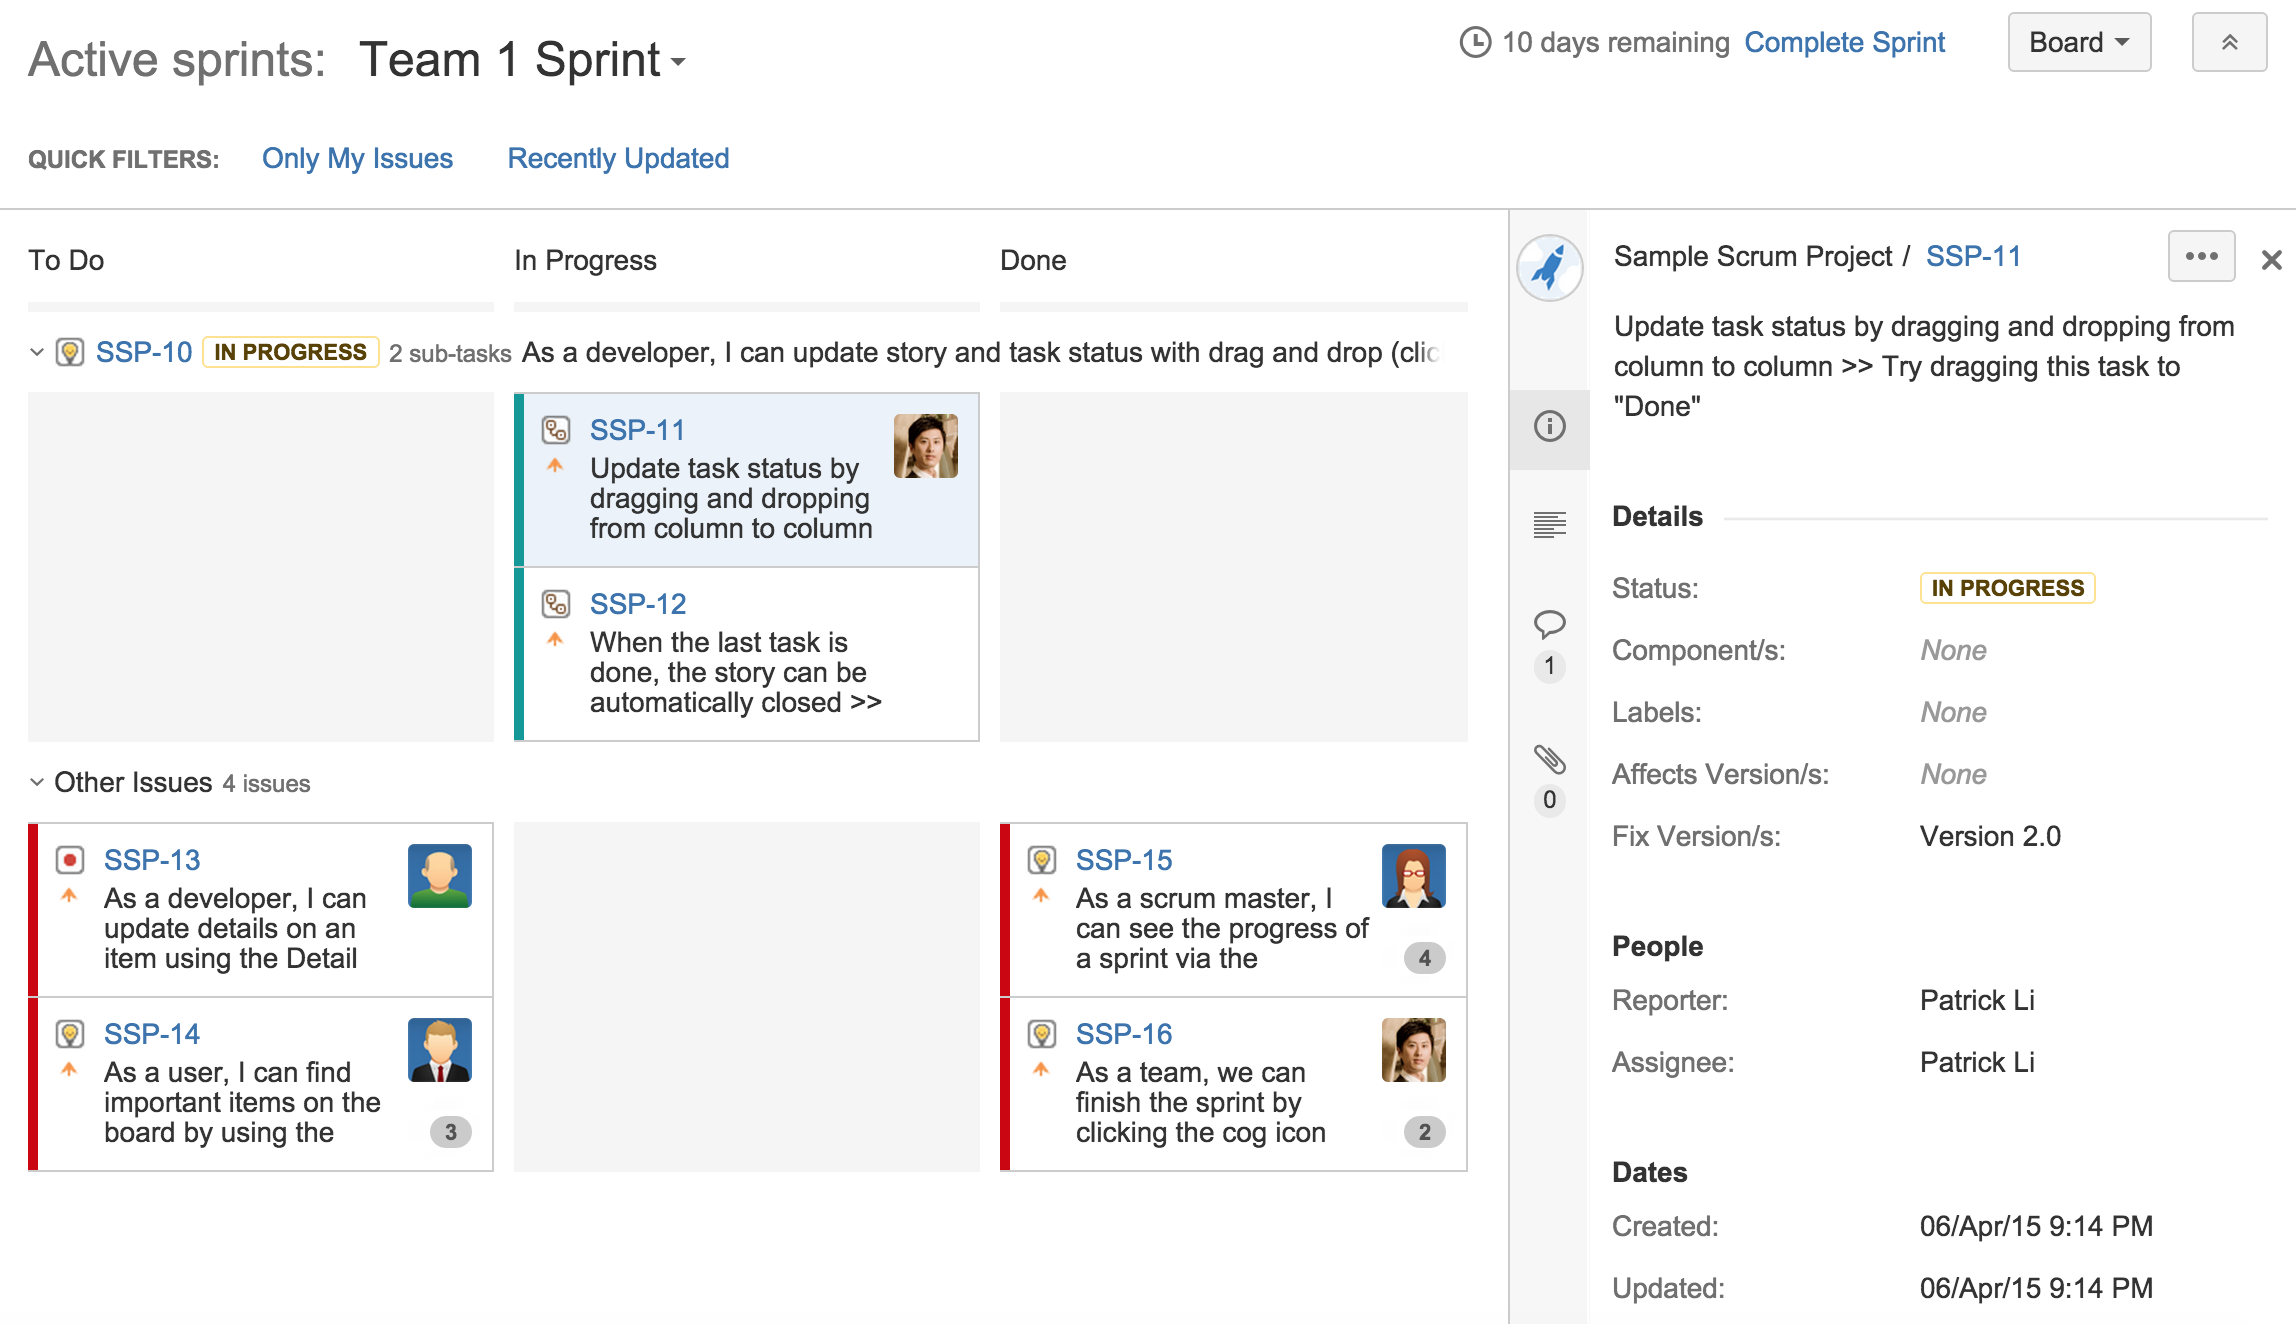
The section on the right-hand side displays the currently selected issue's details, such as its summary and description, comments, and attachments.
In a typical scenario, at the start of a sprint, all the issues will be in the left-most To Do column. During the daily Scrum meetings, team members will review the current status of the board and decide what to focus on for the day. For example, each member of the team may take on an issue and move it to the In Progress column by simply dragging and dropping the issue cards into the column. Once they have finished working on the issues, they can drag them into the Done column. The team will continue this cycle throughout the sprint until all the issues are completed:
During the sprint, the Scrum master as well as the product owner will need to make sure not to interrupt the team unless it is urgent. The Scrum master should also assist with removing impediments that are preventing team members from completing their assigned tasks.
The product owner should also ensure that no additional stories are added to the sprint, and any new feature requests are added to the backlog for future sprints instead. JIRA Agile will alert you if you try to add a new issue to the currently active sprint.
Completing a sprint
On the day the sprint ends, you will need to complete the sprint by performing the following steps:
- Go to your Scrum board and click on Active sprints.
- Click on the Complete Sprint link. This will bring up the Complete Sprint dialog, summarizing the current status of the sprint. As shown in the following screenshot, we have a total of six issues in this sprint. Three issues are completed and three are not:
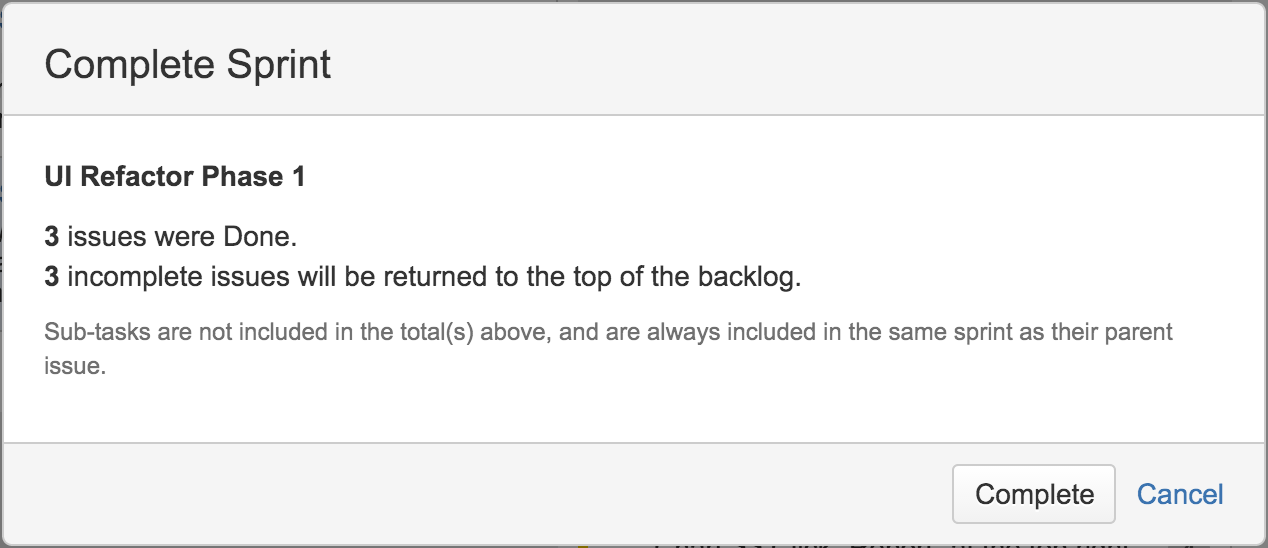
- Click on the Complete button to complete the sprint.
When you complete a sprint, any unfinished issues will be automatically moved back to the top of the backlog. Sometimes, it might be tempting to extend your sprint if you only have one or two issues outstanding, but you should not do this. Remember that the goal here is not to make your estimates appear accurate by extending sprints or to force your team to work harder in order to complete everything. You want to get to a point where the team is consistently completing the same amount of work in each sprint. If you have leftovers from a sprint, it means that your team's velocity should be lowered. Therefore, for the next sprint, you should plan to include less work.
Reporting a sprint's progress
As your team busily works through the issues in the sprint, you need to have a way to track the progress. JIRA Agile provides a number of useful reports via the Report mode. You can access the Report mode anytime during the sprint. These reports are also very useful during sprint retrospective meetings, as they provide detailed insights on how the sprint progressed.
The sprint report
The sprint report gives you a quick snapshot of how the sprint is tracking. It includes a burndown chart and a summary table that lists all the issues in the sprint and their statuses, as shown here:
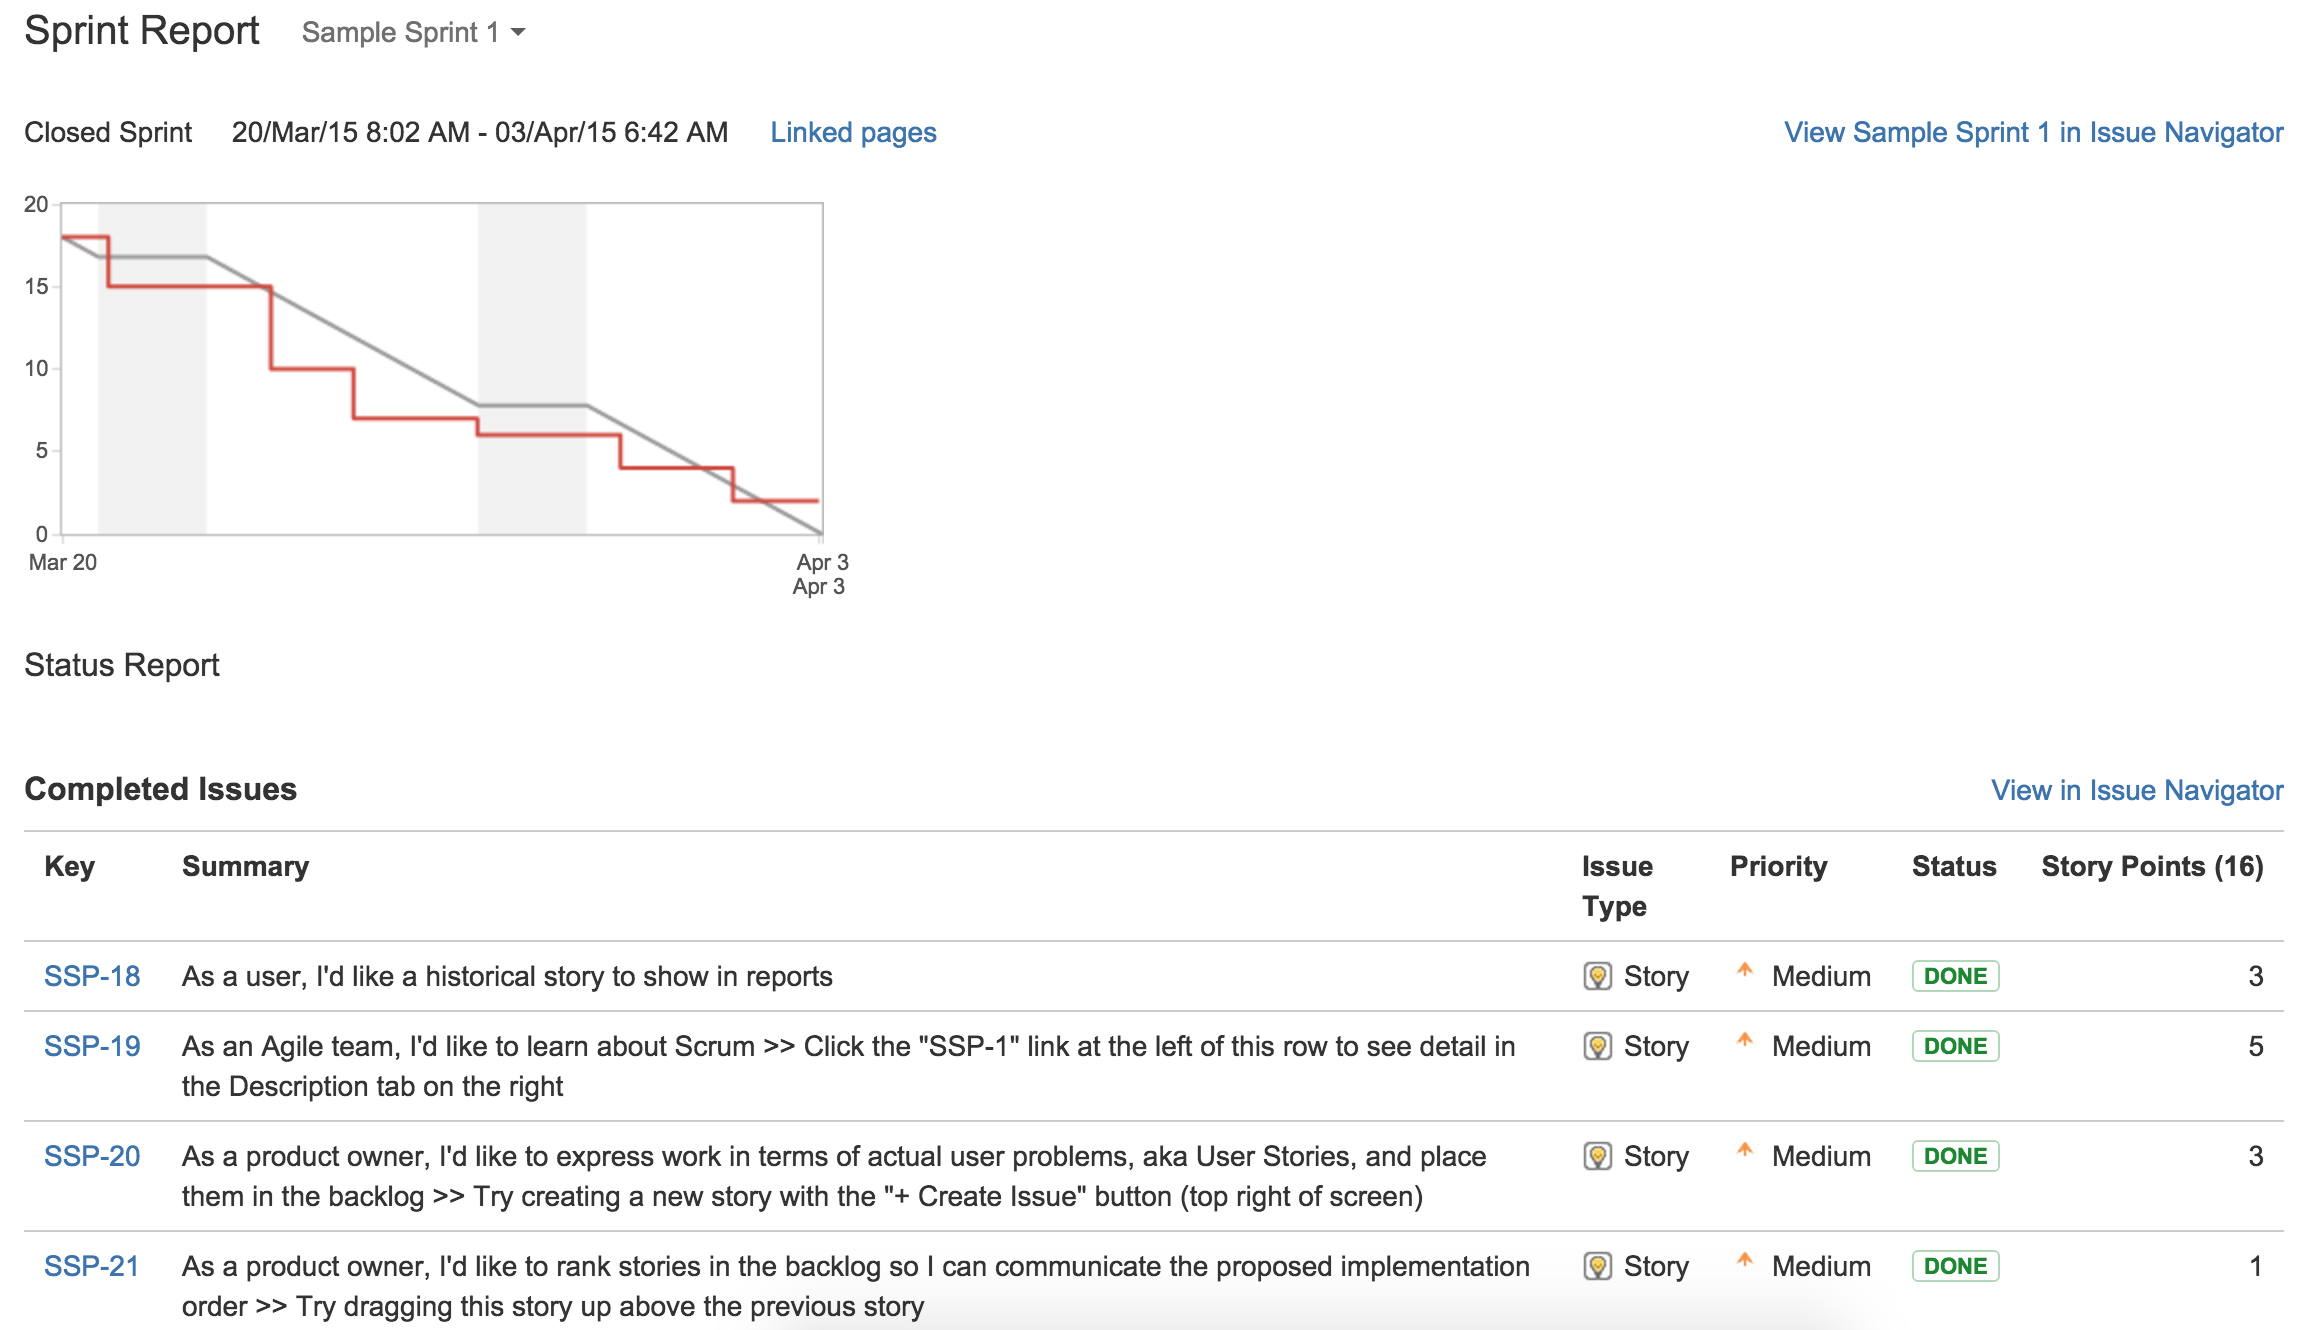
As shown in the preceding sprint report, we have completed four issues in the sprint. One issue was not completed and was placed back in the backlog.
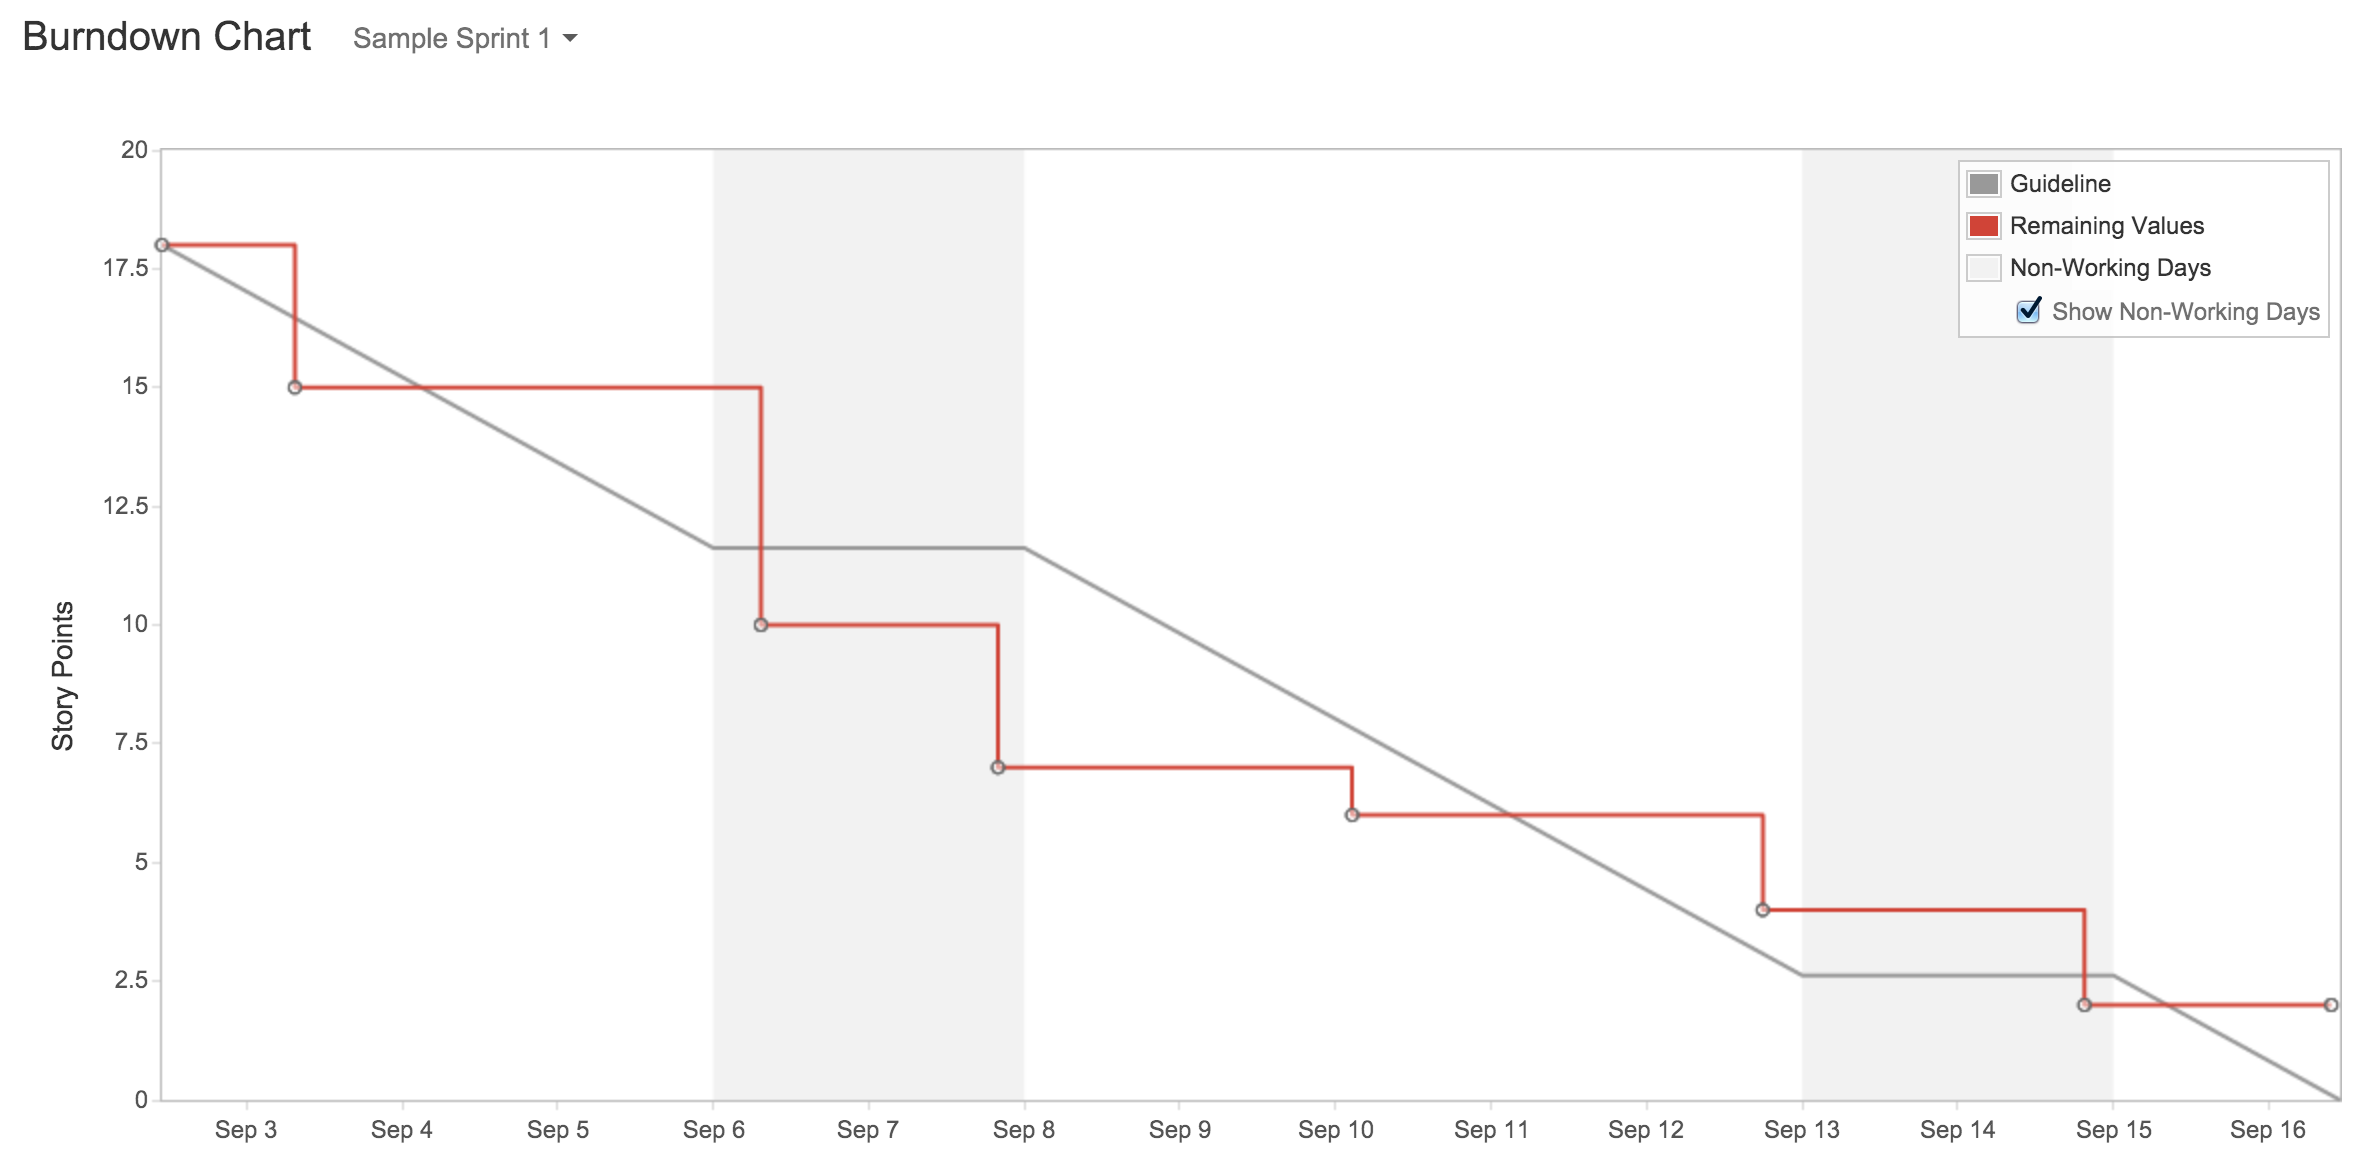
The burndown chart
The burndown chart shows you a graphical representation of the estimated or ideal work left versus actual progress. The gray line acts as a guideline of the projected progress of the project, and the red line is the actual progress. In an ideal world, both lines should be as close to each other as possible, as the sprint progresses each day:
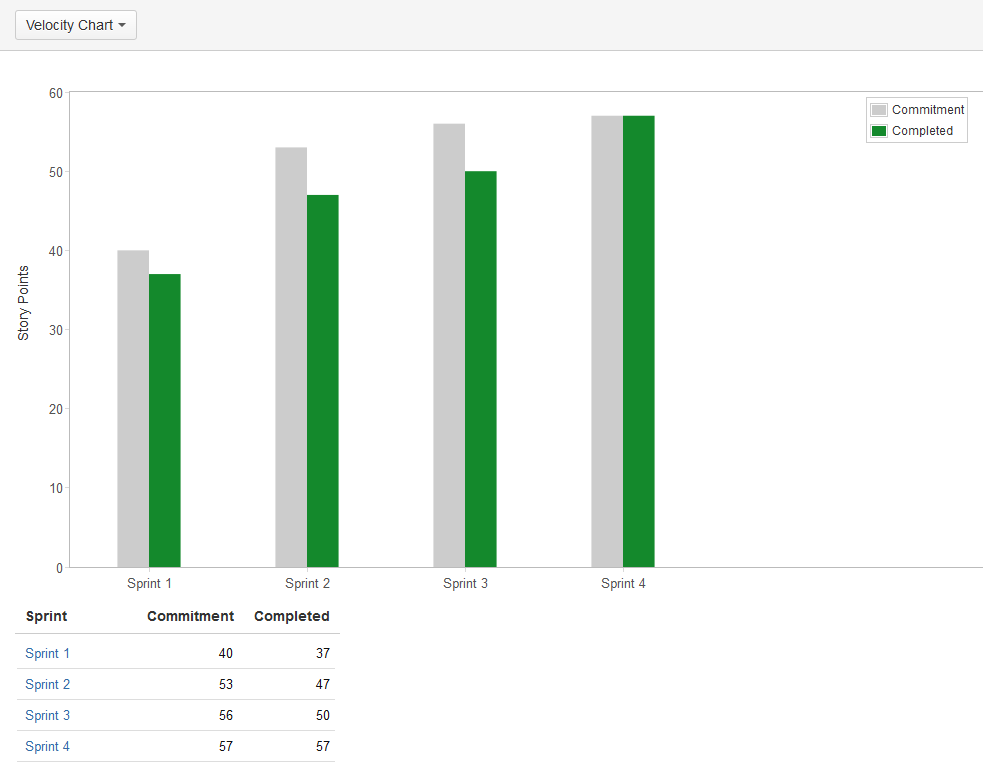
The velocity chart
The velocity chart shows you the amount of work originally committed to the sprint (the gray bar) versus the actual amount of work completed (the green bar), based on how you decide to estimate, such as in the case of story points.
The chart will include past sprints, so you can get an idea of the trend and be able to predict the team's velocity. As shown in the following screenshot, from sprint 1 to 3, we have over-committed the amount of work, and for sprint 4, we have completed all our committed work. So, one way to work out your team's velocity is to calculate the average based on the Completed column, and this should give you an indication of your team's true velocity. Of course, this requires:
- That your sprints stay consistent in duration
- That your team members stay consistent
- That your estimation stays consistent
As your team starts using Scrum, you can expect to see improvements to the team's velocity, as you continuously refine your process. Over time, you will get to a point where the team's velocity becomes consistent and can be used as a reliable indicator for work estimation. This will allow you to avoid over and under committing on work delivery, as shown in the following velocity chart:
Summary
In this article, we looked at how to use JIRA Agile for Scrum. We looked at the Scrum board and how you can use it to organize your issue backlog, plan and run your sprint, and review and track its progress with reports and charts. Remember that the keys for a successfully running sprint are consistency, review, and continuous improvement. It is fine if you find your estimates are incorrect, especially for the first few sprints; just make sure that you review, adjust, and improve.
Resources for Article:
Further resources on this subject:

 United States
 Great Britain
 India
India
 Germany
 France
 Canada
 Russia
 Spain
Spain
 Brazil
 Australia
 Singapore
 Canary Islands
 Hungary
 Ukraine
 Luxembourg
 Estonia
 Lithuania
 South Korea
 Turkey
 Switzerland
 Colombia
 Taiwan
 Chile
Chile
 Norway
 Ecuador
 Indonesia
 New Zealand
 Cyprus
 Denmark
 Finland
 Poland
 Malta
Malta
 Czechia
 Austria
 Sweden
 Italy
Italy
 Egypt
Egypt
 Belgium
 Portugal
 Slovenia
 Ireland
 Romania
 Greece
 Argentina
 Netherlands
 Bulgaria
 Latvia
 South Africa
 Malaysia
 Japan
Japan
 Slovakia
 Philippines
 Mexico
 Thailand


