In this article, we recommend that you use the JBoss AS (version 4.2), which is a free J2EE Application Server that can be downloaded from http://www.jboss.org/jbossas/downloads/ (complete documentation can be downloaded from http://www.jboss.org/jbossas/docs/).
JBoss AS plug-in and the Eclipse WTP
JBoss AS plug-in can be treated as an elegant method of connecting a J2EE Application Server to the Eclipse IDE. It's important to know that JBoss AS plug-in does this by using the WTP support, which is a project included by default in the Eclipse IDE. WTP is a major project that extends the Eclipse platform with a strong support for Web and J2EE applications. In this case, WTP will sustain important operations, like starting the server in run/debug mode, stopping the server, and delegating WTP projects to their runtimes. For now, keep in mind that Eclipse supports a set of WTP servers and for every WTP server you may have one WTP runtime.
Now, we will see how to install and configure the JBoss 4.2.2 runtime and server.
Adding a WTP runtime in Eclipse
In case of JBoss Tools, the main scope of Server Runtimes is to point to a server installation somewhere on your machine. By runtimes, we can use different configurations of the same server installed in different physical locations. Now, we will create a JBoss AS Runtime (you can extrapolate the steps shown below for any supported server):
- From the Window menu, select Preferences.
- In the Preferences window, expand the Server node and select the Runtime Environments child-node. On the right side of the window, you can see a list of currently installed runtimes, as shown in the following screenshot, where you can see that an Apache Tomcat runtime is reported (this is just an example, the Apache Tomcat runtime is not a default one).
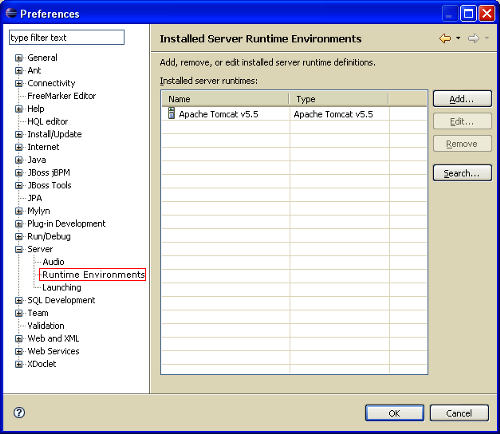
- Now, if you want to install a new runtime, you should click the Add button from the top-right corner. This will bring in front the New Server Runtime Environment window as you can see in the following screenshot. Because we want to add a JBoss 4.2.2 runtime, we will select the JBoss 4.2 Runtime option (for other adapters proceed accordingly). After that, click Next for setting the runtime parameters.
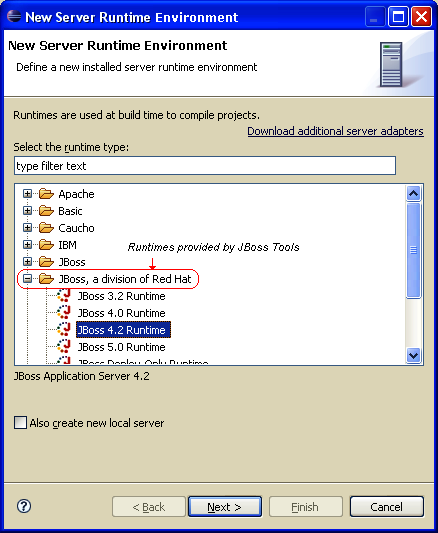
In the runtimes list, we have runtimes provided by WTP and runtimes provided by JBoss Tools (see the section marked in red on the previous screenshot). Because this article is about JBoss Tools, we will further discuss only the runtimes from this category. Here, we have five types of runtimes with the mention that the JBoss Deploy-Only Runtime type is for developers who start/stop/debug applications outside Eclipse.
Unlock access to the largest independent learning library in Tech for FREE!
Get unlimited access to 7500+ expert-authored eBooks and video courses covering every tech area you can think of.
Renews at $19.99/month. Cancel anytime
- In this step, you will configure the JBoss runtime by indicating the runtime's name (in the Name field), the runtime's home directory (in the Home Directory field), the Java Runtime Environment associated with this runtime (in the JRE field), and the configuration type (in the Configuration field).In the following screenshot, we have done all these settings for our JBoss 4.2 Runtime.
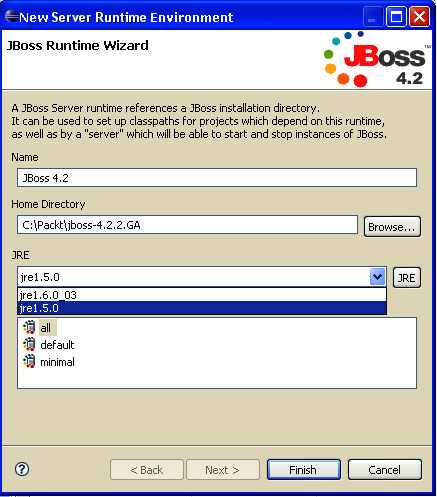
The official documentation of JBoss AS 4.2.2 recommends using JDK version 5. If you don't have this version in the JRE list, you can add it like this:
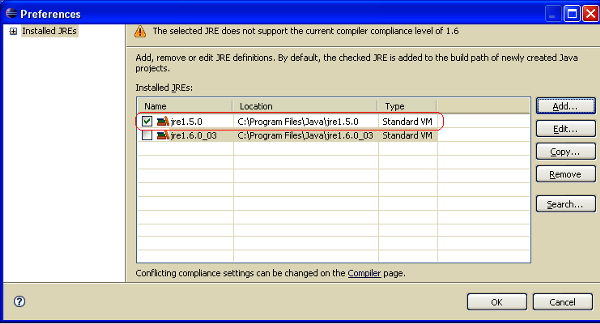
- Display the Preferences window by clicking the JRE button. In this window, click the Add button to display the Add JRE window. Continue by selecting the Standard VM option and click on the Next button. On the next page, use the Browse button to navigate to the JRE 5 home directory.
- Click on the Finish button and you should see a new entry in the Installed JREs field of the Preferences window (as shown in the following screenshot). Just check the checkbox of this new entry and click OK. Now, JRE 5 should be available in the JRE list of the New Server Runtime Environment window.
- After this, just click on the Finish button and the new runtime will be added, as shown in the following screenshot:
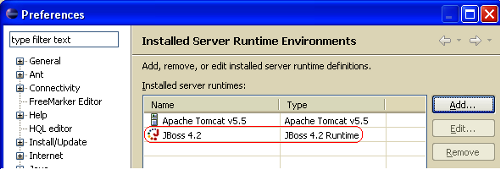
From this window, you can also edit or remove a runtime by using the Edit and Remove buttons. These are automatically activated when you select a runtime from the list.
- As a final step, it is recommended to restart the Eclipse IDE.
 United States
 Great Britain
 India
India
 Germany
 France
 Canada
 Russia
 Spain
Spain
 Brazil
 Australia
 Singapore
 Canary Islands
 Hungary
 Ukraine
 Luxembourg
 Estonia
 Lithuania
 South Korea
 Turkey
 Switzerland
 Colombia
 Taiwan
 Chile
Chile
 Norway
 Ecuador
 Indonesia
 New Zealand
 Cyprus
 Denmark
 Finland
 Poland
 Malta
Malta
 Czechia
 Austria
 Sweden
 Italy
Italy
 Egypt
Egypt
 Belgium
 Portugal
 Slovenia
 Ireland
 Romania
 Greece
 Argentina
 Netherlands
 Bulgaria
 Latvia
 South Africa
 Malaysia
 Japan
Japan
 Slovakia
 Philippines
 Mexico
 Thailand


