
You’ve finished that application you’ve been working on for weeks or months and you’re ready to show it to the world. Now you login to your favorite cloud, launch instances, setup monitoring, security groups and firewalls.
All of that is well and good, but it’s tedious work. You have to learn how to use all of your clouds proprietary bits and services. If you decide to move to a different cloud later, you’ll have to learn that provider’s quirks and possibly rewrite portions of your application that depended on cloud-specific services.

Juju solves that problem (and more). Juju is a cloud orchestration and service modeling toolkit. With it, you can deploy your application to clouds like Amazon, Azure, Google Compute Engine (GCE), Joyent or Digital Ocean, or to your own bare metal via MAAS.
Best of all, Juju does this in a repeatable, reliable fashion with a few simple commands.
Why should you care?
Being in DevOps means being agile. It provides the fast iteration of writing code, testing code, and deploying code. And Juju embraces the DevOps philosophy by taking the tedious and time-consuming tasks and making them nimble.
In the past, I managed dozens of servers with a set of bash scripts wrapped around ssh and rsync to deploy updated code, and manually managed database and memcached clusters as well as load balancers. Later, we upgraded to a Puppet and Kickstart workflow. Each method worked, and was an improvement on the previous, but neither was spectacular.
I wish I’d known about Juju at the time. I would have spent way less time deploying and more time coding.
The anatomy of Juju
A Charm is a structured collection of files that describe what you’re installing, how to install it, its configuration options and what other service(s) it speaks to.
.
├── actions
│   ├── backup
│   └── benchmark
├── hooks
│   ├── config-changed
│   ├── install
│   ├── start
│   ├── stop
│   └── upgrade-charm
├── config.yaml
└── metadata.yaml
Actions are scripts that run against your application. Not all charms have them, but those that do usually encapsulate administrative tasks. They can also run benchmarks, to analyze the performance on your application, for example, across different clouds or hardware configurations in order to find the best balance between cost and performance.
Hooks are things that run in response to something happening. They are also idempotent, meaning that they can be run multiple times with the same result. The standard set of hooks include:
- The install hook is the first executed. As the name implies, it installs any software needed to run a program.
- The start and stop hooks start or stop your application.
- The config-changed hook is executed any time one of the options defined in config.yaml is changed.
- The upgrade-charm hook handles updates to the charm or your application.
As a user, these hooks are executed for you when certain events happen. As a developer, there are a series of best practices to help you write charms that fit the above model.
Relationships
Relationships define the services your application interacts with. When a relationship is joined, each side exchanges information. This handshake may include credentials, hostnames and ports, filesystem locations and more. Hooks, like the ones above, are executed when the state of a relationship changes.
For example, adding a relation between your application and a database would fire the database-relation-joined event, which would provide you with the host name, database name, and credentials to use. The database would receive the host name of your application, allowing it to set ACLs to secure itself.
This removes the need for editing configuration files by hand or script.
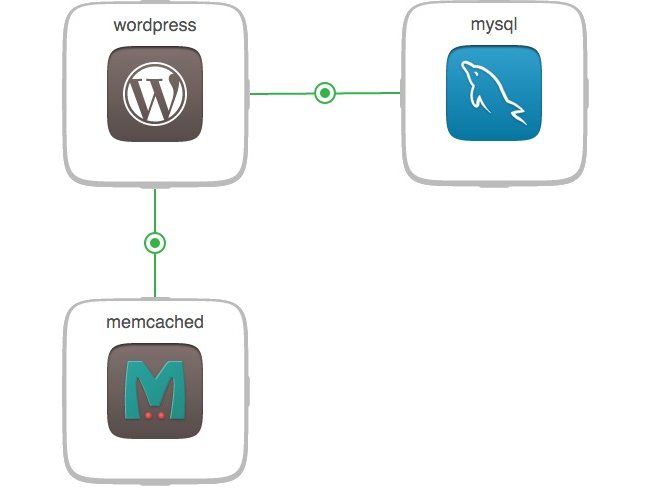
A simplistic example of relations is WordPress. In its metadata.yaml it declares that it requires a database, and can optionally use memcached, as visualized here in a screenshot taken from the Juju GUI. The tiles represent deployed services, and the line between them represents the relationship.
To achieve this model, we run the commands:
$ juju deploy mysql --constraints="cpu-cores=8 mem=32G"
Added charm "cs:trusty/mysql-29" to the environment.
$ juju deploy memcached
Added charm "cs:trusty/memcached-11" to the environment.
$ juju deploy wordpress
Added charm "cs:trusty/wordpress-3" to the environment.
$ juju add-relation wordpress mysql
$ juju add-relation wordpress memcached
$ juju expose wordpress
Scalability
As cool as charms and relationships are, you see what they can really do when it comes to scalability. In the above example, you can simply add machines to the WordPress charm, which will automatically configure load balancing between each machine.
Bundles
So far, we’ve talked about charms and relationships. The real magic happens when you put them all together to create a model of your workload.
We can create a bundles.yaml file that describes the services to deploy, any configuration options that should be changed from their default, and each services relation to each another using this bundle.yaml:
$ juju quickstart bundle.yamlWhat’s next
About the author
Adam Israel has worn many hats over the past twenty years, from help desk to Chief Technical Officer, from point of sale software to search engines and ad server platforms. He currently works at Canonical, Ltd as a Software Engineer, with focus on cloud development and operations.