


In this article by Yatish Patil, the author of the book Microsoft Azure IOT Development Cookbook, we will look at device management using different techniques with Azure IoT Hub. We will see the following recipes:
- Device registry operations
- Device twins
- Device direct methods
- Device jobs
(For more resources related to this topic, see here.)
Azure IoT Hub has the capabilities that can be used by a developer to build a robust device management. There could be different use cases or scenarios across multiple industries but these device management capabilities, their patterns and the SDK code remains same, saving the significant time in developing and managing as well as maintaining the millions of devices.
Device management will be the central part of any IoT solution. The IoT solution is going to help the users to manage the devices remotely, take actions from the cloud based application like disable, update data, run any command, and firmware update.
In this article, we are going to perform all these tasks for device management and will start with creating the device.
Device registry operations
This sample application is focused on device registry operations and how it works, we will create a console application as our first IoT solution and look at the various device management techniques.
Getting ready
Let’s create a console application to start with IoT:
- Create a new project in Visual Studio:
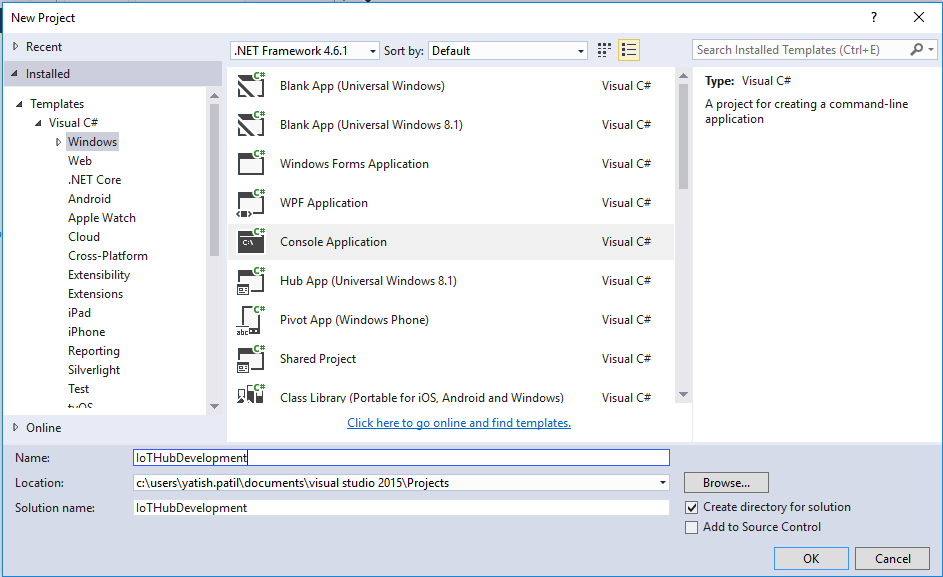 Create a Console Application
 - Add IoT Hub connectivity extension in Visual Studio:
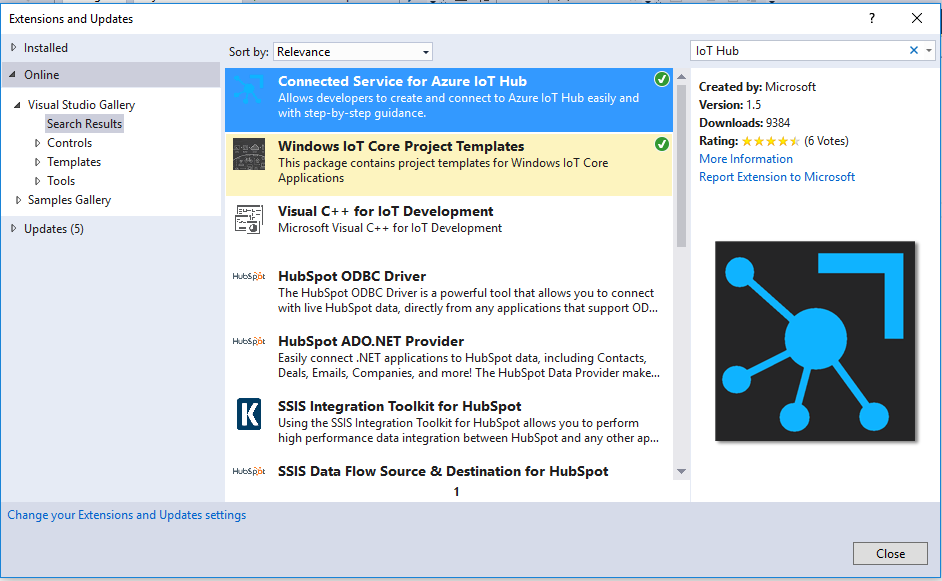 Add the extension for IoT Hub connectivity
 - Now right click on the Solution and go to Add a Connected Services.
- Select Azure IoT Hub and click Add.
- Now select Azure subscription and the IoT Hub created:
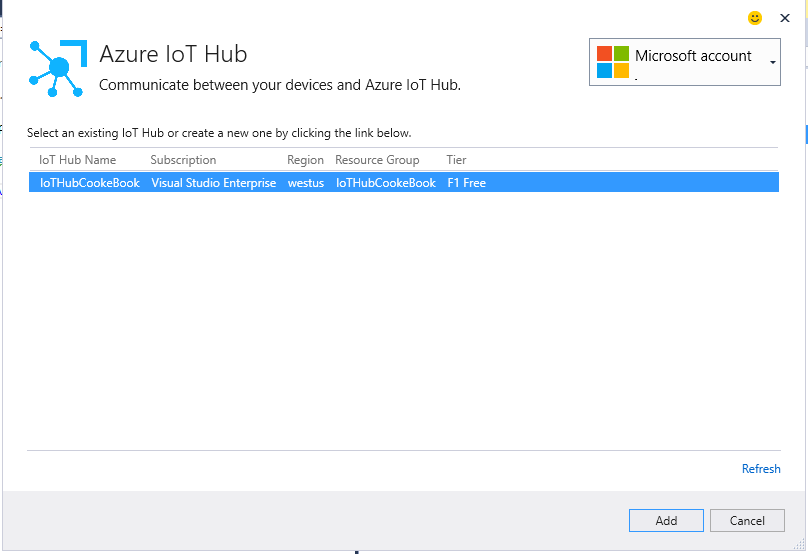 Select IoT Hub for our application
 - Next it will ask you to add device or you can skip this step and click Complete the configuration.
How to do it…
- Create device identity: initialize the Azure IoT Hub registry connection:
registryManager = RegistryManager.CreateFromConnectionString(connectionString); Device device = new Device(); try { device = await registryManager.AddDeviceAsync(new Device(deviceId)); success = true; } catch (DeviceAlreadyExistsException) { success = false; } - Retrieve device identity by ID:
Device device = new Device(); try { device = await registryManager.GetDeviceAsync(deviceId); } catch (DeviceAlreadyExistsException) { return device; } - Delete device identity:
Device device = new Device(); try { device = GetDevice(deviceId); await registryManager.RemoveDeviceAsync(device); success = true; } catch (Exception ex) { success = false; } - List up to 1000 identities:
try { var devicelist = registryManager.GetDevicesAsync(1000); return devicelist.Result; } catch (Exception ex) { // - Export all identities to Azure blob storage:
var blobClient = storageAccount.CreateCloudBlobClient(); string Containername = "iothubdevices"; //Get a reference to a container var container = blobClient.GetContainerReference(Containername); container.CreateIfNotExists(); //Generate a SAS token var storageUri = GetContainerSasUri(container); await registryManager.ExportDevicesAsync(storageUri, "devices1.txt", false); } - Import all identities to Azure blob storage:
await registryManager.ImportDevicesAsync(storageUri, OutputStorageUri);
How it works…
Let’s now understand the steps we performed. We initiated by creating a console application and configured it for the Azure IoT Hub solution. The idea behind this is to see the simple operation for device management.
In this article, we started with simple operation for provision of the device by adding it to IoT Hub. We need to create connection to the IoT Hub followed by the created object of registry manager which is a part of devices namespace.
Once we are connected we can perform operations like, add device, delete device, get device, these methods are asynchronous ones.
IoT Hub also provides a way where in it connects with Azure storage blob for bulk operations like export all devices or import all devices, this works on JSON format only, the entire set of IoT devices gets exported in this way.
There’s more…
Device identities are represented as JSON documents. It consists of properties like:
- deviceId: It represents the unique identification or the IoT device.
- ETag: A string representing a weak ETag for the device identity.
- symkey: A composite object containing a primary and a secondary key, stored in base64 format.
- status: If enabled, the device can connect. If disabled, this device cannot access any device-facing Endpoint.
- statusReason: A string that can be used to store the reason for the status changes.
- connectionState: It can be connected or disconnected.
Device twins
First we need to understand what device twin is and what is the purpose where we can use the device twin in any IoT solution. The device twin is a JSON formatted document that describes the metadata, properties of any device created within IoT Hub. It describes the individual device specific information.
The device twin is made up of: tags, desired properties, and the reported properties. The operation that can be done by a IoT solution are basically update this the data, query for any IoT device.
Tags hold the device metadata that can be accessed from IoT solution only. Desired properties are set from IoT solution and can be accessed on the device. Whereas the reported properties are set on the device and retrieved at IoT solution end.
How to do it…
- Store device metadata:
var patch = new { properties = new { desired = new { deviceConfig = new { configId = Guid.NewGuid().ToString(), DeviceOwner = "yatish", latitude = "17.5122560", longitude = "70.7760470" } }, reported = new { deviceConfig = new { configId = Guid.NewGuid().ToString(), DeviceOwner = "yatish", latitude = "17.5122560", longitude = "70.7760470" } } }, tags = new { location = new { region = "US", plant = "Redmond43" } } }; await registryManager.UpdateTwinAsync(deviceTwin.DeviceId, JsonConvert.SerializeObject(patch), deviceTwin.ETag); - Query device metadata:
var query = registryManager.CreateQuery("SELECT * FROM devices WHERE deviceId = '" + deviceTwin.DeviceId + "'"); - Report current state of device:
var results = await query.GetNextAsTwinAsync();
How it works…
In this sample, we retrieved the current information of the device twin and updated the desired properties, which will be accessible on the device side. In the code, we will set the co-ordinates of the device with latitude and longitude values, also the device owner name and so on. This same value will be accessible on the device side.
In the similar manner, we can set some properties on the device side which will be a part of the reported properties. While using the device twin we must always consider:
- Tags can be set, read, and accessed only by backend .
- Reported properties are set by device and can be read by backend.
- Desired properties are set by backend and can be read by backend.
- Use version and last updated properties to detect updates when necessary.
Each device twin size is limited to 8 KB by default per device by IoT Hub
There’s more…
Device twin metadata always maintains the last updated time stamp for any modifications. This is UTC time stamp maintained in the metadata.
Device twin format is JSON format in which the tags, desired, and reported properties are stored, here is sample JSON with different nodes showing how it is stored:
"tags": {
  "$etag": "1234321",
   "location": {
    "country": "India"
    "city": "Mumbai",
    "zipCode": "400001"
  }
},
"properties": {
  "desired": {
    "latitude": 18.75,
    "longitude": -75.75,
    "status": 1,
    "$version": 4
  },
  "reported": {
    "latitude": 18.75,
    "longitude": -75.75,
    "status": 1,
    "$version": 4
  }
}
Device direct methods
Azure IoT Hub provides a fully managed bi-directional communication between the IoT solution on the backend and the IoT devices in the fields.
When there is need for an immediate communication result, a direct method best suites the scenarios. Lets take example in home automation system, one needs to control the AC temperature or on/off the faucet showers.
- Invoke method from application:
public async Task<CloudToDeviceMethodResult> InvokeDirectMethodOnDevice(string deviceId, ServiceClient serviceClient) { var methodInvocation = new CloudToDeviceMethod("WriteToMessage") { ResponseTimeout = TimeSpan.FromSeconds(300) }; methodInvocation.SetPayloadJson("'1234567890'"); var response = await serviceClient.InvokeDeviceMethodAsync(deviceId, methodInvocation); return response; } - Method execution on device:
deviceClient = DeviceClient.CreateFromConnectionString("",
TransportType.Mqtt);
deviceClient.SetMethodHandlerAsync("WriteToMessage", new
DeviceSimulator().WriteToMessage, null).Wait();
deviceClient.SetMethodHandlerAsync("GetDeviceName", new
DeviceSimulator().GetDeviceName, new
DeviceData("DeviceClientMethodMqttSample")).Wait();
How it works…
Direct method works on request-response interaction with the IoT device and backend solution. It works on timeout basis if no reply within that, it fails. These synchronous requests have by default 30 seconds of timeout, one can modify the timeout and increase up to 3600 depending on the IoT scenarios they have. The device needs to connect using the MQTT protocol whereas the backend solution can be using HTTP.
Device jobs
In a typical scenario, device administrator or operators are required to manage the devices in bulk. We look at the device twin which maintains the properties and tags. Conceptually the job is nothing but a wrapper on the possible actions which can be done in bulk.
Suppose we have a scenario in which we need to update the properties for multiple devices, in that case one can schedule the job and track the progress of that job. I would like to set the frequency to send the data at every 1 hour instead of every 30 min for 1000 IoT devices. Another example could be to reboot the multiple devices at the same time.
How to do it…
- Job to update twin properties.
var twin = new Twin(); twin.Properties.Desired["HighTemperature"] = "44"; twin.Properties.Desired["City"] = "Mumbai"; twin.ETag = "*"; return await jobClient.ScheduleTwinUpdateAsync(jobId, "deviceId='"+ deviceId + "'", twin, DateTime.Now, 10); - Job status.
var twin = new Twin();
 twin.Properties.Desired["HighTemperature"] = "44";
 twin.Properties.Desired["City"] = "Mumbai";
 twin.ETag = "*";

 return await jobClient.ScheduleTwinUpdateAsync(jobId,
 "deviceId='"+ deviceId + "'",
 twin,
 DateTime.Now,
 10);
How it works…
In this example, we looked at a job updating the device twin information and we can follow up the job for its status to find out if the job was completed or failed. In this case, instead of having single API calls, a job can be created to execute on multiple IoT devices. The job client object provides the jobs available with the IoT Hub using the connection to it. Once we locate the job using its unique ID we can retrieve the status for it.
The code snippet mentioned in the How to do it… preceding recipe, uses the temperature properties and updates the data. The job is scheduled to start execution immediately with 10 seconds of execution timeout set.
There’s more…
For a job, the life cycle begins with initiation from the IoT solution. If any job is in execution, we can query to it and see the status of execution.
Another most common scenario where this could be useful is the firmware update, reboot, configuration updates, and so on, apart from the device property read or write.
Each device job has properties that helps us working with them. The useful properties are start and end date time, status, and lastly device job statistics which gives the job execution statistics.
Summary
We have learned the device management using different techniques with Azure IoT Hub in detail. We have explained, how the IoT solution is going to help the users to manage the devices remotely, take actions from the cloud based application like disable, update data, run any command, and firmware update. We also performed different tasks for device management.
Resources for Article:
Further resources on this subject:
- Device Management in Zenoss Core Network and System Monitoring: Part 1 [article]
- Device Management in Zenoss Core Network and System Monitoring: Part 2 [article]
- Managing Network Devices [article]


